

 Apr 5, 2016, 10:56 AM
Last edit by: IB Advertising
See related guides and technical advice from our community experts:
Browse all: Toyota 4Runner Exterior Guides
- Toyota 4Runner 1996-2002: How to Install Rearview Backup Camera
Step by step instructions for do-it-yourself repairs.
Browse all: Toyota 4Runner Exterior Guides

$15 back-up camera install
Apr 25, 2011 | 12:14 PM
#1
Thread Starter
Registered User
Joined: Jan 2008
Posts: 63
Likes: 0
From: South Texas
$15 back-up camera install
I like everything about my cruiser, except all the blind spots. They take some getting used to for sure. Backing up in a tight space, or at night can get real squirrelly. Also, I pull a trailer a couple times month and it's always a pain hooking it up when I don't have a spotter. To me, the obvious solution is a rear view camera. I've seen a number of different camera installs, but not one quite like what I came up with. Maybe someone has already done this, I just haven't seen them. Here is what I put together.
And here is how I did it.
For starters, my stereo head unit has an option for a back up camera. I have a Kenwood DNX7100. There are all kinds of options out there for a monitor though. My $15 doesn't include that part of the cost. What it includes is the camera I bought off of Ebay.
Night Vision Car Rear View Reverse Backup Color Camera | eBay
Just in case the link dies, here is what came in the box:
These are the cables, and even a hole saw

And here is the camera itself
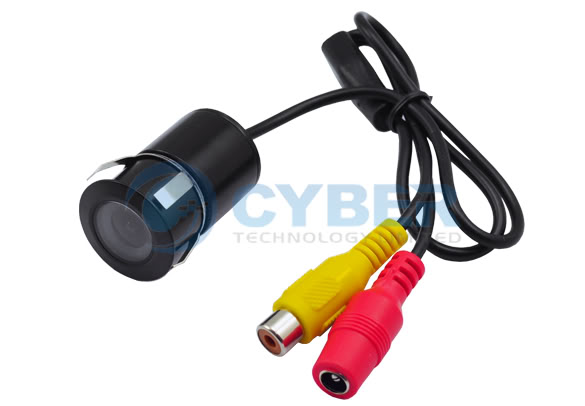
It cost me $15.98 delivered (free shipping!). The seller is from Hong Kong. I was a little worried that it would be crap, but for 15 bucks I took a chance. I chose this camera because it is a flush mount style and the diameter is almost the same as the back-up sensors that are on the bumper.
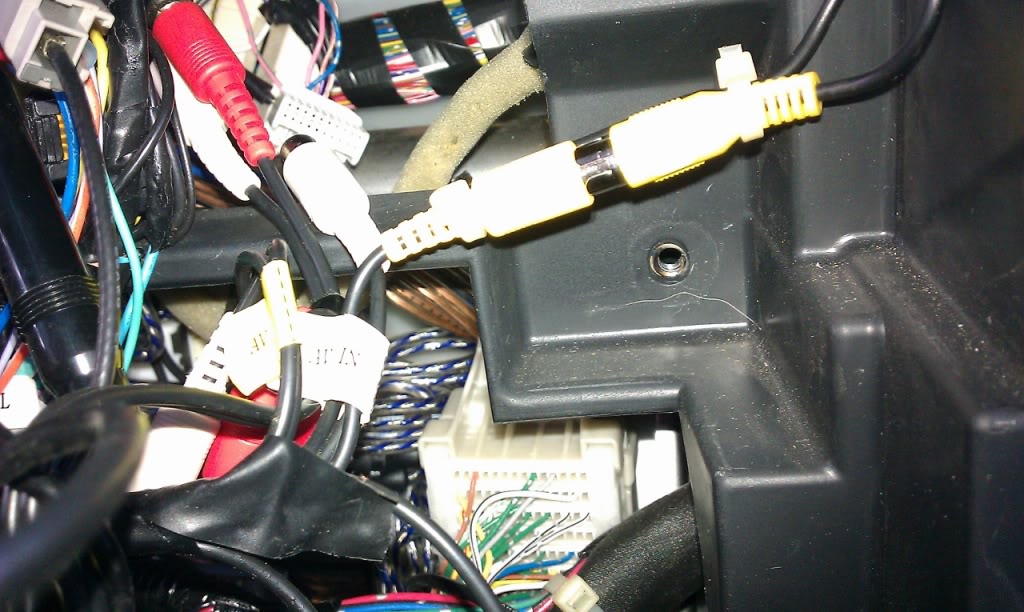
On to the install...first things first, I had to plug the video cable into the rear of the head unit. Getting at the back of the stereo is a breeze thanks to wrigman's write-up (from the blue room). http://www.fjcruiserforums.com/forum...st-w-pics.html
From there, just plug the yellow to the yellow. In my case, one of them was labeled "Back Up Camera". However, when I used this connection it wouldn't kick on when I put it in reverse; I had to scroll through the stereo options to the camera view. This was a pain. I then plugged it into another input labeled "A/V 1" and it worked like it was supposed to. Whatever it takes I guess. Here is a look at it;
After plugging it in, I ran the video cable down the passenger side and to the rear of the truck (sorry no pictures).
The power side of the camera needs to connect to the reverse lights. That way when you put it in reverse the camera kicks on. When you take it out of reverse, it cuts off. There are a lot of posts that help you find this. I chose a wire located along the driver's side door sill. It is RED with a YELLOW STRIPE.
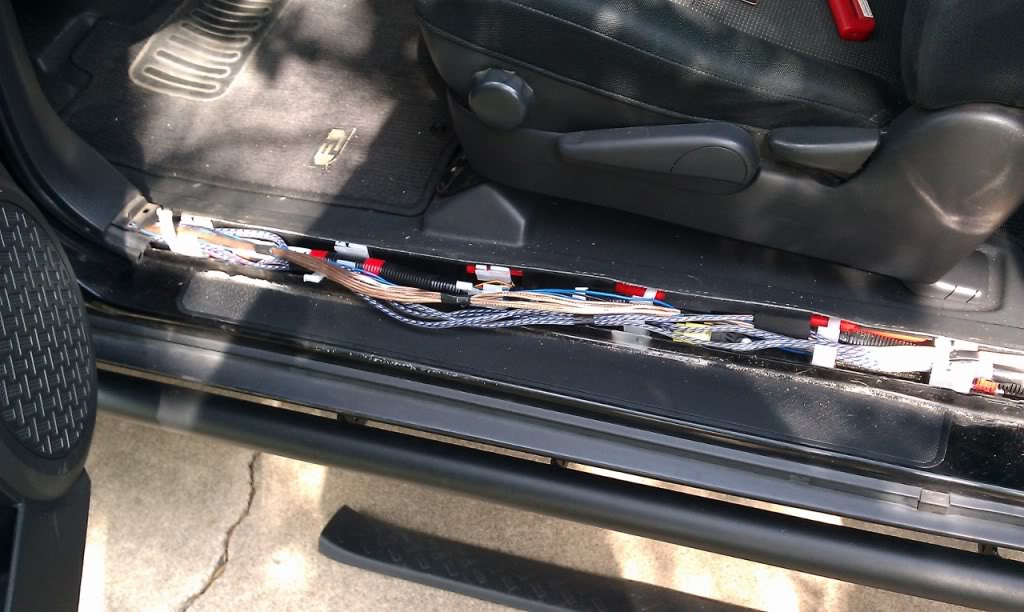
There are a lot more wires on mine from all the after market stereo stuff. Here is a close up of the wire you want:
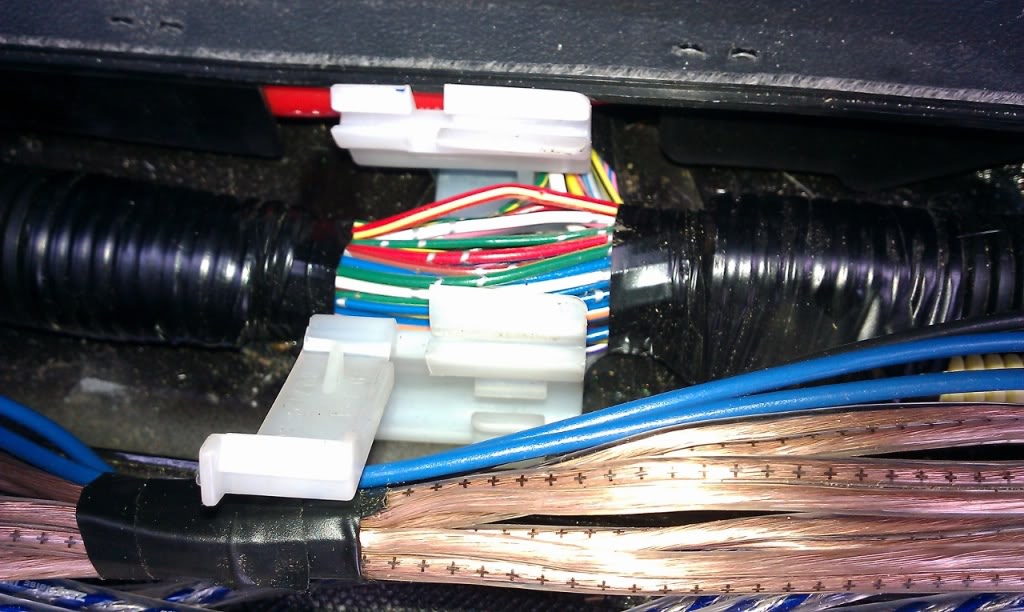
I spliced into it and ran my power wire along the driver's side to the back of the truck. It's the RED wire, you can't see the RED/YELLOW STRIPE wire anymore because it is covered by shrink wrap.
I ran the wires, then tested the camera. I wanted to make sure everything worked before I started drilling holes. Which brings me to the next step.
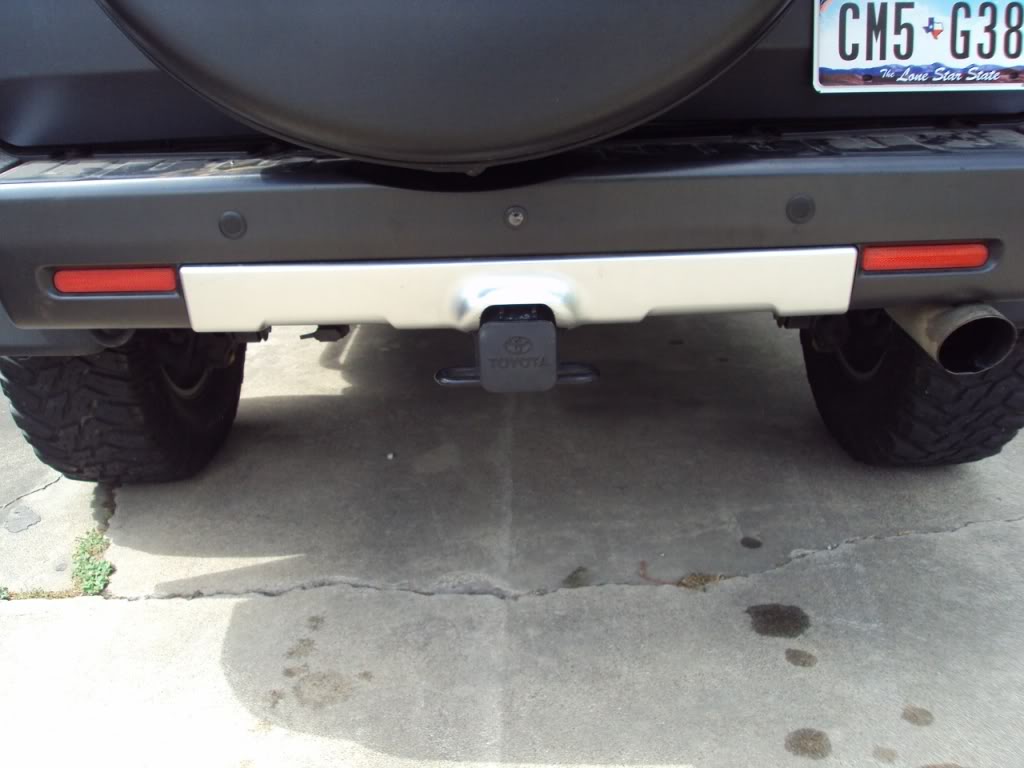
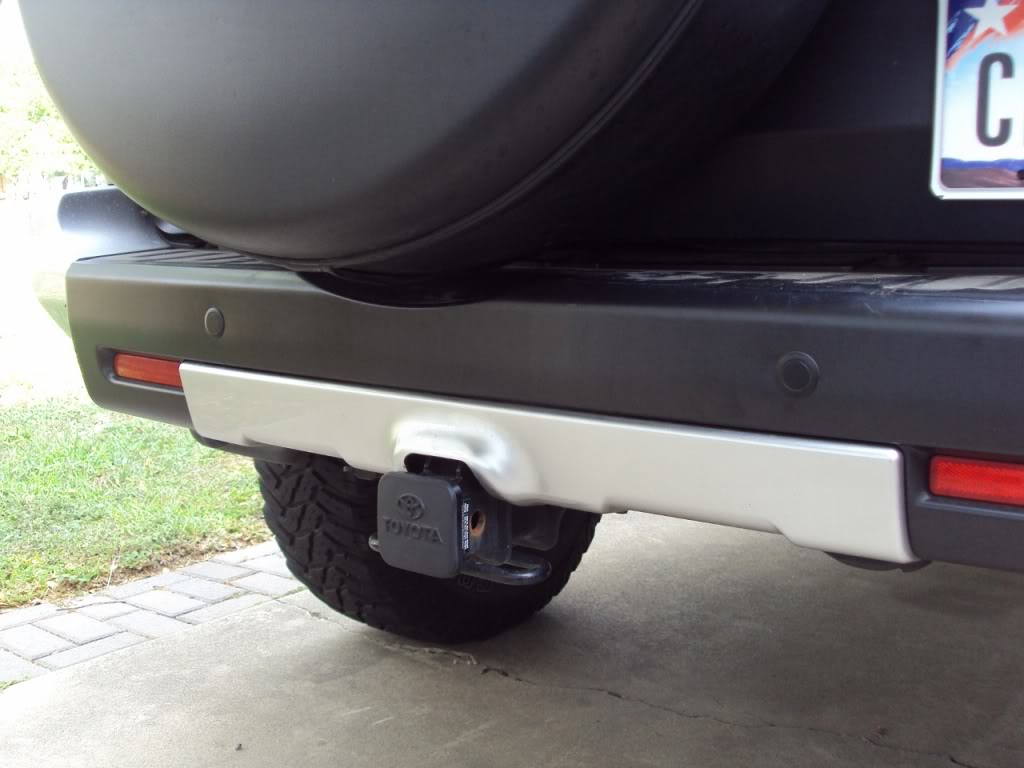
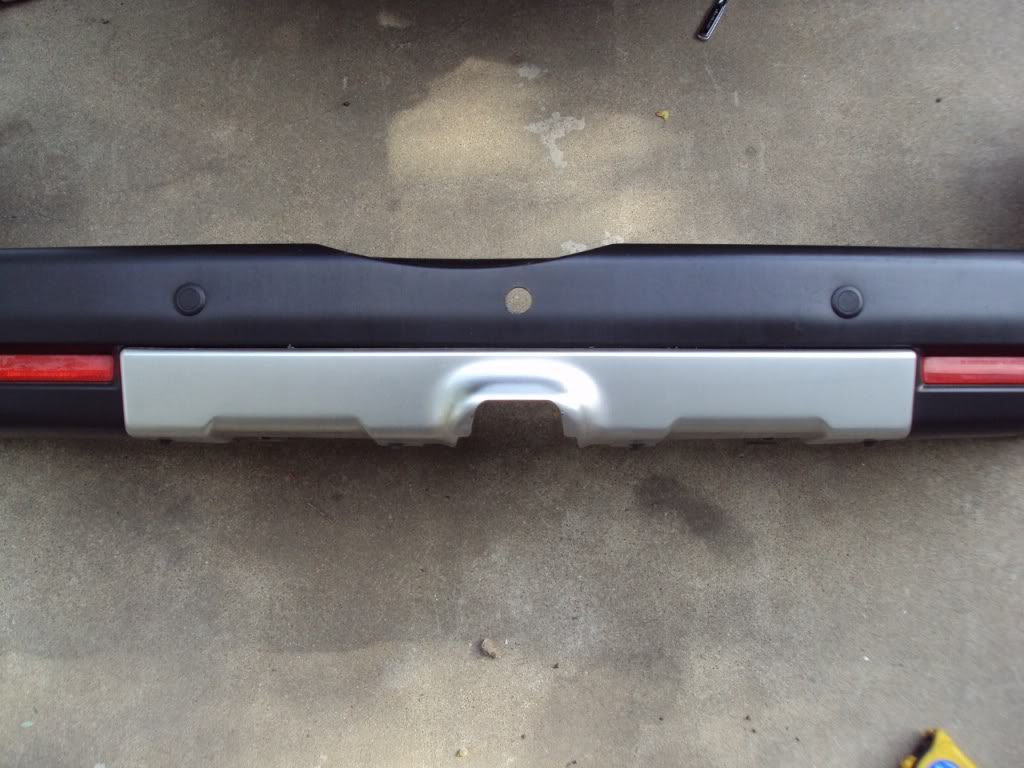
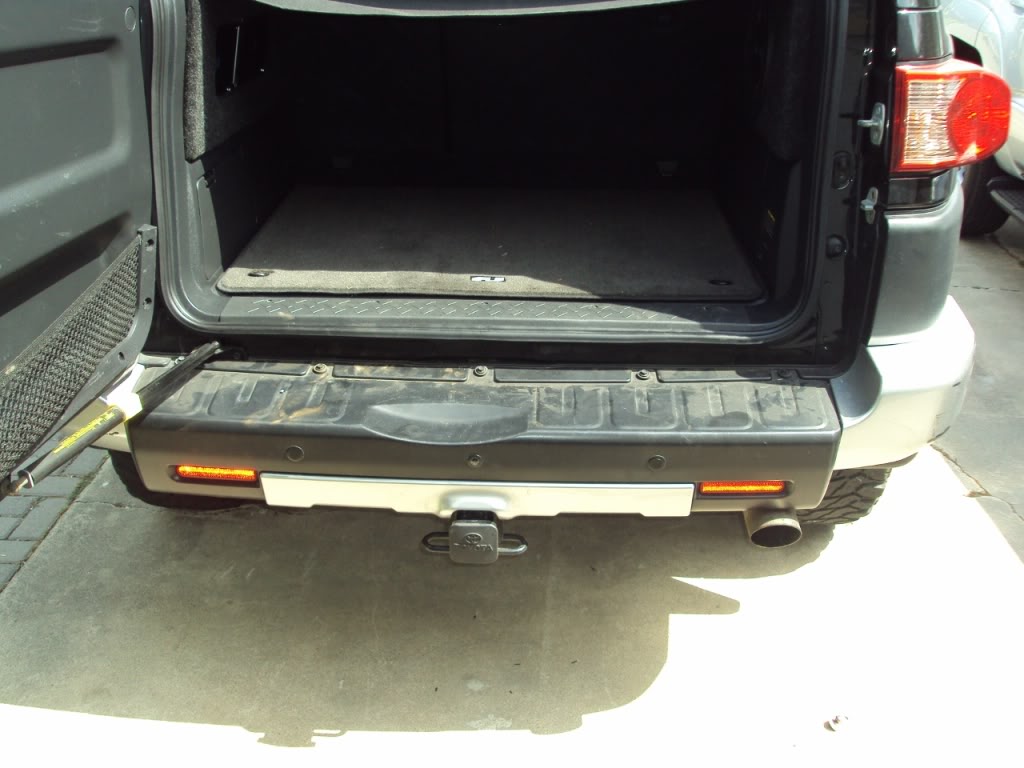
Here is what the bumper looked like before. My idea was to put the camera right in the middle. It would look almost like a third sensor.
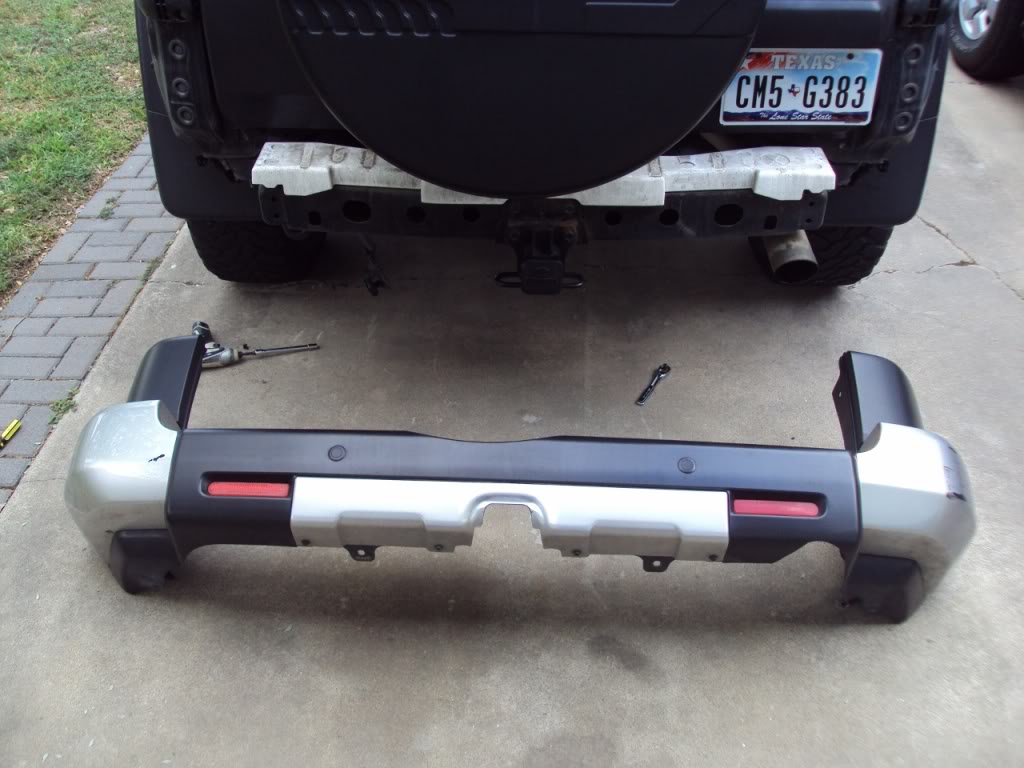
I started by taking the rear bumper off, well at least the plastic outer bumper. LGRT has a real good video showing how to do this (from the blue room).
http://www.fjcruiserforums.com/forum...ent-video.html I would only add that you will need to take the bumper off completely. Don't overlook disconnecting the plugs for the back up sensors. One is locate on each corner. Here is what you get when you pull the bumper cover off.
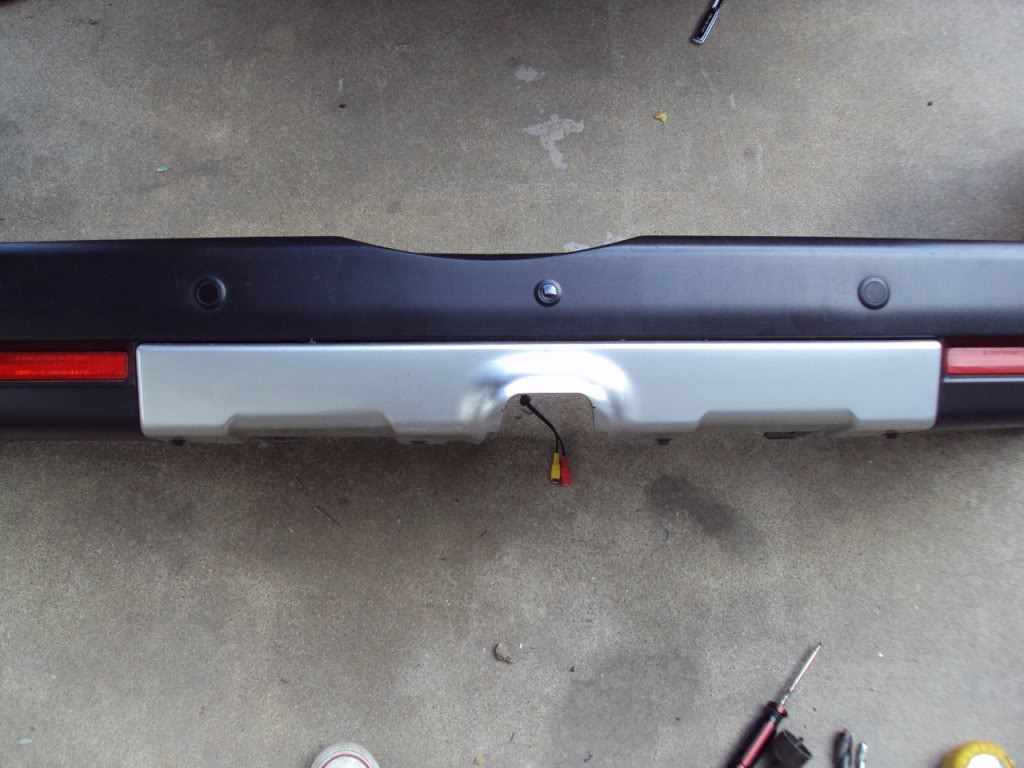
Next step is to measure mark and drill the hole. I used the hole saw that came with my camera.
Test fit worked great.
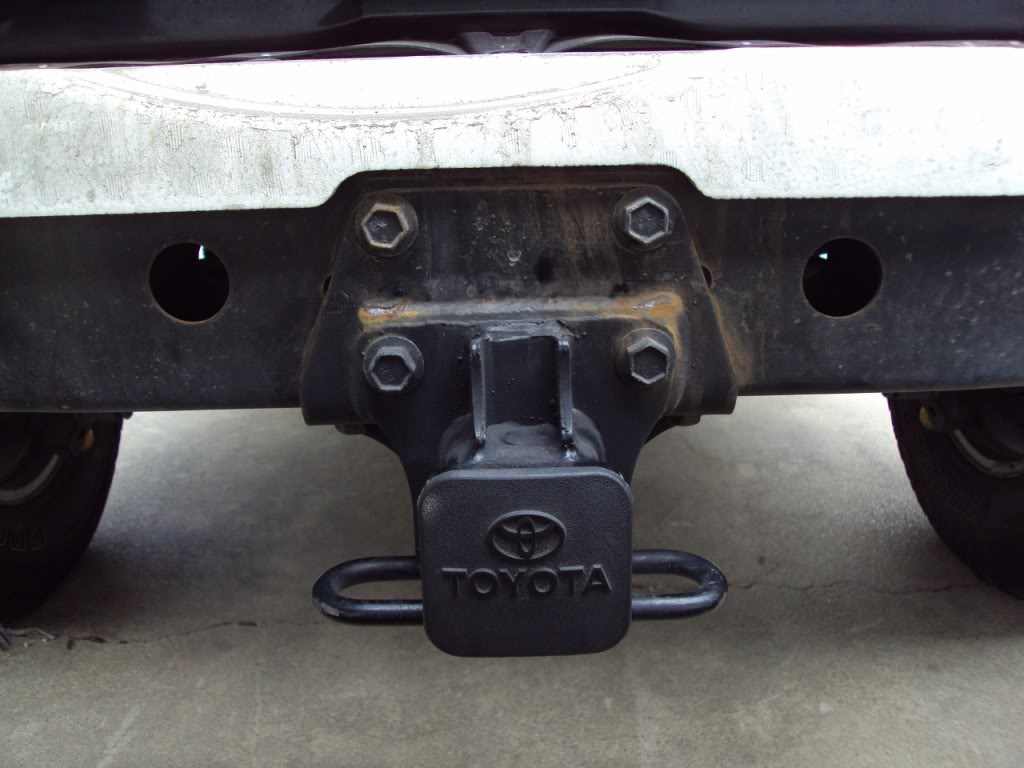
From here you still need to drill another hole. I put the bumper cover back in place and marked the hole location on the inner bumper (the actual bumper that is made of steel). At this point you may have a few different options. I have the factory receiver hitch, which definitely blocked the clearance needed by the camera depth. If you don't have that, you might be able to get away with just a smaller hole for the wires. I'd also recommend using a better hole saw. I burned up the little saw that came with the camera, it just wasn't up to the task.
Here is what it looked like before.
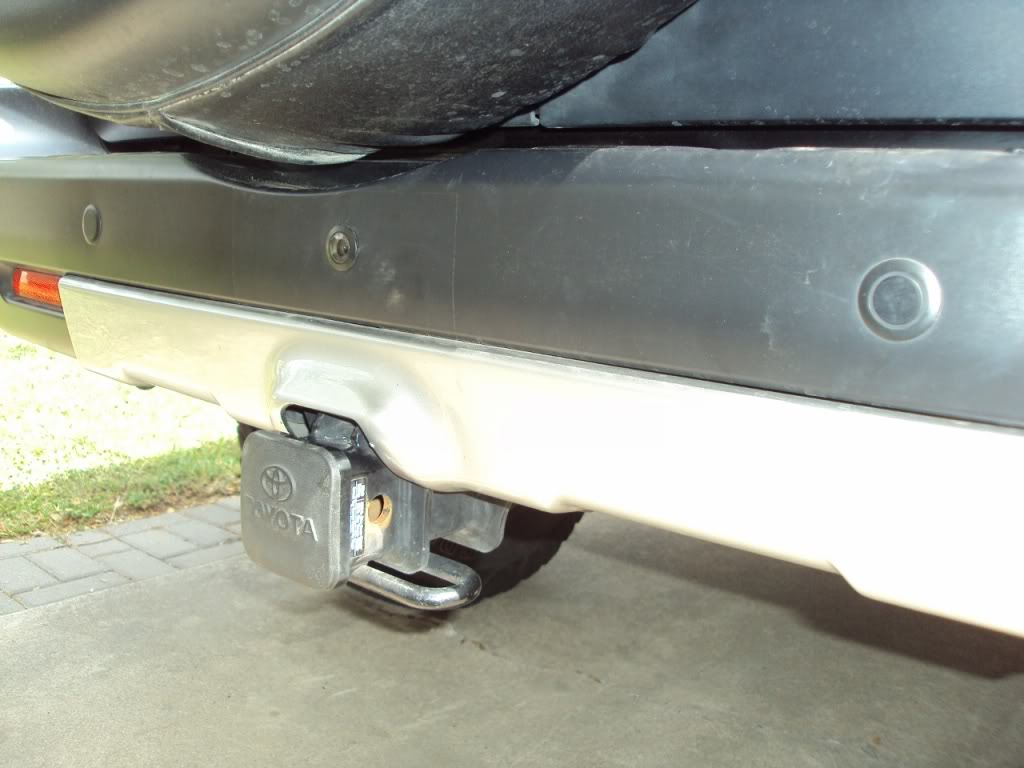
And after

In the after photo you can see that I was able to drill through the top edge of the receiver hitch plate. Shortly after that is when the hole saw gave up on me. I took a 1/2" drill bit and put a hole through the bumper. This was mostly to run the camera wires through. The actual steel bumper has several big holes on both sides of it. Once you run the wires into it you can fish them out on the other side. It took a little effort, but got 'em through. It is also a little tough because you have to fish the wires through while holding the plastic bumper up. Once they are run you can re-install the plastic outer bumper.
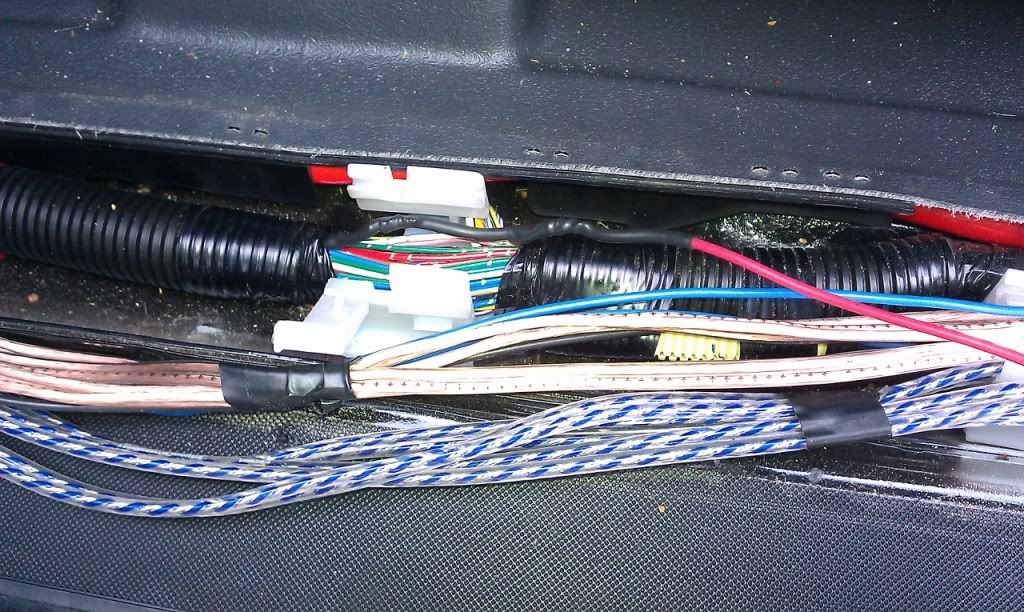
Next step is to finish up the wiring. I had previously run the power wire down the driver's side and to door sill as the back. I ran the video cable down the passenger side to the rear door sill. You can see the RED power cable and the black video cable.

Just off center, under the rear door sill I drilled a 1/2" hole and fished the wires through. Once you drill the hole through the sheet metal here there is a void behind it. There is an existing hole that will allow you to get the wires under the truck.
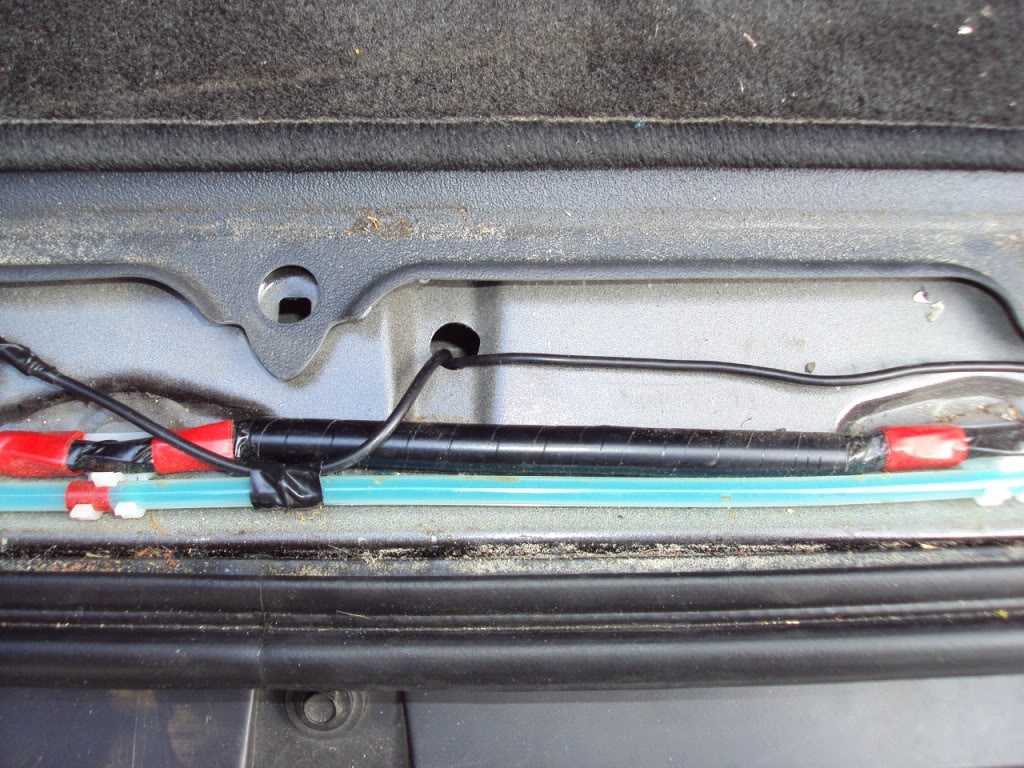
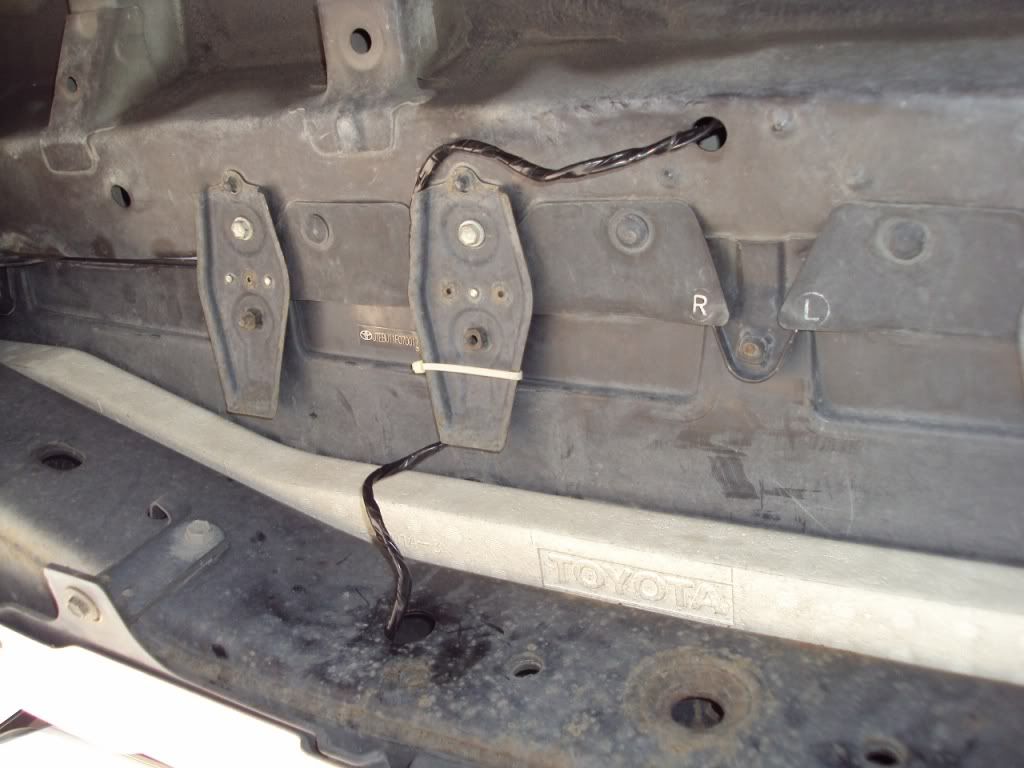
I also made my ground connection under the rear door sill. I just drilled a small hole and put a sheet metal screw into it. The ground wire was wrapped around the sheet metal screw. Then I taped the wires to then existing loom so they won't get pulled out.
On the underside I made the connections.
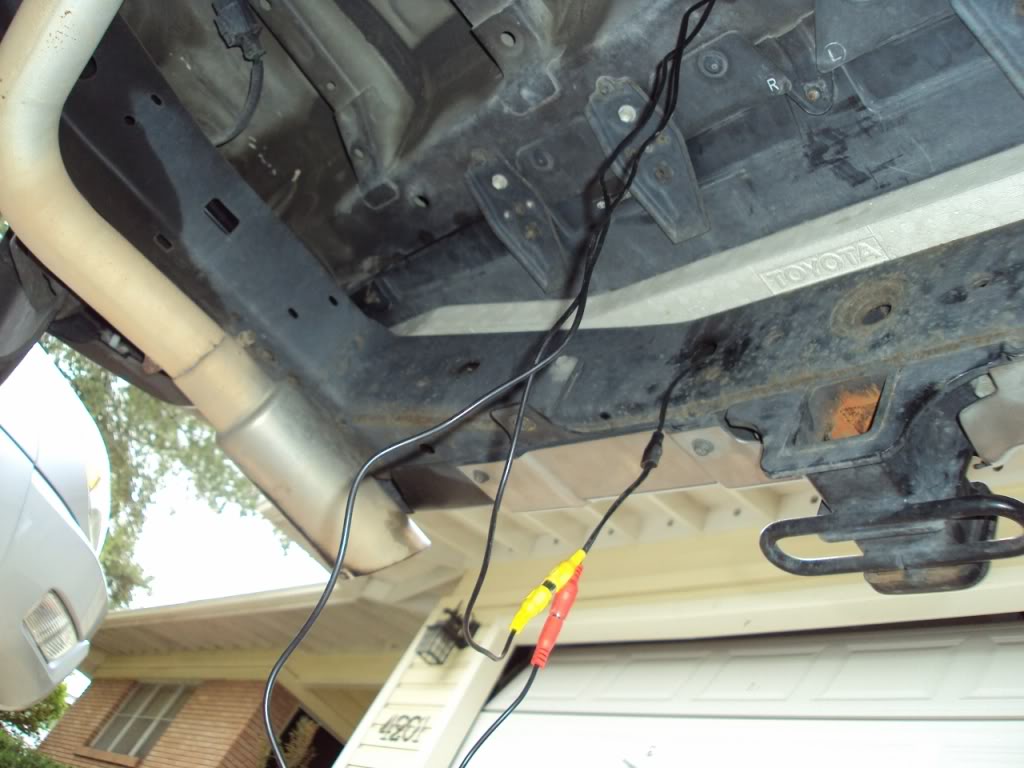
Then I taped the wires up, and zipped tied them into place.
Went back up top and re-installed the door sill. Just about done.
I was really surprised at the image quality. Here's a few shots of the video screen.

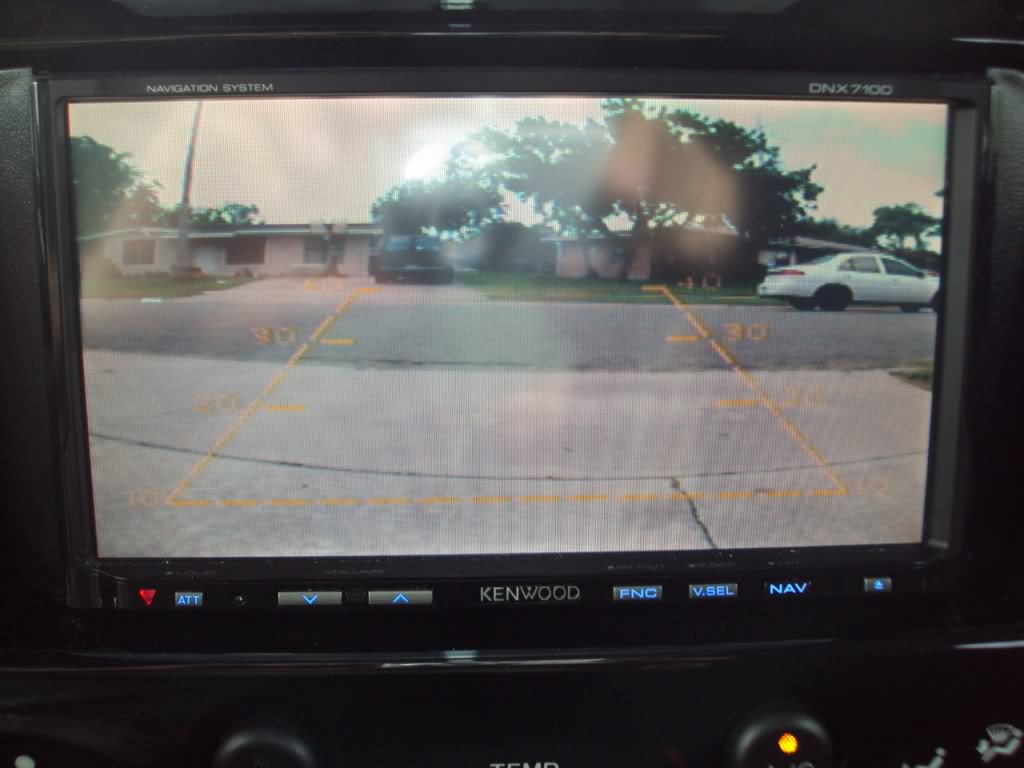
I think it helps a lot when backing up. My next step is to install a switch that will allow me to turn it on while driving forward. Would be nice to have when towing a trailer. As a side benefit, the spare tire looks like it provides a little protection for it. I haven't seen any shadows from the tire either. All in all, not bad for $15
And here is how I did it.
For starters, my stereo head unit has an option for a back up camera. I have a Kenwood DNX7100. There are all kinds of options out there for a monitor though. My $15 doesn't include that part of the cost. What it includes is the camera I bought off of Ebay.
Night Vision Car Rear View Reverse Backup Color Camera | eBay
Just in case the link dies, here is what came in the box:
These are the cables, and even a hole saw
And here is the camera itself
It cost me $15.98 delivered (free shipping!). The seller is from Hong Kong. I was a little worried that it would be crap, but for 15 bucks I took a chance. I chose this camera because it is a flush mount style and the diameter is almost the same as the back-up sensors that are on the bumper.
On to the install...first things first, I had to plug the video cable into the rear of the head unit. Getting at the back of the stereo is a breeze thanks to wrigman's write-up (from the blue room). http://www.fjcruiserforums.com/forum...st-w-pics.html
From there, just plug the yellow to the yellow. In my case, one of them was labeled "Back Up Camera". However, when I used this connection it wouldn't kick on when I put it in reverse; I had to scroll through the stereo options to the camera view. This was a pain. I then plugged it into another input labeled "A/V 1" and it worked like it was supposed to. Whatever it takes I guess. Here is a look at it;
After plugging it in, I ran the video cable down the passenger side and to the rear of the truck (sorry no pictures).
The power side of the camera needs to connect to the reverse lights. That way when you put it in reverse the camera kicks on. When you take it out of reverse, it cuts off. There are a lot of posts that help you find this. I chose a wire located along the driver's side door sill. It is RED with a YELLOW STRIPE.
There are a lot more wires on mine from all the after market stereo stuff. Here is a close up of the wire you want:
I spliced into it and ran my power wire along the driver's side to the back of the truck. It's the RED wire, you can't see the RED/YELLOW STRIPE wire anymore because it is covered by shrink wrap.
I ran the wires, then tested the camera. I wanted to make sure everything worked before I started drilling holes. Which brings me to the next step.
Here is what the bumper looked like before. My idea was to put the camera right in the middle. It would look almost like a third sensor.
I started by taking the rear bumper off, well at least the plastic outer bumper. LGRT has a real good video showing how to do this (from the blue room).
http://www.fjcruiserforums.com/forum...ent-video.html I would only add that you will need to take the bumper off completely. Don't overlook disconnecting the plugs for the back up sensors. One is locate on each corner. Here is what you get when you pull the bumper cover off.
Next step is to measure mark and drill the hole. I used the hole saw that came with my camera.
Test fit worked great.
From here you still need to drill another hole. I put the bumper cover back in place and marked the hole location on the inner bumper (the actual bumper that is made of steel). At this point you may have a few different options. I have the factory receiver hitch, which definitely blocked the clearance needed by the camera depth. If you don't have that, you might be able to get away with just a smaller hole for the wires. I'd also recommend using a better hole saw. I burned up the little saw that came with the camera, it just wasn't up to the task.
Here is what it looked like before.
And after
In the after photo you can see that I was able to drill through the top edge of the receiver hitch plate. Shortly after that is when the hole saw gave up on me. I took a 1/2" drill bit and put a hole through the bumper. This was mostly to run the camera wires through. The actual steel bumper has several big holes on both sides of it. Once you run the wires into it you can fish them out on the other side. It took a little effort, but got 'em through. It is also a little tough because you have to fish the wires through while holding the plastic bumper up. Once they are run you can re-install the plastic outer bumper.
Next step is to finish up the wiring. I had previously run the power wire down the driver's side and to door sill as the back. I ran the video cable down the passenger side to the rear door sill. You can see the RED power cable and the black video cable.
Just off center, under the rear door sill I drilled a 1/2" hole and fished the wires through. Once you drill the hole through the sheet metal here there is a void behind it. There is an existing hole that will allow you to get the wires under the truck.
I also made my ground connection under the rear door sill. I just drilled a small hole and put a sheet metal screw into it. The ground wire was wrapped around the sheet metal screw. Then I taped the wires to then existing loom so they won't get pulled out.
On the underside I made the connections.
Then I taped the wires up, and zipped tied them into place.
Went back up top and re-installed the door sill. Just about done.
I was really surprised at the image quality. Here's a few shots of the video screen.
I think it helps a lot when backing up. My next step is to install a switch that will allow me to turn it on while driving forward. Would be nice to have when towing a trailer. As a side benefit, the spare tire looks like it provides a little protection for it. I haven't seen any shadows from the tire either. All in all, not bad for $15


 Apr 25, 2011 | 01:29 PM
#4
Registered User
Joined: Apr 2010
Posts: 815
Likes: 0
From: Kingston, Ontario CANADA
That is excellent. Now I have to get a new stereo system! I use to have a back-up camera, the monitor looked like a GPS and was mounted on top of the dash. I miss not having one now. Good write-up.
Apr 25, 2011 | 03:34 PM
#5
Thread Starter
Registered User
Joined: Jan 2008
Posts: 63
Likes: 0
From: South Texas
Thanks for compliments. The biggest problem I see with this install is that I'm addicted to driving backwards now  . Gotta get that switch installed!
That stereo was in the FJ when I bought. I'm way too cheap to have spent what the previous owner spent on it. Having said that, it is an awesome head unit  . Ipod controls, DVD player, & GPS navigation all built in has spoiled me. My wife is a little jealous too, so I may have to spend the money and get one for her 4runner.
. Gotta get that switch installed!. Ipod controls, DVD player, & GPS navigation all built in has spoiled me. My wife is a little jealous too, so I may have to spend the money and get one for her 4runner.
Apr 27, 2011 | 02:54 PM
#6
Thread Starter
Registered User
Joined: Jan 2008
Posts: 63
Likes: 0
From: South Texas
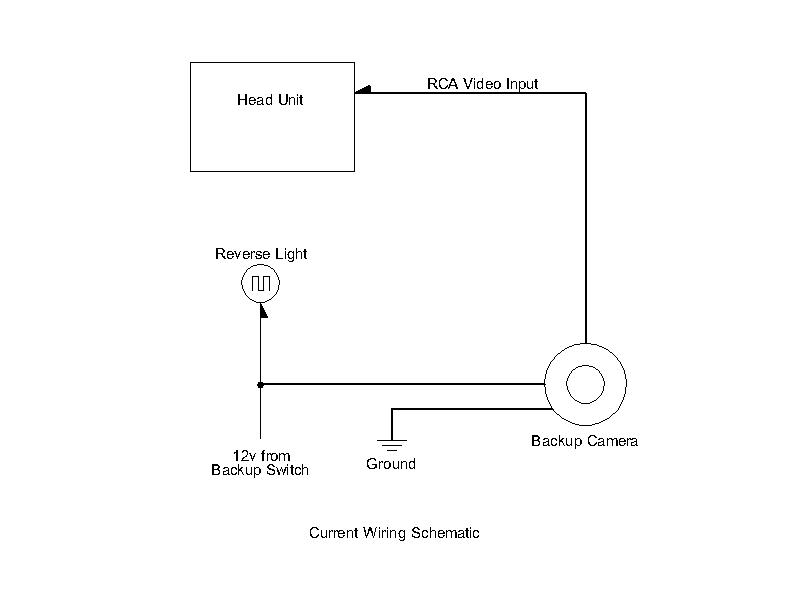
Well I worked up a wiring schematic and tested it out today. Here is the current wiring for the camera:
And these are the changes I think are necessary to make my switch work:
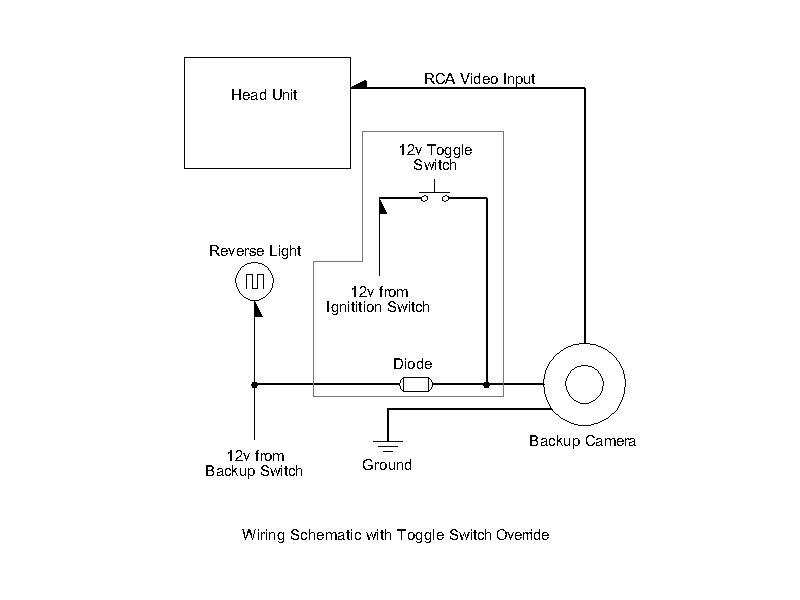
I picked up some switches and a variety of diodes yesterday. Today I busted out the soldering iron to see what I could come up with. Everything worked like a charm, although it isn't wired up like I intend it to be. Need to clean it all up and hide all the wires. Also need to work up a good spot for the switch. However, I can drive around with the camera running without turning on the reverse lights. And it still turns on automatically when I put it in reverse. Just what I was after. Will post some install photos once it is complete.
And these are the changes I think are necessary to make my switch work:
I picked up some switches and a variety of diodes yesterday. Today I busted out the soldering iron to see what I could come up with. Everything worked like a charm, although it isn't wired up like I intend it to be. Need to clean it all up and hide all the wires. Also need to work up a good spot for the switch. However, I can drive around with the camera running without turning on the reverse lights. And it still turns on automatically when I put it in reverse. Just what I was after. Will post some install photos once it is complete.
Trending Topics
Apr 29, 2011 | 12:07 PM
#8
Co-Founder/Administrator
iTrader: (1)
Joined: May 2002
Posts: 32,242
Likes: 21
From: Auburn, Washington
Very nice, makes me want to to flush mount my backup camera.
https://www.yotatech.com/50487202-post113.html
I like flipping it on every once in awhile too at a stop light, as sometimes I think some get to close on purpose.
Most of the time it is an optical illusion that they are so close, and the camera shows me they are several feet back.
Mine turns on automatically too when I put it in reverse, makes parking easier.
May 2, 2011 | 11:37 AM
#9
Thread Starter
Registered User
Joined: Jan 2008
Posts: 63
Likes: 0
From: South Texas
I'm pretty sure it is part of the camera display. I say that because I have hooked the camera into the REAR CAM rca plug and the AUX rca plug and the overlay shows up on both. If it was in the HU it would probably just show up on the REAR CAM rca. It annoyed me at first, but I got over it.
May 2, 2011 | 11:40 AM
#10
Thread Starter
Registered User
Joined: Jan 2008
Posts: 63
Likes: 0
From: South Texas
Very nice, makes me want to to flush mount my backup camera.
https://www.yotatech.com/50487202-post113.html
I like flipping it on every once in awhile too at a stop light, as sometimes I think some get to close on purpose.
Most of the time it is an optical illusion that they are so close, and the camera shows me they are several feet back.
Mine turns on automatically too when I put it in reverse, makes parking easier.
https://www.yotatech.com/50487202-post113.html
I like flipping it on every once in awhile too at a stop light, as sometimes I think some get to close on purpose.
Most of the time it is an optical illusion that they are so close, and the camera shows me they are several feet back.
Mine turns on automatically too when I put it in reverse, makes parking easier.
May 2, 2011 | 11:43 AM
#11
Thread Starter
Registered User
Joined: Jan 2008
Posts: 63
Likes: 0
From: South Texas
I had been driving around with a switch laying on the floor just to make sure it worked. Yesterday, I re-wired everything and tied up all the loose ends. Here are a few pic's of the final switch install.
The wiring diagram list above worked perfectly. I pulled my constant power from power signal to one of my amplifiers. I've read lots of comments in other installs about using a diode to prevent the signal from traveling back to the reverse lights when the camera is powered by the switch. Most of them just say "use a diode". I've only seen a couple comments about which specific diode to use and I couldn't find that specific diode. Here's a look at the diodes that I bought at Radio Shack.
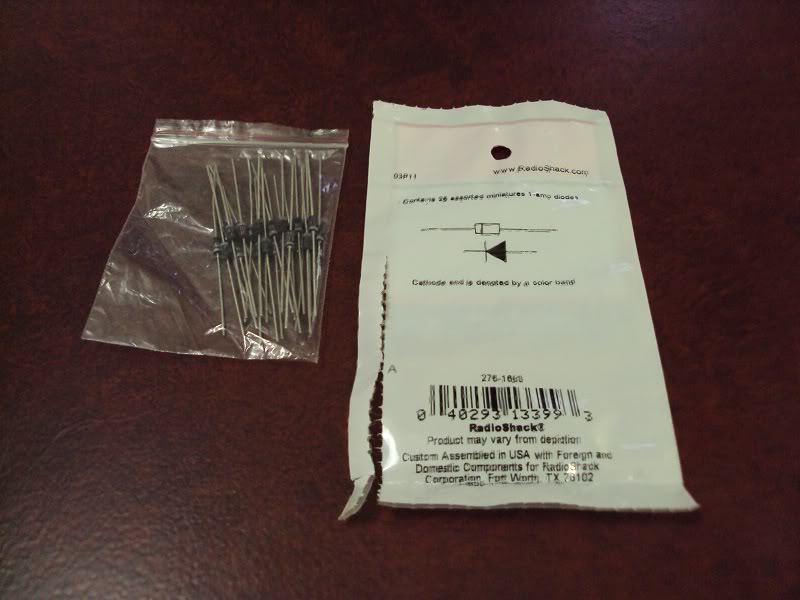
Don't know if it is the best choice, but it works. The only trick to it is to make sure you install it in the correct direction (banded end closest to the backup light). I thought I had it right, but it didn't work, so I flipped it over and SHAZAM, worked just like it is supposed to.
I put the switch in the bank of switches below the stereo.
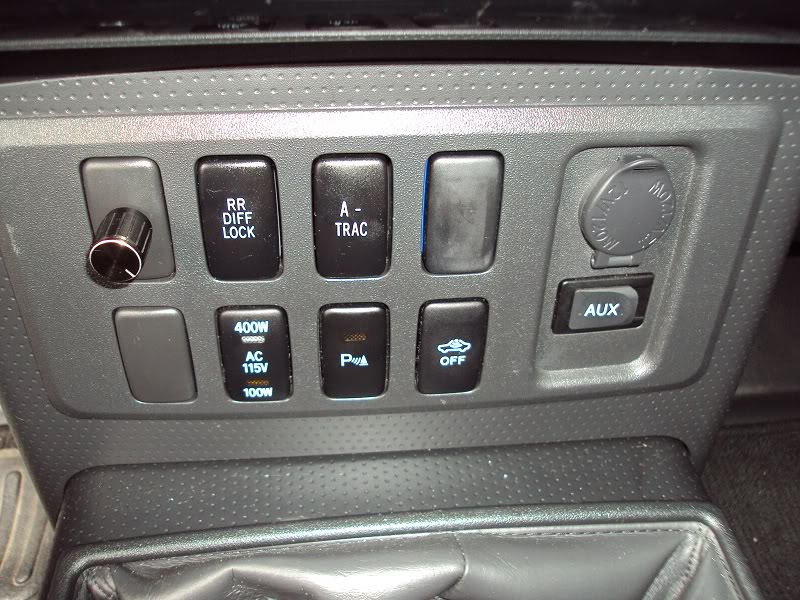
It is the top row on the far right. I am looking into getting a die-cut sticker to label it just because I am that kind of nerd. I ended up using the sub woofer switch for this application. I have an aftermarket sub and it is controlled by the rotary dial on the upper left. So my sub switch wasn't doing anything. I cut the plug from the wiring harness, tied in the wires to the camera power, then plugged it into the switch. I put some lacquer thinner on a rag and wiped the label right off the switch. ba-da-bing ba-da-boom. Once I get my label, I can call it done.
The wiring diagram list above worked perfectly. I pulled my constant power from power signal to one of my amplifiers. I've read lots of comments in other installs about using a diode to prevent the signal from traveling back to the reverse lights when the camera is powered by the switch. Most of them just say "use a diode". I've only seen a couple comments about which specific diode to use and I couldn't find that specific diode. Here's a look at the diodes that I bought at Radio Shack.
Don't know if it is the best choice, but it works. The only trick to it is to make sure you install it in the correct direction (banded end closest to the backup light). I thought I had it right, but it didn't work, so I flipped it over and SHAZAM, worked just like it is supposed to.
I put the switch in the bank of switches below the stereo.
It is the top row on the far right. I am looking into getting a die-cut sticker to label it just because I am that kind of nerd. I ended up using the sub woofer switch for this application. I have an aftermarket sub and it is controlled by the rotary dial on the upper left. So my sub switch wasn't doing anything. I cut the plug from the wiring harness, tied in the wires to the camera power, then plugged it into the switch. I put some lacquer thinner on a rag and wiped the label right off the switch. ba-da-bing ba-da-boom. Once I get my label, I can call it done.
 Jun 14, 2011 | 08:04 AM
#15
Registered User
Joined: Jul 2003
Posts: 25
Likes: 0
From: charlotte, nc
nice job with the install, very nice write up there! at this point though, i still prefer backup sensors rather than cameras. my sisters new 4 runner has a camera and it is the worst thing to try and use backing up. it almost seems like it isn't showing the right distance or something when doing it?


Thread
Thread Starter
Forum
Replies
Last Post
punks_is_4x4
86-95 Trucks & 4Runners
10
Aug 21, 2015 01:35 PM
Esibnitsud
86-95 Trucks & 4Runners
0
Jul 30, 2015 08:19 PM
Suprarossa
99+ Tundra, 00+ Sequoia, 98+ Land Cruiser/LX470
0
Jul 6, 2015 05:21 AM


