
Redeth's 89 4Runner custom front plate bumper fab.
 Oct 14, 2013 | 11:01 AM
#61
Thread Starter
Registered User
Joined: Apr 2012
Posts: 2,817
Likes: 2
From: Los Angeles CA
Ahhh okay got ya. Thanks a lot man. I'm going to try that out. Now that you mention it I remember when I was workibg on the rear bumper and when the welds were looking like this I did raise the temp for the guage thickness and it started looking better. Only defference is that u was using a bigger gas 220 welder. Ill adjust the settings like u said. That outta fix my problem.
Oct 15, 2013 | 04:57 PM
#62
Thread Starter
Registered User
Joined: Apr 2012
Posts: 2,817
Likes: 2
From: Los Angeles CA
Lol i just realized i reached my bandwidth limit on the 2nd free photobucket account. darn it... Sorry ya'll! you're all going too have to wait till my bandwidth resets for more pix hahaha
 Oct 16, 2013 | 10:29 AM
#64
Grrrrrrr! Lol....
Hmm, so when is your birthday? Let me know if that's what you want for your birthday and if its close. I think I have it in my phone, but I forgot.... Hey, one day you'll start forgetting crap too! Lol.
Hmm, so when is your birthday? Let me know if that's what you want for your birthday and if its close. I think I have it in my phone, but I forgot.... Hey, one day you'll start forgetting crap too! Lol.
Oct 17, 2013 | 06:53 PM
#65
Thread Starter
Registered User
Joined: Apr 2012
Posts: 2,817
Likes: 2
From: Los Angeles CA
Feels like I've been gone from YotaTech for nearly a week. OUTSANE thanks I totally forgot about that feature.
My dad was teaching me how to weld with the stick welders this past week.
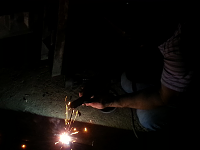

Not very good shots cuz they were taken at almost 9pm. But I have to admit. This type of welder is more tricky to do. Have to make a spark first my tapping or sliding the tip of the stick to get a spark then u can't go too far away from the metal you are welding or the welds come out like crap and it'll turn off on ya. Lol and on top of that u gotta keep in mind the stick wastes as you use it. Haha Im having a heck of a time learning with this one. But I must admit I do like the way the welds come out a lot more with this type of a welder. They look so damn clean! No pix of welds yet because we didn't work on my bumper yet. Just pracrice on scrap metal for now. We will work on the bumper all day saturday so ill take loads of pix then.
Mark(Chef). My birthday is on December 13th. Thanks for remembering. I know u have one coming up soon too right? in november or this month. I don't remember. What do u mean by let me know if I want that for my birthday? You can't possibly mean the 8" Dick Ceptiks lol
Btw I am gonna need help running the switches, relays, and wires, through my truck and have ready to plug into for when we do put the bumper in. I know you've done this a few times. Would you mind helping me run my wires and install that stuff? I would be going at this blindly if I did it myself.
Oct 17, 2013 | 07:08 PM
#66
I don't mind helping at all, and what I meant was I would gladly get you the Photobucket pay account for your birthday. I think the DC's are good enough deal already. Lol.
I have to wire in my wiring harness upgrade and 130A alt soon
Been totally consumed with my daughters car in my spare time. It is somewhat of a basket case, but I've seen worse, and it seems to run pretty well.( only thing is, of course once I got it I started looking and everything, and it looks as though the steering pump is leaking and possibly a couple of things that are very difficult to get to. Looks like a rack and pinion job is in the not-too-distant future as well.... lol
lol
I have to wire in my wiring harness upgrade and 130A alt soon
Been totally consumed with my daughters car in my spare time. It is somewhat of a basket case, but I've seen worse, and it seems to run pretty well.( only thing is, of course once I got it I started looking and everything, and it looks as though the steering pump is leaking and possibly a couple of things that are very difficult to get to. Looks like a rack and pinion job is in the not-too-distant future as well....
lol
Oct 17, 2013 | 07:31 PM
#68
Thread Starter
Registered User
Joined: Apr 2012
Posts: 2,817
Likes: 2
From: Los Angeles CA
I don't mind helping at all, and what I meant was I would gladly get you the Photobucket pay account for your birthday. I think the DC's are good enough deal already. Lol.
I have to wire in my wiring harness upgrade and 130A alt soon
Been totally consumed with my daughters car in my spare time. It is somewhat of a basket case, but I've seen worse, and it seems to run pretty well.( only thing is, of course once I got it I started looking and everything, and it looks as though the steering pump is leaking and possibly a couple of things that are very difficult to get to. Looks like a rack and pinion job is in the not-too-distant future as well.... lol
I have to wire in my wiring harness upgrade and 130A alt soon
Been totally consumed with my daughters car in my spare time. It is somewhat of a basket case, but I've seen worse, and it seems to run pretty well.( only thing is, of course once I got it I started looking and everything, and it looks as though the steering pump is leaking and possibly a couple of things that are very difficult to get to. Looks like a rack and pinion job is in the not-too-distant future as well....
lolI'm thinking i might need to buy one of those alternators for my truck too once i get that winch and lights all wired up too. haha I'll use my alternator till it dies! its brand new still from our last trip haha!
As for long sleeves. I totally agree. I got sunburnt last weekend. and during this time when i was learning to weld with the stick i wasnt wearing a shirt lol. Honestly my skin tone is so darn white i might as well keep it off to get a lil artificial tan going on huh hahahaha
Oct 17, 2013 | 08:10 PM
#70
Thread Starter
Registered User
Joined: Apr 2012
Posts: 2,817
Likes: 2
From: Los Angeles CA
Hi Tuef. Dad said they are 332 rods.
My dad gave me the same advice. he said to keep it away from the metal at approx 1/4" away. Like i said though im still learning. haha. But although it is harder to work with i do like the way these come out much better then the wire ones.
I dont know much about it. All i know is my dad worked in welding for almost 15 years and he has 8 different size welders in our garage hahaha. Been trying to learn all i can while i can ya know. This is a very helpful skill to have especially with our hobbies.
Oct 18, 2013 | 11:07 AM
#72
Registered User
Joined: May 2010
Posts: 2,587
Likes: 7
From: Ofallon Missouri
You are making your own bumper. Thats pretty cool.
Cant wait to see it on and painted up!
PS your pics from earlier arnt showing up....photobucket bandwidth thing...
Cant wait to see it on and painted up!
PS your pics from earlier arnt showing up....photobucket bandwidth thing...
Last edited by HighLux; Oct 18, 2013 at 11:10 AM.
Oct 18, 2013 | 11:32 AM
#73
Thread Starter
Registered User
Joined: Apr 2012
Posts: 2,817
Likes: 2
From: Los Angeles CA
Yea making the front bumper. I think if you click on the no photo image it will take u to the photobucket website and display my pictures. But yea my bandwidth maxed out. So I need to wait till the month is over so my free 2gb is reset. For now ill do what Outsane mentioned and just upload them as attatchments to my posts.
 Oct 19, 2013 | 08:10 PM
#75
Thread Starter
Registered User
Joined: Apr 2012
Posts: 2,817
Likes: 2
From: Los Angeles CA
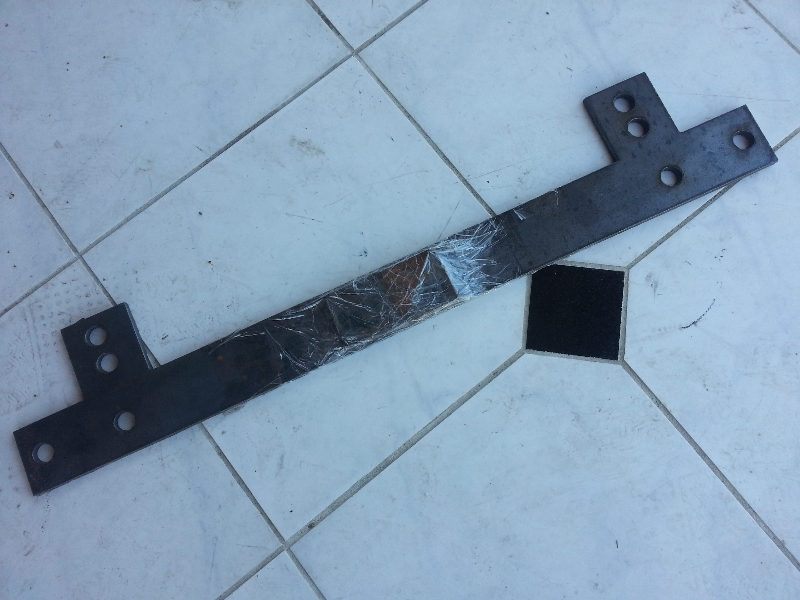
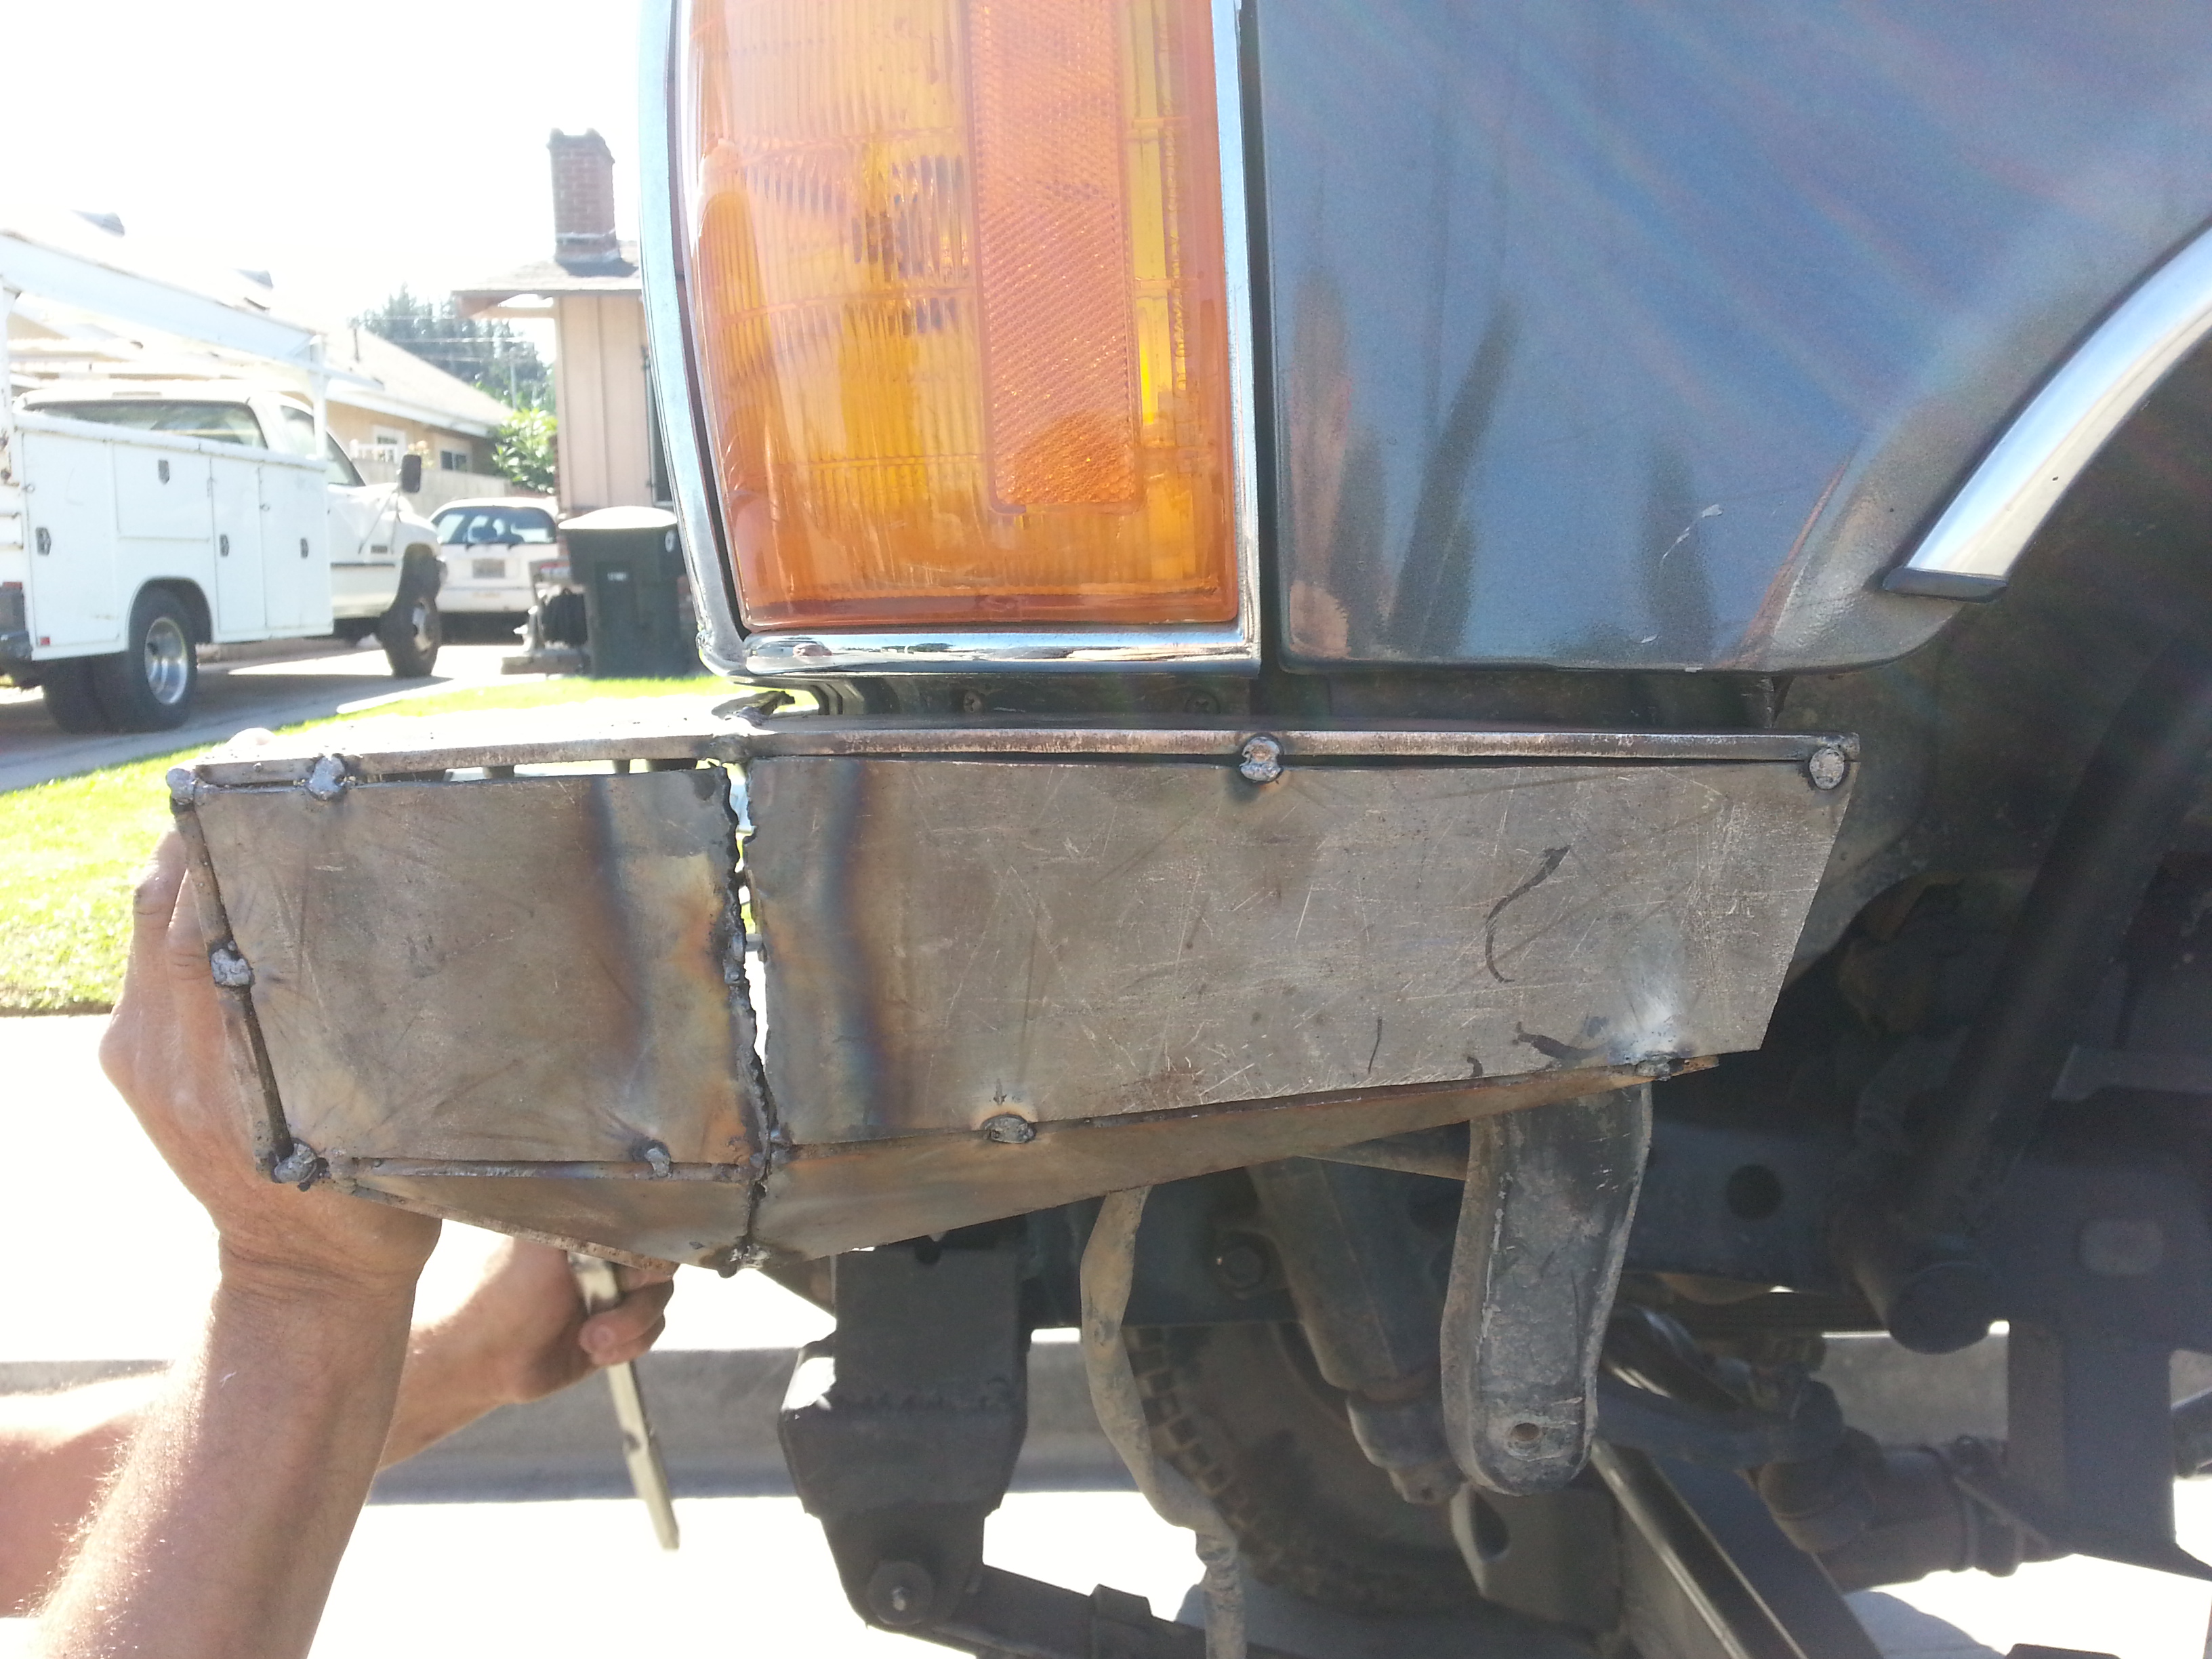
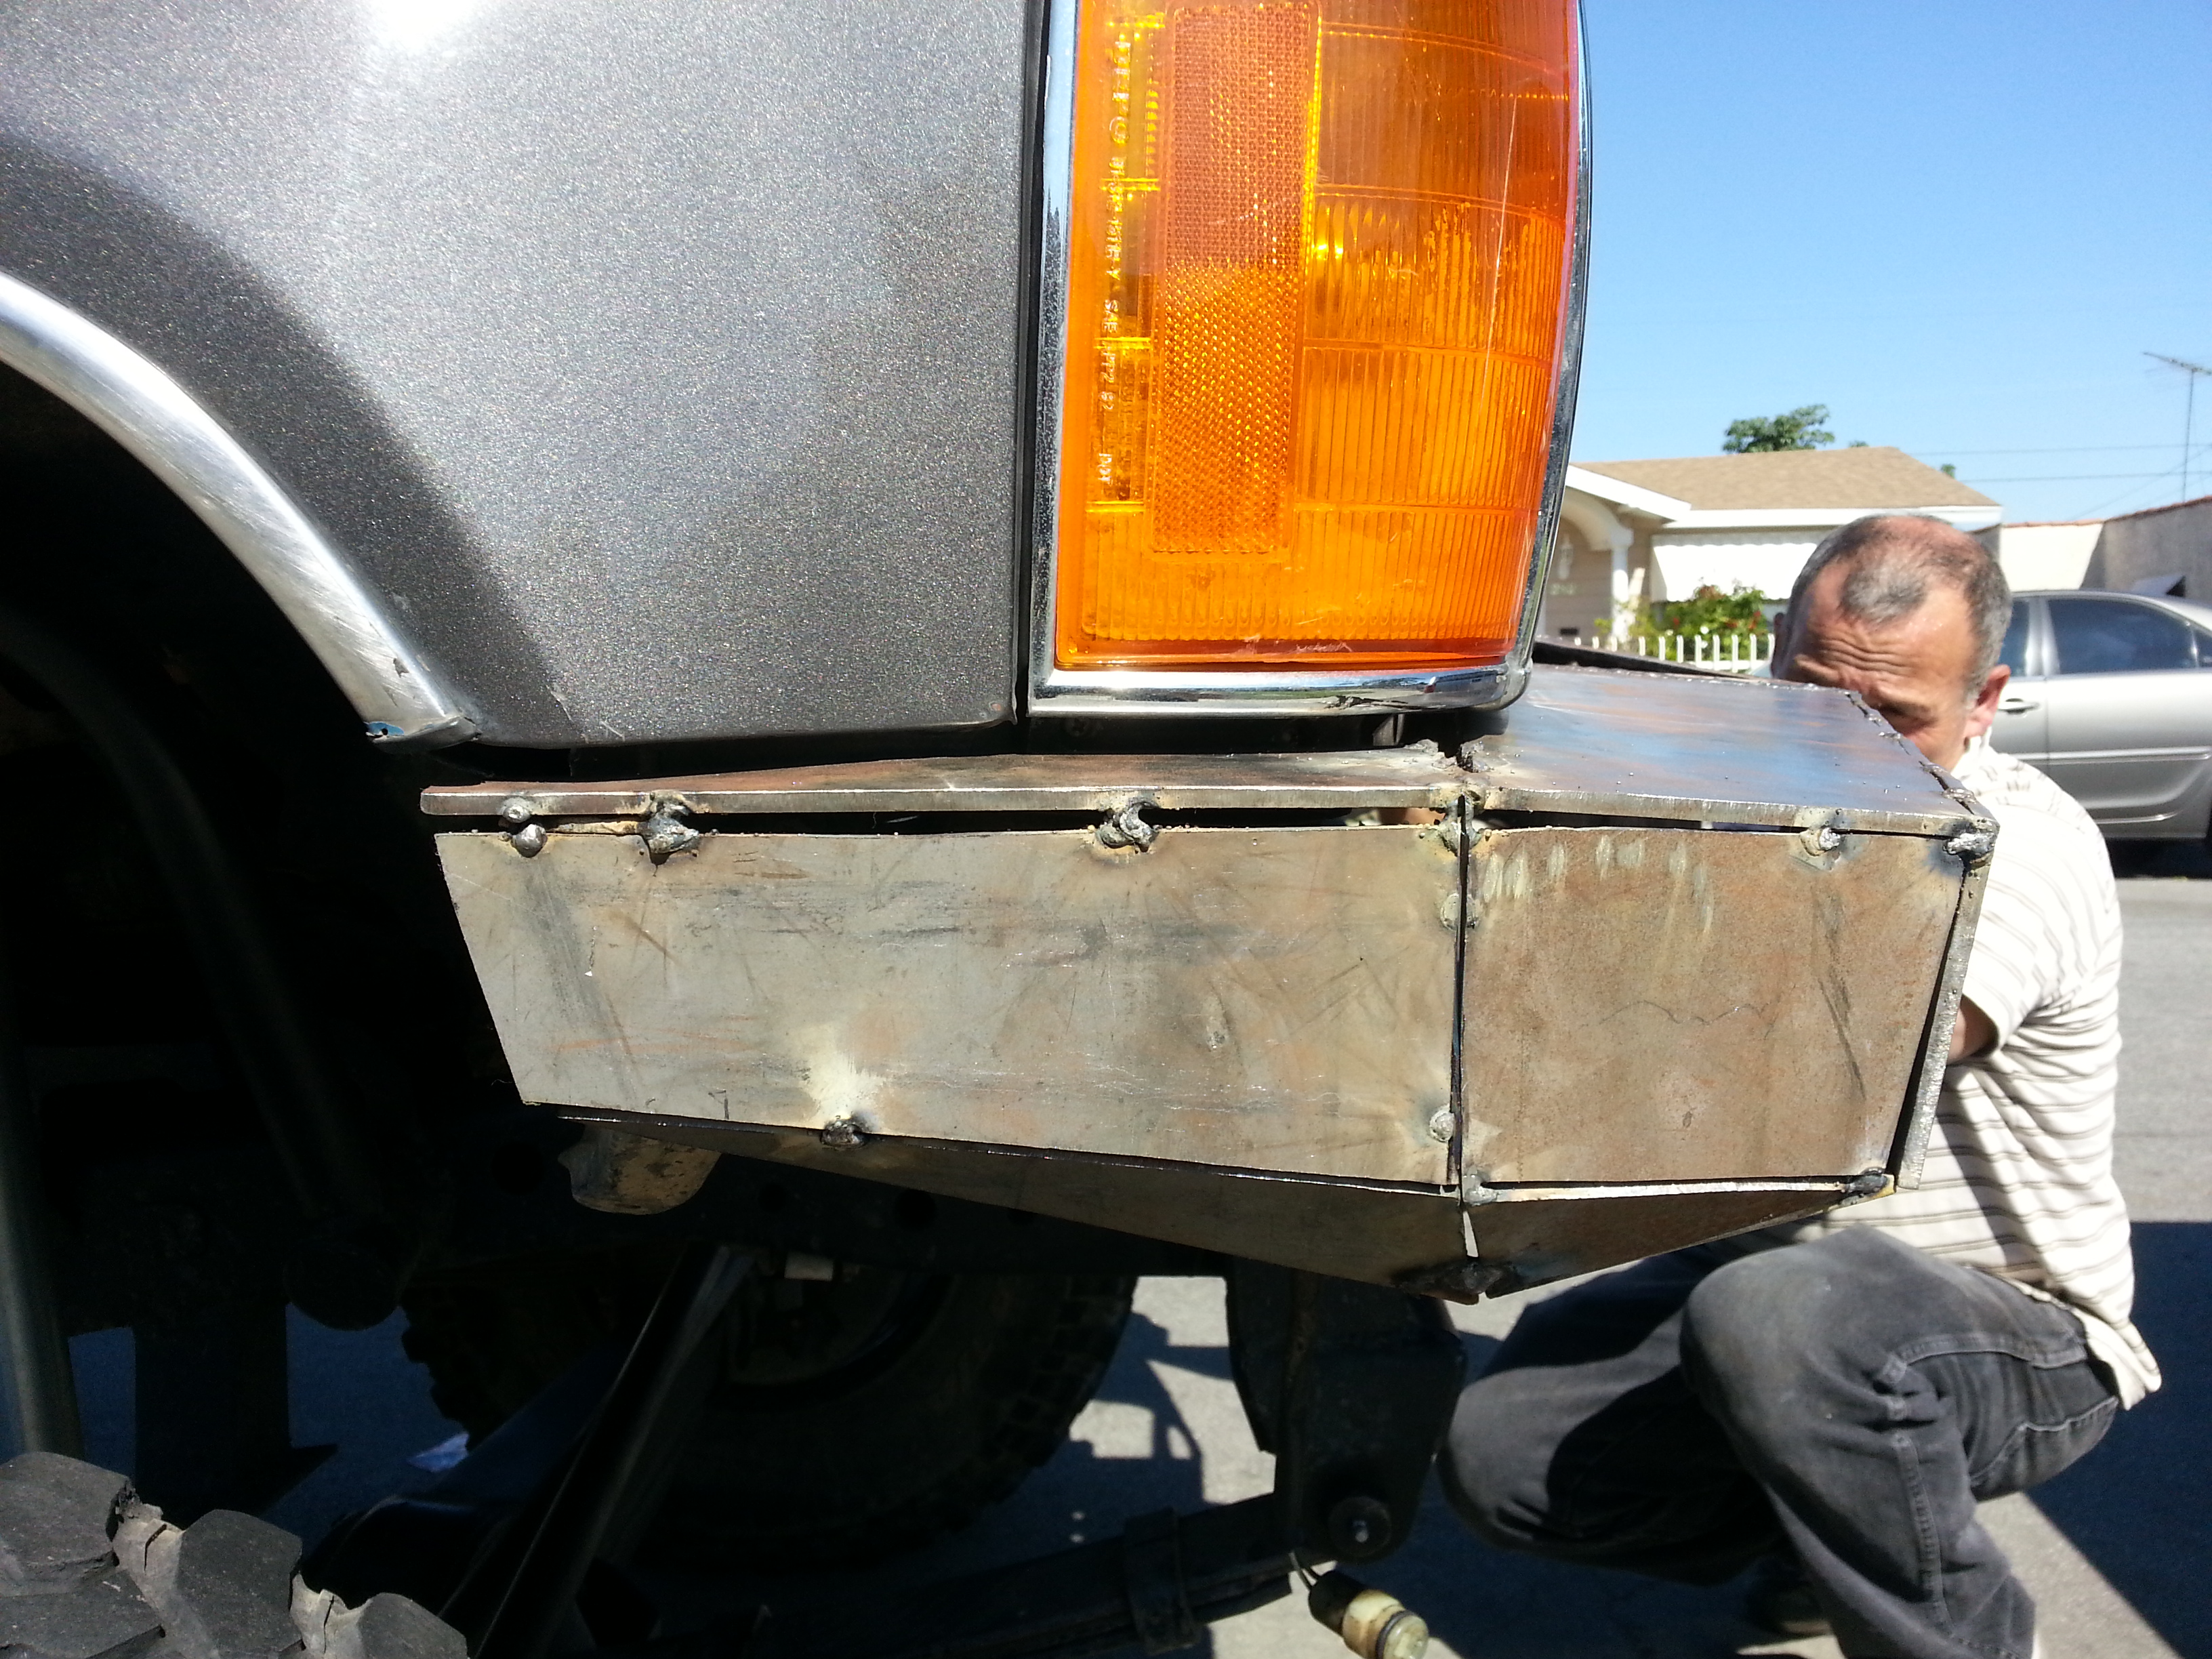
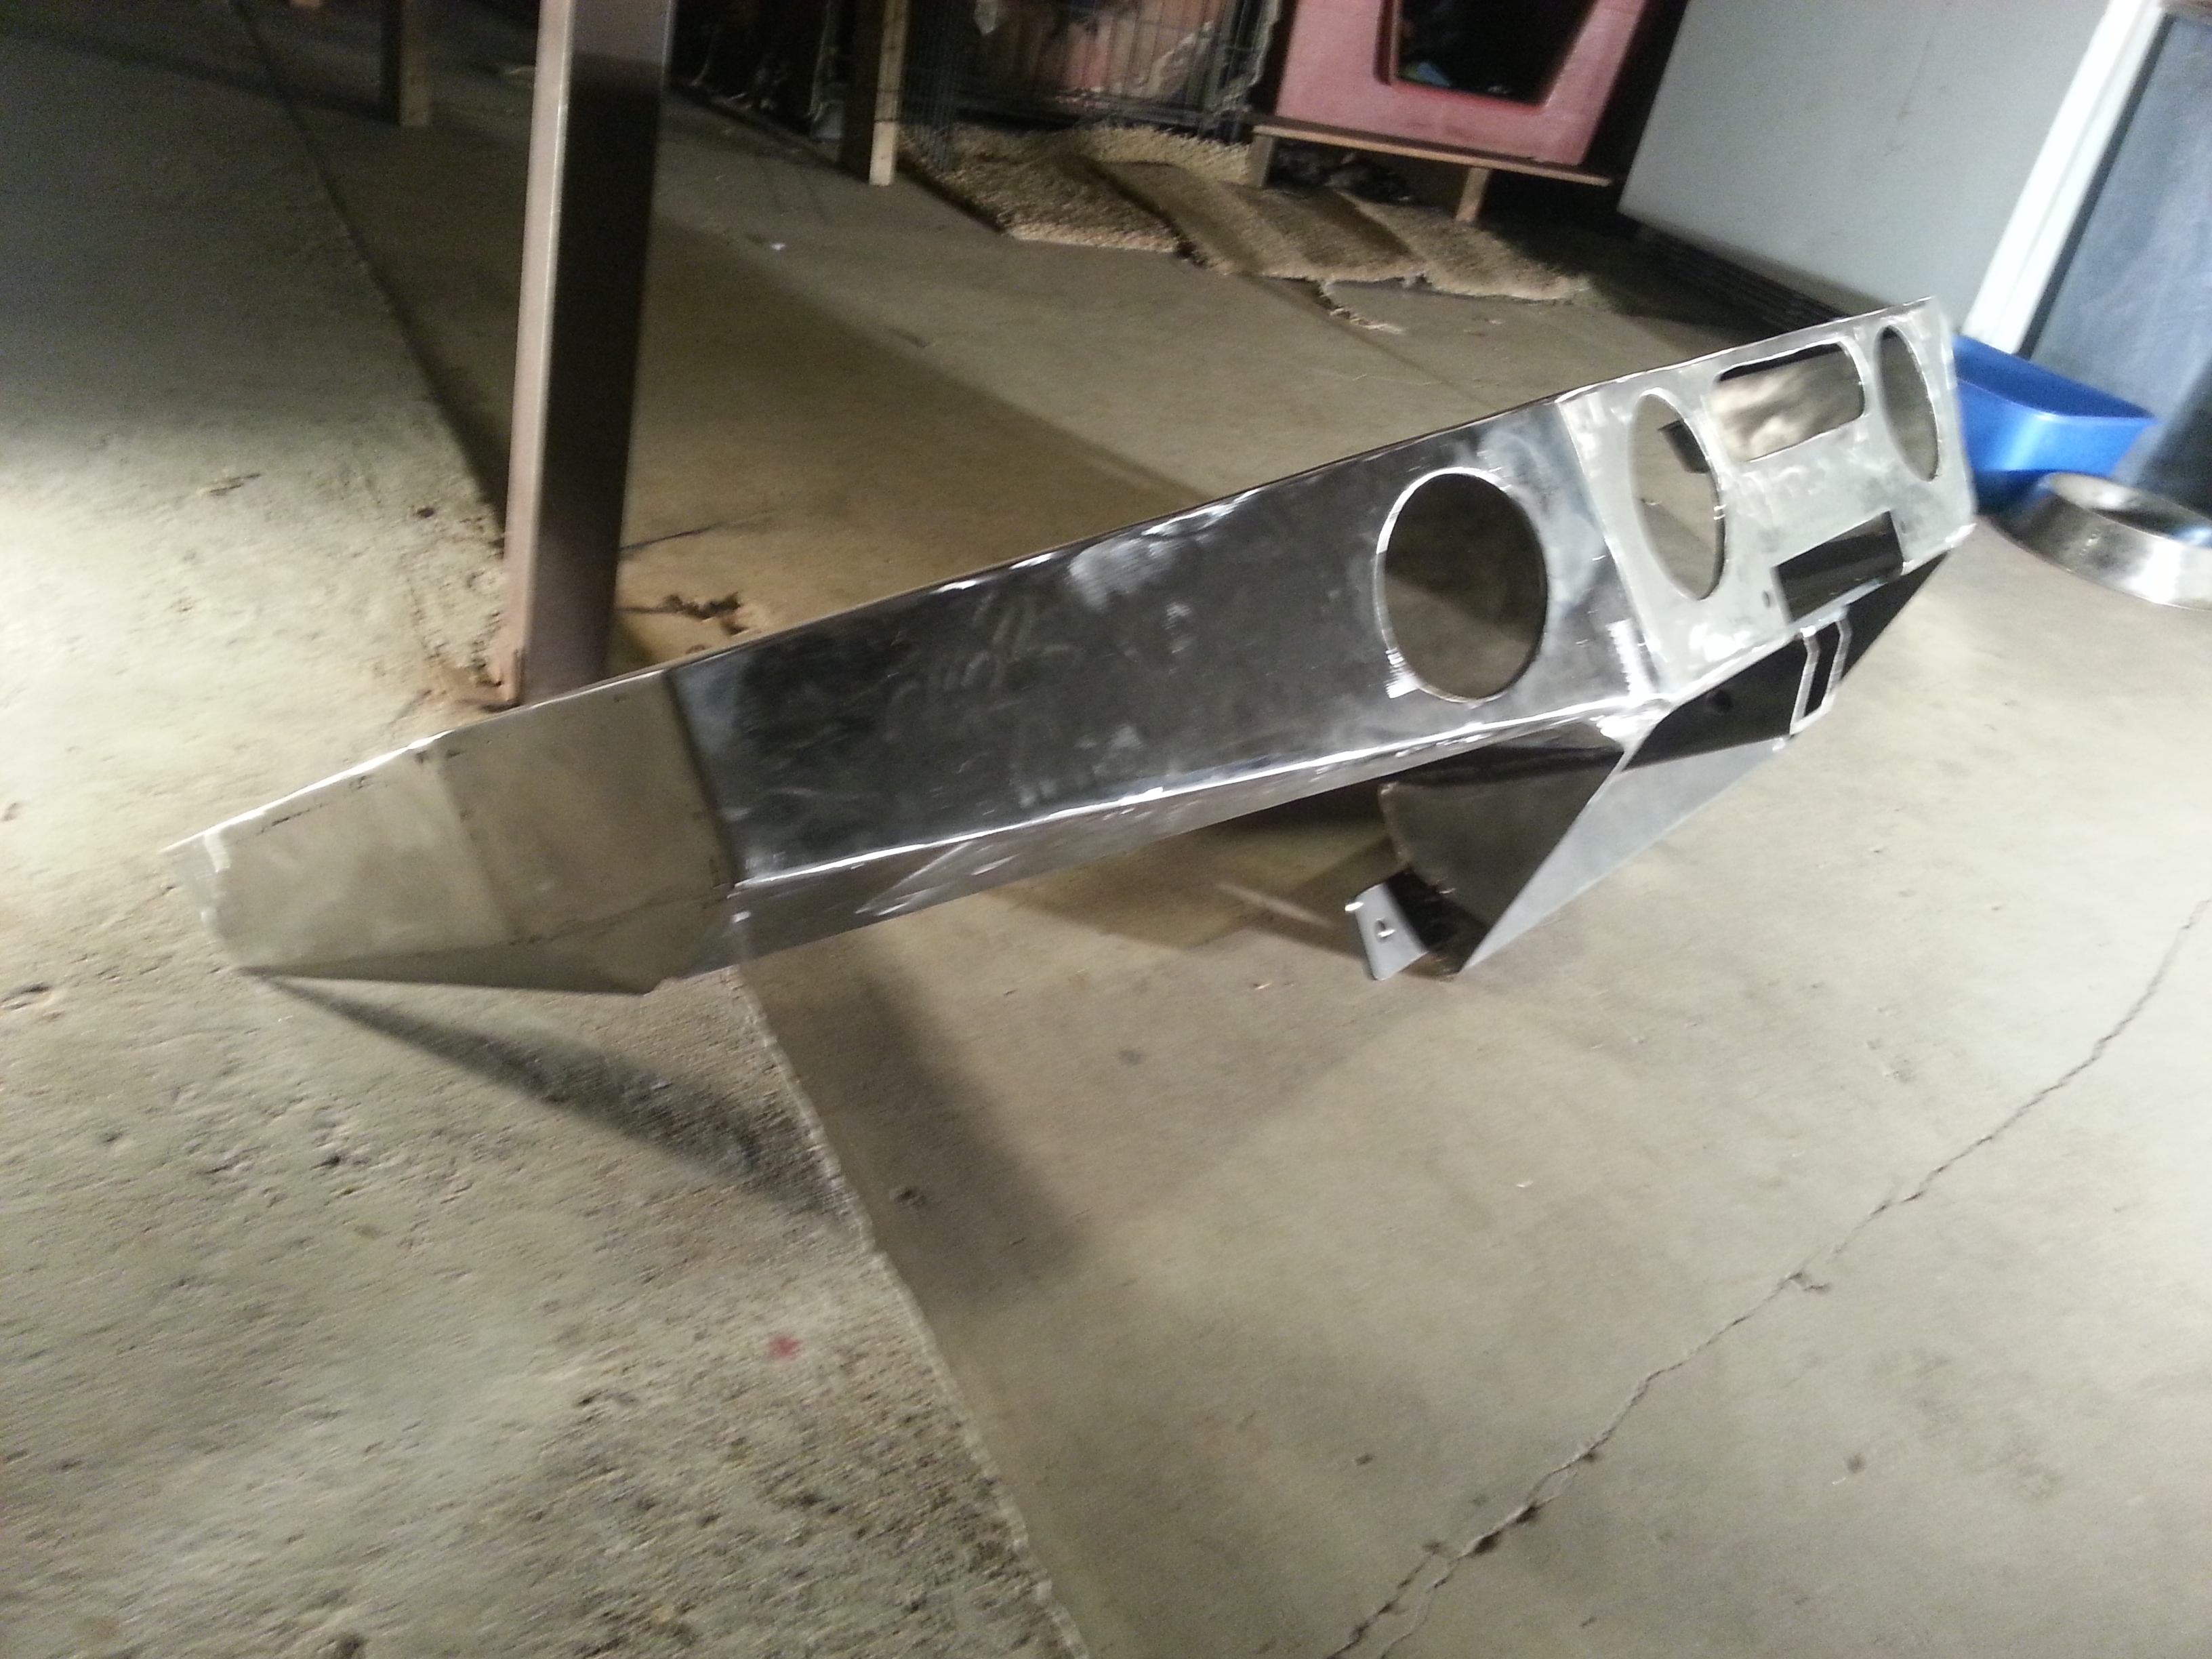
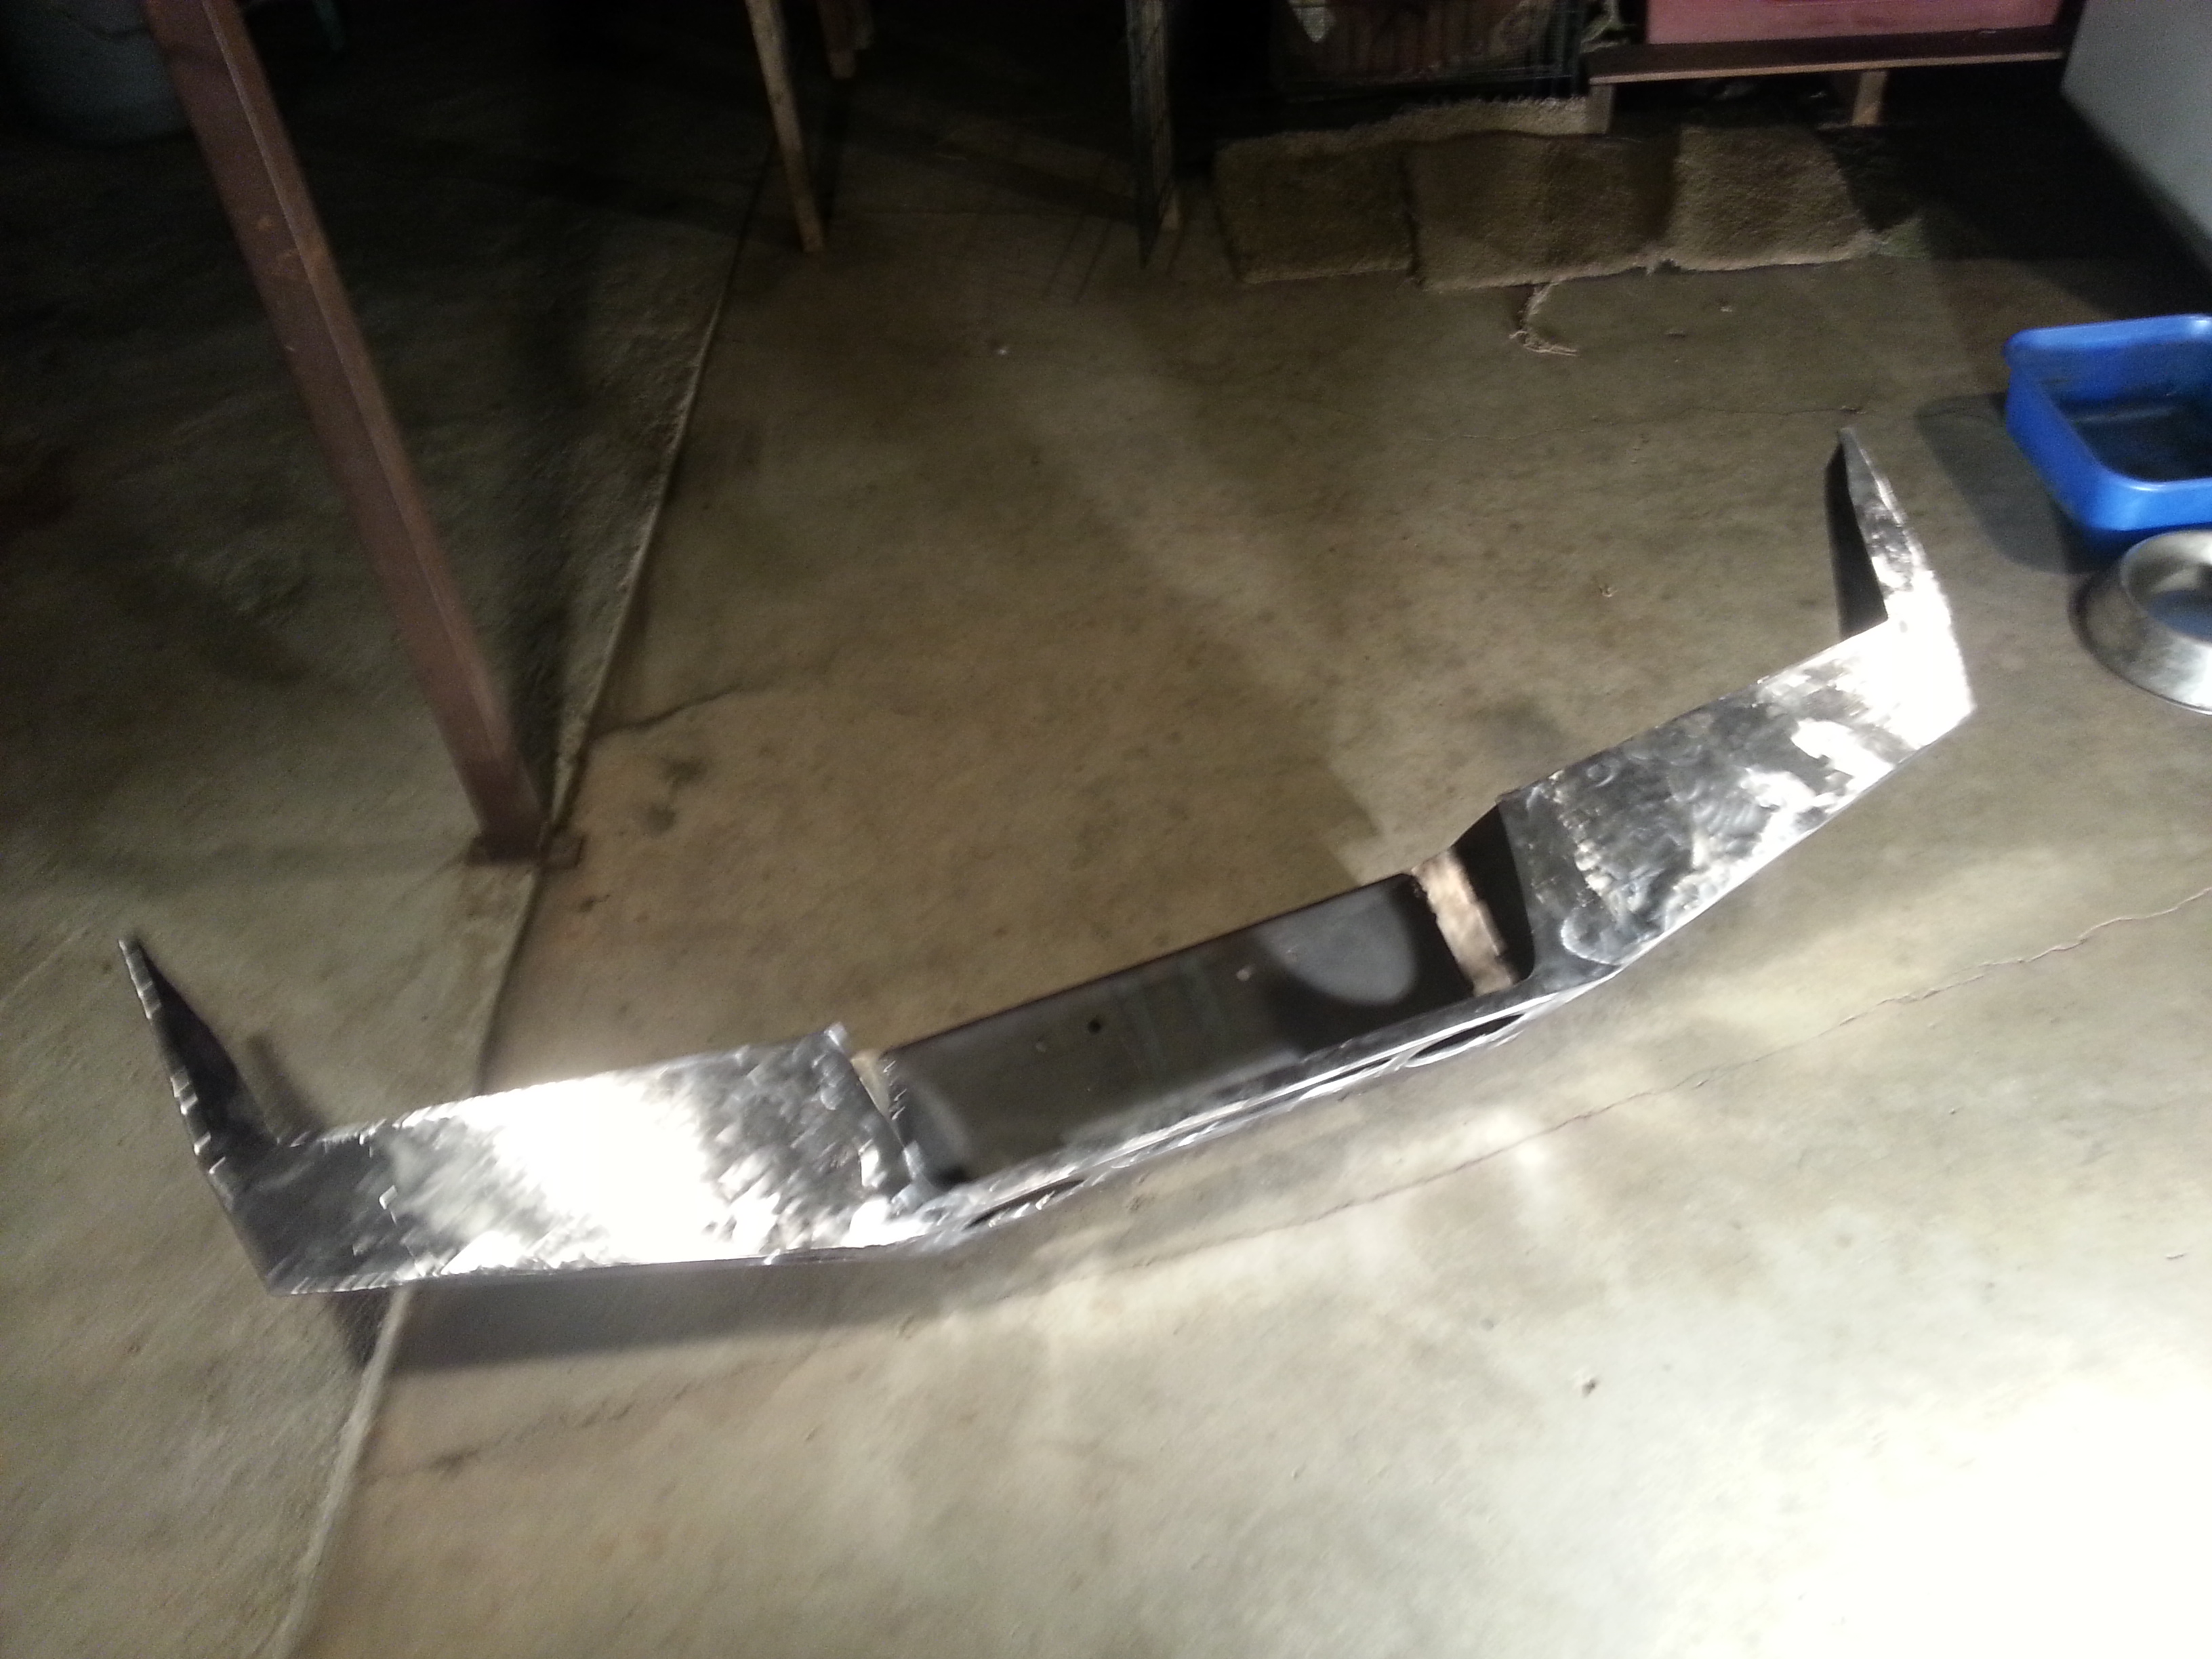
Got some decent progress in today guys. We cut off some of the tack welds. and re adjusted the corner pieces. Now it sits exactly where i want it.
I know the picture codes arent working from photobucket due to lack of bandwidth. I'm still going to upload them anyway for when the bandwidth does kick in. All you have to do is just click on the image photobucket is providing for all my pix and you will bve directed to the picture via photobucket.com
Here are the pix of the fixed sides/corners of the bumper.
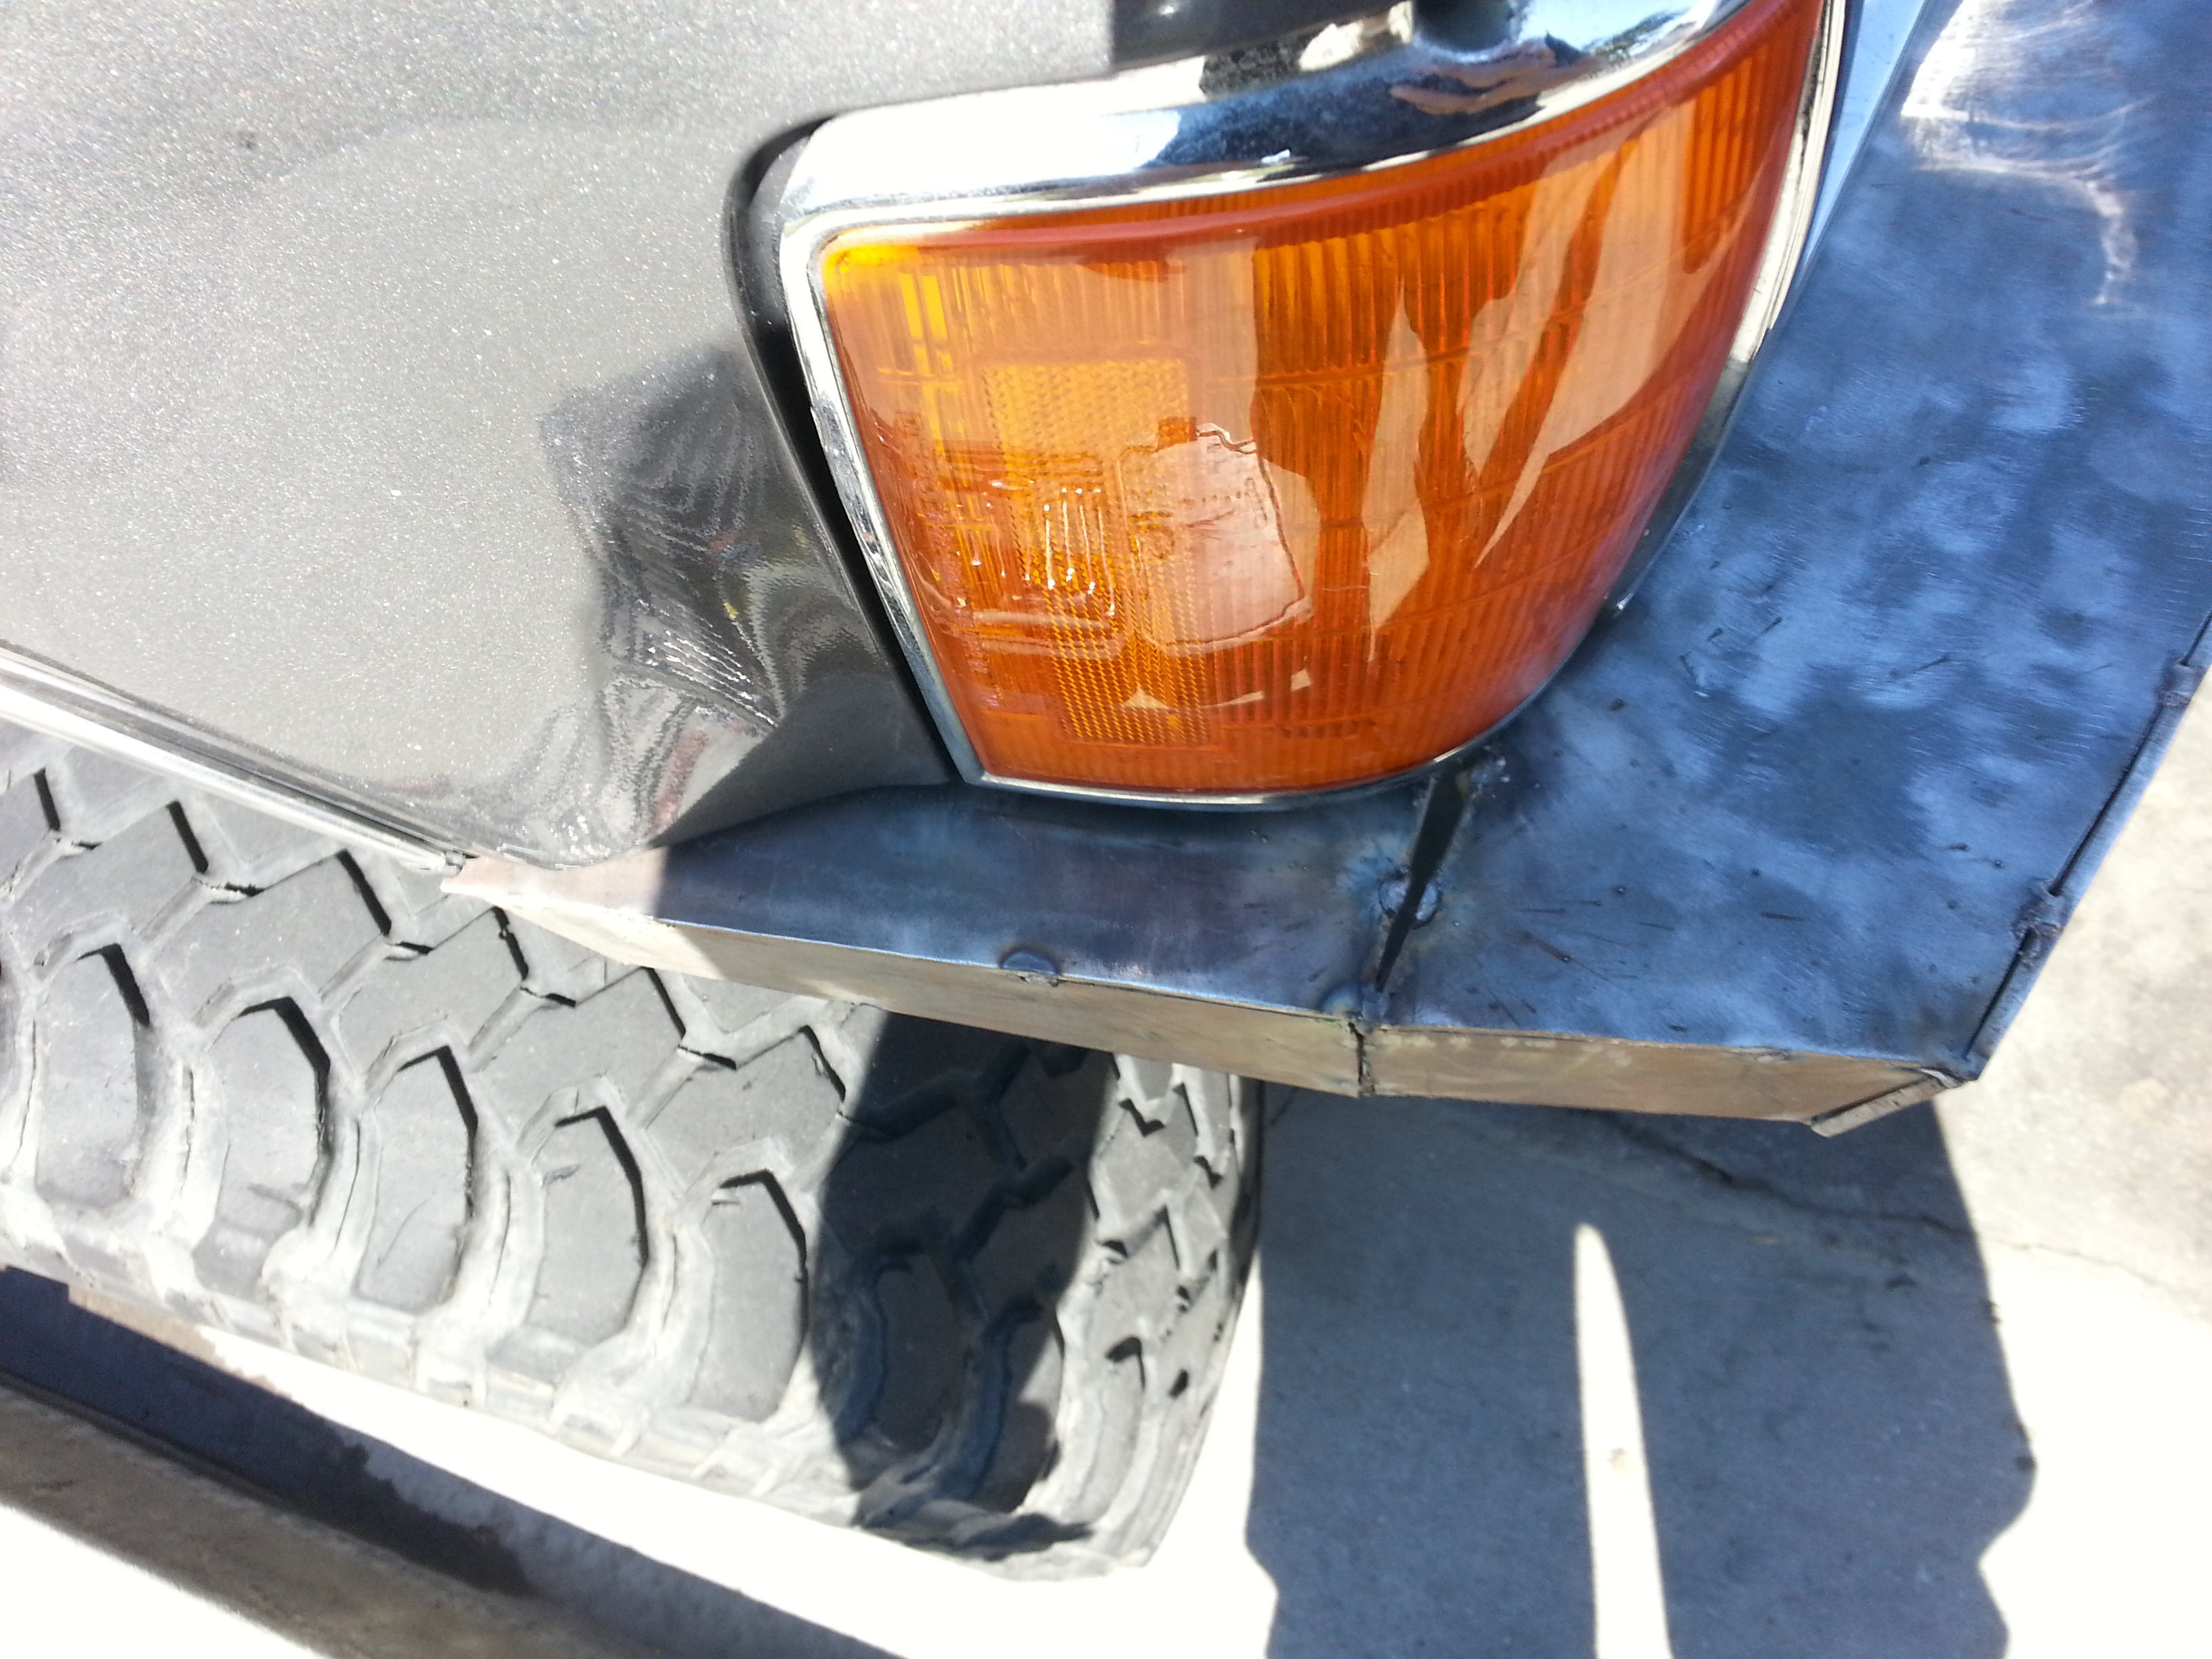
Driver side doesnt rub the fender anymore.
Passenger side isnt rubbing either
We added the reinforcement that i wanted to the center part of the bumper. Here is the first shot i took.
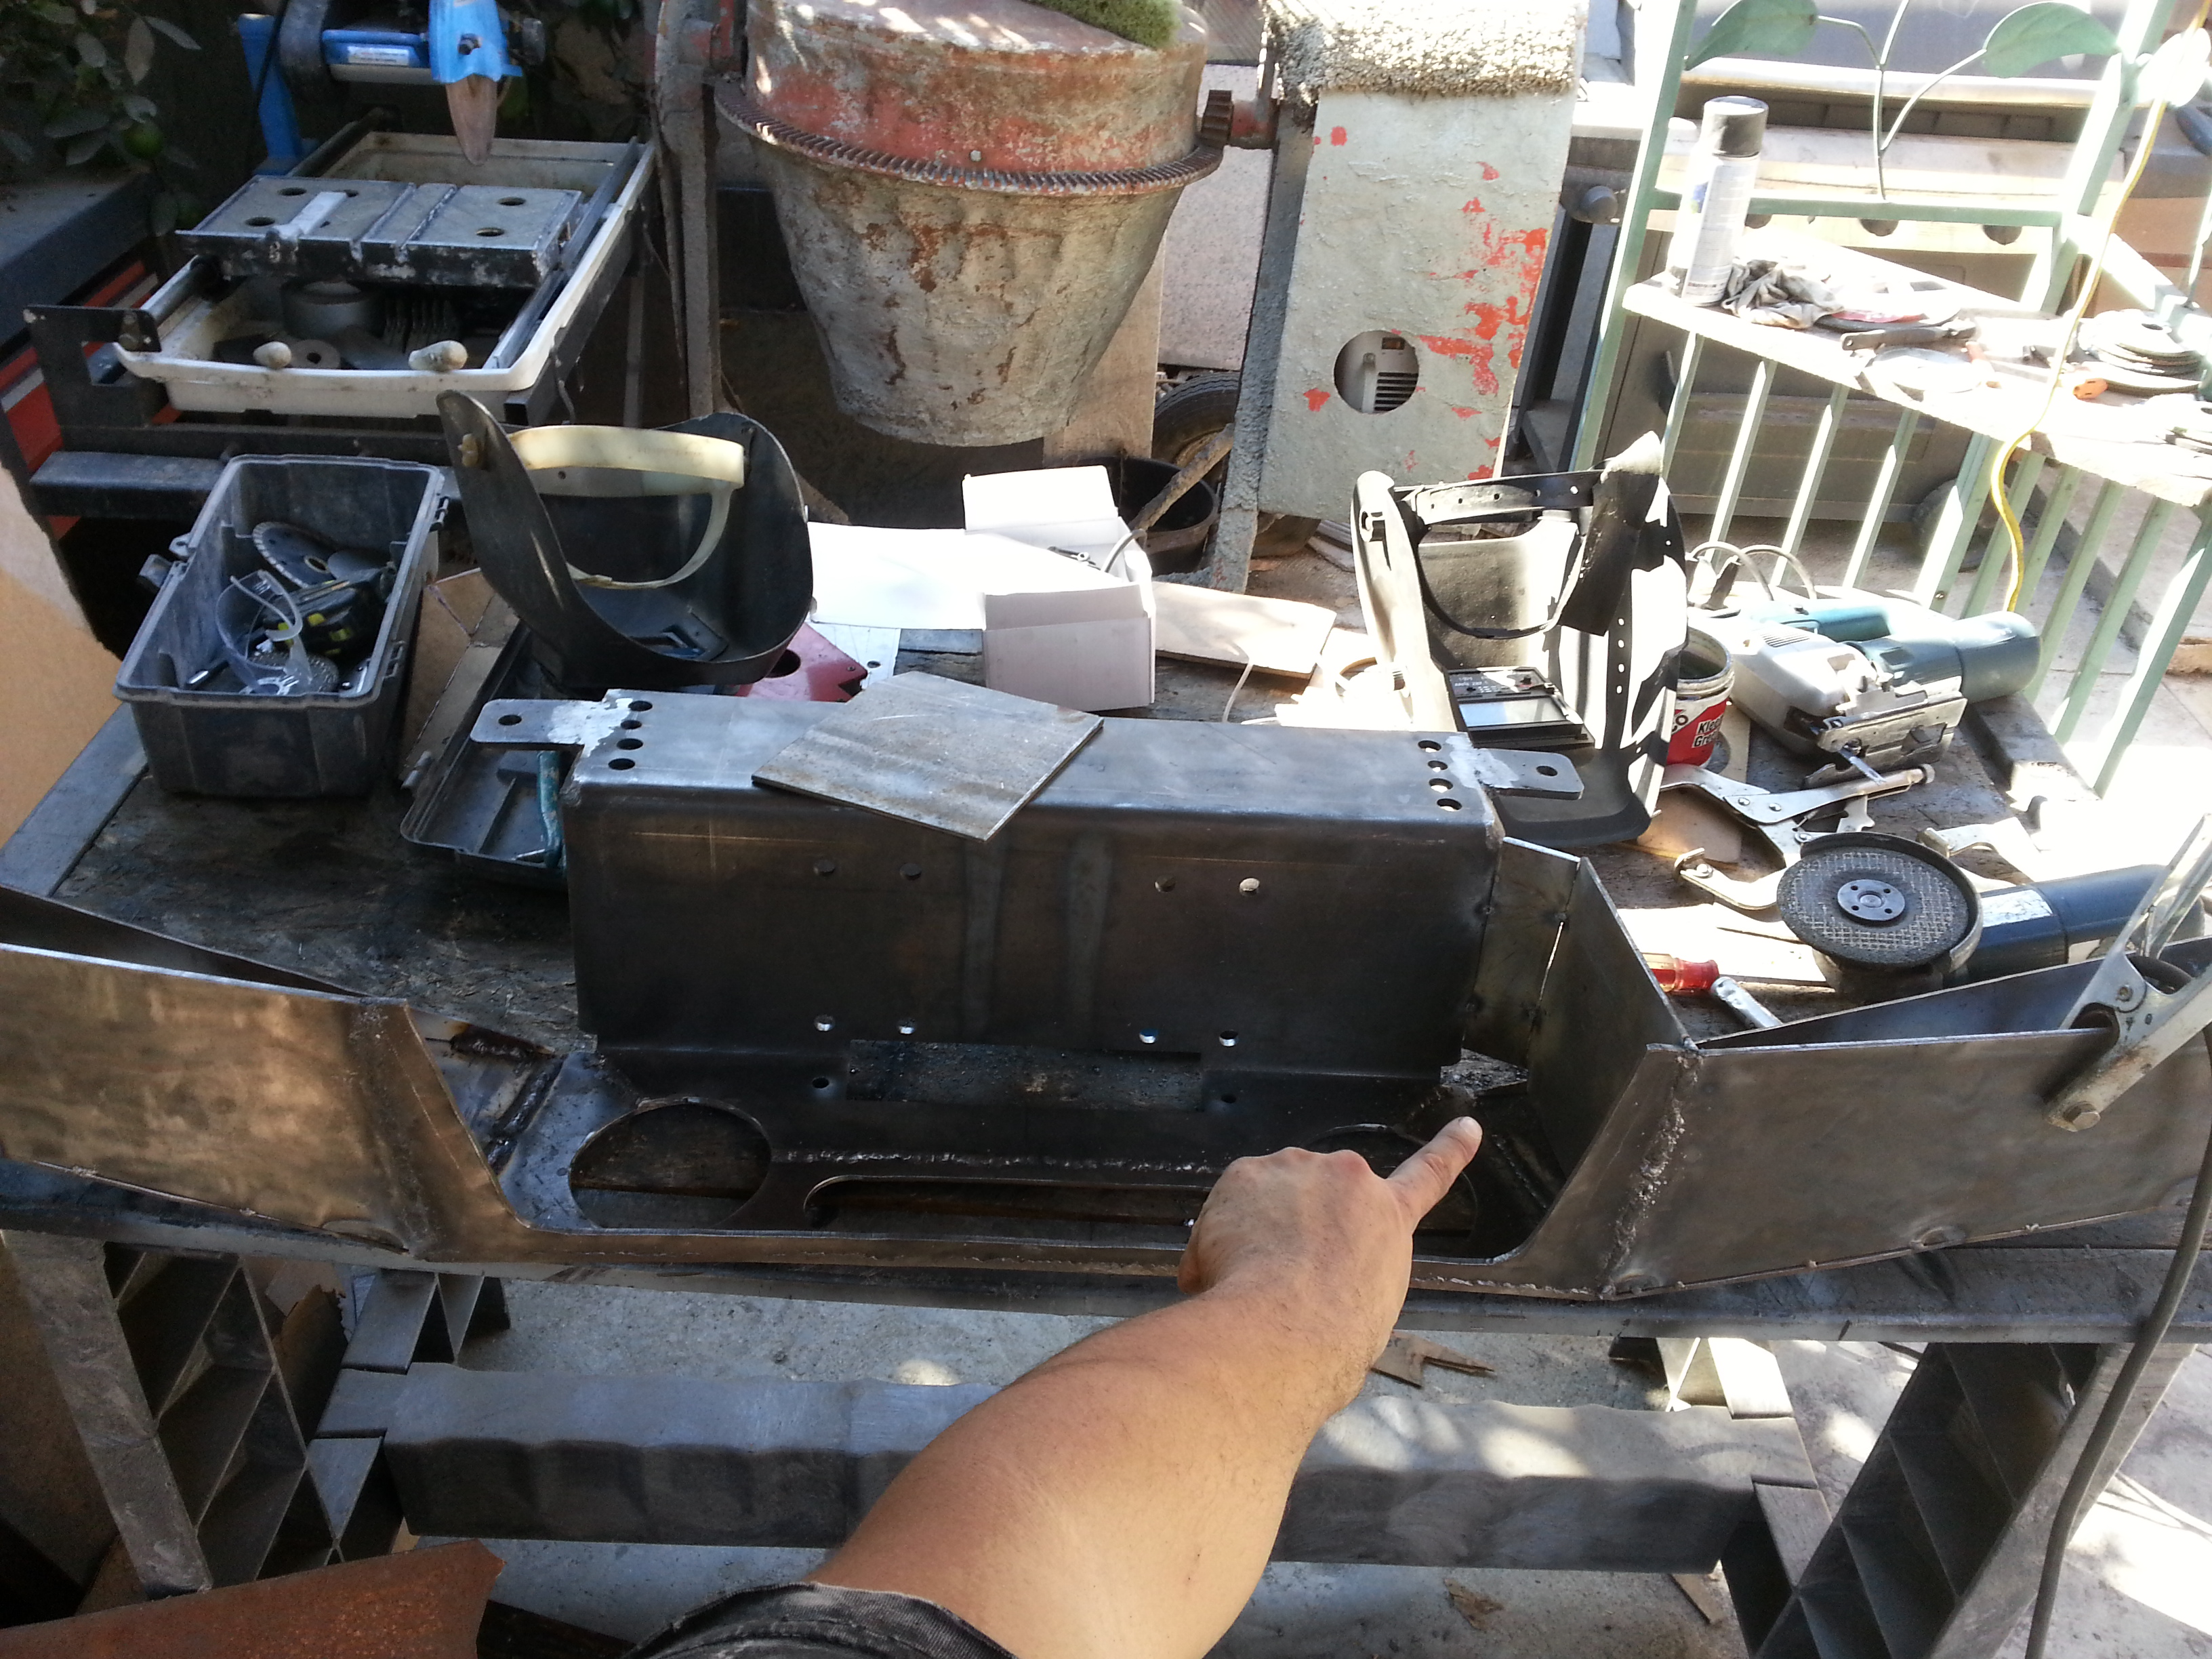
Here is the full view of the back of my bumper. Both center reinforcements finished.
After this picture was taken we did all the final welds throughout the entire bumper. and silly me forgot to take pictures lol But the entire bumper finally got the full welds. The only thing it is still missing is to add 2 circle or square tube from the corner pieces of the bumper to the winch plate too support the sides. I also began grinding some of the welds down to make look nice and neat. but i didnt finish. I'm not sure i'll have time to work on this tomorrow. but we will see. im crossing my fingers and hoping i at least get 3 hours of grinding in.
I know the picture codes arent working from photobucket due to lack of bandwidth. I'm still going to upload them anyway for when the bandwidth does kick in. All you have to do is just click on the image photobucket is providing for all my pix and you will bve directed to the picture via photobucket.com
Here are the pix of the fixed sides/corners of the bumper.

Driver side doesnt rub the fender anymore.

Passenger side isnt rubbing either

We added the reinforcement that i wanted to the center part of the bumper. Here is the first shot i took.

Here is the full view of the back of my bumper. Both center reinforcements finished.

After this picture was taken we did all the final welds throughout the entire bumper. and silly me forgot to take pictures lol But the entire bumper finally got the full welds. The only thing it is still missing is to add 2 circle or square tube from the corner pieces of the bumper to the winch plate too support the sides. I also began grinding some of the welds down to make look nice and neat. but i didnt finish. I'm not sure i'll have time to work on this tomorrow. but we will see. im crossing my fingers and hoping i at least get 3 hours of grinding in.
Last edited by Redeth005; Oct 19, 2013 at 08:21 PM.
Oct 22, 2013 | 09:28 PM
#79
Thread Starter
Registered User
Joined: Apr 2012
Posts: 2,817
Likes: 2
From: Los Angeles CA
Alright guys I have a quick update before i head to bed.
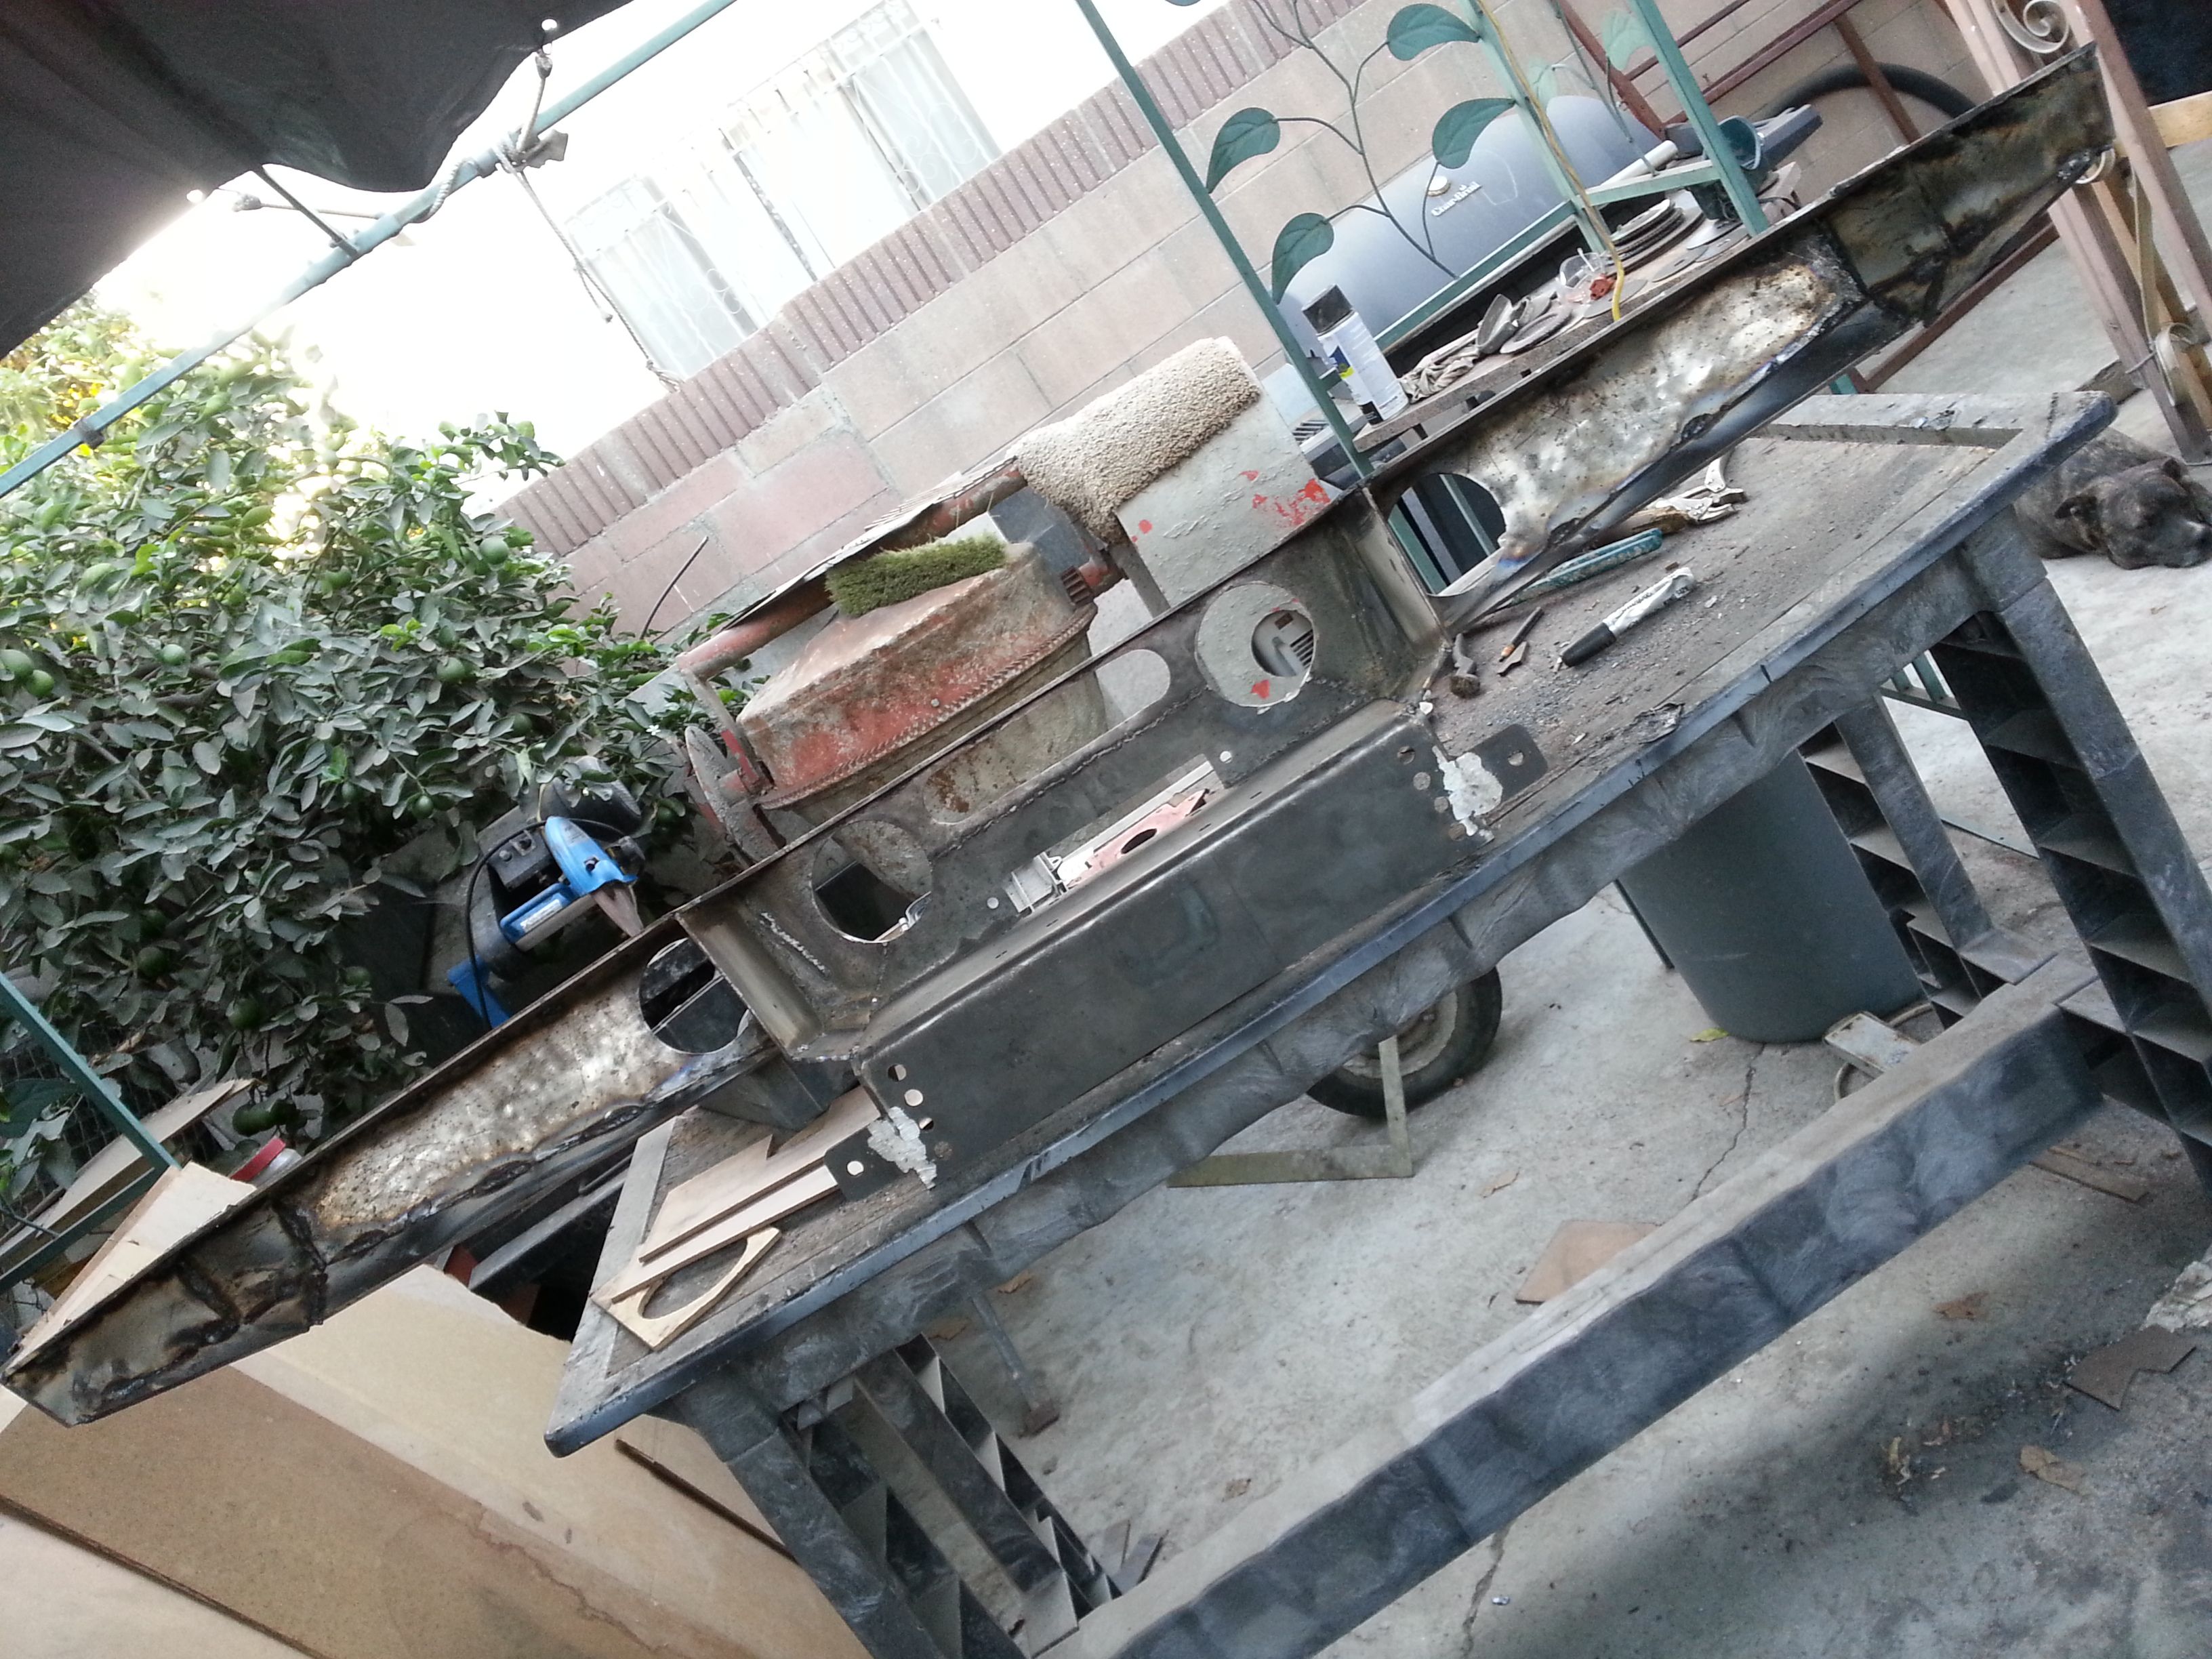
Today i spent approx 3 hours grinding down all my exterior welds and sanding down all the exterior surfaces of the bumper.
I KNOW THE PIX WONT WORK TILL MY BANDWIDTH RESETS! Just go ahead and click on the pictures that photobucket replaces my pix with and you will be redirected to my photobucket account where the picture is at.
Front View
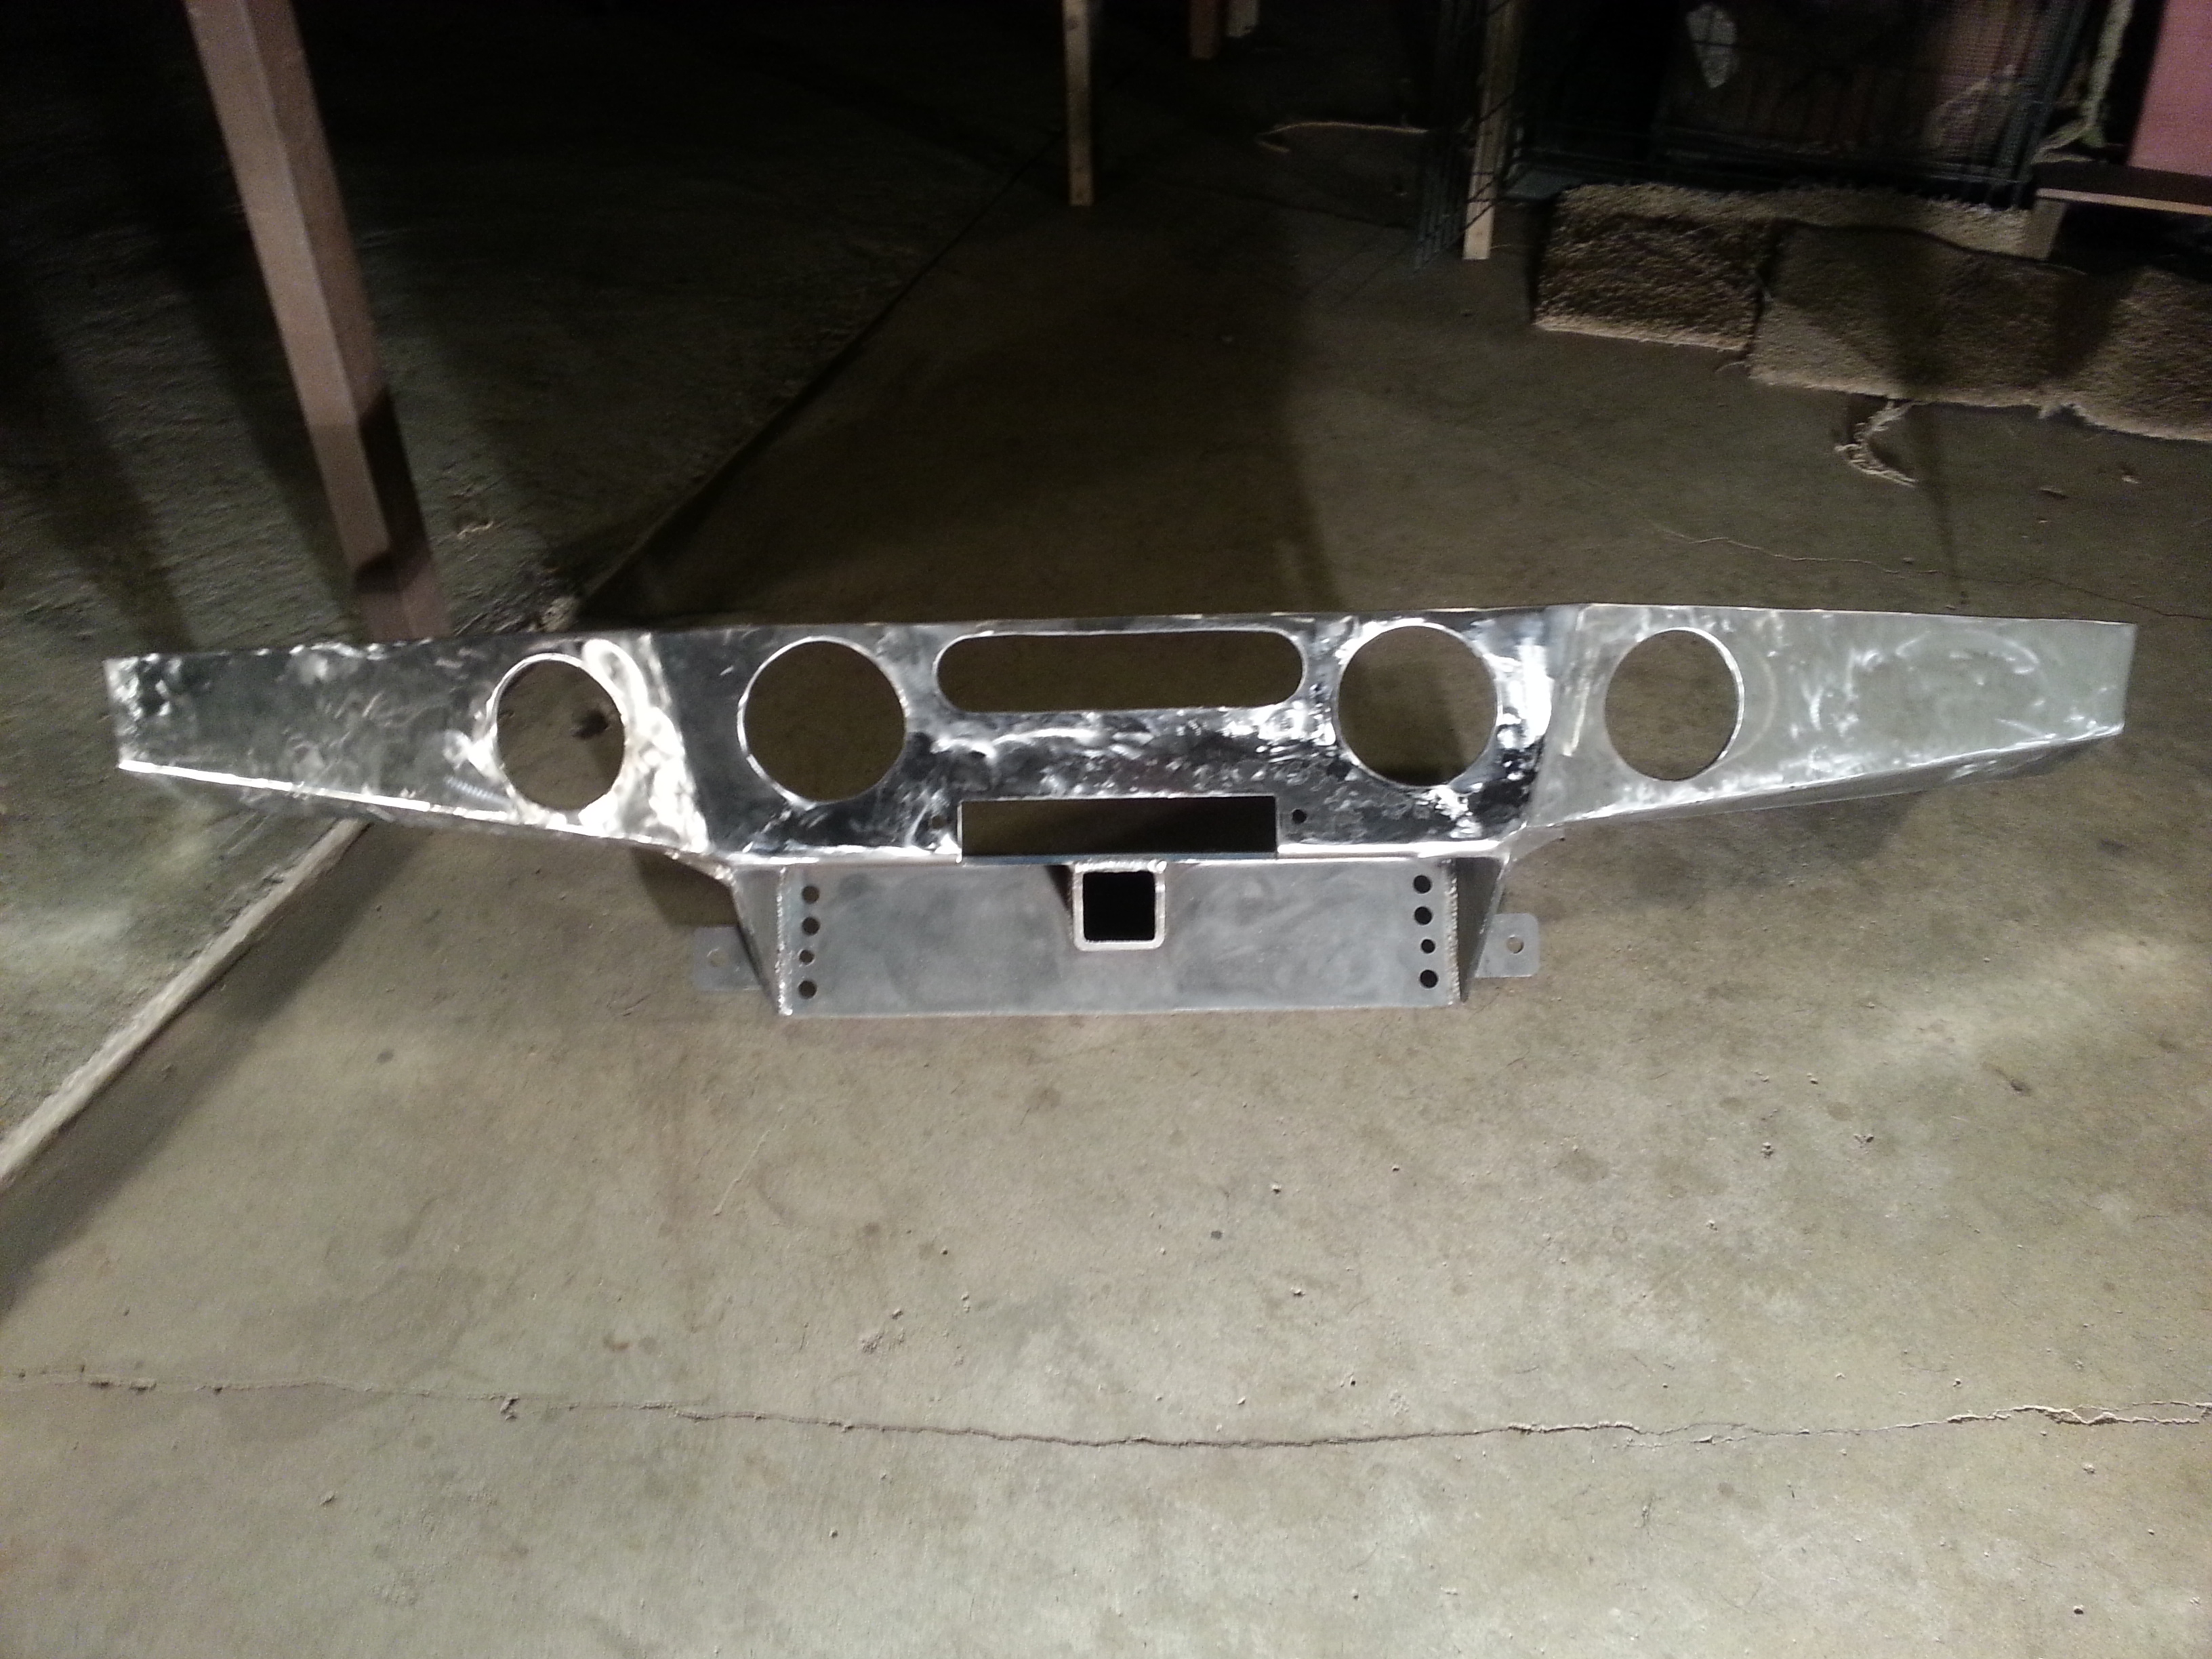
Top Corner
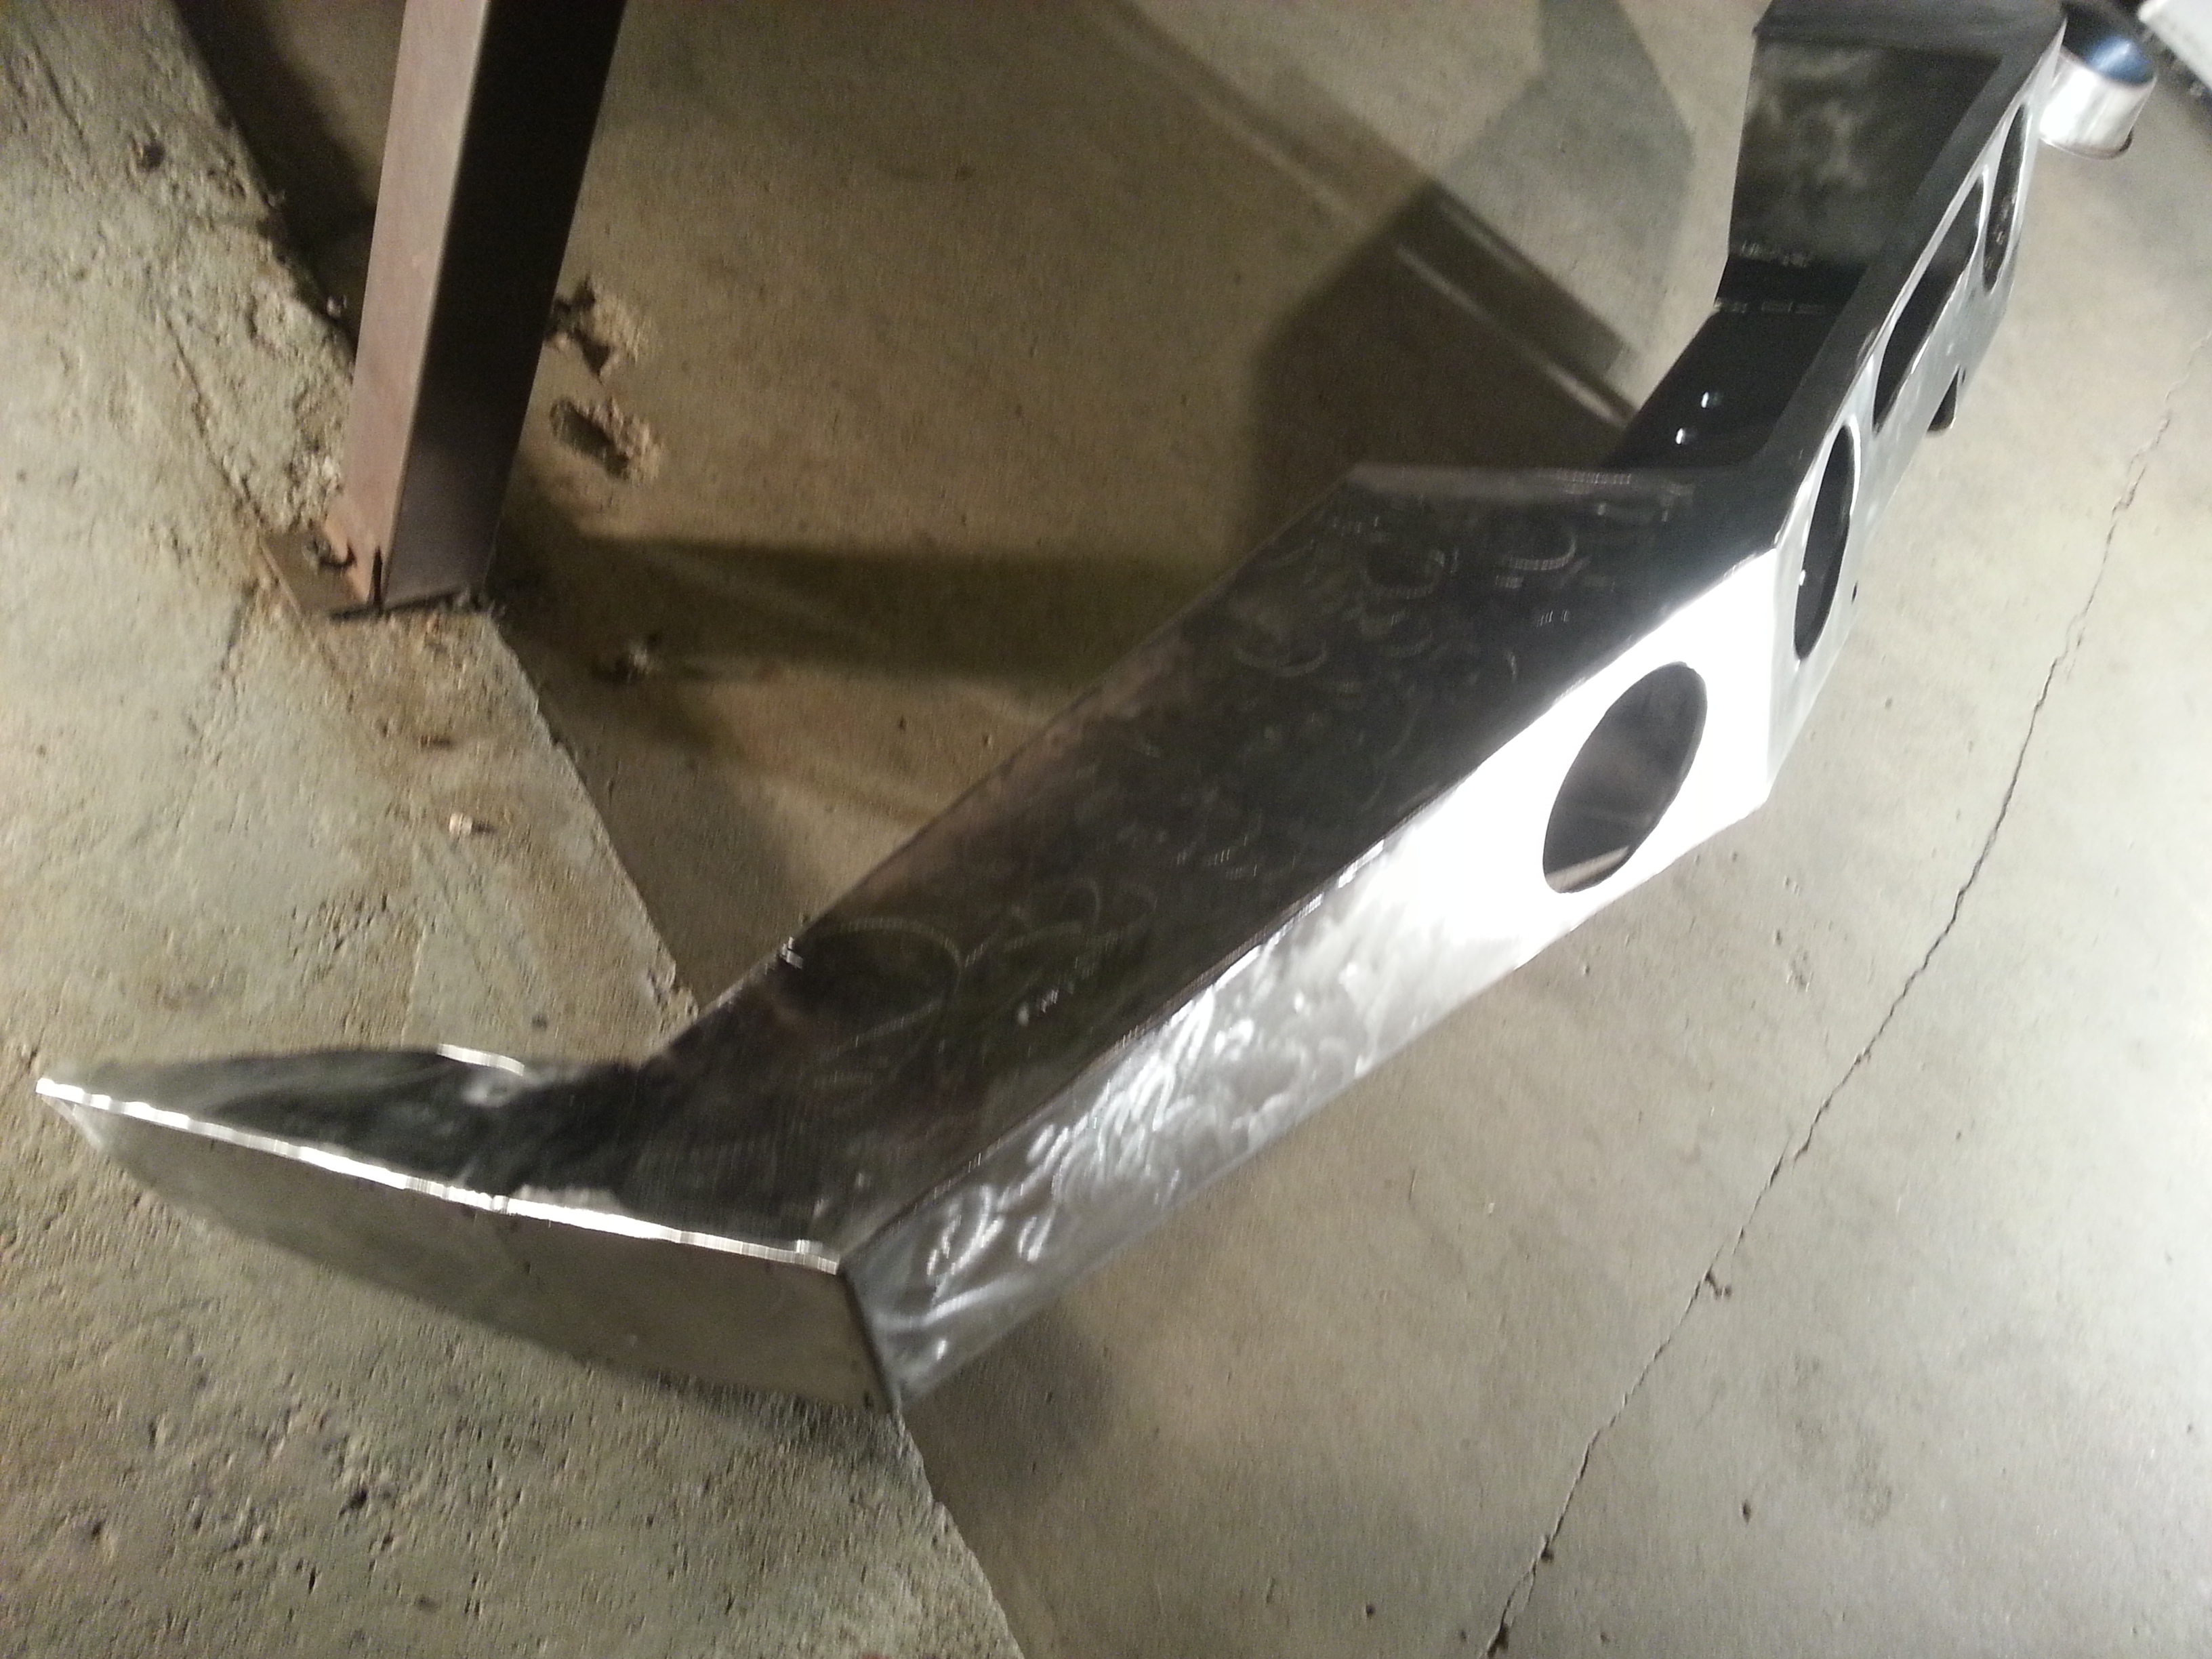
Bottom Corner
Top View
And in case you're at a computer i made you guys a video showing all the details to my bumper. Posted it on youtube. hope you guys like.
Today i spent approx 3 hours grinding down all my exterior welds and sanding down all the exterior surfaces of the bumper.
I KNOW THE PIX WONT WORK TILL MY BANDWIDTH RESETS! Just go ahead and click on the pictures that photobucket replaces my pix with and you will be redirected to my photobucket account where the picture is at.
Front View

Top Corner

Bottom Corner

Top View

And in case you're at a computer i made you guys a video showing all the details to my bumper. Posted it on youtube. hope you guys like.


