When you click on links to various merchants on this site and make a purchase, this can result in this site earning a commission. Affiliate programs and affiliations include, but are not limited to, the eBay Partner Network.
***Note: I am now selling custom bumper plans based on this bumper design. PM me if interested.
Well, I've been wanting to start this thread for a while now, to document my bumper build. I really like the looks of the aftermarket plate bumpers: TJM, ARB, and Shrockworks. But, I want something unique, and thought it would be a great learning opportunity to build one myself, since I've never done anything like this before. After reading several build threads, doing a ton of research, and listing all of my design constraints, I was ready to start designing.
Design constraints:
- keep it simple, easy to build, and keep cost down.
- bumper must accomidate my 1.5" body lift.
- bumper must house a 9000 lb winch.
- bumper must look good, and follow the lines of the truck.
- bumper must house a set of fog lights.
- bumper must be strong enough for winching and tugging.
- bumper must not weigh more than 100 pounds. Less is better!
- bumper must mount in stock mounting locations.
- bumper must have hoops over grille and headlights.
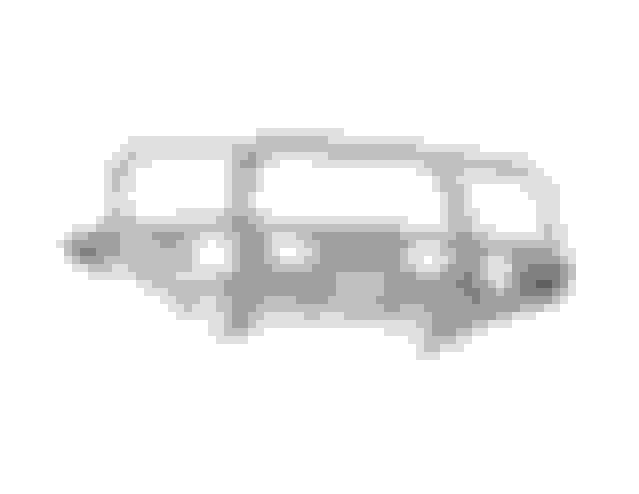
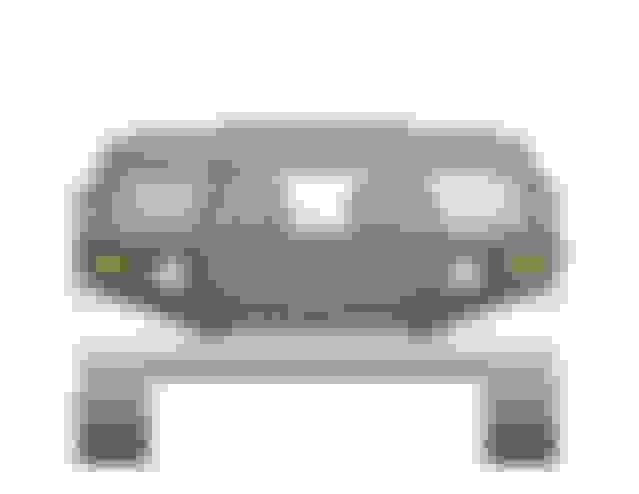
So here is what I came up with. Now keep in mind I started designing over a year ago, and the design has gone through numerous iterations and changes over that time.
The mounting portion with winch plate and shackle hangers:
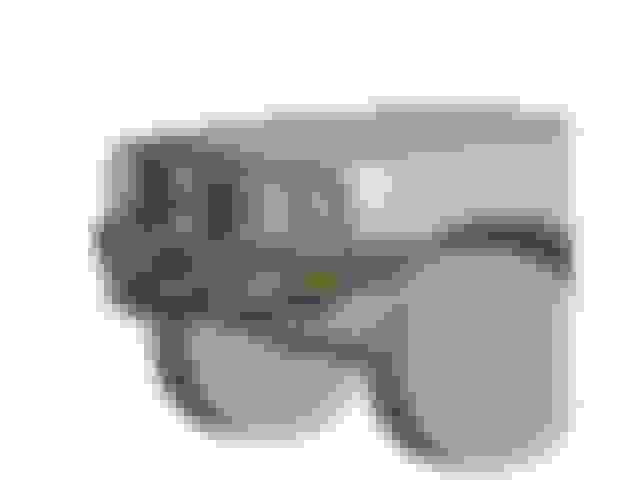
And some pics of the end result (I hope) of what it will look like on the truck:
More to come.
Last edited by Bandit Runner; Jul 18, 2017 at 05:03 PM.
Well, I've been wanting to start this thread for a while now, to document my bumper build. I really like the looks of the aftermarket plate bumpers: TJM, ARB, and Shrockworks. But, I want something unique, and thought it would be a great learning opportunity to build one myself, since I've never done anything like this before. After reading several build threads, doing a ton of research, and listing all of my design constraints, I was ready to start designing.
Design constraints:
- keep it simple, easy to build, and keep cost down.
- bumper must accomidate my 1.5" body lift.
- bumper must house a 9000 lb winch.
- bumper must look good, and follow the lines of the truck.
- bumper must house a set of fog lights.
- bumper must be strong enough for winching and tugging.
- bumper must not weigh more than 100 pounds. Less is better!
- bumper must mount in stock mounting locations.
- bumper must have hoops over grille and headlights.
So here is what I came up with. Now keep in mind I started designing over a year ago, and the design has gone through numerous iterations and changes over that time.
Looks good, should accommodate you in what your looking for.
Doesn't look the simplest to make, and I can guarantee it's going to weigh over 100lbs. Mine weighs in at around 100lbs and it has a whole lot less metal in it.
Thanks for all the feedback thus far. To answer a few questions:
looks good man. have some skill with the computer program there. i like it
Yeah, I'd better have some CAD skills, I've been doing it 40+ hours a week for the last 17 years.
Doesn't look the simplest to make, and I can guarantee it's going to weigh over 100lbs. Mine weighs in at around 100lbs and it has a whole lot less metal in it.
The bumper itself (not including shackles, winch, lights, etc.) will come in less than 100 lbs. In fact the CAD model says it weighs a little less than 90 lbs. I took a lot of time to reduce material in non-critical areas.
dang dude looks good, wish i had the time and money to get a bumper like that.
A lot of time? Definitely! But not a lot of money.
Here are some other options incase you want to save 80 hours of labor.
I am not taking the easy and more costly way out. I love a challenge. This has been a fun project so far, and I am just getting to the good stuff.
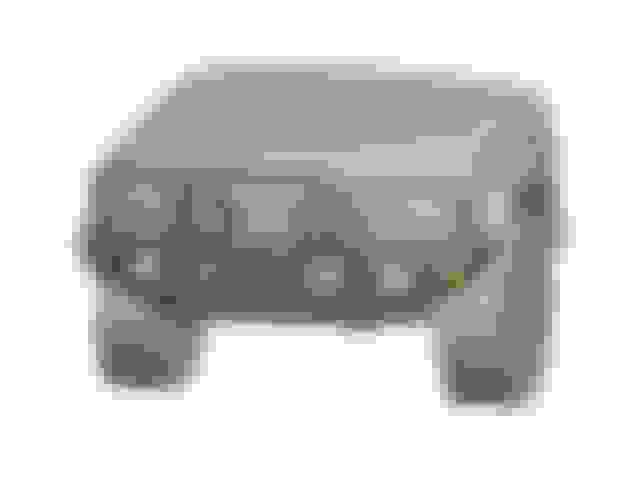
So after I completed the CAD design, I wanted to prototype the bumper before ever cutting any steel. So with the use of some 1/8" thick plywood, pvc tubing, duct tape, and a lot hot glue gun sticks, this is what I came up with.
Last edited by Bandit Runner; Jul 18, 2017 at 05:09 PM.
Did not mean to imply you wanted to easy way out, just saw that the Shrockworks was almost exactly what you wanted. Beyond the cad work would you happen to have access to a water jet, seems like it would be the best way to cut so many pieces. Looks like a good solid design. Are you gonna make a matching rear? Also don't forget to design/decide what type of access you are going to need for your winch.
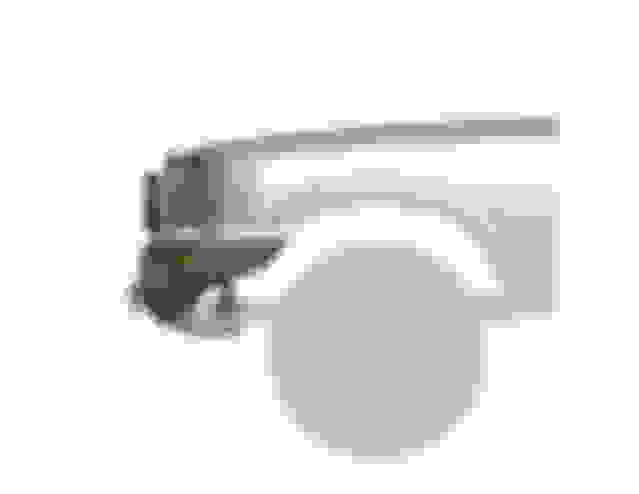
So then it was time to cut some steel. Having access to a water jet really kicks butt. I had all of the 1/4" thick mounting pieces cut for an exact fit.
Then my neighbor welded them up for me:
Then I started cutting out the 12 gage thick outer skin pieces. Starting with the top, front, and a few miscellaneous pieces. Also you can see the shackle hangers welded on.
That is basically where it sits today. I've got a ton of work to do yet, but I'm in no hurry. This project will probably take most of this summer. I'll try to update this thread every couple of weeks or so with my progress.
Last edited by Bandit Runner; Jul 18, 2017 at 05:13 PM.
w.o.w. that is SICK! Great job on the mockup. I would take that and paint it all black and put in the house somewhere haha. This is gonna be a sick bumper when it is done. Def looking forward to seeing this one!
Did not mean to imply you wanted to easy way out, just saw that the Shrockworks was almost exactly what you wanted. Beyond the cad work would you happen to have access to a water jet, seems like it would be the best way to cut so many pieces. Looks like a good solid design. Are you gonna make a matching rear? Also don't forget to design/decide what type of access you are going to need for your winch.
No problem, Its just that I can buy a welder and all the steel for both the front and rear bumpers for much less than the price of a Shrockworks bumper shipped. Plus I get to learn a really cool skill (welding) that I've wanted to do for years.
A matching rear bumper design is already in the works. For the winch access, I have a pretty cool idea. I'll show pics of it in a few days.
w.o.w. that is SICK! Great job on the mockup. I would take that and paint it all black and put in the house somewhere haha. This is gonna be a sick bumper when it is done. Def looking forward to seeing this one!
wow thats a freakin crazy mock up of the bumper!
A few words about the mock-up. I am so glad I did it. I learned a lot about how to build the real one. There were things that I never thought of in CAD, but when I started playing with physical parts in my hands, realizations were made. I made several small changes to the design from my learnings with the prototype. For me, it was definitely time well spent.
dang bandit u should start selling kits of the bumper... that looks sweet! so jw if u dont mind, about how much did u spend on the bumper itself? like to buy the metal and everything else.

 Mar 4, 2010 | 07:50 AM