
86' 4runner: Lockable Storage/Console
 Nov 18, 2013 | 05:17 PM
#1
Thread Starter
Registered User
iTrader: (2)
Joined: Sep 2010
Posts: 2,716
Likes: 7
From: Tri-Cities, Wa
86' 4runner: Lockable Storage/Console
Since I don't really have any funds to work on my other builds,and I get restless and bored on my days off, I thought I'd start a new (and hopefully cheap) project. I have some 14 ga sheetmetal left over from my trailer build, so I decided that I will build a new storage center console for my 4runner. There's five criteria that I'm going to try to meet on this project.
1. Obviously a bigger storage compartment
2. Security, going to make it lockable
3. I'm going to make it taller, so I can have a usable padded armrest
4. relocation of the factory rear window switches
5. last, but not least a CUPHOLDER!!!
A few things that I haven't decided on yet is whether or not I will build the entire center console including the surround that covers the shifters up to the lower dash, or if I will just stick to building the storage portion, I guess that will come during the design stage. I need to relocate my aftermarket gages because right now they are mounted (temporarily where the stereo should be. I'm going to take some measurements and try to get a template made up tonight out of card board, I'll post some pics tomorrow.

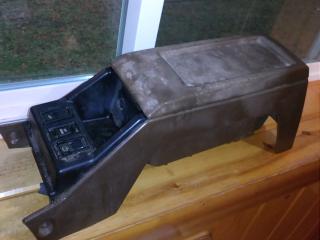
Here's a pic of the factory storage console for those of you who don't how small they are, also you can see how grimy the window toggle switches are from 30 years worth of spills and dust! Know wonder my rear window won't roll up/down, lol.
1. Obviously a bigger storage compartment
2. Security, going to make it lockable
3. I'm going to make it taller, so I can have a usable padded armrest
4. relocation of the factory rear window switches
5. last, but not least a CUPHOLDER!!!
A few things that I haven't decided on yet is whether or not I will build the entire center console including the surround that covers the shifters up to the lower dash, or if I will just stick to building the storage portion, I guess that will come during the design stage. I need to relocate my aftermarket gages because right now they are mounted (temporarily where the stereo should be. I'm going to take some measurements and try to get a template made up tonight out of card board, I'll post some pics tomorrow.

Here's a pic of the factory storage console for those of you who don't how small they are, also you can see how grimy the window toggle switches are from 30 years worth of spills and dust! Know wonder my rear window won't roll up/down, lol.
Last edited by rustED; Apr 14, 2014 at 08:23 AM.


 Nov 18, 2013 | 06:21 PM
#3
Registered User
Joined: Nov 2012
Posts: 698
Likes: 0
From: florida
Step 1 bolt old cooler to floor
Step 2 cut hole in lid and insert 3" pvc pipe cap
Step 3 duck tape Styrofoam to top of lid
Step 4 add clevis and masterlock vola all criteria met
Step 5 step back observe your handiwork and proudly proclaim your redneckness
Check this fiberglass console out you could use the same technique to make what you want
https://www.yotatech.com/forums/f115...pgrade-139770/
And as for the gages
https://www.yotatech.com/forums/f123...91/index2.html
Last edited by Stetson_md; Nov 18, 2013 at 06:23 PM.
Nov 18, 2013 | 07:41 PM
#4
Thread Starter
Registered User
iTrader: (2)
Joined: Sep 2010
Posts: 2,716
Likes: 7
From: Tri-Cities, Wa
Step 1 bolt old cooler to floor
Step 2 cut hole in lid and insert 3" pvc pipe cap
Step 3 duck tape Styrofoam to top of lid
Step 4 add clevis and masterlock vola all criteria met
Step 5 step back observe your handiwork and proudly proclaim your redneckness
Check this fiberglass console out you could use the same technique to make what you want
https://www.yotatech.com/forums/f115...pgrade-139770/
And as for the gages
https://www.yotatech.com/forums/f123...91/index2.html
Step 2 cut hole in lid and insert 3" pvc pipe cap
Step 3 duck tape Styrofoam to top of lid
Step 4 add clevis and masterlock vola all criteria met
Step 5 step back observe your handiwork and proudly proclaim your redneckness
Check this fiberglass console out you could use the same technique to make what you want
https://www.yotatech.com/forums/f115...pgrade-139770/
And as for the gages
https://www.yotatech.com/forums/f123...91/index2.html
Man, that fiberglass console is pretty sick, same with the dash/pod instrument gage holder. I might have to steal some ideas, but probably won't go with the fiberglass since I already have the sheet metal... Thanks Stetson for the links!
Nov 26, 2013 | 02:37 PM
#5
Thread Starter
Registered User
iTrader: (2)
Joined: Sep 2010
Posts: 2,716
Likes: 7
From: Tri-Cities, Wa
Sorry guys, I haven't got much done on the console, it's been so cold outside the past week, (it's been in the teens) and we get so little sun now that it's hard for me to get motivated.
Yesterday I started to work on the console a little bit. I have a carport that I work out of, and then behind that is a storage container (it basically looks like the enclosed box off a U haul truck that someone put on blocks. Anyway because of bears we lock our garbage up inside the storage container until I have enough to take to the garbage dump. Anyhow I also lock my tools up in there, well yesterday I forgot to shut the roll up door on it. When I went out there I heard something digging around in the garbage, I thought it was the neighbors cat, then jumped back when I realized it was a skunk! I tried banging on the wall of the container, throwing rocks at it, to try to scare it out of there, but nothing phased it, it just kept tearing into garbage bags. It was dark out by now, and not wanting to leave it in there I ended up shooting it with my .22 rifle. I thought since I got a perfect head shot that it wouldn't spray, but a few minutes later I could tell that it had. Anyway no more skunk, but my storage shed where all my tools are stinks beyond belief! I pulled out my welder and welding helmet today which were right next to where I shot the skunk, and my helmet smells like a skunk died in it, LITERALLY!
Yesterday I started to work on the console a little bit. I have a carport that I work out of, and then behind that is a storage container (it basically looks like the enclosed box off a U haul truck that someone put on blocks. Anyway because of bears we lock our garbage up inside the storage container until I have enough to take to the garbage dump. Anyhow I also lock my tools up in there, well yesterday I forgot to shut the roll up door on it. When I went out there I heard something digging around in the garbage, I thought it was the neighbors cat, then jumped back when I realized it was a skunk! I tried banging on the wall of the container, throwing rocks at it, to try to scare it out of there, but nothing phased it, it just kept tearing into garbage bags. It was dark out by now, and not wanting to leave it in there I ended up shooting it with my .22 rifle. I thought since I got a perfect head shot that it wouldn't spray, but a few minutes later I could tell that it had. Anyway no more skunk, but my storage shed where all my tools are stinks beyond belief! I pulled out my welder and welding helmet today which were right next to where I shot the skunk, and my helmet smells like a skunk died in it, LITERALLY!
Last edited by rustED; Nov 26, 2013 at 07:19 PM.
Jan 6, 2014 | 07:13 PM
#6
Thread Starter
Registered User
iTrader: (2)
Joined: Sep 2010
Posts: 2,716
Likes: 7
From: Tri-Cities, Wa
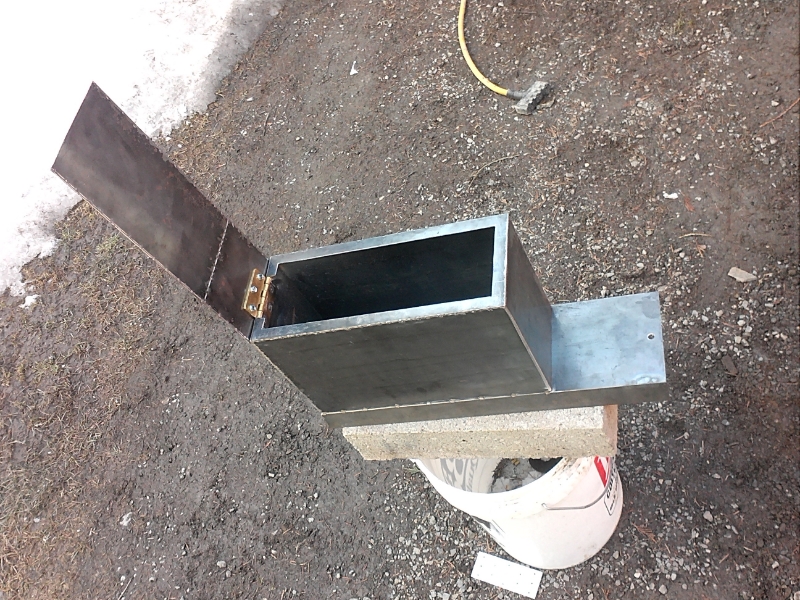
Sorry I haven't updated this thread in so long, I have made some progress, here's the pics.
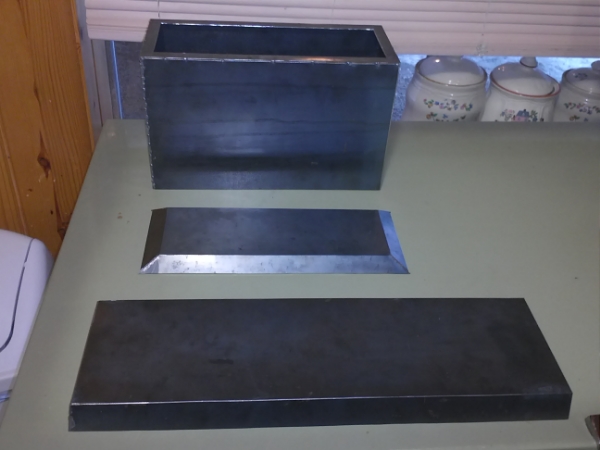
^^^this is where I am at so far, the bottom long flat looking plate will contour the floor and bolt in the stock mounting locations, the part above it is the door to the storage compartment, and the part above that of course is the compartment, it measures 14" long x 8-1/4" deep x 5-1/2" wide.

^^^The flat area in front is where the cupholders will be, still in the design stage on that

Tomorrow I'll finish tack welding everything, still need a piano hinge and a lock cylinder.

^^^this is where I am at so far, the bottom long flat looking plate will contour the floor and bolt in the stock mounting locations, the part above it is the door to the storage compartment, and the part above that of course is the compartment, it measures 14" long x 8-1/4" deep x 5-1/2" wide.

^^^The flat area in front is where the cupholders will be, still in the design stage on that


Tomorrow I'll finish tack welding everything, still need a piano hinge and a lock cylinder.
Last edited by rustED; Jan 6, 2014 at 07:16 PM.
Apr 14, 2014 | 08:30 AM
#7
Thread Starter
Registered User
iTrader: (2)
Joined: Sep 2010
Posts: 2,716
Likes: 7
From: Tri-Cities, Wa
I haven't updated this in a while, I made a little progress.

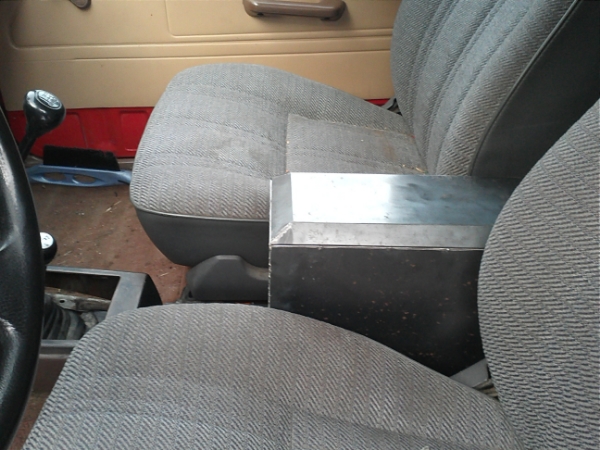
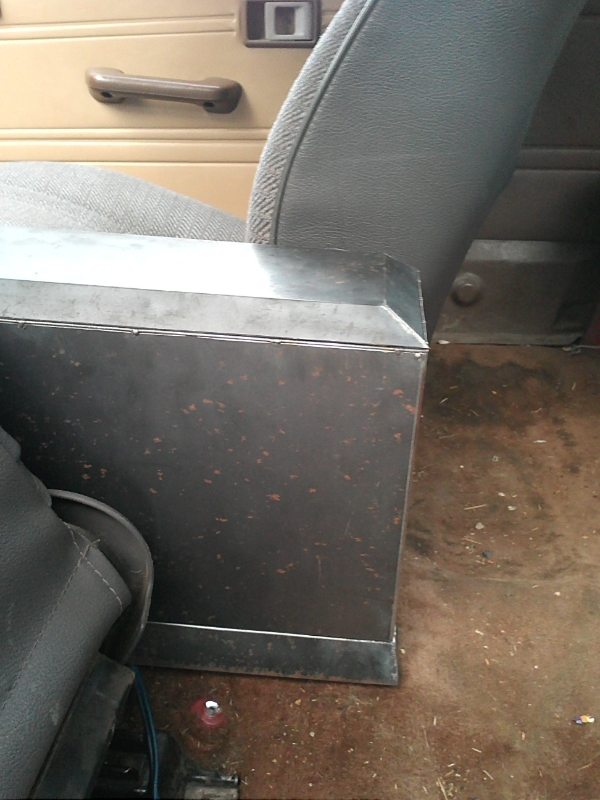
ΔΔΔ I drilled holes and got the base bolted down and mocked into place. I used the 2 factory console mounting holes in the back, but tapped them to accept a standard course thread 1/4" bolt since I didn't have any metric bolts long enough. In the front I drilled a hole threw the floor, and was able to reach through where the t-case shifter hole is and put a nut on the other side and tighten it.
ΔΔΔ After getting the base bolted down where I wanted it, I went ahead and tack welded the storage box part to the base, and then mounted the hinge and lid. The hinge is welded to the inside of the console, the lid is screwed on.

I also got the hole drilled and the lock cylinder mounted, didn't get any pics of that. Today I'll finish up welding the base, and hopefully get the cup holder design figured out.

ΔΔΔ I drilled holes and got the base bolted down and mocked into place. I used the 2 factory console mounting holes in the back, but tapped them to accept a standard course thread 1/4" bolt since I didn't have any metric bolts long enough. In the front I drilled a hole threw the floor, and was able to reach through where the t-case shifter hole is and put a nut on the other side and tighten it.

ΔΔΔ After getting the base bolted down where I wanted it, I went ahead and tack welded the storage box part to the base, and then mounted the hinge and lid. The hinge is welded to the inside of the console, the lid is screwed on.

I also got the hole drilled and the lock cylinder mounted, didn't get any pics of that. Today I'll finish up welding the base, and hopefully get the cup holder design figured out.
Last edited by rustED; Apr 14, 2014 at 09:02 AM.
Trending Topics


 Apr 16, 2014 | 05:18 AM
#10
Thread Starter
Registered User
iTrader: (2)
Joined: Sep 2010
Posts: 2,716
Likes: 7
From: Tri-Cities, Wa
Thanks man, I just need to finish up some welds, grind them down, add some padding and upholster the arm rest. I'm still trying to decide on what to do on the base of the console, paint or upholster the rest of it, haven't decided yet.
Last edited by rustED; Apr 16, 2014 at 10:40 PM.
 Apr 20, 2014 | 10:53 AM
#16
Thread Starter
Registered User
iTrader: (2)
Joined: Sep 2010
Posts: 2,716
Likes: 7
From: Tri-Cities, Wa
Thanks bud! I'm pretty happy with how its turning out, I left it installed while driving back &forth to work this week, and its real comfortable, I can shift without my arm leaving the armrest, and I'm loving the cup holder!
This project is taking a lot longer than I had expected! Hopefully I'll make some progress on Mon, or Tues, I'm going to try to find some 3M spray on adhesive/contact cement to use for upholstering the lid/armrest. I still need to cut a slot in the underside of the lid for the lock mechanism to hook into, I'll post some pics of my progress.
Last edited by rustED; Apr 20, 2014 at 10:57 AM.
Apr 20, 2014 | 11:01 AM
#17
It looks great. I think you could even get some single spray cans of bedliner. I think duplicolor sells it at advanced auto parts. 3m also has a fabric adhesion spray as well that you should be able to get at a local parts house.
I Long for a cup holder like that. The more I look at your progress on it, te more it makes me want to build one.
I Long for a cup holder like that. The more I look at your progress on it, te more it makes me want to build one.
Apr 20, 2014 | 01:10 PM
#18
Thread Starter
Registered User
iTrader: (2)
Joined: Sep 2010
Posts: 2,716
Likes: 7
From: Tri-Cities, Wa
It looks great. I think you could even get some single spray cans of bedliner. I think duplicolor sells it at advanced auto parts. 3m also has a fabric adhesion spray as well that you should be able to get at a local parts house.
I Long for a cup holder like that. The more I look at your progress on it, te more it makes me want to build one.
I Long for a cup holder like that. The more I look at your progress on it, te more it makes me want to build one.
You should build one! If I could have made mine 1" taller I think it would have been perfect height, but I was limited by the dimensions of the scrape metal I had left over from my trailer build. I think once I add the padding and fabric to the armrest it should be pretty good. I still need to relocate my switches to the dash too.
Apr 20, 2014 | 01:58 PM
#19
Yeah that's what I was thinking, was the duplicolor single spray cans, hopefully I can find them, where I live all we have is a Walmart, Auto zone, and Napa, lol. You should build one! If I could have made mine 1" taller I think it would have been perfect height, but I was limited by the dimensions of the scrape metal I had left over from my trailer build. I think once I add the padding and fabric to the armrest it should be pretty good. I still need to relocate my switches to the dash too.


