
Idler Arm Brace
 Oct 5, 2011 | 11:17 PM
#1
Thread Starter
Registered User
Joined: Jun 2009
Posts: 977
Likes: 4
From: Southern California
Idler Arm Brace
Some of you Yotatech readers might remember from previous post that I was building my own Idler Arm braces. My creation was simple, easy to build, and functional. I even posted some sketches and dimensions for you all to build your own based on my design. I am not sure if anyone ever did? Anyhow the concept of my design was decent and it performed well over the years. In any case I suspect not many people want to bother with welding and fabrication. I think a bolt-on unit makes more sense.
So, I built it! Then I tested it! There is a local spot with a trail that is a "frame twister" and I have found it will bend an un-braced idler arm every time. I have witnessed it happen on my rigs as well as some of my acquaintances rides. I took my new design on the frame twister over and over, trying to do damage, but nothing bent. Then a few weeks ago I did a 40 mile hot lap on the race course in the Mojave Desert at the M.O.R.E. chilly cook off. It held up great in the desert race environment as well.
So, I built it! Then I tested it! There is a local spot with a trail that is a "frame twister" and I have found it will bend an un-braced idler arm every time. I have witnessed it happen on my rigs as well as some of my acquaintances rides. I took my new design on the frame twister over and over, trying to do damage, but nothing bent. Then a few weeks ago I did a 40 mile hot lap on the race course in the Mojave Desert at the M.O.R.E. chilly cook off. It held up great in the desert race environment as well.
Last edited by BlazeN8; Oct 5, 2011 at 11:23 PM.
Oct 5, 2011 | 11:17 PM
#2
Thread Starter
Registered User
Joined: Jun 2009
Posts: 977
Likes: 4
From: Southern California
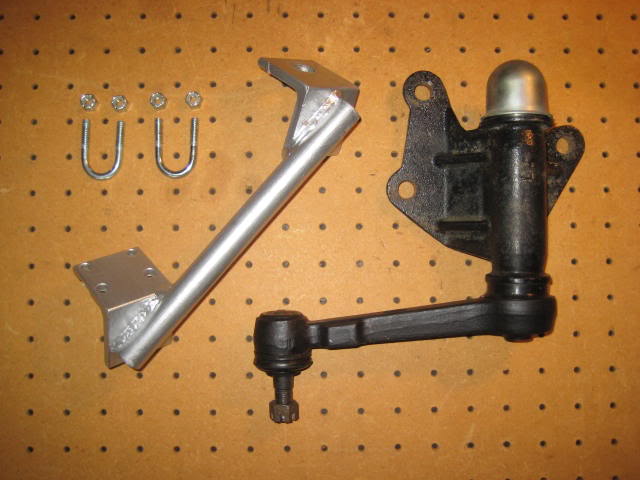
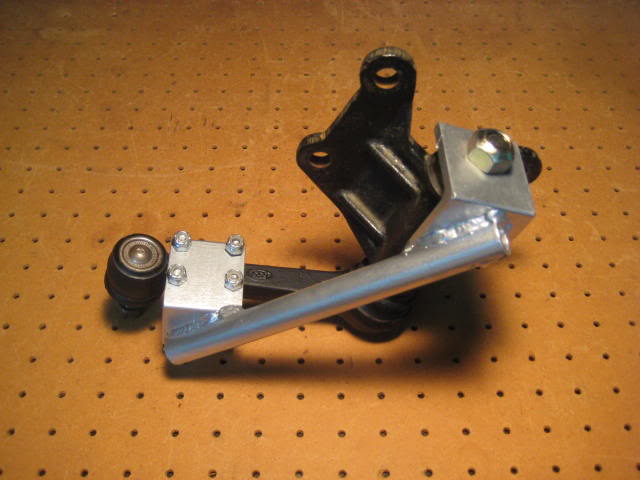
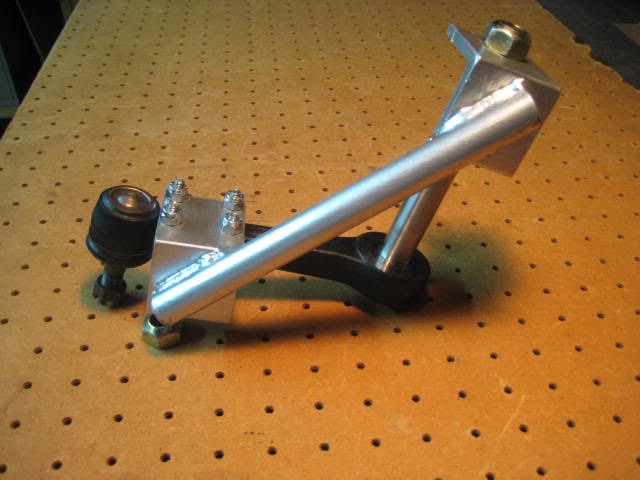
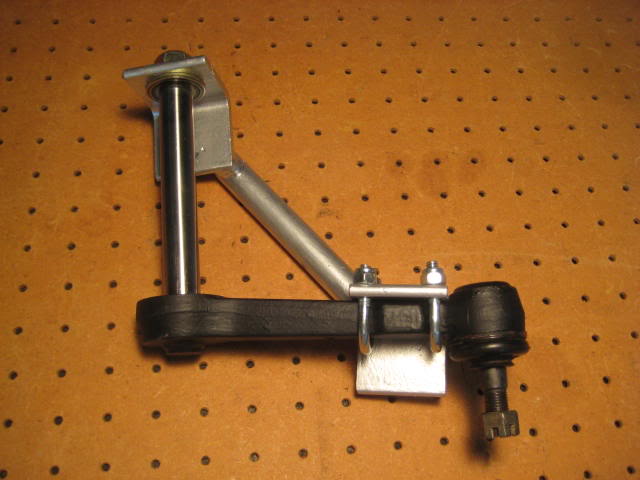
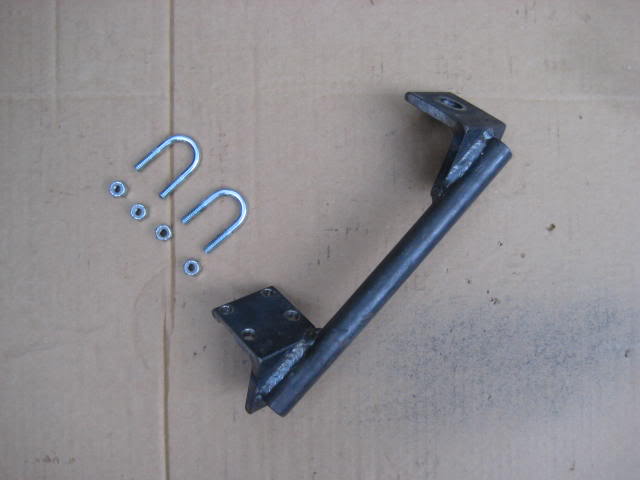
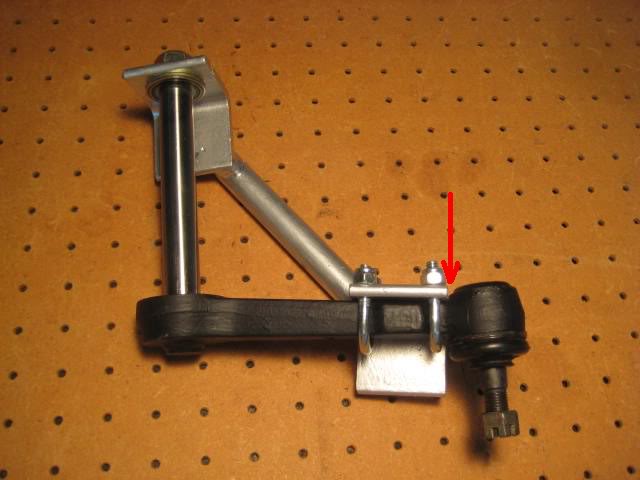
The basic form of this design is achieved by adding a diagonal brace to a cantilever form. This brace triangulates the geometry and shortens the moment arm. The Idler arm assembly has a vertical rod that has a lip machined into the top (just below the threads) One end of my brace bolts onto this lip and the other end bolts onto the arm with U-bolts. Once everything is tightened up there is little chance things are going to bend.
Last edited by BlazeN8; Oct 5, 2011 at 11:25 PM.
Oct 5, 2011 | 11:18 PM
#3
Thread Starter
Registered User
Joined: Jun 2009
Posts: 977
Likes: 4
From: Southern California
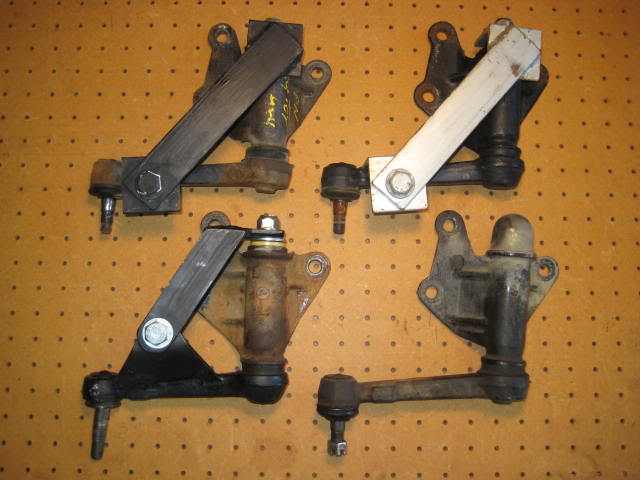
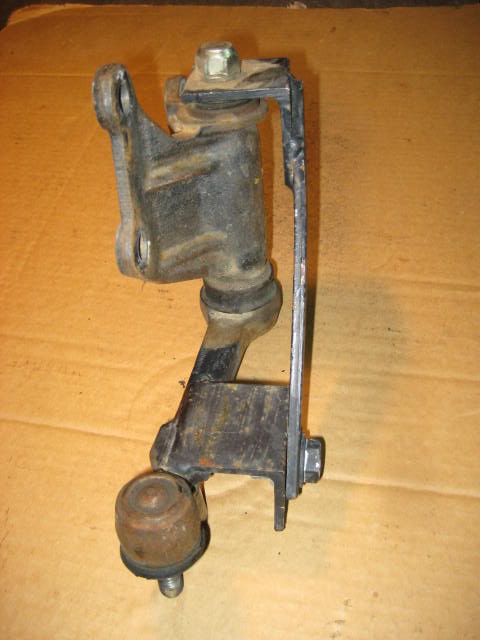
Here are a few variations I've built over the years (fig. C1). The bottom left was the first. It was worn out, bent, and had a lot of slop in the bushings, perfect for experimenting with! When I welded the angle onto the arm the heat transferred thru to the rod end bushings melted the internals, oops! The next attempt I wrapped with a wet rag and mellowed out on the heat so as to not melt the internals. The one on the upper right is currently on my 4 Runner and has been for years. The one on the upper left was on my Fordota, but it eventually wore out and needed replacement. It still works but is sloppy and it is slightly bowed from years of abuse. If you look at the close up photo you can see the brace is bowed out (fig.C2). That brace held up for years of abuse including jumping and pre-running.
Last edited by BlazeN8; Oct 5, 2011 at 11:28 PM.
Oct 5, 2011 | 11:18 PM
#4
Thread Starter
Registered User
Joined: Jun 2009
Posts: 977
Likes: 4
From: Southern California
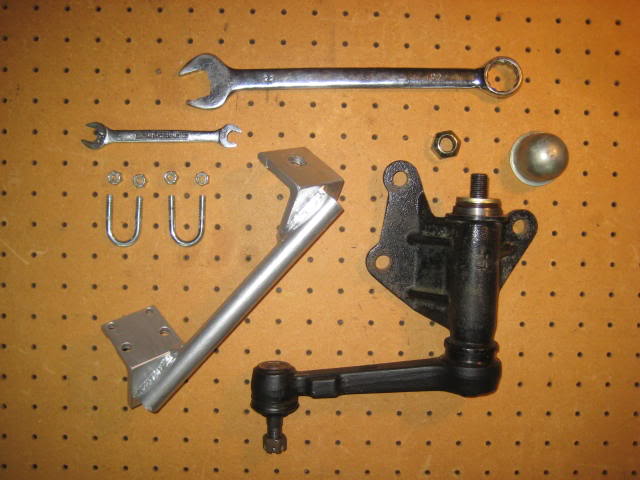
Installation is extremely simple and requires a 22mm and 7/16" wrench or socket. You don't even need to take the unit off the truck (if nothing has been bent from previous abuse) Just pop off the dust cap and loosen the large nut with a 22mm socket. A breaker bar may be needed as this is a large high torque nut with a top-lock. Now remove the nut, but not the captured washer. The idler arm brace now just installs onto the shaft on top of the washer. Replace the nut and tighten it down but not with any torque. Now connect the other side of the brace to the rod-end portion of the idler arm with the u-bolts. Tighten the u-bolts nuts a little at a time then move to the large nut; work your way back and forth between the u-bolts and the large nut until everything is tight.
Last edited by BlazeN8; Oct 5, 2011 at 11:29 PM.
Oct 5, 2011 | 11:19 PM
#5
Thread Starter
Registered User
Joined: Jun 2009
Posts: 977
Likes: 4
From: Southern California
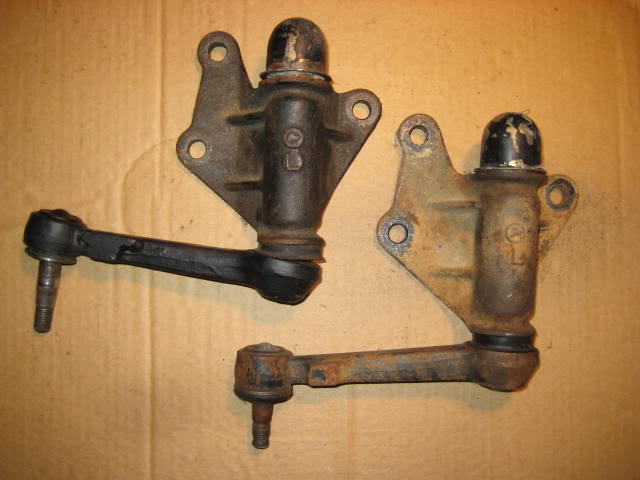
If you all ready have a bent the shaft (fig. E1 & E2) installation is more complicated as you will need to straighten it before the brace will bolt on. Don't worry, it can be bent back! Once the shaft is straightened the brace will bolt right on.
Last edited by BlazeN8; Oct 5, 2011 at 11:30 PM.
Oct 5, 2011 | 11:19 PM
#6
Thread Starter
Registered User
Joined: Jun 2009
Posts: 977
Likes: 4
From: Southern California
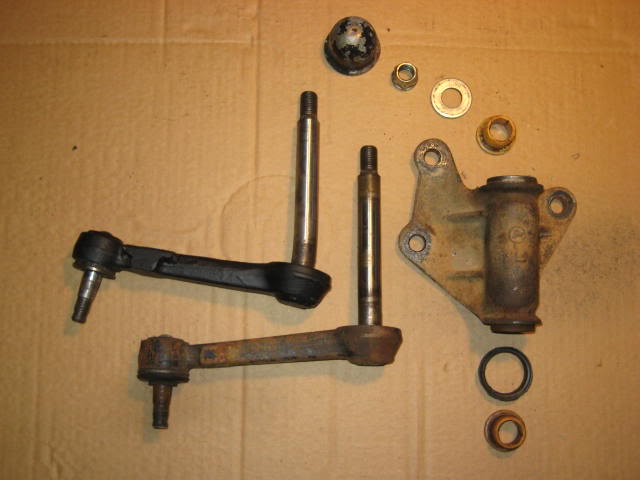
Here is how to straighten the shaft. The first thing you need to do is pop-off the dust cap and loosen the large nut as mentioned above. Just "break the nut loose" as mentioned above but don't remove it yet. Now go to the rod-end of the idler arm connected to the center link. Remove the cotter pin from the castle nut and remove the castle nut with a 19mm wrench. Then with a tie-rod-end puller press the tapered end from the center link. Now you can unbolt the three bolts connecting the idler arm to the frame. This is also 17mm socket and box wrench. Once the unit is off the truck you can perform the rest of the teardown on the workbench.
To disassemble the idler arm unit, now is when you remove the loosened top lock nut from the shaft. Once the nut has been removed you will need to hold the cast housing portion of the unit in a vice and with a hammer tap the shaft out. With the shaft out, wipe off the grease and inspect.
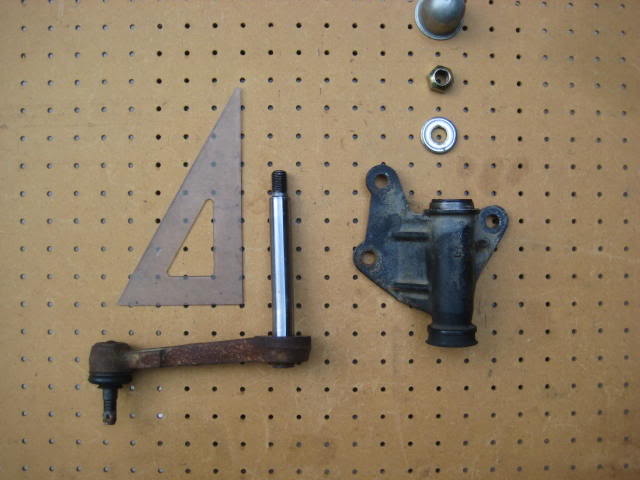
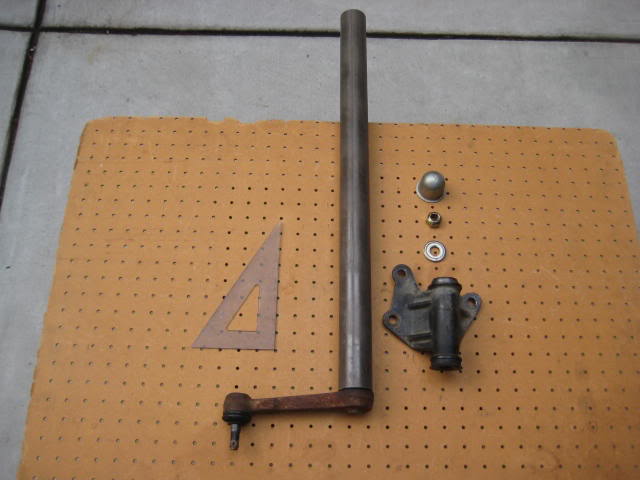
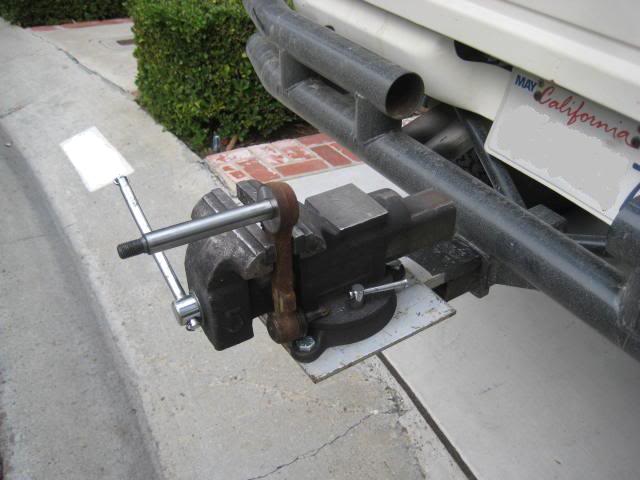
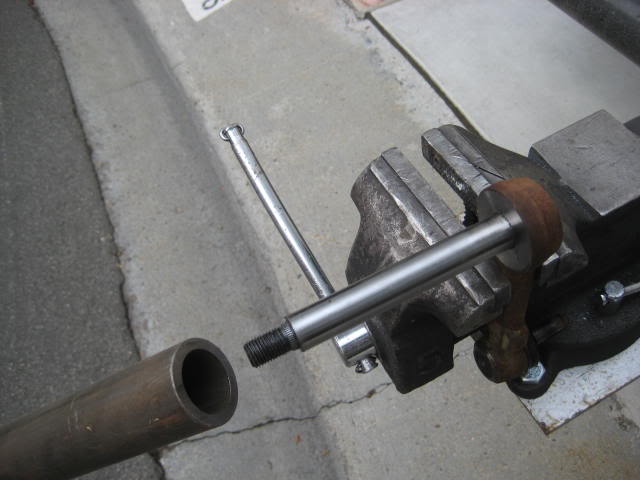
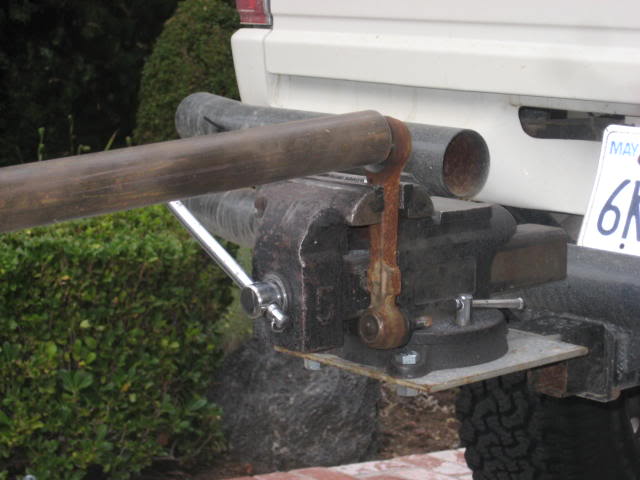
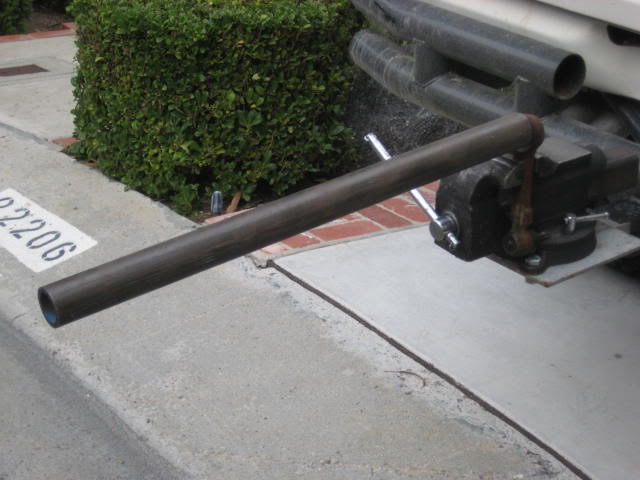
You need a right angle square to use as a guide when you straighten the shaft (fig. F1). You will also need a heavy wall pipe to slip over the bent shaft and a sturdy vice to hold it into (fig. F2 thru F6). To straighten the shaft you will have to generate a hell of a lot of force. The longer the pipe the easier it will be. The pipe I used was fairly long but I still had to get under it and squat press it with some serious muscle before bent back. Note: I mounted my vice into my receiver hitch on my truck. If I had tried it on my workbench I would have ripped the vice off my workbench. You will have to go through a straightening procedure a few times and compare it to the square until it is at 90 degrees. Once it is straight it can be re-assembled. As you re-assemble inspect the plastic bushings for damage and wear. The assembly is the reverse of the disassembly (with the addition of adding the idler arm brace)
To disassemble the idler arm unit, now is when you remove the loosened top lock nut from the shaft. Once the nut has been removed you will need to hold the cast housing portion of the unit in a vice and with a hammer tap the shaft out. With the shaft out, wipe off the grease and inspect.
You need a right angle square to use as a guide when you straighten the shaft (fig. F1). You will also need a heavy wall pipe to slip over the bent shaft and a sturdy vice to hold it into (fig. F2 thru F6). To straighten the shaft you will have to generate a hell of a lot of force. The longer the pipe the easier it will be. The pipe I used was fairly long but I still had to get under it and squat press it with some serious muscle before bent back. Note: I mounted my vice into my receiver hitch on my truck. If I had tried it on my workbench I would have ripped the vice off my workbench. You will have to go through a straightening procedure a few times and compare it to the square until it is at 90 degrees. Once it is straight it can be re-assembled. As you re-assemble inspect the plastic bushings for damage and wear. The assembly is the reverse of the disassembly (with the addition of adding the idler arm brace)
Last edited by BlazeN8; Oct 5, 2011 at 11:34 PM.
Oct 5, 2011 | 11:20 PM
#7
Thread Starter
Registered User
Joined: Jun 2009
Posts: 977
Likes: 4
From: Southern California
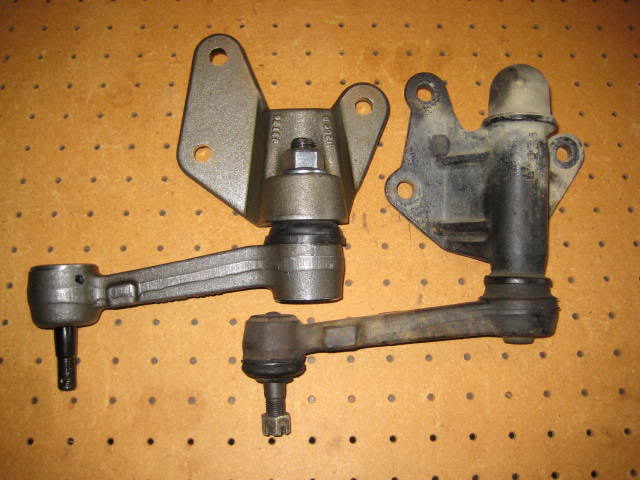
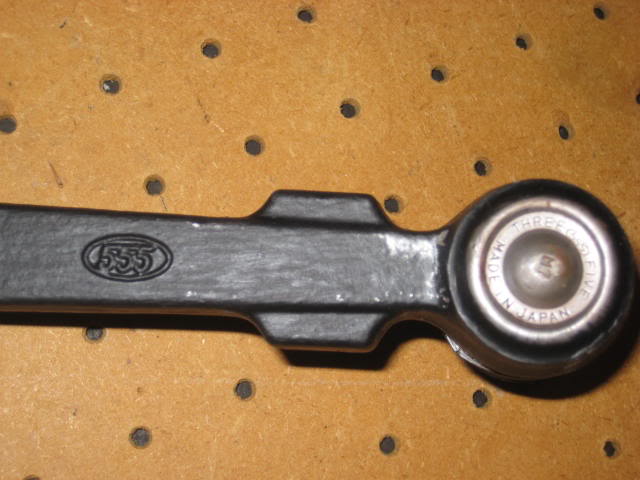
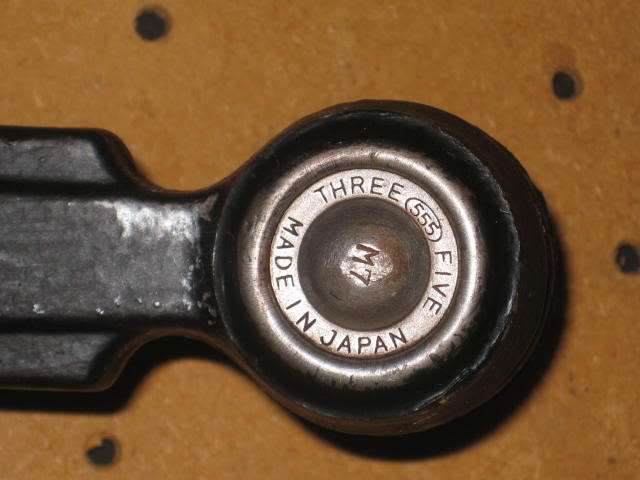
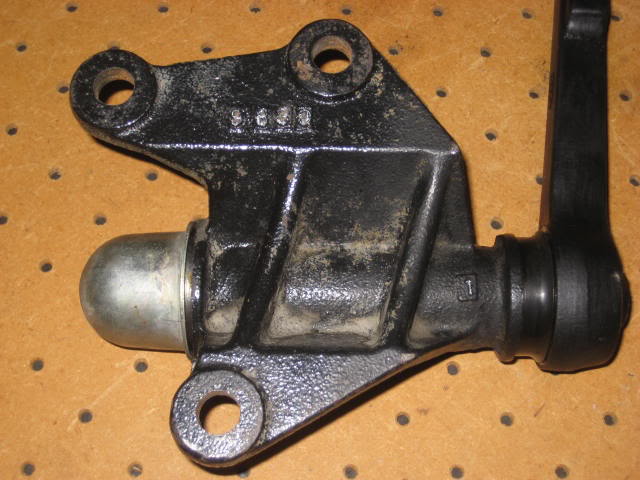
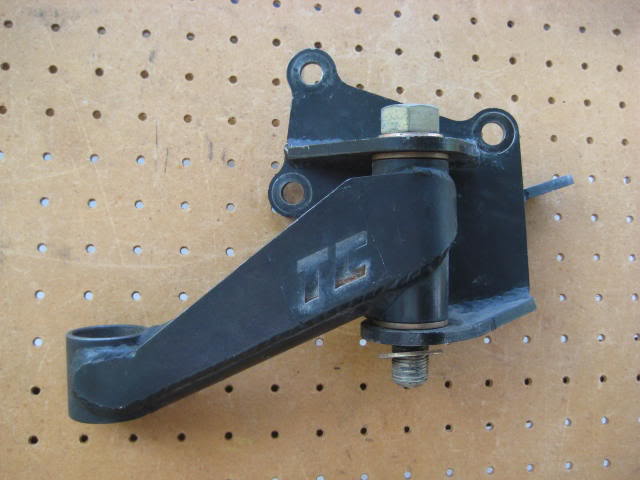
There are a number of manufactures of the idler arms. Some have larger shafts than others, but they all seem to bend when I am at the wheel. I have observed two drastic variations in design from one manufacture (fig. G1) I'll call the one on the left the "shorty style" I have tried the shorty style unit and I bent it. My Idler Arm Brace definitely will not work in the shorty style unit, and it may not work in all the different brands out there? But, I do know my design will work in the "Three Five" brand. This brand is made in Japan. I believe this is what comes on these rigs from the factory? Made in Japan is probably going to be the highest quality? Here are the markings that can be found to identify the Three Five unit. The four digit number on the back in the casting reads 9630 from what I can tell.
Last edited by BlazeN8; Oct 6, 2011 at 08:55 AM.
Trending Topics
Oct 5, 2011 | 11:51 PM
#9
Thread Starter
Registered User
Joined: Jun 2009
Posts: 977
Likes: 4
From: Southern California
No, I don't mind if you copy it.
If people are interested, I can build these braces with minimal materials and labor in house. I don't need to deal with my laser cutter. I don't need to send out to have brackets bent on a brake. There is no powder coat painting expense. You paint them yourself and you pick the color. Just bolt it on your ride and you’re done. No more bent idler arms. I estimate a retail price at $39. That is for the brace, the u-bolts and nylon lock nuts. I may eventually be adding it to the Blazeland website, but I though I’d offer it here on Yotatech first.
If people are interested, I can build these braces with minimal materials and labor in house. I don't need to deal with my laser cutter. I don't need to send out to have brackets bent on a brake. There is no powder coat painting expense. You paint them yourself and you pick the color. Just bolt it on your ride and you’re done. No more bent idler arms. I estimate a retail price at $39. That is for the brace, the u-bolts and nylon lock nuts. I may eventually be adding it to the Blazeland website, but I though I’d offer it here on Yotatech first.
Last edited by BlazeN8; Oct 5, 2011 at 11:52 PM.


 Oct 6, 2011 | 02:50 PM
#11
oh man, i'm definitely fabbing up one of these ASAP. i WAS gonna try to fab up one like the old Downey brace ever since upping to 33s, but yours is a much simpler design and looks like it "triangulates" better.
have you tried this type of bracing on the Autozone idler that SDORI makes the brass bushings for?
have you tried this type of bracing on the Autozone idler that SDORI makes the brass bushings for?
Oct 6, 2011 | 06:31 PM
#12
Thread Starter
Registered User
Joined: Jun 2009
Posts: 977
Likes: 4
From: Southern California
No, I haven't tried it on an SDORI compatible one, but its likely it will fit. Having brass bushings instead of the plastic might prolong the bushing life and durability. Then again the plastic bushings will spring back under impact loads where the brass is more likely to deform and stay deformed. Think of a dead blow brass hammer vs a rubber mallet! SDORI mentions the deformation characteristics of the brass on their website.
Oct 9, 2011 | 06:53 AM
#13
Registered User
Joined: Feb 2004
Posts: 129
Likes: 0
This is perfect. In early Nov I'm running in the ECORS big race at Windrock, suposedly 60 miles of abuse... just replaced the idler and bushings, been thinking about a brace option.
If this approach survives that, it will survive anything.
FYI I'm sitting here looking at a "555" arm, and a new FA540 picked up from Autozone (the one SBORI's brass bushings fit) and teh outside looks identical.
IIRC the only difference between those models is the internal shank size, the FA5040 is ever so slightly bigger.
Last edited by RatLabGuy; Oct 9, 2011 at 06:55 AM.
Oct 9, 2011 | 08:46 AM
#14
Registered User
Joined: Oct 2008
Posts: 1,621
Likes: 7
From: Sacramento, Crawlifonia
This is perfect. In early Nov I'm running in the ECORS big race at Windrock, suposedly 60 miles of abuse... just replaced the idler and bushings, been thinking about a brace option.
If this approach survives that, it will survive anything.
FYI I'm sitting here looking at a "555" arm, and a new FA540 picked up from Autozone (the one SBORI's brass bushings fit) and teh outside looks identical.
IIRC the only difference between those models is the internal shank size, the FA5040 is ever so slightly bigger.
If this approach survives that, it will survive anything.
FYI I'm sitting here looking at a "555" arm, and a new FA540 picked up from Autozone (the one SBORI's brass bushings fit) and teh outside looks identical.
IIRC the only difference between those models is the internal shank size, the FA5040 is ever so slightly bigger.
Oct 9, 2011 | 09:20 AM
#15
Registered User
Joined: Aug 2009
Posts: 13,574
Likes: 72
From: Wilkes-Barre, PA, USA
Looks good. I have the FA5040 SDORI compatible idler if ya wanna send me one to prototype fit.  $39 isn't bad. I think I'd sport one.
On a side note, I think a while back I had bent my pitman arm. I wonder if the same concept can be used.
$39 isn't bad. I think I'd sport one. On a side note, I think a while back I had bent my pitman arm.
I wonder if the same concept can be used.
Last edited by xxxtreme22r; Oct 9, 2011 at 09:21 AM.
Oct 9, 2011 | 12:21 PM
#16
Registered User
Joined: Jan 2007
Posts: 6,106
Likes: 27
Looks like a winner.
There's only one flaw in the design, if you can call it that.
In my experience with these idler arms, braces, bushings, and their durability under severe duty, I've found there to be another area of weakness that's been ignored. Even with my heavily modified(larger shaft, bronze bushings, brace) idler arm, I've still managed to bend something. The tie rod end part that's unbraced (red arrow in pic below). It will bend up, eventually, with enough force applied. Been there, done it. Haven't snapped it off, like I have the shaft once though. Not yet that is...
Try bending that back with a steel bar!
It'll take a bit more than that. Like an oxy-ace torch and some BFH'n on it. After you remove the tie rod components from it of course...
Still trying to figure a way to brace it all the way to the tip...haven't yet. Probably will someday...
Last edited by MudHippy; Oct 9, 2011 at 12:22 PM.
Oct 9, 2011 | 09:39 PM
#17
Thread Starter
Registered User
Joined: Jun 2009
Posts: 977
Likes: 4
From: Southern California
Thanks for the heads up Mudhippy! I can see the area you highlighted (with the red mark) as being another next weak point. I personally have not experienced or witness this area failing but it wouldn't surprise me at all. My advice to people who are bending and breaking the idler arms under the "severe duty situations" like you: skip the brace, skip the bronze bushings, skip the thicker shaft hunting, etc. just go with a TC King Kong unit! Albert has one on the Mantruck, it works awsome! I even took the thing off the truck a while back and took it apart for a little reverse engineering of the Alien technology. I have to say it is a really well engineered product. To build something to match its quality and performance would take a lot of effort and expense!
I try to inspect my Idler Arm after sever use before getting back on pavement. Usually after I hit something hard the next time I stop for a break, I do a quick once-over and the idler arm is always on the check list. Yesterday I was running a high speed wash in Ocitillo Wells and came up on a ravine that washed out. It was passable at crawl speed but I was doing 40mph and there no chance of stopping or even slowing much for this one. When it happens all you can do is get on the gas pedal! I popped over this one but it was a huge hit! Nothing bent or broke. My passenger visiting from Arizona was impressed with Blazeland. He usually drives a yota rock buggy but he was ridding beyatch on this trip. He is a more hard core aggressive off-roader than than I, so I appreciate his observations and approval. He said he was surprised after ridding with me how well it sucked up the bumps and that the he wasn't slamming his head on the roof mobb'en through the desert as hard as we were. As a side note, back in January he was wheeling with me in his rock buggy. Here it is on its lid!
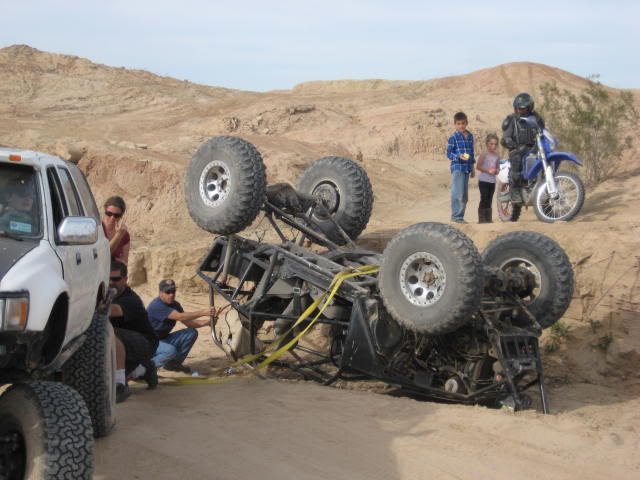
I try to inspect my Idler Arm after sever use before getting back on pavement. Usually after I hit something hard the next time I stop for a break, I do a quick once-over and the idler arm is always on the check list. Yesterday I was running a high speed wash in Ocitillo Wells and came up on a ravine that washed out. It was passable at crawl speed but I was doing 40mph and there no chance of stopping or even slowing much for this one. When it happens all you can do is get on the gas pedal! I popped over this one but it was a huge hit! Nothing bent or broke. My passenger visiting from Arizona was impressed with Blazeland. He usually drives a yota rock buggy but he was ridding beyatch on this trip. He is a more hard core aggressive off-roader than than I, so I appreciate his observations and approval. He said he was surprised after ridding with me how well it sucked up the bumps and that the he wasn't slamming his head on the roof mobb'en through the desert as hard as we were. As a side note, back in January he was wheeling with me in his rock buggy. Here it is on its lid!
Last edited by BlazeN8; Oct 18, 2011 at 09:59 AM. Reason: language
Oct 9, 2011 | 10:06 PM
#18
Registered User
Joined: Oct 2008
Posts: 1,621
Likes: 7
From: Sacramento, Crawlifonia
N8 stop all this talk about the Blazeland kit. Its bad enough I have too look at my kit sitting here for the next few weeks. I can't do the install until I move on the 14th. LOL.
I think we would also like to see more vids of your truck in action, not just reading about it man. I'll do my best to capture vid. on my end here.
I think we would also like to see more vids of your truck in action, not just reading about it man. I'll do my best to capture vid. on my end here.
Oct 10, 2011 | 06:54 AM
#19
Registered User
Joined: Feb 2004
Posts: 129
Likes: 0
I've been through 4 idler arms.
3 of them (the FA5040) bent in the same place that MudHippy points out.
I have an idea I might try to help out. This afternoon I'm making up my own version of Nate's design.
However I'm thinking I might try drilling and tapping a hole in the top of the "head" of the balljoint, like would be there if it were setup for a grease fitting. Then put an extra piece of plate on top of the angled one shown here, that also goes over the balljoint head. Then use the hole to bolt that in. That way at least the play supports the top to keep that "neck" from bending. May even use angle instead of flat plate.


