
habanero's 1996 4Runner Build-Up Thread
 Aug 29, 2022 | 04:22 PM
#4401
Thread Starter
Contributing Member


Joined: Sep 2005
Posts: 8,247
Likes: 497
From: mo
Last edited by habanero; Aug 29, 2022 at 04:32 PM.
Aug 29, 2022 | 04:49 PM
#4402
Thread Starter
Contributing Member
Joined: Sep 2005
Posts: 8,247
Likes: 497
From: mo
I got lucky when I had to replace the pressure lines on my pickup. I had loaned it to my middle daughter when she as stationed at Camp Pendleton, California. Only a couple hours from Yuma, where we lived at the time. She learned to drive in the truck, and fell in love with it, and needed a vehicle, so what the heck. She got the base's hydraulic shop at the motor pool to make her brand new hoses. It helps to get stuff like that done if you're a tall, beautiful, blonde Marine.
Sorry, little stroll down memory lane...
Pat☺
Sorry, little stroll down memory lane...
Pat☺

Parts and labor to have the line rebuilt shouldn't be too bad though, if I gotta go that route.
Gotta love 26 year old rubber.
Sep 15, 2022 | 05:35 PM
#4403
Thread Starter
Contributing Member
Joined: Sep 2005
Posts: 8,247
Likes: 497
From: mo
96 4Runner 324,757 miles- It forgot how to move.
There's a lot going on under the skirts of the old jalopy these days...mostly it's called waiting on parts.
I did finally order and receive o-rings for the e-locker from McMaster Carr.
oe o-rings on the top, McM o-rings on the bottom.
Unfortunately you have to buy a lot...
I chose (hopefully this works)
1295n248 Chemical-Resistant Viton� Fluoroelastomer (10)
2mm wide x 20.5 ID x 24.5 OD
90025K222 X-Profile Oil-Resistant Buna-N O-Ring, (100...I almost didn't buy this one because 100 is a lot, but the old one is pretty hard so...)
3/32 Fractional Width, 0.362 id x 0.568 od
1295N267 Chemical-Resistant Viton� Fluoroelastomer (5)
2 mm Wide, 54 mm ID x 58 mm OD
1295N275 Chemical-Resistant Viton� Fluoroelastomer O-Ring (5)
2mm wide, 72mm ID x 76mm OD
They seem to be darned close size-wise, the magnet housing is maybe a millimeter too big, but does fit within the groove.
Hoping to find the time to put the e-lockers back together tomorrow, with a pic or two.
We have a total of 3 e-lockers. The 3 bolts for one of the magnet housings I bought from the local Ace Hardware.
You can get a kit with 3 hex head bolts, 3 washers, and 3 phillips-head bolts, plus the 4 o-rings from LandTank Products for $32 bucks + shipping....for me that's $39.50 (!)
If I got the McMaster Carr stuff right the pile of o-rings cost me a little over that and I'll be able to do all 3 e-lockers. I did have to buy the magnet housing bolts too, the actuator housing bolts are fine.
RTV would have been a heck of a lot cheaper...
I also bought
20 button head hex drive bolts M8 x 1.25mm x 40mm 10.9
50 hex nut m8 x 1.25mm class 10
50 washers m8 10.9
for another soon upcoming underbelly project
Last edited by habanero; Sep 15, 2022 at 05:39 PM.
Sep 17, 2022 | 05:24 PM
#4404
Thread Starter
Contributing Member
Joined: Sep 2005
Posts: 8,247
Likes: 497
From: mo
96 4Runner 324,757 miles
On our trip the oil stayed in the transmission like it was supposed to, but I noticed a small amount more in the rear transfer case and a small amount less in the Taco Box.
Talking to Marlin they felt the rear case input shaft seal is the culprit, and that seems logical so...
Changed the transfer case input seal today.
Hardest part was separating the two transfer cases. I already have the transmission/taco/transfer case out and the transmission/transfer cases separated, it was easy enough to pull the cases out from under the truck.

As simple as pulling the old seal out from around the input shaft and replacing it. I put the new seal in the freezer while I pulled the old one, then oiled the surfaces and tapped the new one in place.

PS. Imgur is still being annnoying...sorry about the image sizes.
On our trip the oil stayed in the transmission like it was supposed to, but I noticed a small amount more in the rear transfer case and a small amount less in the Taco Box.
Talking to Marlin they felt the rear case input shaft seal is the culprit, and that seems logical so...
Changed the transfer case input seal today.
Hardest part was separating the two transfer cases. I already have the transmission/taco/transfer case out and the transmission/transfer cases separated, it was easy enough to pull the cases out from under the truck.
As simple as pulling the old seal out from around the input shaft and replacing it. I put the new seal in the freezer while I pulled the old one, then oiled the surfaces and tapped the new one in place.
PS. Imgur is still being annnoying...sorry about the image sizes.
Last edited by habanero; Sep 18, 2022 at 05:50 AM.
Sep 18, 2022 | 09:31 AM
#4405
Thread Starter
Contributing Member
Joined: Sep 2005
Posts: 8,247
Likes: 497
From: mo
96 4runner 324,757 miles
Annnd the whole reason the old thing hasn't moved for awhile...
My re-rebuilt transmission has never been quiet, but I chalked it up to being so spoiled by how quiet the transmission I destroyed was.
An aside: when I asked that the seal they sent with the second one be the type they installed in the 3rd (!) one they said there was only one seal- the eco-seal. I sent pics of the seal they originally sent with the Taco box and the one that came with the second transmission...the first one was the wrong seal. It fit well enough, but it allowed the taco box to pulled the oil out of the transmission. Had I checked the transmission instead of the taco box I would not have fried the transmission...but would have had to buy a lot of oil and checked it A LOT to have saved it. Anyhow...it wasn't me! It was the wrong seal. Still, if I had checked both taco box and transmission instead of just taco box....that did make it me. Still, I thought I'd installed something wrong, though it's pretty simple with a built unit.
So the 2nd guy was a bit whiny. It was getting whinier over time and becoming a bit bothersome to Ms. What'sthatnoise, but I'd resigned myself to it. On the way back from our big trip it started making the odd 'squorp' and other odd sounds. I knew it had oil because I checked it A LOT while we were in CO/UT (lesson learned). We ditched hwy 70 at Columbia MO because people kept crashing, and took the back roads home. It was randomly making more and more noise, especially on hill climbs.
I mentioned it to Marlin when I emailed to let them know the new seal (didn't know the old one was wrong at the time) worked wonderfully. They said it was still under warranty and I could have it rebuilt. As much as I did NOT want to pull the transmission again I could not ignore the noises.
So...
My newly rebuilt transmission bell housing is on and it is in.
Whew.
Sep 19, 2022 | 04:57 AM
#4406

Registered User

Joined: Feb 2010
Posts: 748
Likes: 135
From: St. Louis MO
Strange. The oil that came out of the noisy trans had a very small amount of tiny metal bits. Some of which seemed to be aluminum, some of which was steel. But Marlin rebuilt it again under warranty, but said they didn't see anything too unusual inside?
Sep 19, 2022 | 01:26 PM
#4407
Thread Starter
Contributing Member
Joined: Sep 2005
Posts: 8,247
Likes: 497
From: mo
They said they replaced all the bearings this time, crossing fingers for a not whiny transmission that works well and keeps working and working and working. And working.
Out of the truck it's kinda clattery now, and 1st is a little iffy, but without oil...well, fingers crossed it just needs some juice....
I'm really tired of transmission situations.
Sep 21, 2022 | 03:40 PM
#4408
Thread Starter
Contributing Member
Joined: Sep 2005
Posts: 8,247
Likes: 497
From: mo
96 4runner 324,757 miles
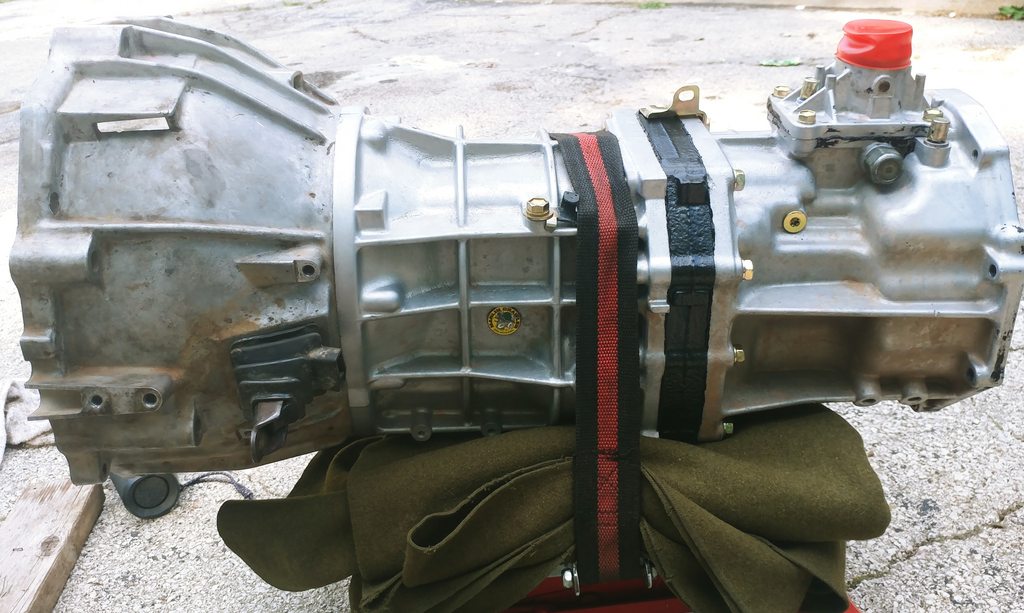
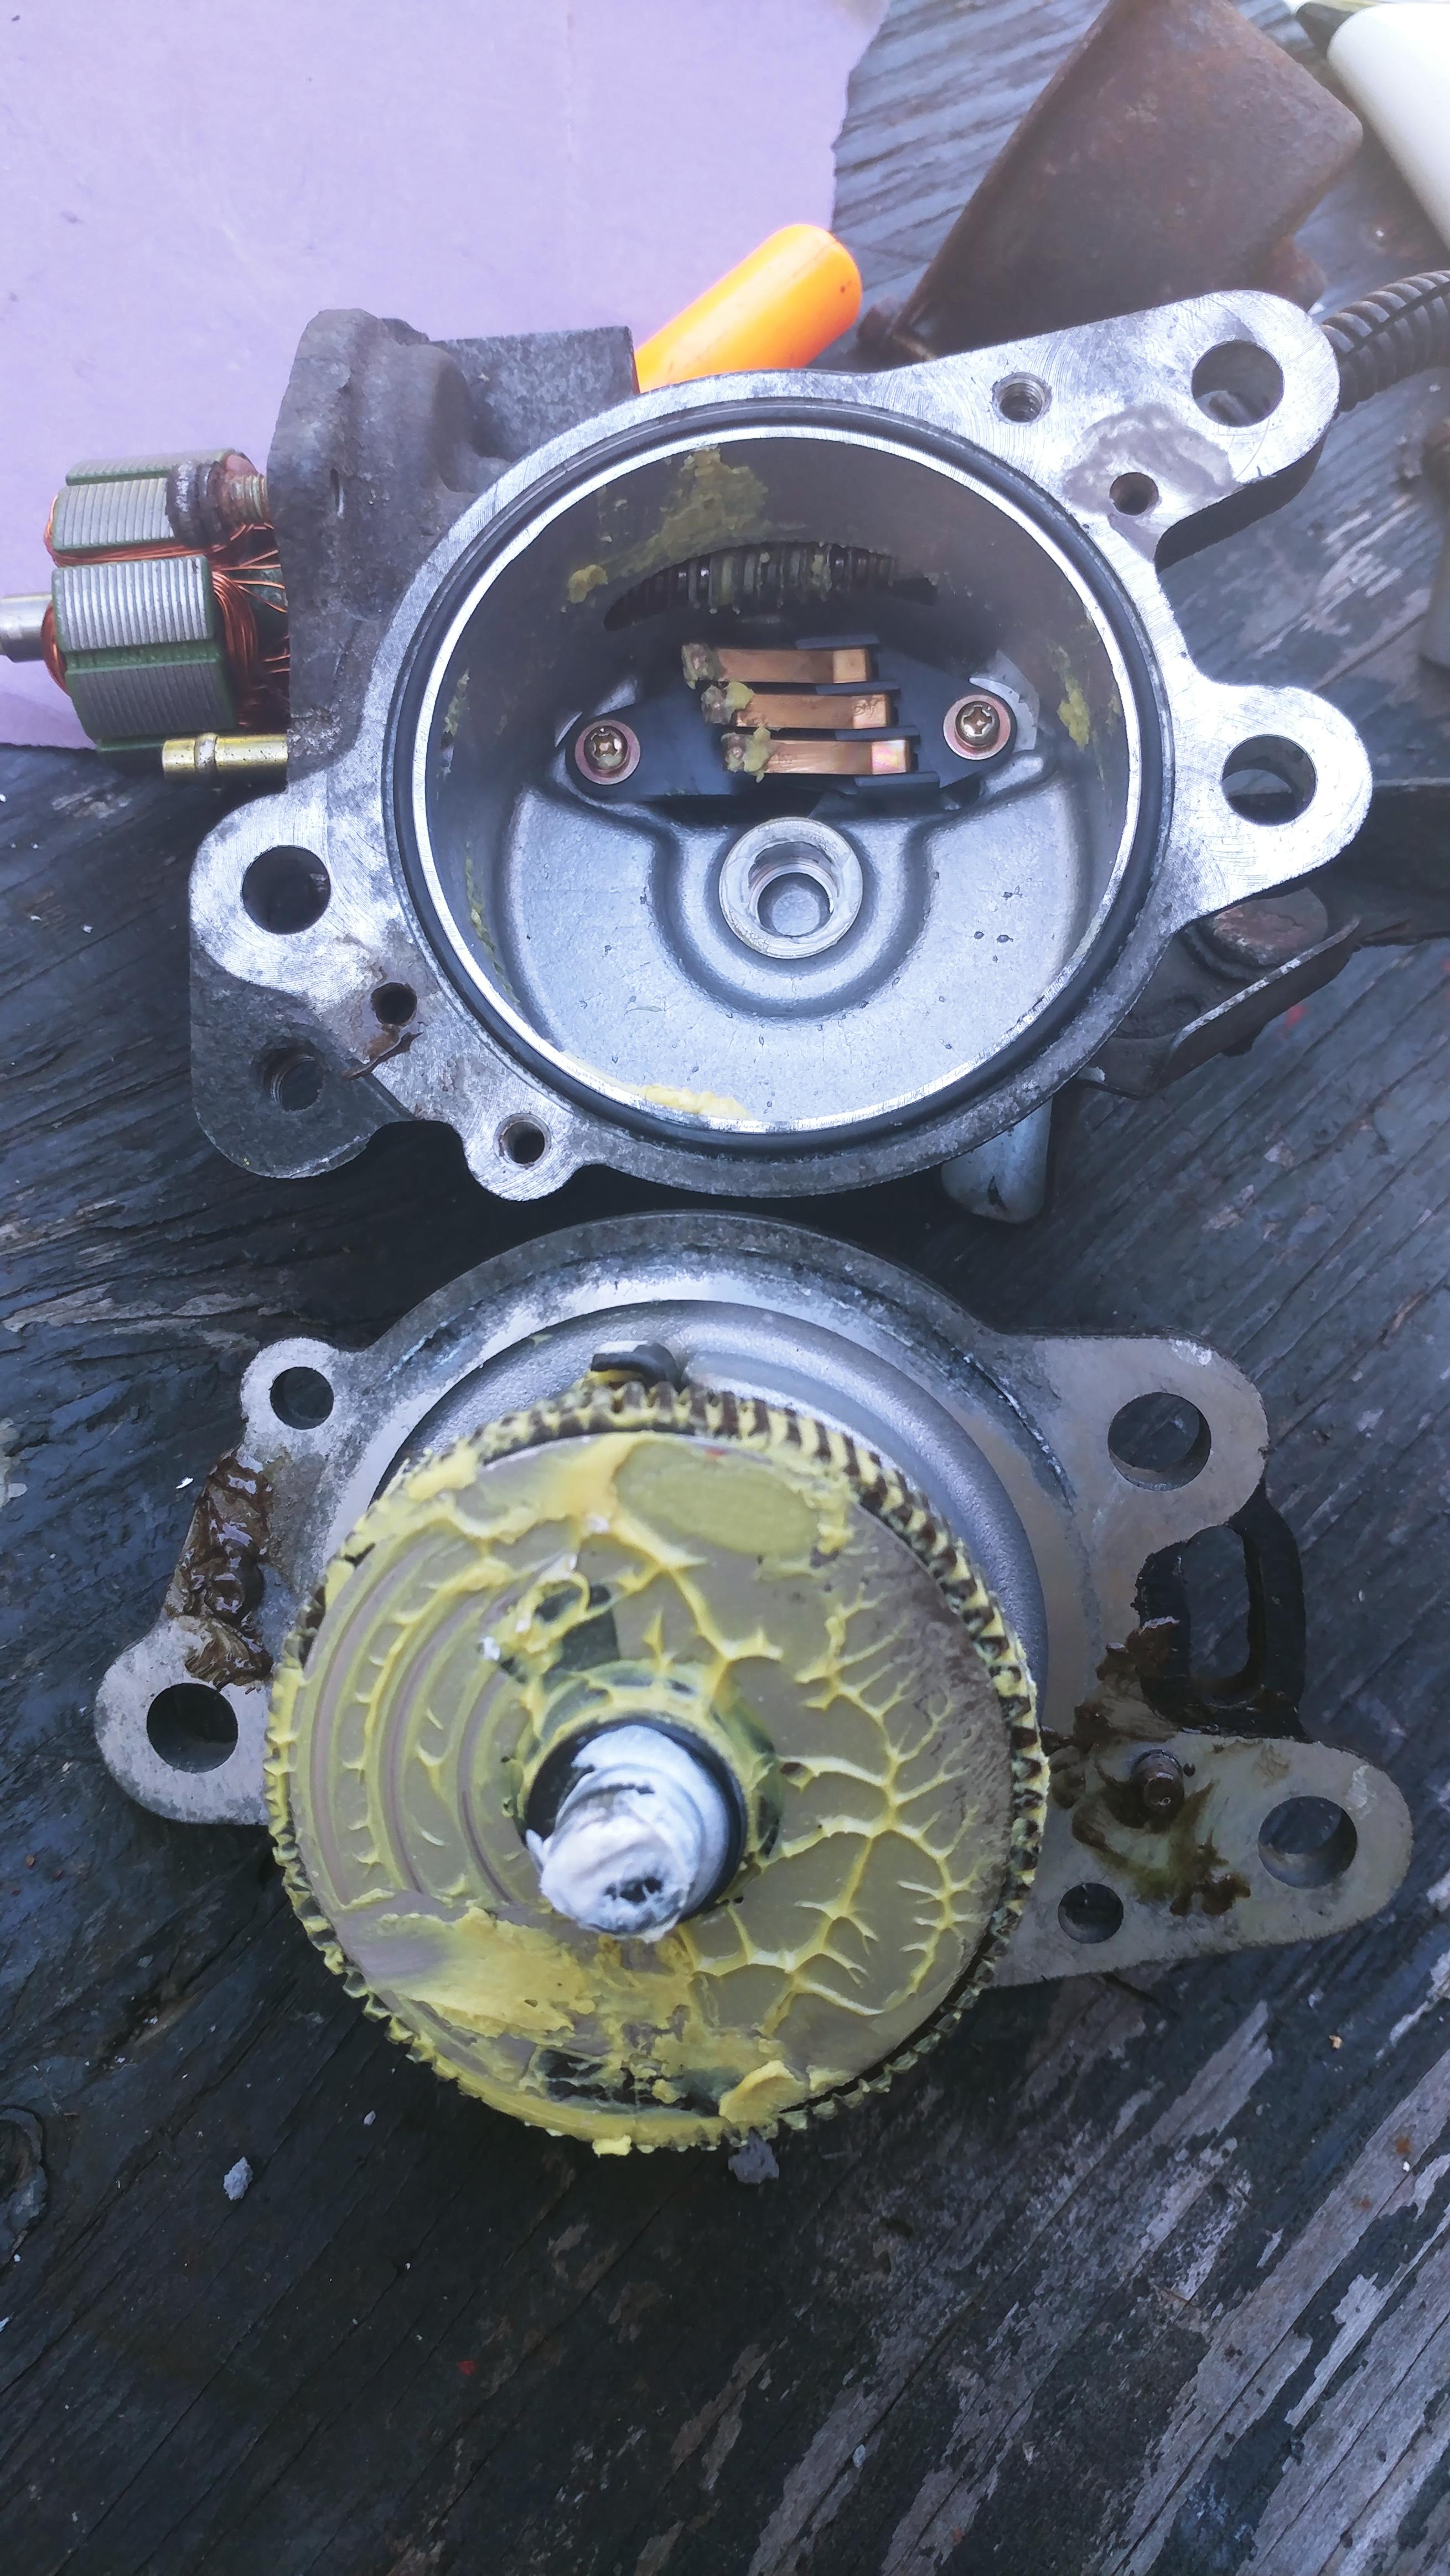
Clutch slave and line brackets installed.
Starter installed.
Though I welcome the incoming cold front of nicer temps
the thunder and darkening skies and mosquitos and the wind causing acorns to rain down from above have driven me back in.
Mostly the mosquitos.
Clutch slave and line brackets installed.
Starter installed.
Though I welcome the incoming cold front of nicer temps
the thunder and darkening skies and mosquitos and the wind causing acorns to rain down from above have driven me back in.
Mostly the mosquitos.
Sep 24, 2022 | 05:50 PM
#4409
Thread Starter
Contributing Member
Joined: Sep 2005
Posts: 8,247
Likes: 497
From: mo
96 4Runner 324,757 miles
Another step closer, transfer cases and cross member + transmission mount in.
This = heavy
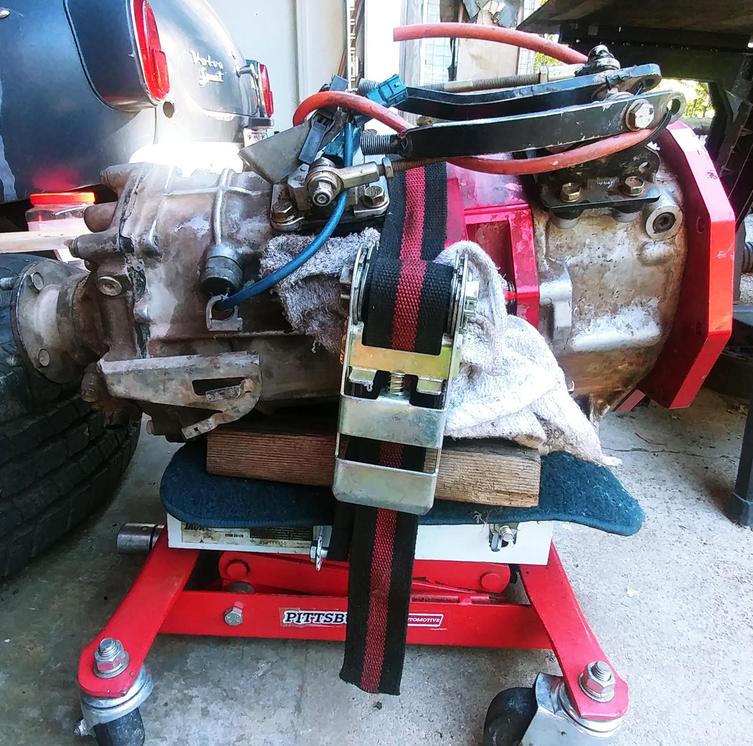
Lining everything up, getting the input shaft into the coupler without damaging the seal, fipg the way too much fipg'd stuff (I need it to seal!)

Next up: New bolts for the 3rd member and e-locker re-install, also still need to replace the power steering pressure line.
I'm doing this stuff by myself. I wouldn't have gotten this far without those Harbor Freight transmission jacks, some blocks of wood, a ratchet strap, and a lot of patience.
Oh, and occasionally bumping my dumb head on random stuff. Ouch.
At least most of the bloodshed has been courtesy the mosquitos. Some high octane Off! skeeter repellent has been very helpful.
Maybe someday I'll get to drive the old blue thing again.
Another step closer, transfer cases and cross member + transmission mount in.
This = heavy
Lining everything up, getting the input shaft into the coupler without damaging the seal, fipg the way too much fipg'd stuff (I need it to seal!)
Next up: New bolts for the 3rd member and e-locker re-install, also still need to replace the power steering pressure line.
I'm doing this stuff by myself. I wouldn't have gotten this far without those Harbor Freight transmission jacks, some blocks of wood, a ratchet strap, and a lot of patience.
Oh, and occasionally bumping my dumb head on random stuff. Ouch.
At least most of the bloodshed has been courtesy the mosquitos. Some high octane Off! skeeter repellent has been very helpful.
Maybe someday I'll get to drive the old blue thing again.
Last edited by habanero; Sep 24, 2022 at 05:59 PM.
Sep 25, 2022 | 07:09 PM
#4410
Thread Starter
Contributing Member
Joined: Sep 2005
Posts: 8,247
Likes: 497
From: mo
96 4Runner 324,757 miles
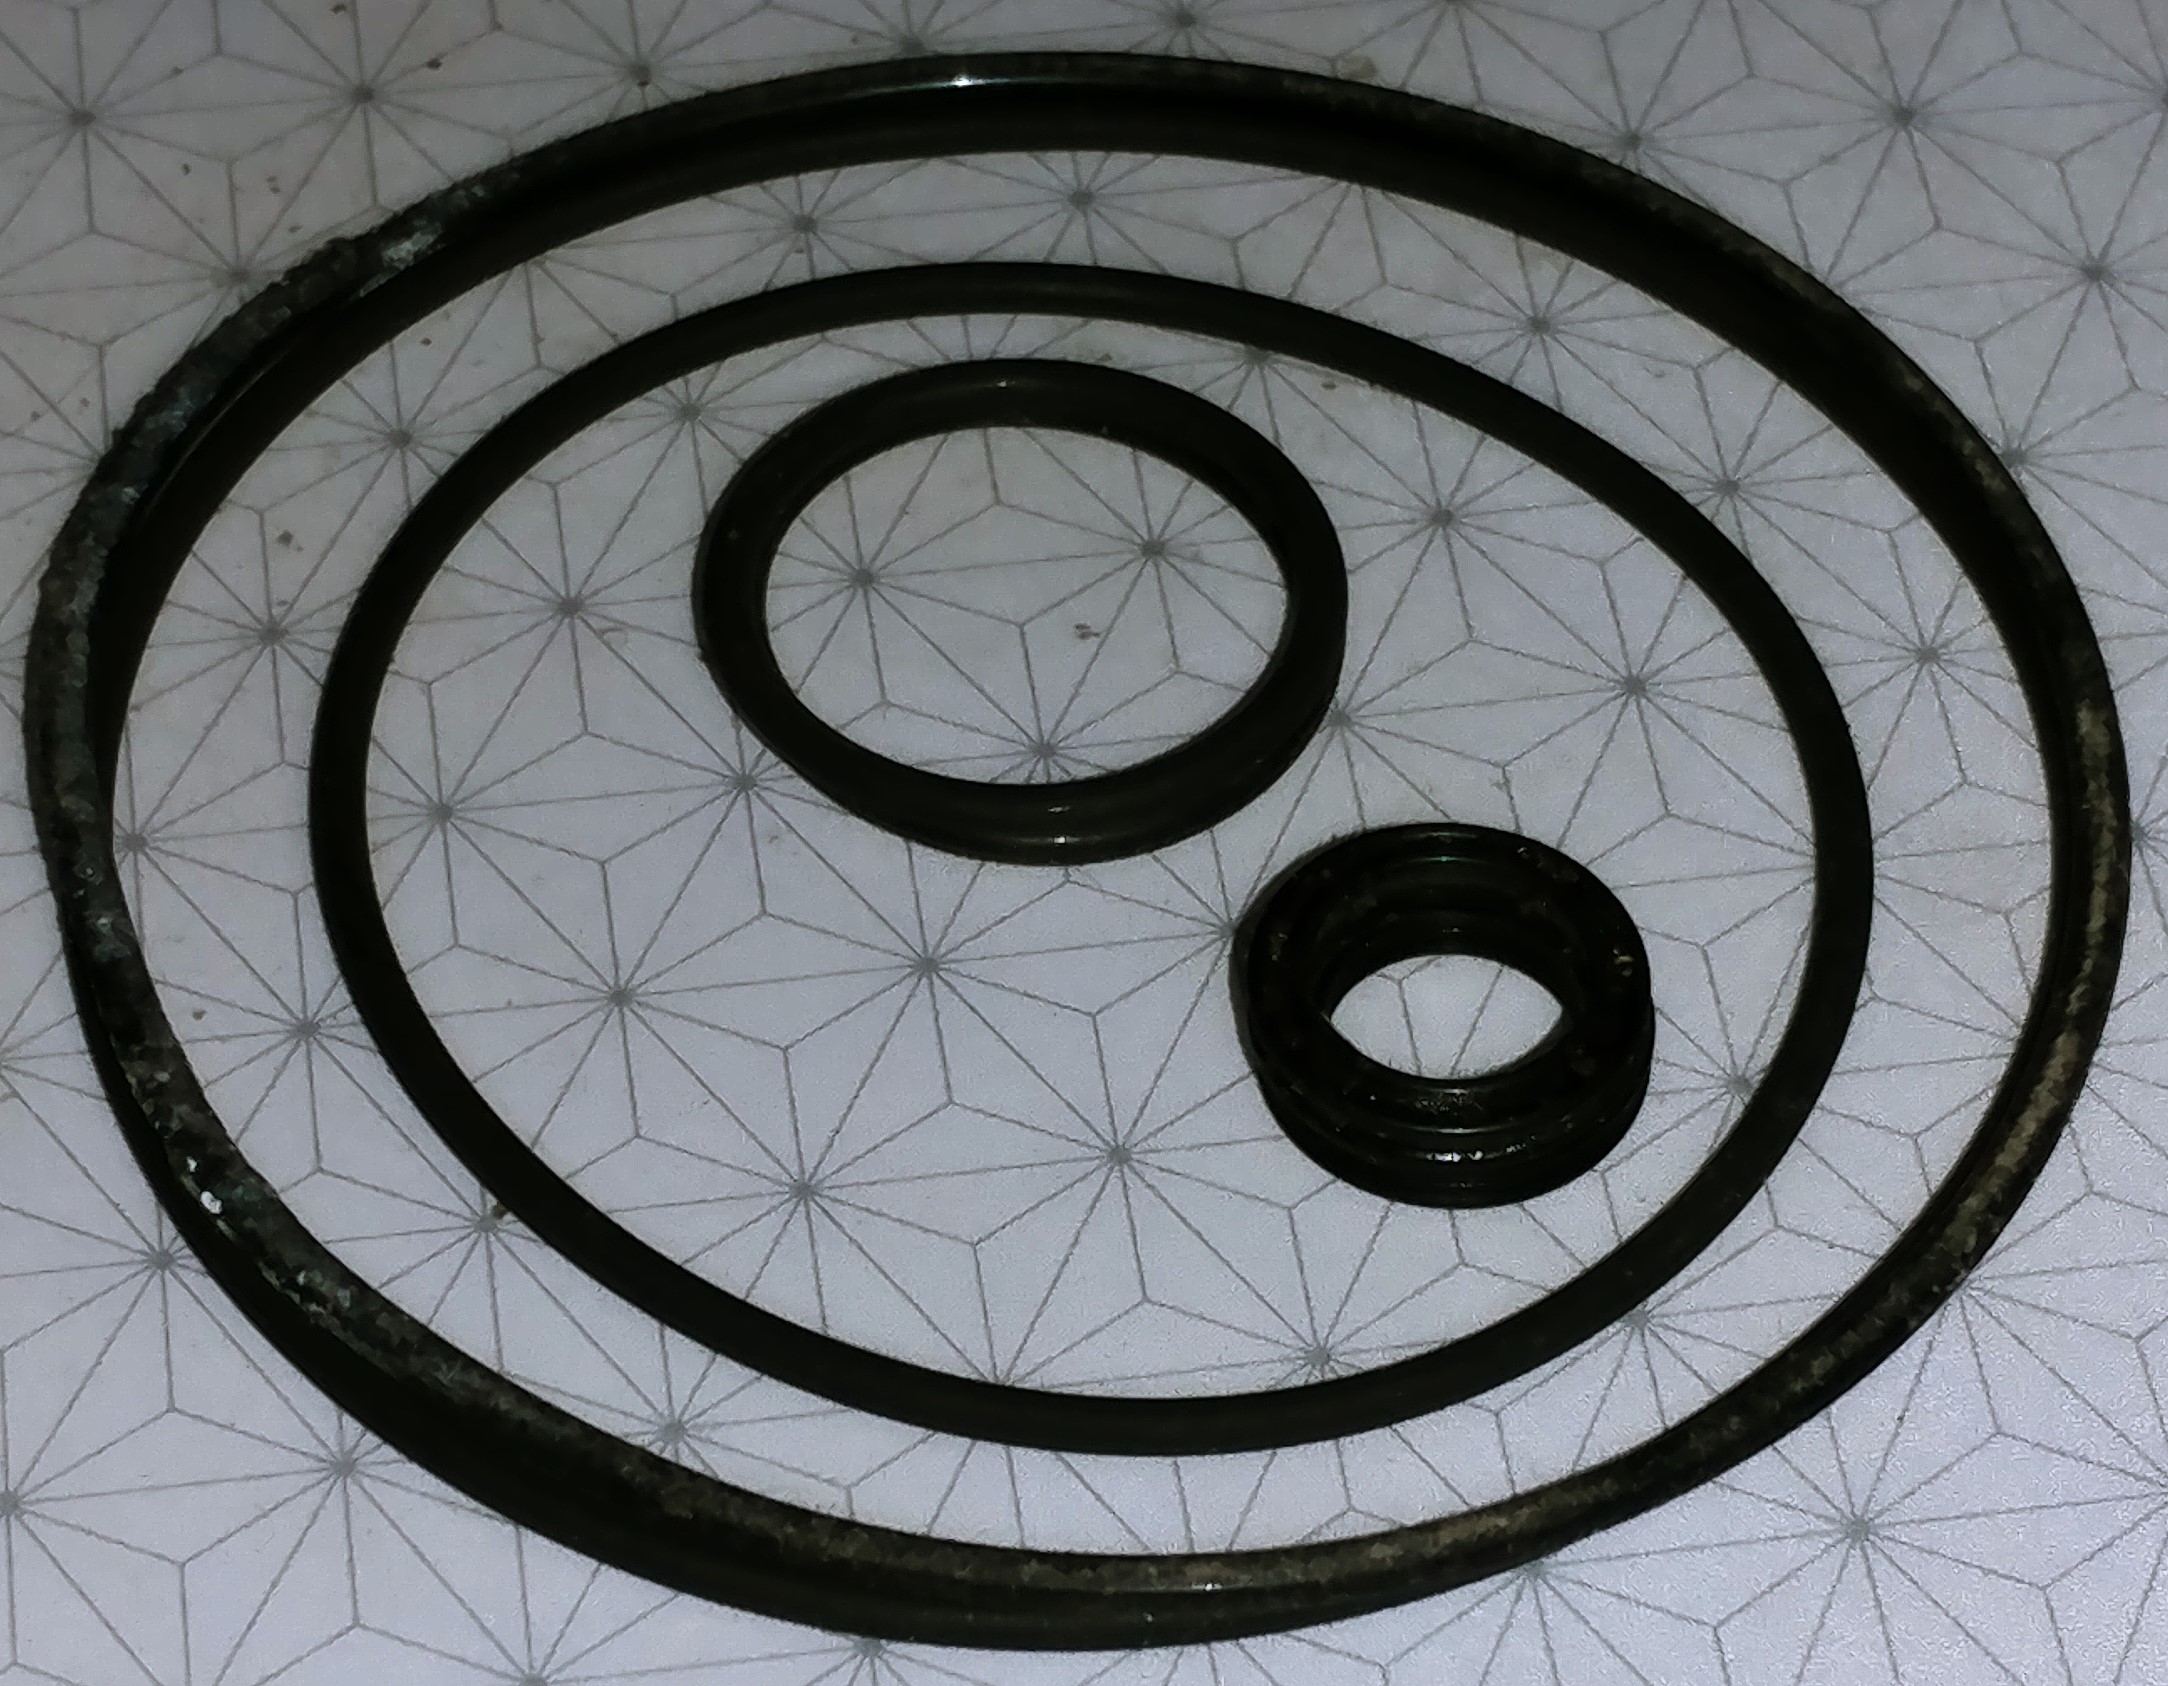
I put new o-rings in the other e-locker today and buttoned it up. The McMaster Carr o-ring that I chose for the magnet housing is a couple of millimeters too long, but the aluminum housing is degraded enough that I used a bit of rtv, stuck the o-ring in it, and bolted it together. I replaced the screws for that housing with hex-head bolts to make it easier to take them off next time. The other o-rings all fit well.
To get the e-locker apart there are two knock pins. That's the posts with the anti-seize on them (and on the corresponding holes, too)
The inspection plate is back on the bell housing, back-up switch is installed, and the transmission's got oil in it.
Sep 26, 2022 | 04:23 PM
#4411
Thread Starter
Contributing Member
Joined: Sep 2005
Posts: 8,247
Likes: 497
From: mo
96 4Runner 324,757 miles
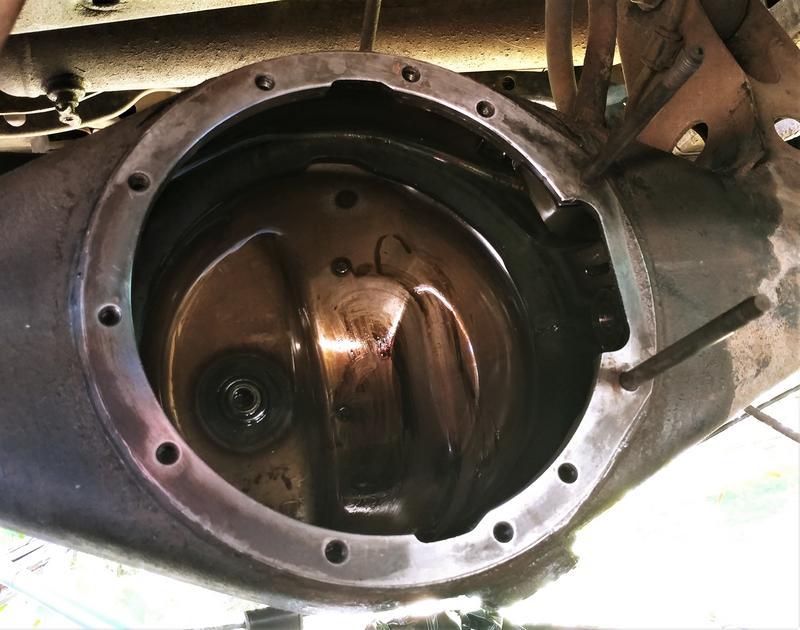
On the way back from our trip 4 of the studs near the top of the 3rd member loosened.
I think you can imagine what I thought when a sheen of oil suddenly built up on the back window, that being the same thing that happened when the taco box ate all the transmission oil and puked out what it couldn't hold.
EEKS!
We stopped at the next gas station where I noticed a mess of oil above and to the right of the rear axle, and that's how I figured out the loose studs. There was still plenty of oil in the rear diff so I tightened them back up and went on my way, no problem.
Today I verified that the fill plug was removable, then re-shaped the guard around the diff drain plug so I could get the socket on the plug. It was only a little tweaked from our fun and games.
I drained the oil and pulled all of the studs (they all came out rather than the nut coming off), then B'lasted the long studs and the nuts I have to remove to pull the axles so I can pull the 3rd member.
When I had this apart years ago I used anti-seize on those long studs, am crossing fingers they don't fight me.
While I was looking for the part number for a new toyota e-locker diff gasket- #42181-60050- I came across a number of posts about those studs backing off and several companies selling a bolt kit to stop that from happening.
Since I was already getting o-rings from McM-C I went ahead and bought some button head bolts and nuts too.
I'll try to remember pics when I get back out there, hopefully tomorrow.
Last edited by habanero; Sep 27, 2022 at 01:05 PM.
Sep 27, 2022 | 01:07 PM
#4413
Thread Starter
Contributing Member
Joined: Sep 2005
Posts: 8,247
Likes: 497
From: mo
 Sep 28, 2022 | 04:56 PM
#4414
Thread Starter
Contributing Member
Joined: Sep 2005
Posts: 8,247
Likes: 497
From: mo
My get up and go must've got up and left.
It's on jack stands, the keepers for the parking brake cable have been removed from the bell cranks.
The 8 little nuts that hold the axles on (4 each side) have been removed.
The tranny jack is on standby to help me not drop the 3rd member.
The locker has been set to lock (teeth towards the center.
Annnnd...that's it for today.
I simply need to unbolt the brake lines with my 10mm line wrench and pull the axles out enough to not as simply wiggle the 3rd member out and off.
Should've done it while I was out there, but instead I came inside and made corn muffins for the batch of chili I had stewing in the crock pot all day.
It was worth it.
Sep 29, 2022 | 12:21 PM
#4415
Registered User
Joined: Jul 2005
Posts: 2,345
Likes: 656
From: Chiloquin, OR
Chilli and cornbread, whether muffins, or one big cornbread, is an awesome taste combination. You can put a big chunk of cornbread in a bowl with the chilli on top, or just a bowl of chilli with corn muffins in a basket on the table. Either way, fantastic taste. I like it, anyway. I can stuff myself full with it, and do. I have to not make it too often, or it will make my gut even bigger than it is now!
Enjoy it, get back on your 4Runner tomorrow. After you get over the food coma
Pat☺
Enjoy it, get back on your 4Runner tomorrow. After you get over the food coma
Pat☺
Oct 1, 2022 | 05:06 PM
#4416
Thread Starter
Contributing Member
Joined: Sep 2005
Posts: 8,247
Likes: 497
From: mo
96 4Runner 324,757 miles
Spent the day working on the rear diff
Threw the axle on jack stands
Undid brake lines at the wheels and the parking brake cable keepers at the bell housing.
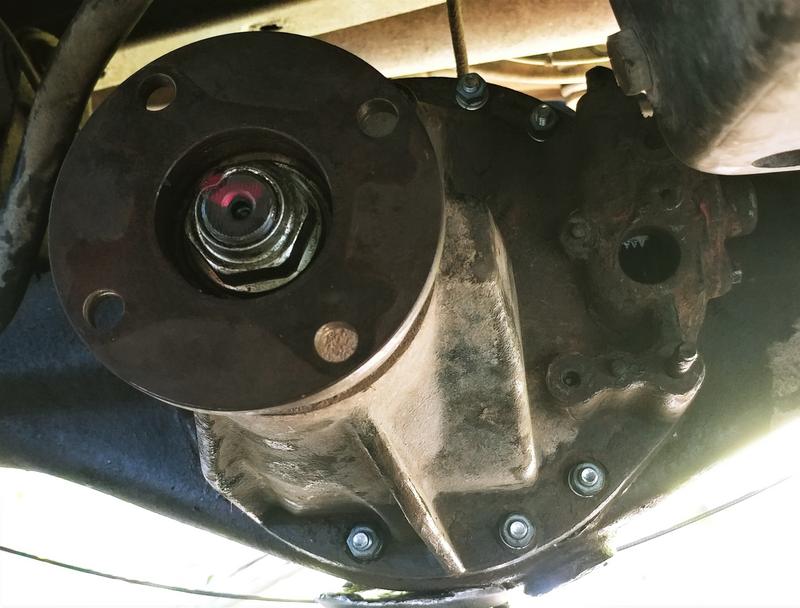
Next off came the 4 nuts at each wheel that hold the axles to the housing
Pulled the axles far enough out to be able to remove the 3rd member as well as engaging the e-locker. It has to be locked to get the 3rd member out.
The studs came out super-easy.
I ran the new bolts through front-side first, then from the back. Before I installed them I made sure there were no buggered threads.
Once I got them to stick out far enough using the allen wrench I double nutted the other end and pulled them through the case with the ratchet. It took a long time.
Also, there are a lot of sharp edges in there. It was the land of a million paper cuts except it was 6 and metal slices.
Bolt size is 8mm x1.25 thread pitch x 40mm long.

I left the long studs in, just cleaned them up and hit them with anti-seize.
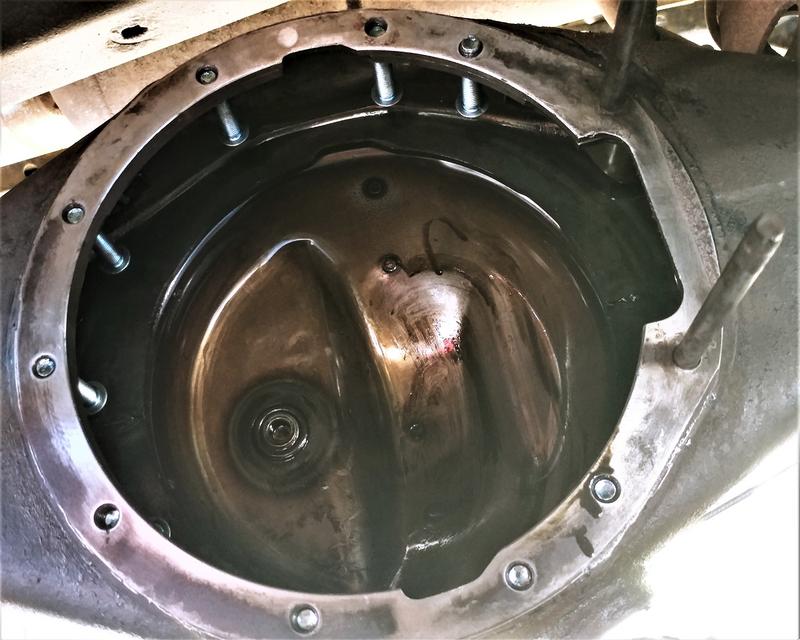
Everything buttoned up, minus the e-locker. The e-locker teeth are in the locked position in the pic- towards the diff. Unlocked is towards the left wheel.
The rear brake lines were very rusty so they were replaced with toyota parts, surprisingly not terribly expensive.
For the 96 with 4wd 16" wheels..verify for your own truck...
Left: Tube, rr brake #6 Toyota 47326-35060
Right: Tube, rr brake #5 Toyota 47325-35280
Spent the day working on the rear diff
Threw the axle on jack stands
Undid brake lines at the wheels and the parking brake cable keepers at the bell housing.
Next off came the 4 nuts at each wheel that hold the axles to the housing
Pulled the axles far enough out to be able to remove the 3rd member as well as engaging the e-locker. It has to be locked to get the 3rd member out.
The studs came out super-easy.
I ran the new bolts through front-side first, then from the back. Before I installed them I made sure there were no buggered threads.
Once I got them to stick out far enough using the allen wrench I double nutted the other end and pulled them through the case with the ratchet. It took a long time.
Also, there are a lot of sharp edges in there. It was the land of a million paper cuts except it was 6 and metal slices.
Bolt size is 8mm x1.25 thread pitch x 40mm long.
I left the long studs in, just cleaned them up and hit them with anti-seize.
Everything buttoned up, minus the e-locker. The e-locker teeth are in the locked position in the pic- towards the diff. Unlocked is towards the left wheel.
The rear brake lines were very rusty so they were replaced with toyota parts, surprisingly not terribly expensive.
For the 96 with 4wd 16" wheels..verify for your own truck...
Left: Tube, rr brake #6 Toyota 47326-35060
Right: Tube, rr brake #5 Toyota 47325-35280
Last edited by habanero; Oct 2, 2022 at 03:37 AM.
Oct 7, 2022 | 02:17 PM
#4417
Thread Starter
Contributing Member
Joined: Sep 2005
Posts: 8,247
Likes: 497
From: mo
96 4Runner 324,757 miles, but not really...
So this happened:

It moves!!!
The speedo's not working again, or that mileage would read 324,777ish. I'm thinking a ground issue, but will see when I put the insides back in place.
I still need to install the front sway bar, the new PS pressure hose, the front drive shaft and put the interior back together...stuff like that.
So this happened:
It moves!!!
The speedo's not working again, or that mileage would read 324,777ish. I'm thinking a ground issue, but will see when I put the insides back in place.
I still need to install the front sway bar, the new PS pressure hose, the front drive shaft and put the interior back together...stuff like that.
Oct 8, 2022 | 05:04 PM
#4418
Thread Starter
Contributing Member
Joined: Sep 2005
Posts: 8,247
Likes: 497
From: mo
96 4Runner 324,xxx miles
I drove it more today, but still no speedo and no speedo means no odo either.
Meant to reinstall the front swaybar, but got involved with the power steering pressure hose since I figured it would be a little easier with less stuff to reach around.
Not a terribly difficult job.
Removing the air box was very useful.
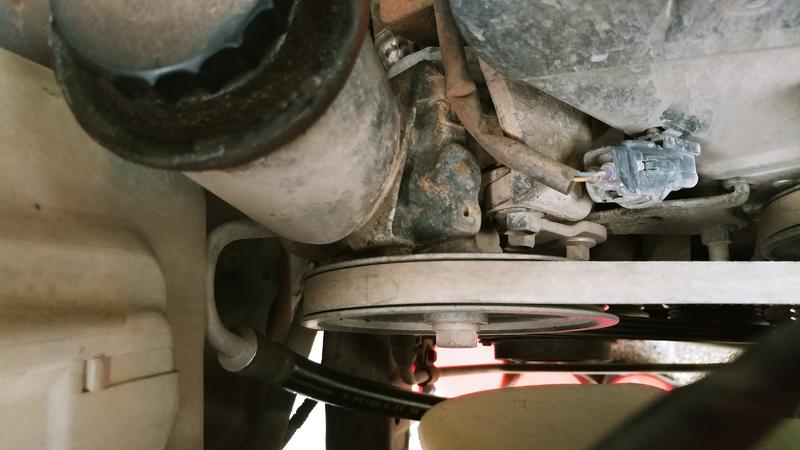
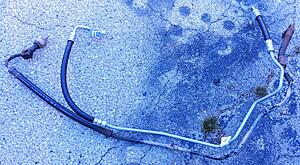
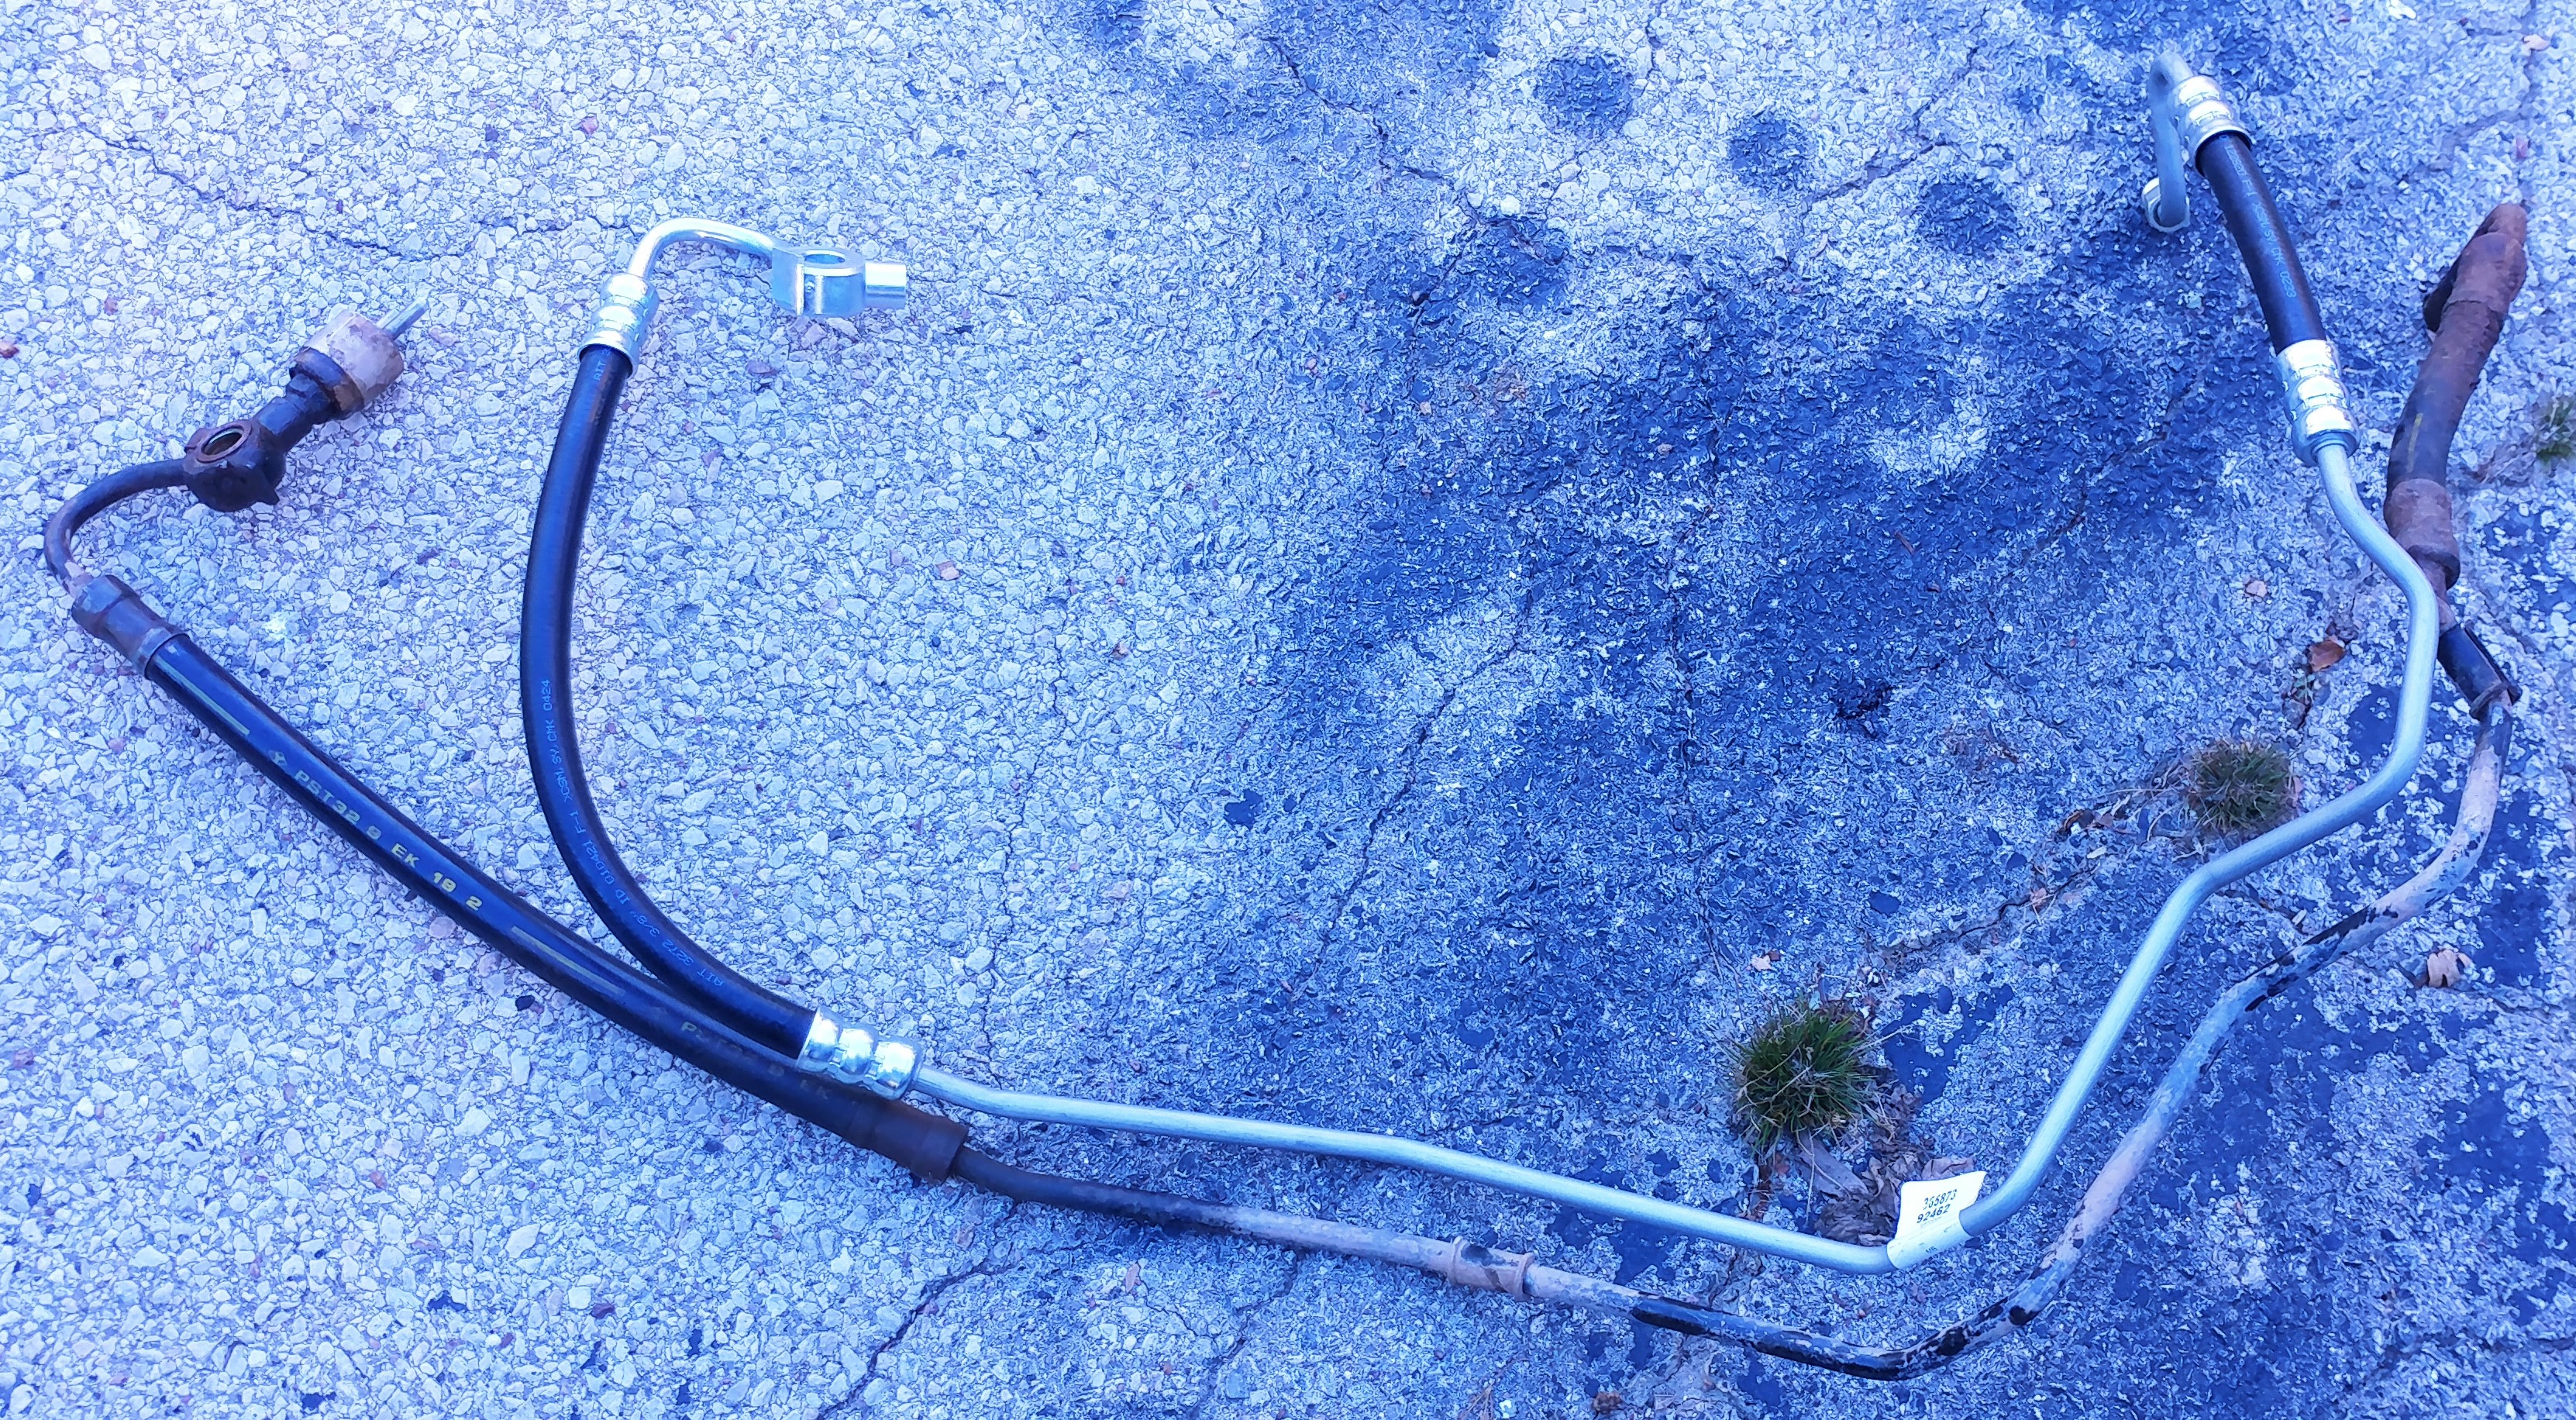
Toyota doesn't supply them any more. One can still be had for a steeeep price. I went with Edelmann/Plews 92462 for the 96 4Runner.
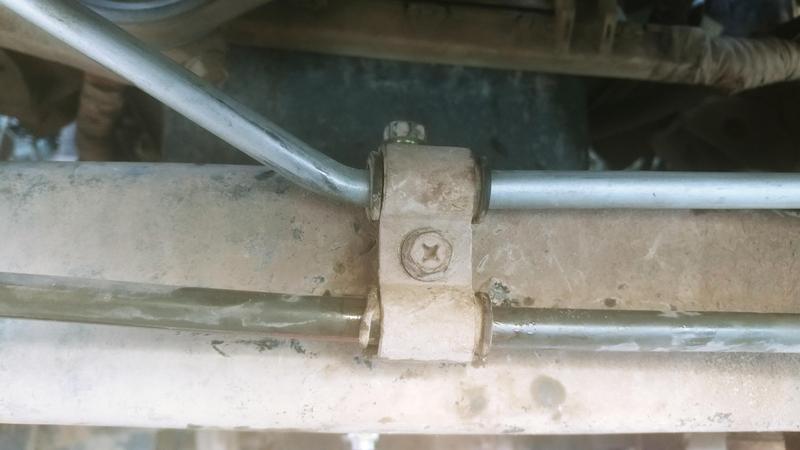
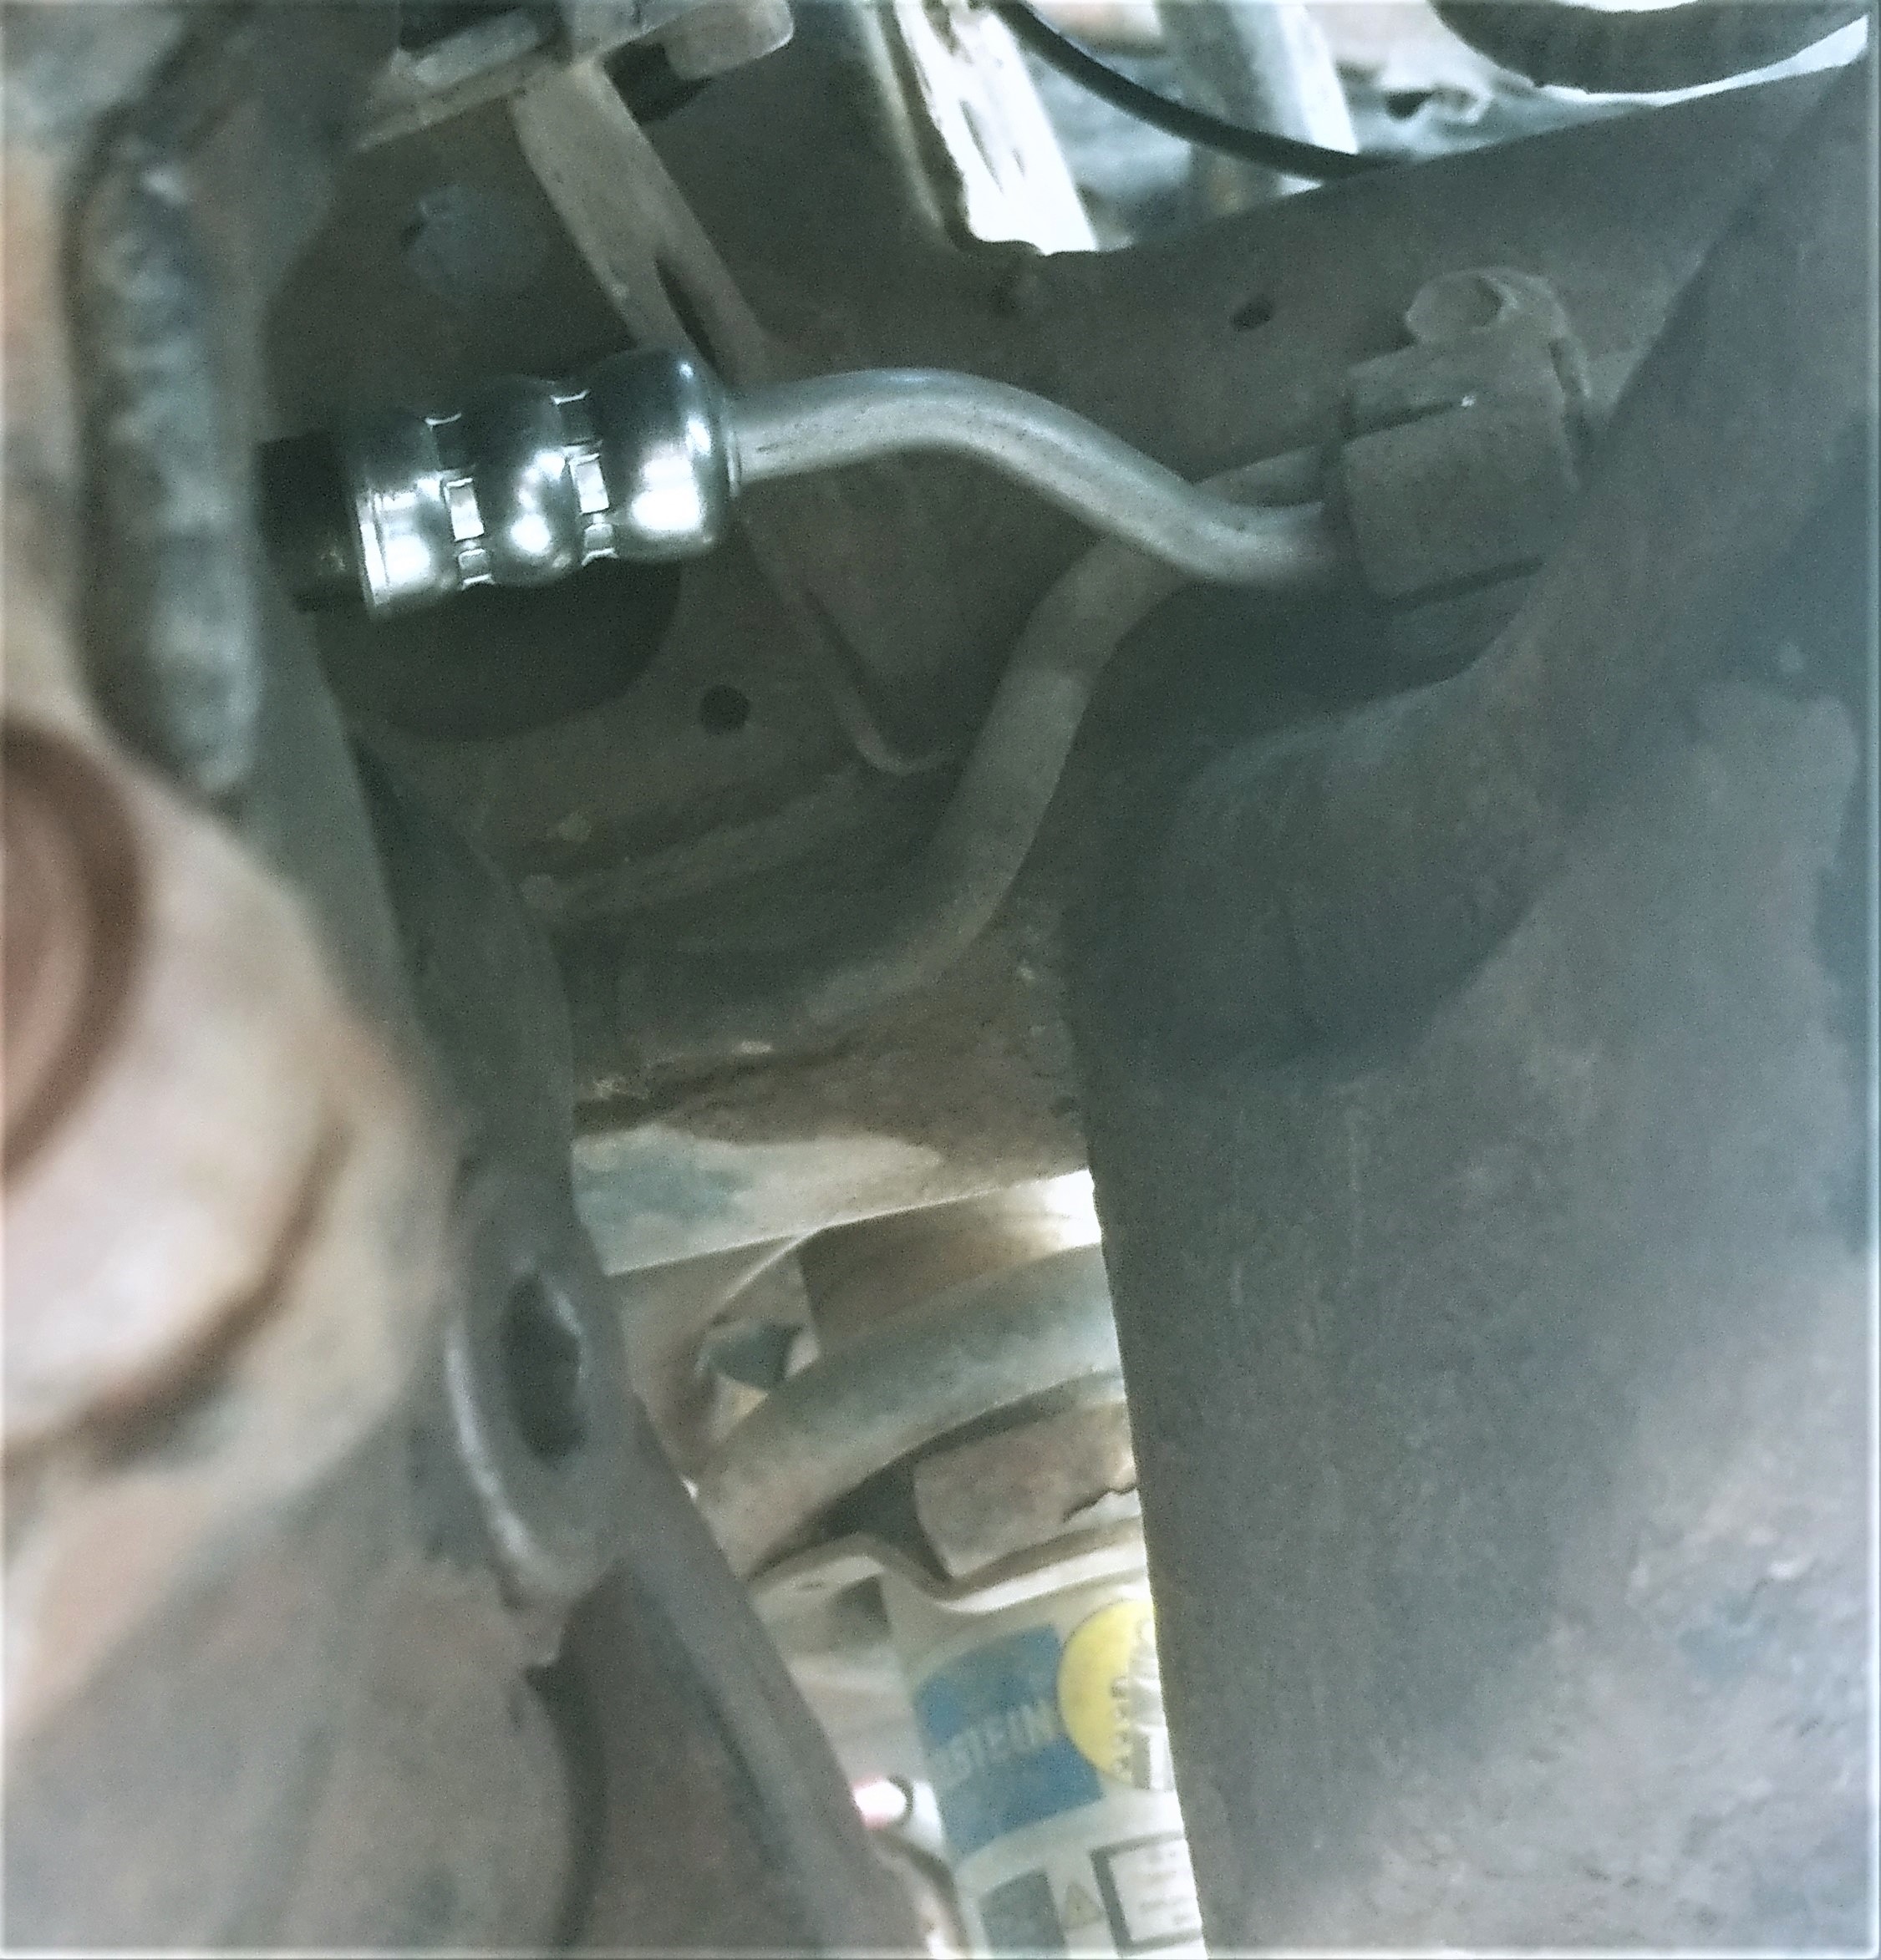
There are 3 brackets to either loosen or pull apart.
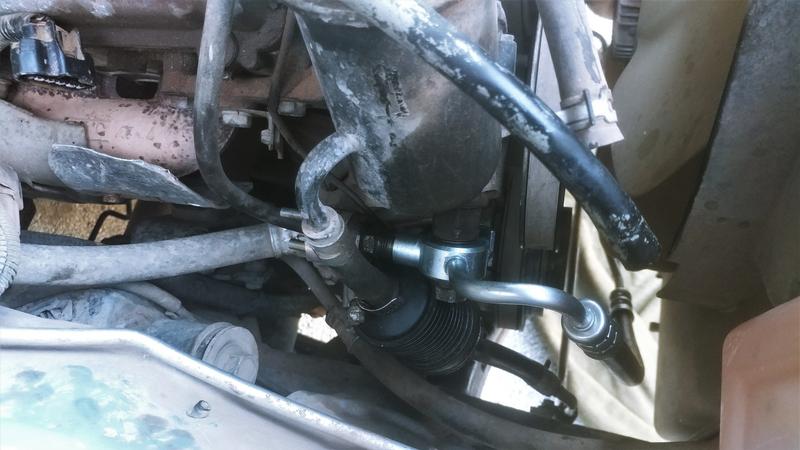
I undid the bolt on the left frame bracket with a 10mm socket. It's under the one that's readily visible in the pic. The pressure line is on the bottom.

I unbolted both the bolt on top of the front crossmember and the bolt that holds the lines together. This time the pressure line is on top.
And lastly I unbolted the smaller bolt that holds the return line to the bracket. No pressure line involvement here, but I wanted wiggle room.
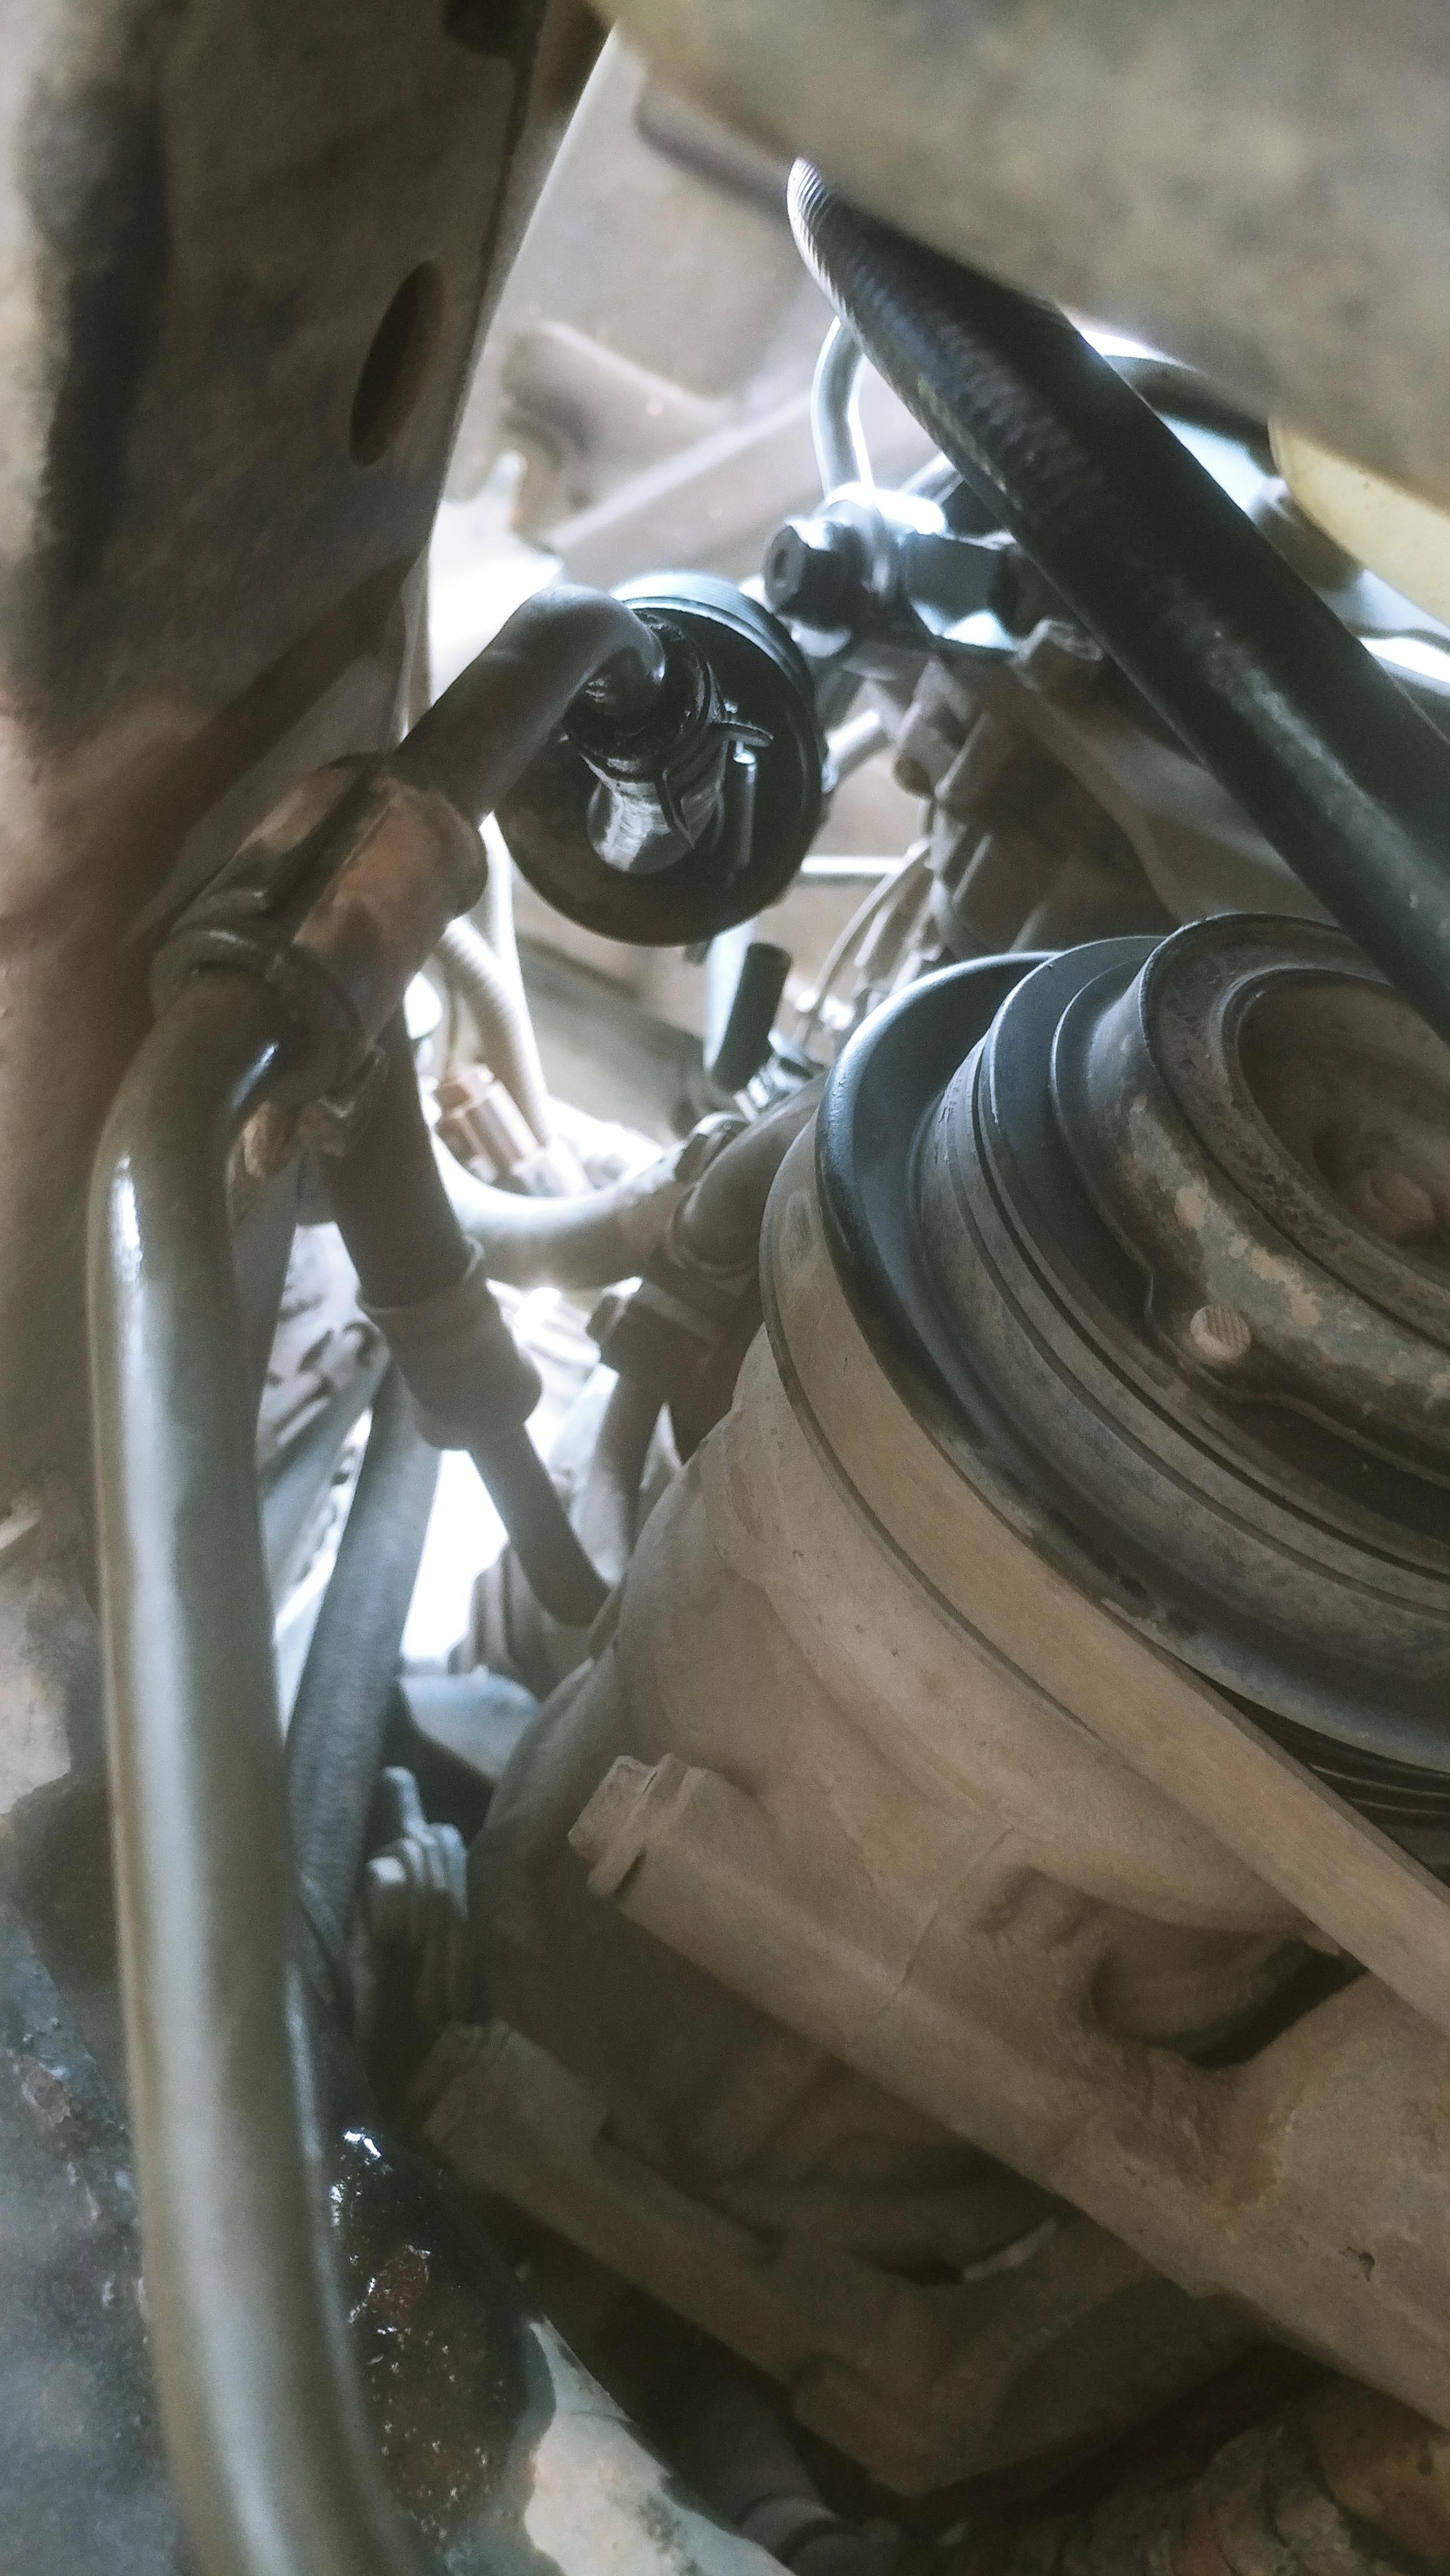
Next I unscrewed the pressure line at the power steering rack. 17mm open end wrench did better here than the 17mm line wrench, because of the angles to get to the nut.
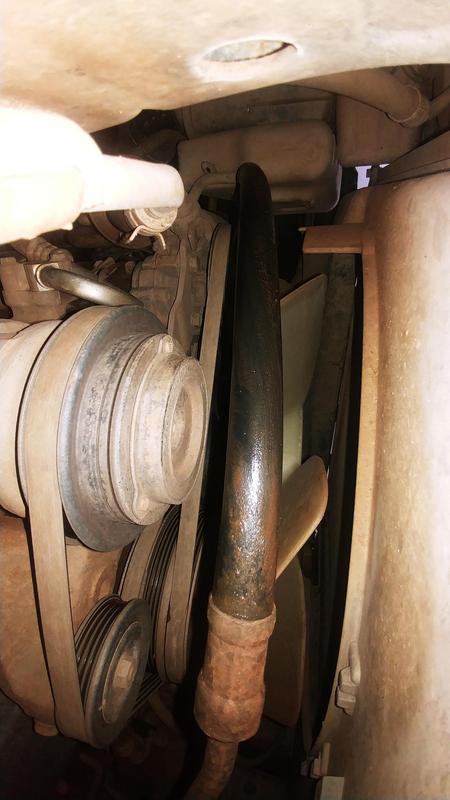
This is a pic with the new one installed so you can see the pressure line sits a little below and towards the right side. Have something to catch the fluid, a couple-few cups in my case.

And lastly I unbolted the line using a 17mm for the bolt and a 24mm to hold the banjo still.
That was stuck on there good. The shiny part is the new line.
After I removed it I had to take the idle-up contraption off to add to the new line. The 96's is vacuum operated. That was also stuck on there good.
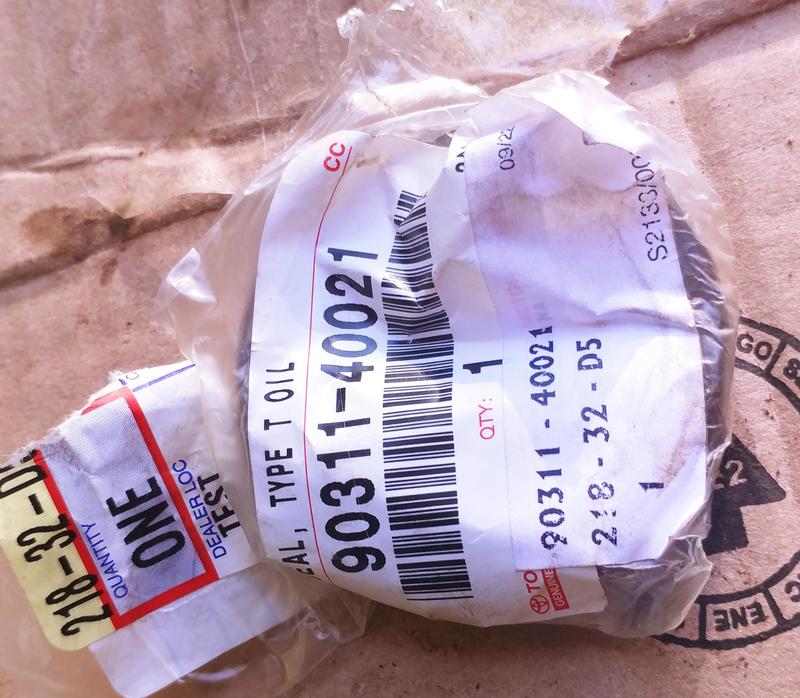
Don't forget your little copper washers for the banjo bolt (supplied).
I added atf, but haven't worked any trapped air out of the system yet.
I drove it more today, but still no speedo and no speedo means no odo either.
Meant to reinstall the front swaybar, but got involved with the power steering pressure hose since I figured it would be a little easier with less stuff to reach around.
Not a terribly difficult job.
Removing the air box was very useful.
Toyota doesn't supply them any more. One can still be had for a steeeep price. I went with Edelmann/Plews 92462 for the 96 4Runner.
There are 3 brackets to either loosen or pull apart.
I undid the bolt on the left frame bracket with a 10mm socket. It's under the one that's readily visible in the pic. The pressure line is on the bottom.
I unbolted both the bolt on top of the front crossmember and the bolt that holds the lines together. This time the pressure line is on top.
And lastly I unbolted the smaller bolt that holds the return line to the bracket. No pressure line involvement here, but I wanted wiggle room.
Next I unscrewed the pressure line at the power steering rack. 17mm open end wrench did better here than the 17mm line wrench, because of the angles to get to the nut.
This is a pic with the new one installed so you can see the pressure line sits a little below and towards the right side. Have something to catch the fluid, a couple-few cups in my case.
And lastly I unbolted the line using a 17mm for the bolt and a 24mm to hold the banjo still.
That was stuck on there good. The shiny part is the new line.
After I removed it I had to take the idle-up contraption off to add to the new line. The 96's is vacuum operated. That was also stuck on there good.
Don't forget your little copper washers for the banjo bolt (supplied).
I added atf, but haven't worked any trapped air out of the system yet.
Oct 15, 2022 | 09:14 AM
#4419
Thread Starter
Contributing Member
Joined: Sep 2005
Posts: 8,247
Likes: 497
From: mo
96 4Runner 324,766 miles
Went to cars and coffee this morning, checked out some cool cars, pulled my instrument cluster and moved my speedometer input wire from the Tacoma speed sender to the 4Runner's original abs speed sender wire.
I haven't had a speedo since putting the thing back together and driving it.
The wiring and ground for the Taco VSS look good (haven't checked continuity or resistance yet).
Since there are 4 hair-width wires pertinent to and on the speedometer that have no reason to still be attached to their 4 little posts after all these years and vibration-
And because I put male spade connectors on both the vss and the abs sensor wires and a female connector on the speedometer side
To make changing them very easy
I did that to make sure the speedometer itself was working.
It is!
At some point I'll test the vss set-up to find what needs fixing, but for now I'm good with the abs sender. With the current set-up it's only a mile or two mph lower than actual speed.
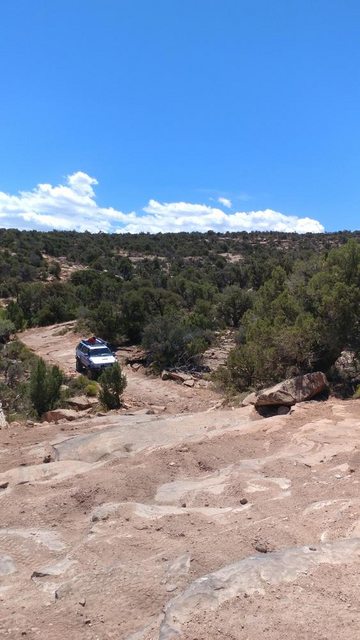
A couple more pics from the return section of Top of the World, Moab UT
need to go down this
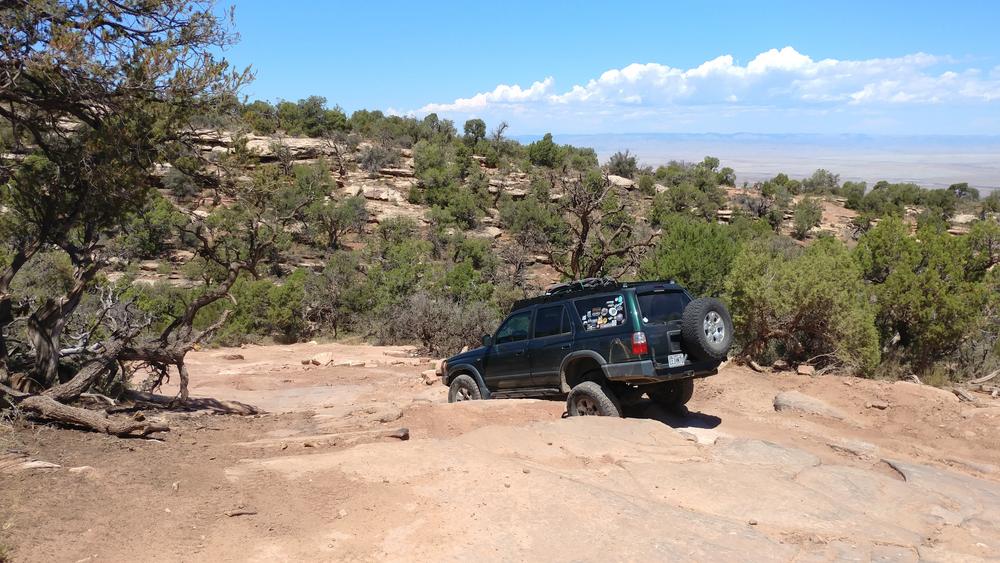
and come up this
Went to cars and coffee this morning, checked out some cool cars, pulled my instrument cluster and moved my speedometer input wire from the Tacoma speed sender to the 4Runner's original abs speed sender wire.
I haven't had a speedo since putting the thing back together and driving it.
The wiring and ground for the Taco VSS look good (haven't checked continuity or resistance yet).
Since there are 4 hair-width wires pertinent to and on the speedometer that have no reason to still be attached to their 4 little posts after all these years and vibration-
And because I put male spade connectors on both the vss and the abs sensor wires and a female connector on the speedometer side
To make changing them very easy
I did that to make sure the speedometer itself was working.
It is!
At some point I'll test the vss set-up to find what needs fixing, but for now I'm good with the abs sender. With the current set-up it's only a mile or two mph lower than actual speed.
A couple more pics from the return section of Top of the World, Moab UT
need to go down this
and come up this
Last edited by habanero; Oct 15, 2022 at 09:16 AM.
Oct 22, 2022 | 05:52 PM
#4420
Thread Starter
Contributing Member
Joined: Sep 2005
Posts: 8,247
Likes: 497
From: mo
96 4Runner 324,818 miles
Still buttoning up.
Tightened the bolts on the cat.
Installed the front driveshaft.
Worked on some buzzy rattles here and there.
Zip tied some of the trans/trans/trans wire harness out of the way of the front driveshaft as needed.
Replaced the ground between firewall and engine that I'd repaired before with a longer scrap of 6 gauge I had laying around. Not so long it would interact with the exhaust, but not as likely to pull apart either, as this one was in the process of doing.
VERY carefully tightened the reachable valve cover bolts. There was a small leak on the rear left side, near #6.
Last edited by habanero; Oct 23, 2022 at 11:05 AM.


