
For those who want to put the 99+ center dash bezel in.

 Apr 25, 2008 | 08:47 AM
#42

Registered User
Joined: Dec 2006
Posts: 369
Likes: 0
Jan 23, 2009 | 08:44 AM
#43
Registered User
Joined: May 2007
Posts: 2,175
Likes: 2
From: Denver metro area-CO
mad props to all of you-these threads never die - they just hang out for searches
I am doing a simple 99 SR5 to a Limited Woodgrain conversion-but the pics Rocket has attached are most helpful
I am doing a simple 99 SR5 to a Limited Woodgrain conversion-but the pics Rocket has attached are most helpful
Jan 23, 2009 | 04:18 PM
#44
anyone ever figure out what happened to blarchitect's pics and instructions? i just got a '99+ radio bezel for parts and experimentation, thinking about just putting it in sometime down the road and i'd love to know how everything is wired for the ect and rear window switch. it's a shame that wonderful write-up seems to be lost forever 
Mar 10, 2009 | 01:49 AM
#47
man I feel you guys! What exactly do you all need or want to know??
Face it, Blarchitect is gone forever. I seriously question who he actually was along with his reason to delete his write-ups. Although his info was valuable, it was still incomplete.
I've read older/recent posts on this subject about this threads info being "invaluable" but please explain why.
I have everything functioning as normal and where it should be.
Last edited by rocket; Mar 10, 2009 at 01:56 AM.
Mar 16, 2009 | 04:20 PM
#48
Registered User
Joined: Jun 2007
Posts: 442
Likes: 1
From: Salt Lake City, UT
Hey sorry there rocket... I hadn't yet received my '02 bezel when I started trying to make sense of everything... but now that I have it and can compare with your pictures, everything is starting to make sense! Funny how that happens eh? Anyway, thanks for all your help. It's greatly appreciated 
Mar 17, 2009 | 08:36 AM
#49
Registered User
Joined: May 2007
Posts: 2,175
Likes: 2
From: Denver metro area-CO
I have pictures now of the front and rear of both 99 radio bezels.
Woodgrain conversion now done in my 99. I changed over from "plain black" trim.
If anyone has questions about connections or wants to see the photos just drop a
note. I am not hosting friendly but can email photos back and forth.
pattycakes-the main electrical connector is behind the ECT switch. There are also the warning hazard connector and the cig lighters (3) and the safety (orange) connector that is related to the airbag sensor in the passenger seat I think it is.
Since I am a manny tranny I now have a "dead"ECT switch on my dash with my new Limited woodgrain look. I was hoping to adapt the switch to another function but I don't have a clue how to do so.
Mar 21, 2009 | 06:16 PM
#50
Registered User
Joined: Jun 2007
Posts: 442
Likes: 1
From: Salt Lake City, UT
Alright... So I put my new '02 sport trim dash bezel in and have not yet found the C23 connector from a donor truck, but I have done the hazard switch. I put together this diagram to help those who will be doing this in the future. You have to rearrange the stock wiring in the connector so that the wires are in this order:
Looking from the top of the connector down
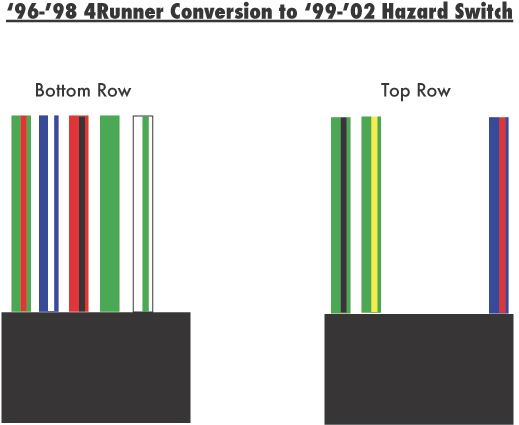
Then simply plug the connector into the '99+ hazard switch and everything will work! It is a little tricky, but as was stated before, you need to pry out the white section on the bottom of the connector (unlocks the pins) and then each pin has a tab holding it in place, which you need to push down with a small pick or precision screwdriver. Then the pins slide right out. As you put each one back in place it will click into place. Enjoy!
On a sidenote, your blinkers will NOT work if you do not rewire this switch or if you leave it unplugged... Didn't realize that, and I went the past week without blinkers. Not fun
Looking from the top of the connector down
Then simply plug the connector into the '99+ hazard switch and everything will work! It is a little tricky, but as was stated before, you need to pry out the white section on the bottom of the connector (unlocks the pins) and then each pin has a tab holding it in place, which you need to push down with a small pick or precision screwdriver. Then the pins slide right out. As you put each one back in place it will click into place. Enjoy!
On a sidenote, your blinkers will NOT work if you do not rewire this switch or if you leave it unplugged... Didn't realize that, and I went the past week without blinkers. Not fun
Last edited by pdyebrasil; Mar 21, 2009 at 06:18 PM.
Mar 22, 2009 | 03:49 PM
#51
Registered User
Joined: May 2007
Posts: 2,175
Likes: 2
From: Denver metro area-CO
most helpful pdye. that was quite an undertaking.
curious if you left the green switch backlighting illumination in place for the rear defrost and the rear window switch ?
I just replaced both bulbs at 6.04 each. puny little things
curious if you left the green switch backlighting illumination in place for the rear defrost and the rear window switch ?
I just replaced both bulbs at 6.04 each. puny little things
Jun 10, 2009 | 11:19 AM
#52
Registered User
Joined: Mar 2006
Posts: 432
Likes: 0
Finally got around to wiring this thing up today.
Only have one question about the ECT switch. Anyone have any idea where the wires from the 96' console switch connect to the 99+ C23 plug?
Also, I really don't care about the rear defrost, but I think this is where the turn on for the bezel backlighting comes from. Can anyone confirm which wires control the backlighting?
Dec 17, 2010 | 07:57 AM
#53
Registered User
Joined: Jun 2007
Posts: 442
Likes: 1
From: Salt Lake City, UT
I FINALLY DID THIS!!! It was actually pretty easy too. I had already done the rear window and hazard switch, but kept putting this one off. I took the old rear defrost switch and soldered the new wires in... Works like a charm! As far as the ECT switch, it doesn't work, but even when it did I couldn't notice any difference.
Oh and Midget, you've been waiting a long time for the answer, but here it is: The backlighting for the new 99+ bezel does come from the old defroster switch. It actually looks like 4 of the 6 wires you need to solder are for the lighting. The two wires on the left are for the defroster 'on' light, (looking at Rocket's pics) and the top two wires on the right control the backlighting of the bezel.
Oh and Midget, you've been waiting a long time for the answer, but here it is: The backlighting for the new 99+ bezel does come from the old defroster switch. It actually looks like 4 of the 6 wires you need to solder are for the lighting. The two wires on the left are for the defroster 'on' light, (looking at Rocket's pics) and the top two wires on the right control the backlighting of the bezel.
Last edited by pdyebrasil; Dec 18, 2010 at 03:43 PM.
Dec 27, 2017 | 07:56 AM
#54
Registered User


Joined: Dec 2017
Posts: 231
Likes: 192
From: Portland
With so many broken links in this thread, I hope it's OK for me to post a link to a comprehensive tutorial I prepared that has all the wiring answers, including the defogger switch:
http://www.toyota-4runner.org/3rd-ge...-tutorial.html
In case you can't wait, the defogger does indeed only need three wires to be soldered:

I decided to solder the LG-B jumper on a more accessible part of the circuit board that was still electrically connected to the terminal of interest. It gave me more room for soldering errors. Here is how I soldered the three jumpers:
.jpg)
http://www.toyota-4runner.org/3rd-ge...-tutorial.html
In case you can't wait, the defogger does indeed only need three wires to be soldered:
I decided to solder the LG-B jumper on a more accessible part of the circuit board that was still electrically connected to the terminal of interest. It gave me more room for soldering errors. Here is how I soldered the three jumpers:

Thread
Thread Starter
Forum
Replies
Last Post
ashersullivan88yota
86-95 Trucks & 4Runners
24
Jan 18, 2022 05:37 PM
GreatLakesGuy
The Classifieds GraveYard
8
Sep 4, 2015 09:27 AM


