
For those who want to put the 99+ center dash bezel in.
 Oct 25, 2004 | 11:39 AM
#1
Thread Starter
Registered User
Joined: Sep 2003
Posts: 626
Likes: 0
From: Surprise AZ
For those who want to put the 99+ center dash bezel in.
I sold my dash bezel from my 96 about 5 months ago, and installed the one from an 01 (the piece that goes around the radio and holds the clock and vents). Since then i have lost the use of my hazards, and rear defroster.
Now about a month ago i installed a 99+ center console, and moved the rear window button just like in Bob's directions. I didn't really like the location of the switch, and up was down and down was up...
Since the 99+ dash bezel has the window buttons, i decided to make it work with the window, and get the defroster's working too.
So I spent the last two nights mapping out the circuit and making plans on how to rewire it. Well as luck would have it in my case, the rear defroster switch on the 96 is actually a circuit, not just a button, but on the 99+, it's just a button and light.
I took the 96 defroster apart, and tried to map the circuit as best i could, and try to find a way to make the 99+ switch work, but it would only turn the defrosters on when you held the button... I decided that i still needed to use the 96 switch circuitry to make the defrosters work the way they should, but i also found a way to use the 99+ switch and light. It involved opening up the 96 switch, and soldering some wires in place to get it to work flawlessly. I will do a writeup and post pics probably within a week or two. I've also got the rear window switch working, and now have a +12V accessory button (The Auto tran's ETC button, I have a 5 speed).
If anyone like me was waiting to do this mod, it's very nice, and clean looking. If you can't wait for the writeup PM me and i'll give you the quick and dirty...
Steve
BTW What do you 99+ 5 speed guys have just to the right of the rear Defroster switch?
Oct 25, 2004 | 11:55 AM
#3
Thread Starter
Registered User
Joined: Sep 2003
Posts: 626
Likes: 0
From: Surprise AZ
Originally Posted by SLC Punk
Wow that sounds like a lot of work! I am thinking of going that mod, but if I have to re-wire the defroster, ECT and hazards, it may not be worth it.... 
I think it would be, I lost the Hazzard switch, so i'll have to go buy one, The plug in the back is the same, but some of the wiring is different, that one should be pretty easy. The Mod itself only took me about 3 hours, from start to finish. As long as you can solder, and can follow some simple instructions and pictures it's pretty easy. Trying to figure out what went where and how everything worked took the longest, partially because i didn't have a schematic...
Steve
Oct 26, 2004 | 07:31 AM
#5
Registered User
Joined: Oct 2003
Posts: 315
Likes: 0
From: Nashville
Thats pretty cool. I did the console, but I hadn't thought about the dash. Although I personally do like the rear window switch above my foglight switch on the left. I separated my right shoulder and the left side location meant I could still use it.
Oct 26, 2004 | 10:02 AM
#7
Thread Starter
Registered User
Joined: Sep 2003
Posts: 626
Likes: 0
From: Surprise AZ
Originally Posted by Albuquerque Jim
A blank filler.
Oh, I was hoping that it was the same switch, just another name... oh well i'll just leave that switch in there and use it for my fogs i guess...
Trending Topics
Oct 26, 2004 | 11:37 AM
#9
Thread Starter
Registered User
Joined: Sep 2003
Posts: 626
Likes: 0
From: Surprise AZ
Originally Posted by SLC Punk
Steve, if possible, can you take a pic of the ECT switch (where the harness goes), I am wondering how many wires the 99+ switch uses.
I don't have a pic of it, but it's just a simple switch, where it get's 12V from a power source, and when the switch is closed it sends 12V out on that line. Since your's is a stand alone switch you'll probably have 2 wires for the light (it if has a light when you turn on the running lights). they are solid green with silver specs, the other would be white with a green stripe. so if yours works the same way you will have 4 wires 1 will have 12V when the key is in the ACC Position, one will have ~0V when the ETC switch is open and 12V when it's pressed in, then the two wires for the light.
Steve
 Dec 10, 2004 | 12:24 PM
#12
Registered User
Joined: Apr 2003
Posts: 721
Likes: 1
From: Virgina
Originally Posted by NorCalVP
I replaced the upper most duct, it's only attached by one screw.
Thanks
Dec 10, 2004 | 12:35 PM
#13
Thread Starter
Registered User
Joined: Sep 2003
Posts: 626
Likes: 0
From: Surprise AZ
Originally Posted by WT
Hey got any PICS of this ?? I am working on a new idea and wanted to see if something would fit your current setup...
Thanks
Thanks
What kind of pictures are you looking for. if i take a pic of the dash it'll look just like the 99+ dash. I have a few pics of the mod to the flasher circuitry
Steve
Dec 10, 2004 | 06:39 PM
#14
Registered User
Joined: Apr 2003
Posts: 721
Likes: 1
From: Virgina
Originally Posted by NorCalVP
What kind of pictures are you looking for. if i take a pic of the dash it'll look just like the 99+ dash. I have a few pics of the mod to the flasher circuitry
Steve
Steve
Thanks
Dec 10, 2004 | 08:24 PM
#15
Thread Starter
Registered User
Joined: Sep 2003
Posts: 626
Likes: 0
From: Surprise AZ
Originally Posted by WT
Wondering if you had what part you had to put in there to fit the 99 bezel ?
Thanks
Thanks
The black plastic ducting that goes from the vents in the dash bezel to behind the heater core. If you look on your bezel the vents are right next to each other, and on the 99 bezel, the clock is between the vents, so the ducting that goes to those vents is just a little different. once you get yours off, you'll know what i mean. There is one phillips screw holding it in place, and the swap only takes about 30 seconds once the bezel is off.
Steve
Aug 23, 2006 | 06:34 PM
#16
drum roll please.... :drum:
Now how cool is this? NorCalVP did all the work to do this swap but ended losing the pics he had. Most of you know i bought his 4runner about 6 months ago. Almost 2 years later after he did the swap, i present to you the pictures that i took.
The console pops right off. I couldn't believe a scewdriver or any tools were not needed. All you have to do is lift up the front of the shifter console a bit and then start pulling the radio console out. No need to pull knobs or undo screws. In a 2nd gen, you have to use a few tools and take apart half the freakin interior to get the console off.
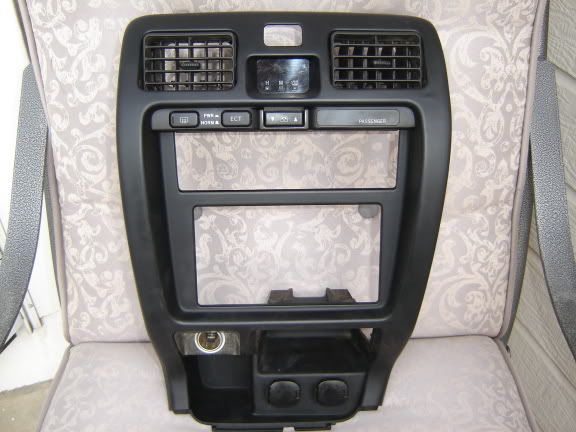
So heres the '99+ console. I took the ashtray out to paint the metal bracket cause it had some surface rust and i'm picky about things like that. Notice it has three 12V outlets. The one on the left uses your factory '96-'98 wiring. The two on the right are wired up to always have constant power:
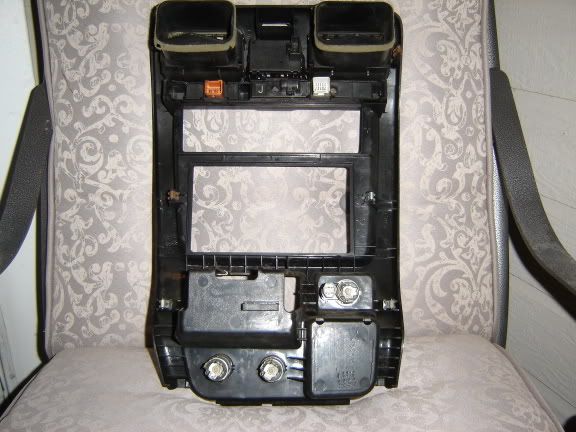
Heres the back:
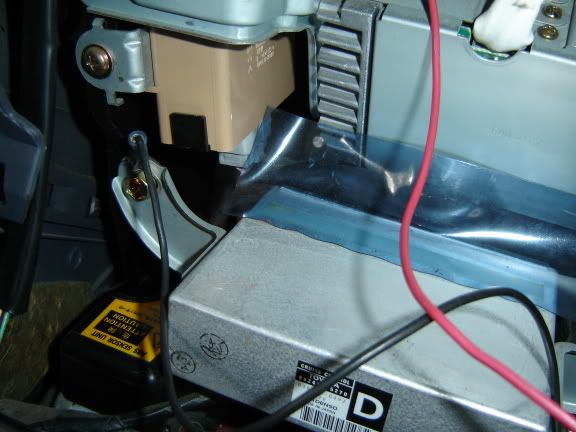
Heres the wiring for the two 12v outlets on the right. Black is gounded below the radio and the Red eventually goes to the battery:
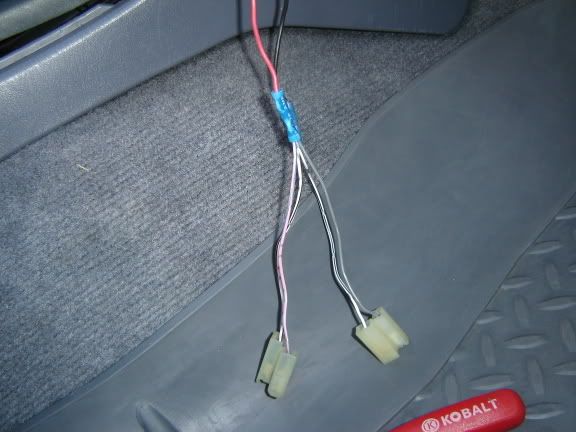
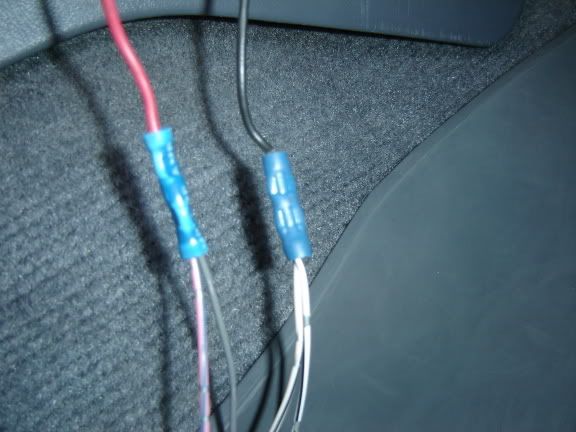
This is where the Black wire is grouned:
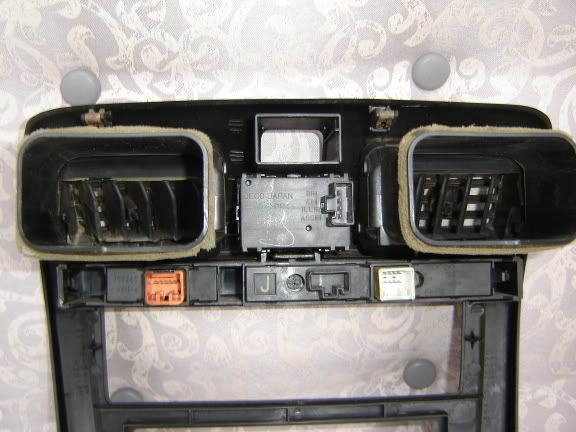
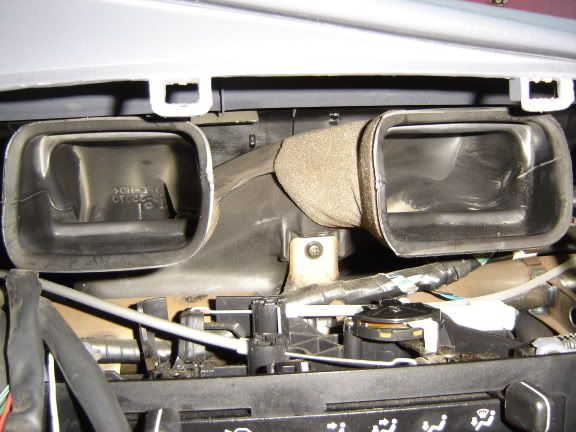
Heres the '99+ air duct. I took it out and cleaned it. One screw is all it takes:
The rest of the wiring is coming next...
Now how cool is this? NorCalVP did all the work to do this swap but ended losing the pics he had. Most of you know i bought his 4runner about 6 months ago. Almost 2 years later after he did the swap, i present to you the pictures that i took.
The console pops right off. I couldn't believe a scewdriver or any tools were not needed. All you have to do is lift up the front of the shifter console a bit and then start pulling the radio console out. No need to pull knobs or undo screws. In a 2nd gen, you have to use a few tools and take apart half the freakin interior to get the console off.
So heres the '99+ console. I took the ashtray out to paint the metal bracket cause it had some surface rust and i'm picky about things like that. Notice it has three 12V outlets. The one on the left uses your factory '96-'98 wiring. The two on the right are wired up to always have constant power:
Heres the back:
Heres the wiring for the two 12v outlets on the right. Black is gounded below the radio and the Red eventually goes to the battery:
This is where the Black wire is grouned:
Heres the '99+ air duct. I took it out and cleaned it. One screw is all it takes:
The rest of the wiring is coming next...
Last edited by rocket; Aug 24, 2006 at 02:25 AM.


 Aug 23, 2006 | 08:35 PM
#20
Thread Starter
Registered User
Joined: Sep 2003
Posts: 626
Likes: 0
From: Surprise AZ
I don't know how willing Rocket will be to tear the defrost switch apart.... But If he doesn't get that apart, and someone wants to tear theirs open, I can show you the locations of where to solder the wires to make it work.
Steve
Steve


