
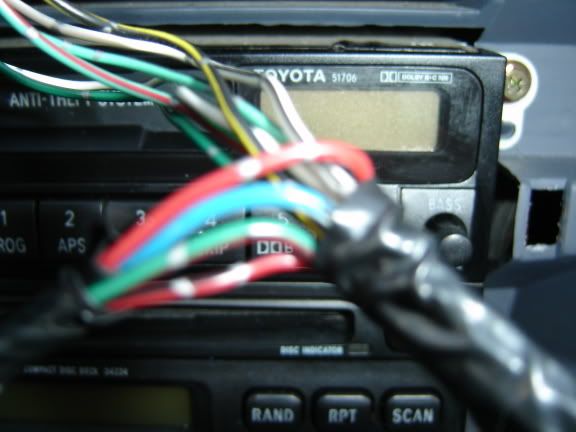
For those who want to put the 99+ center dash bezel in.
 Aug 23, 2006 | 08:37 PM
#21
wow.. i had no idea norcalvp (Steve) solderd wires inside the defrost switch untill after just reading his first post again. I thought all the wires that went into the switch were there from the factory. So i just went back out to my 4runner and took a closer look. I then pulled the switch apart...it wasn't easy and i almost gave up but 10~ mintues later it finally came apart.
Holy crap! Talk about a master piece job! So i snapped and uploaded more pics...hence the long wait.
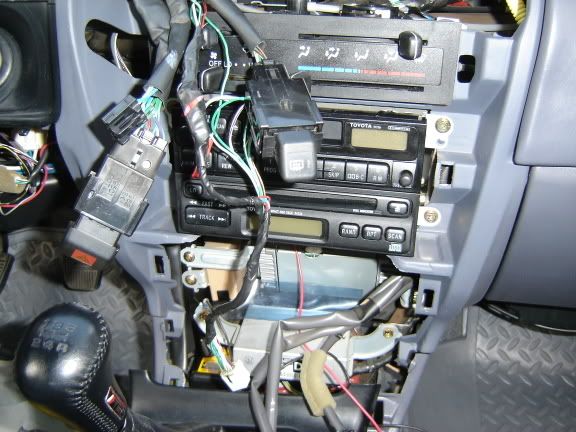
I'll add color coded descriptions of all the wiring that was cut, crimped, solderd, and not used. The first color said is "solid" and the second color is striped.
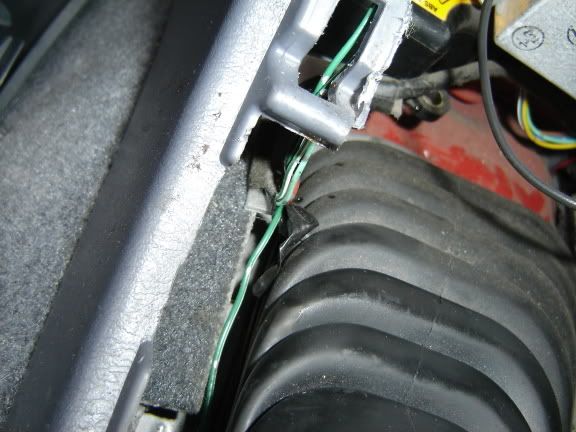
I pulled back the shifter console to show the wires that were re-routed for the rear window. One Green/white stays and runs under the cup/center console. The rest go up toward the dash:
mmmmmmm wires:

gotta love the TRD knob:
At first i figured these would be good enough:

But then i decided to take the electrical tape off. Good thing i did:
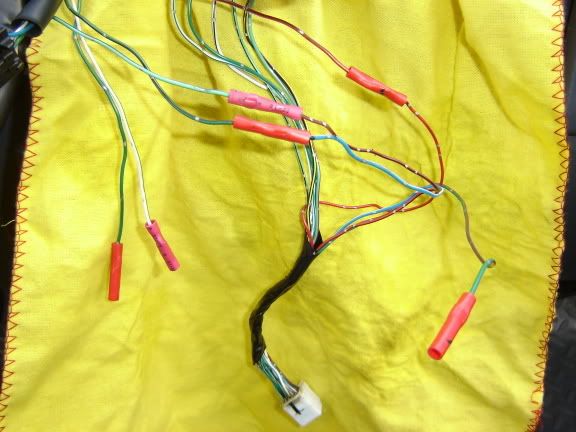
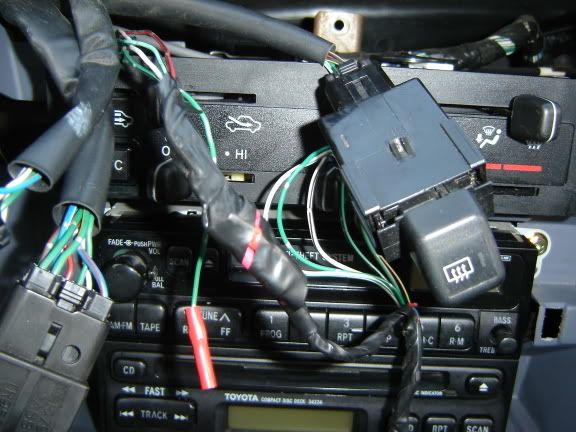
One wire coming from the harness plug is not used. It's Green/red:
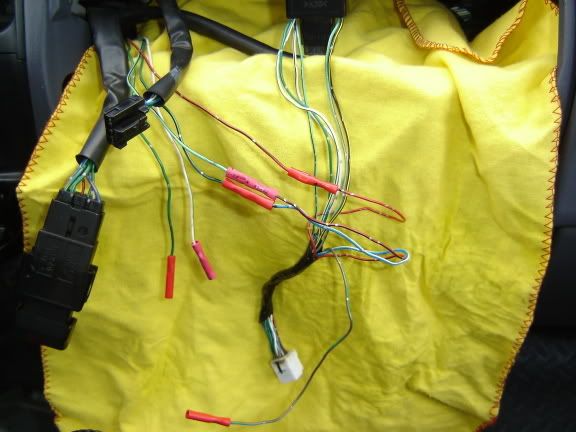
Two wires coming up from the center console are not used and can be seen on the left. One is solid Green and the other is White/green:
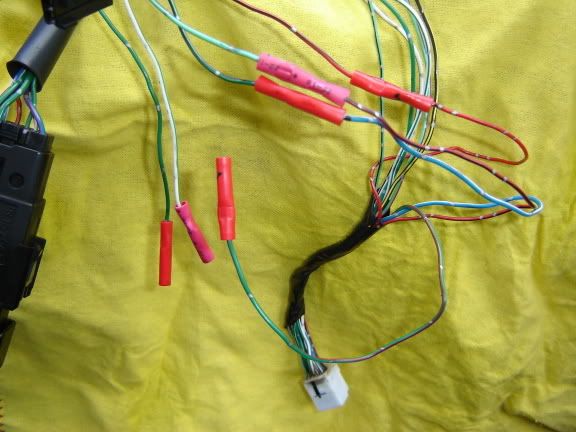
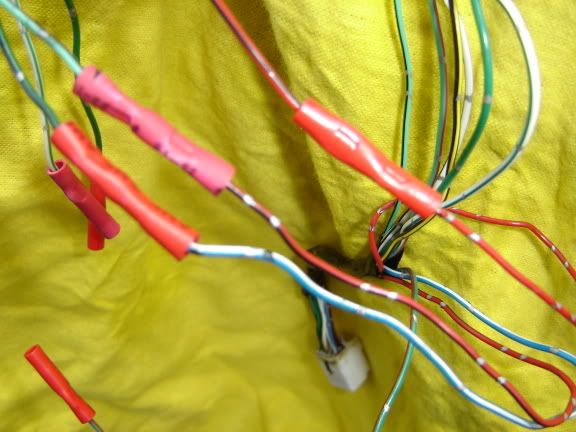
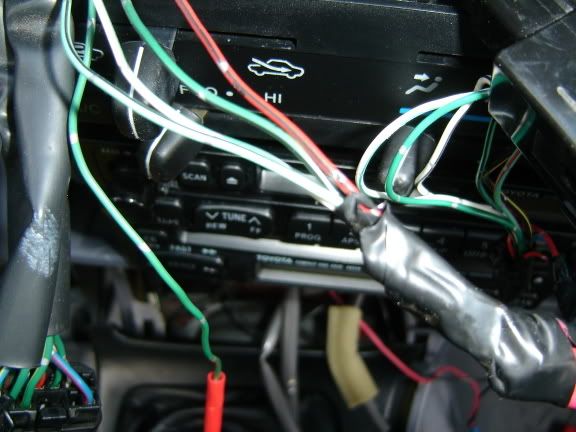
Going left (re-routed from center console) to the right (harness plug)...
Red/black connects to solid Red:
Lt.Green/black connects to Red/black:
Dk.Green/black connects to Blue/white:
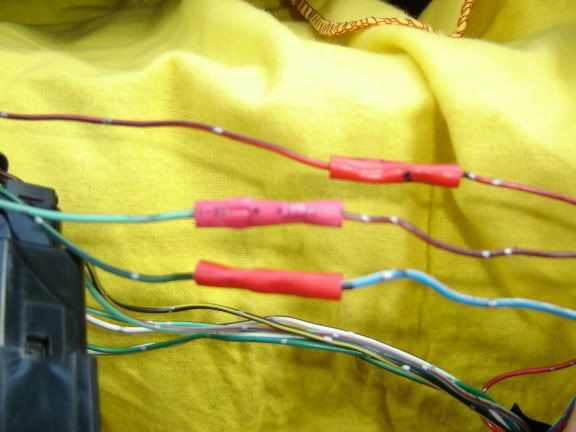
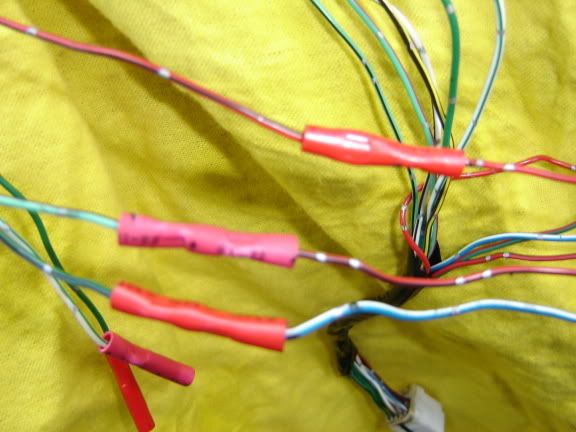
The defroster switch is next...
Holy crap! Talk about a master piece job! So i snapped and uploaded more pics...hence the long wait.
I'll add color coded descriptions of all the wiring that was cut, crimped, solderd, and not used. The first color said is "solid" and the second color is striped.
I pulled back the shifter console to show the wires that were re-routed for the rear window. One Green/white stays and runs under the cup/center console. The rest go up toward the dash:
mmmmmmm wires:
gotta love the TRD knob:
At first i figured these would be good enough:
But then i decided to take the electrical tape off. Good thing i did:
One wire coming from the harness plug is not used. It's Green/red:
Two wires coming up from the center console are not used and can be seen on the left. One is solid Green and the other is White/green:
Going left (re-routed from center console) to the right (harness plug)...
Red/black connects to solid Red:
Lt.Green/black connects to Red/black:
Dk.Green/black connects to Blue/white:
The defroster switch is next...
Last edited by rocket; Aug 23, 2006 at 10:55 PM.
Aug 23, 2006 | 08:54 PM
#23
This is what i didn't notice earlier. Two perfectly drilled holes in the defrost switch with a total of 6 wires going inside:
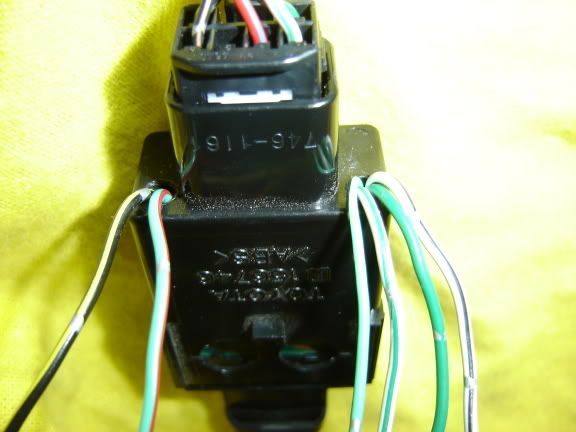
Got it apart:
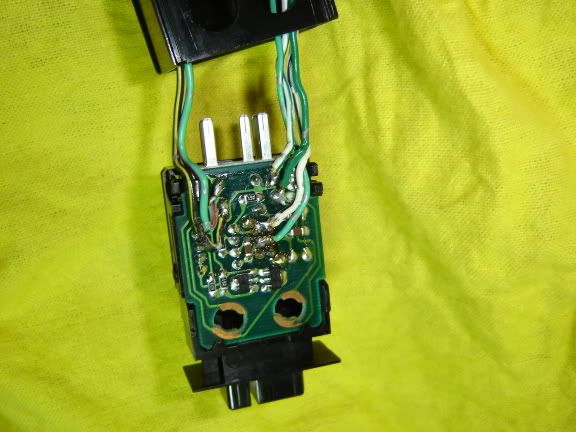
Click link for a 1152x864 image:
http://i16.photobucket.com/albums/b4...DSC01064-1.jpg
Hope that helps you guys!
Steve, you are a genius!
Got it apart:
Click link for a 1152x864 image:
http://i16.photobucket.com/albums/b4...DSC01064-1.jpg
Hope that helps you guys!
Steve, you are a genius!
Last edited by rocket; Aug 23, 2006 at 09:23 PM.


 Aug 24, 2006 | 08:22 AM
#27
Thread Starter
Registered User
Joined: Sep 2003
Posts: 626
Likes: 0
From: Surprise AZ
Originally Posted by garrett1478
steve when you ordered the connector C23 (the white one used on 99+) did it already have all the wires coming out of the back??
I got my connector from a donor truck, so It already had the wires in it. I believe that If you order just the connecter, it will come without the wires and connectors (metal conductors)
Aug 24, 2006 | 08:27 AM
#28
Thread Starter
Registered User
Joined: Sep 2003
Posts: 626
Likes: 0
From: Surprise AZ
The Green/Red wire comming from C23 that has just a red butt connector is the Switched +12V comming from the ECT button... I hadn't figured what to do with it just yet.
I believe the two wires comming up from the console that are not used are for the green backlight for the window button... Since the 99+ panel combines the lights from a number of different sources, these are not needed.
And Bob... For the Defrost button, You already know the connector is the same, but the pinouts are different, You don't need to cut and splice this connection (its easier, but doesn't look as good) There is a white part of the black connector on the bottom. If you take a small screwdriver and pop this part up about 1/8 of an inch, Then you can take a small pick or really small precision screwdriver and pull each pin out individually (there is a small tab on each pin that you must pry up and slide the pin/wire out). Then just move them around the connector and plug them back in the right place. Then just push the white piece back down and it locks everything back in place.
Steve
Last edited by NorCalVP; Aug 24, 2006 at 08:28 AM.
Aug 24, 2006 | 10:39 AM
#29

Banned
Joined: Jan 2005
Posts: 0
Likes: 0
Originally Posted by NorCalVP
I got my connector from a donor truck, so It already had the wires in it. I believe that If you order just the connecter, it will come without the wires and connectors (metal conductors)
Aug 24, 2006 | 05:00 PM
#30
Steve, thanks for helping out with more info.
I took couple more big pics (1152x864) today.
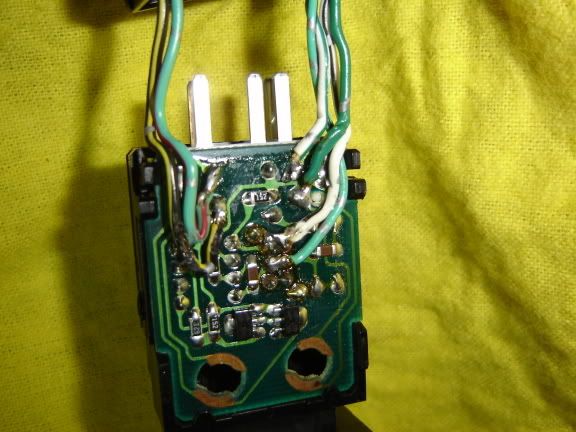
Soldering:
http://i16.photobucket.com/albums/b4...6/DSC01081.jpg
Back of the defrost swtich:
http://i16.photobucket.com/albums/b4...6/DSC01082.jpg
If you guys need pics of anything else, just let me know soon before i start putting everything back together.
From what i see, this swap really dosen't look all that hard. Once you know the wiring, it's just a matter of connecting and soldering it all. At least i think so.
btw Steve, I found something that you left in my 4runner before i bought it from you. I've been holding onto it just incase you need it back.
Can you guess which one it is?


I took couple more big pics (1152x864) today.
Soldering:
http://i16.photobucket.com/albums/b4...6/DSC01081.jpg
Back of the defrost swtich:
http://i16.photobucket.com/albums/b4...6/DSC01082.jpg
If you guys need pics of anything else, just let me know soon before i start putting everything back together.
From what i see, this swap really dosen't look all that hard. Once you know the wiring, it's just a matter of connecting and soldering it all. At least i think so.
btw Steve, I found something that you left in my 4runner before i bought it from you. I've been holding onto it just incase you need it back.
Can you guess which one it is?
Aug 24, 2006 | 05:20 PM
#31
Thread Starter
Registered User
Joined: Sep 2003
Posts: 626
Likes: 0
From: Surprise AZ
Originally Posted by garrett1478
hmm... i have the connector on order already. is it feasible to say that i want to remove the wires/conductors from my existing 1998 switches and 'plug' them into the connector C23 or is it not gonna be that easy...
The pins in the connectors for the 96-98, and the 99+ are different sizes and I don't think they will easily switch between the two... You will probably need to order the pins too... They should be fairly inexpensive.
Aug 24, 2006 | 05:23 PM
#32
Thread Starter
Registered User
Joined: Sep 2003
Posts: 626
Likes: 0
From: Surprise AZ
Originally Posted by rocket
btw Steve, I found something that you left in my 4runner before i bought it from you. I've been holding onto it just incase you need it back.
Can you guess which one it is?
Man You know what... I sure did leave that nice Kobalt Pick set in that 4 Runner...

Last edited by NorCalVP; Aug 24, 2006 at 05:24 PM.
Sep 3, 2007 | 02:55 PM
#33
Registered User
Joined: Sep 2002
Posts: 30
Likes: 0
From: Inland Empire, Ca
Good info thus far. I'm about to swap my 96 center console for a 99. I acquired the 99 bezel and cupholder/center console(to be done at a later date)from a local junk yard for only $100.00.
I have a few questions on the 4-way hazard switch, and defrost button. I've searched and read many threads over the last few days. I can't confirm if anyone else has successfully modified the 4-way hazard switch and defrost buttons from a 99 or later, to work with the factory wiring from a 96-98.
NorCalVP modified his defroster switch, and I was wondering if it's possible to use just the pins without opening up the switch itself. I believe(if my understanding is correct) that rocket shows the wiring changes necessary for the rear window and backlighting to work on the '99 or later bezel with 96-98 wiring.
I won't mind opening up the '99 switch, but my soldering skills aren't the greatest. How about just using the pins on the rear of the '99 switch, and then making your wiring connections from there--without opening up the switch. Any suggestions or ideas? I don't have a factory wiring manual just yet.
The connector pieces are different on the '99(as Bob and others pointed out a while back). I understand splicing of the wiring is a must. Any photos(similar to what rocket or NorCalVP)posted would be geatly appreciated. If you have info, PLEASE reply.
Bob. We're you finally able to utilize all the switches on the 99 or later bezel to work on your '98? If so, what did you do to make it all happen?
Thanks.
Tony
Sep 3, 2007 | 06:00 PM
#34
Thread Starter
Registered User
Joined: Sep 2003
Posts: 626
Likes: 0
From: Surprise AZ
I have a few questions on the 4-way hazard switch, and defrost button. I've searched and read many threads over the last few days. I can't confirm if anyone else has successfully modified the 4-way hazard switch and defrost buttons from a 99 or later, to work with the factory wiring from a 96-98.
NorCalVP modified his defroster switch, and I was wondering if it's possible to use just the pins without opening up the switch itself. I believe(if my understanding is correct) that rocket shows the wiring changes necessary for the rear window and backlighting to work on the '99 or later bezel with 96-98 wiring.
I won't mind opening up the '99 switch, but my soldering skills aren't the greatest. How about just using the pins on the rear of the '99 switch, and then making your wiring connections from there--without opening up the switch. Any suggestions or ideas? I don't have a factory wiring manual just yet.
The connector pieces are different on the '99(as Bob and others pointed out a while back). I understand splicing of the wiring is a must. Any photos(similar to what rocket or NorCalVP)posted would be geatly appreciated. If you have info, PLEASE reply.
Bob. We're you finally able to utilize all the switches on the 99 or later bezel to work on your '98? If so, what did you do to make it all happen?
Thanks.
Tony
Doing the solder connections inside the controller are actually pretty easy, Just your standard radio shack cheepie soldering iron would do.
The hazzard switch connector is the same, but the wiring pinouts are different. I just used a DVM on both switches to move the wires around. it only took a few minutes to do. The toyota connectors come apart by gently prying up the little white piece on the bottom, then use a small flat tip screwdriver to move the holders. The pins just slide right out, then snap back into place, no cutting or soldering required.
I wish i could be more help, I don't own that truck anymore so I can't go out and inspect it.
Steve
Sep 3, 2007 | 08:57 PM
#35
Registered User
Joined: Sep 2002
Posts: 30
Likes: 0
From: Inland Empire, Ca
Thanks Steve. I appreciate the info. I think I should be able to handle the hazard switch since it sounds like it's just a matter of moving a couple of pins around so that they are in the position as the my 96 switch.
If anybody else has done the swap, feel free to chime in if you have any other additional information.
If anybody else has done the swap, feel free to chime in if you have any other additional information.
Sep 4, 2007 | 12:07 AM
#36
Whats up Steve! Cool to see ya helping out on this again.
4RUN-GT, i took all the pics that i thought necessary. But i'm currently tearing into my interior for a stereo/CB install so if you need something else just let me know. Far as i've seen, NorCalvp is the only one thats done this swap to the extent that he did...
4RUN-GT, i took all the pics that i thought necessary. But i'm currently tearing into my interior for a stereo/CB install so if you need something else just let me know. Far as i've seen, NorCalvp is the only one thats done this swap to the extent that he did...
Sep 4, 2007 | 02:56 PM
#37
Registered User
Joined: Sep 2002
Posts: 30
Likes: 0
From: Inland Empire, Ca
Thanks Rocket. Your pictures of the wiring/connections will be a big help. I guess I'll wait for Bob to respond and see if he completed his.
I have a few ideas, so I'll have to keep trying until I get it right.
I have a few ideas, so I'll have to keep trying until I get it right.

 Apr 23, 2008 | 07:32 AM
#39

Registered User
Joined: Dec 2006
Posts: 369
Likes: 0
I'm looking to do this mod and prepare a write-up of the results.
Have secured a 99+ bezel and in the process of pulling everything apart.
My question is with the hazard button. I have removed the pins from my 98 switch but am not sure of the seating order to reinstate them as per 99 arrangement. I don't have a volt meter or access to one. I can just about make out the top row on the pics in thread #21 above but not the bottom row. Too many green wires!
So, I wondered if Bob, Rocket or 4run-GT ever completed this and if so could they take a pic of the repinned switch.
Last edited by blarchitect; Apr 23, 2008 at 10:16 AM. Reason: spelling and grammar!


