
rustED's 86' V8-Runner Build-up Thread


 Jun 2, 2014 | 06:37 PM
#924
Thread Starter
Registered User
iTrader: (2)
Joined: Sep 2010
Posts: 2,716
Likes: 7
From: Tri-Cities, Wa
My wife and I are hooked on the Dog Whisper TV series, it's amazing what Cesar Milan can do with a misbehaving dog. We plan on using his method of being the "pack leader" in hopes of having a very well behaved and trustworthy pitty.
LOL,...yeah, the hard part for us has been trying to unanimously decide upon a name...my wife said "Yota, or Yoter" or any other form, and/or abrevition of the word Toyota is out of the running, lol.
Thanks Gizler! I was suprised that we got her, i really didnt expect the first two people infront of us on the waiting list to pass on her! I guess there was alot of interest in her on the day we picked her up, good timing!
On a side note, I didn't get anything done on the runner, we went to town and pretty much loaded up on puppy food, treats, toys, we got a nice size indoor kennel from Wally World (42" long by 27" wide by 31" tall) she should still be able to sleep in it at night when she's full grown. I plan on working on the runner tomorrow!
Last edited by rustED; Jun 2, 2014 at 06:50 PM.
Jun 3, 2014 | 11:10 PM
#927
Thread Starter
Registered User
iTrader: (2)
Joined: Sep 2010
Posts: 2,716
Likes: 7
From: Tri-Cities, Wa
Got some work done on the runner today. Before I swapped in the AllPro leafsprings I checked the pinion angle, just for a reference. It was 15*...after the AllPro leaves springswere swapped it was 10*
^^^again this was just for my reference, I have no idea if this is the correct way to check the angle, but it should work.
So then to make it easier to cut the old axel spring perches off, I yanked the rear axel. I had to pull the mudflaps off to roll the axel out to clear the tires, it ticked me off because I broke off 2 out of 3 bolts holding the passenger side flap in place. So I went ahead and just cut those lower tabs off that hold the flaps and the plastic bumper skirts in place. I was planning to do this eventually, I was just witing till I got a rear bumper, oh well.
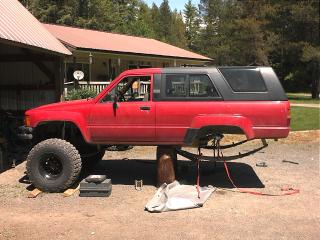
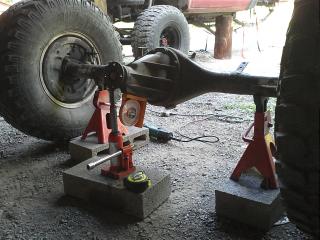
I set the axel up on some jack stands, and set the pinion angle at 10* like it was when it was under the 4runner, then I checked to see what degrees the axel perches were at, they were at lets call it -5* since it was on the other side of the zero degree mark. So after cutting off the old perches, I set the pinion at 20* (remember that I was originally at 15*) in hopes that this should be pretty close and hopefully correct my driveshaft/pinion angle, basically I guessed, lol. After setting the pinion at 20* I measured and clamped the perches in place and tacked welded them into place set at -5* ...I couldn't finish, got interrupted by a thunderstorm, but tomorrow I will roll the axel back in place and mock it up and check the driveline angle, hopefully it's good, then I'll finish welding it up, hopefully get the shocks mounted in time to drive it to work at 2pm, lol.

Last edited by rustED; Jun 3, 2014 at 11:47 PM.
Jun 5, 2014 | 06:17 AM
#928
Thread Starter
Registered User
iTrader: (2)
Joined: Sep 2010
Posts: 2,716
Likes: 7
From: Tri-Cities, Wa
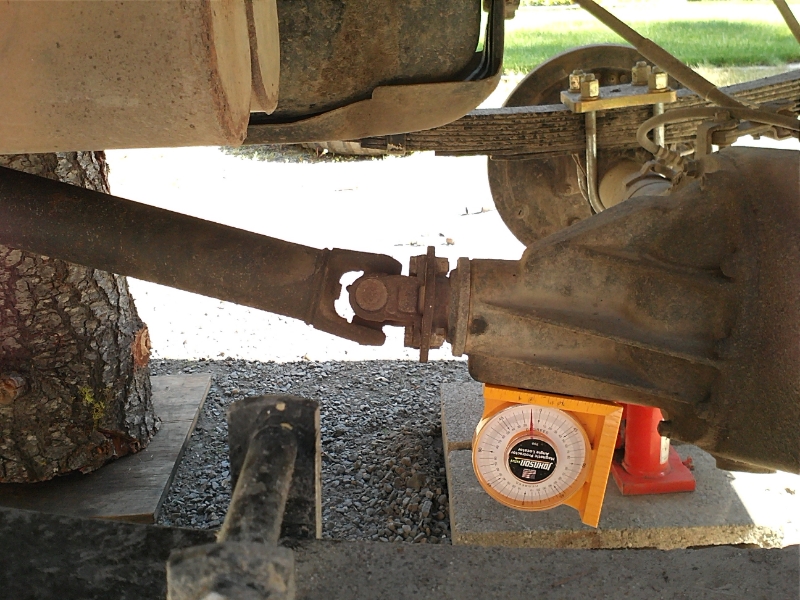
So yesterday I got the axel put back in and the weight of the runner back on the tires with the pinion angle set at 20 degrees and the new axel spring perches set at -5 degrees ....20* was a little to much, so I set it at 17* and it came out just right, here is a before and after shot.
^^^before at 10 degrees
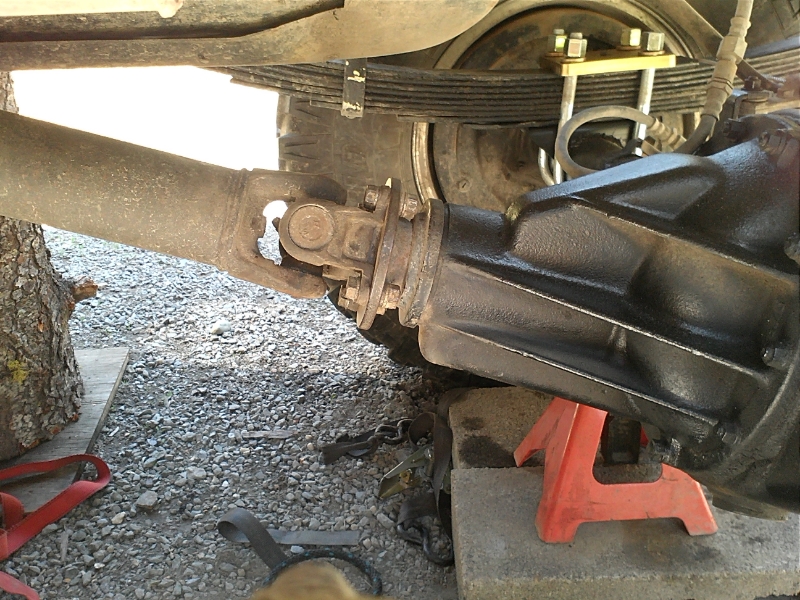
^^^after cutting off the old perches, rotating the axel up 7 degrees, new 3 hole axel perches set at stock specs at -5 degrees...notice my U bolts, I used the rear most hole on the spring perch so I could move the axel forward 1" which worked, should solve my rubbing issue, but I don't like the looks of the u bolts, the nut looks like it's only making contact with the washer on one side do to the angle. It's tightened down good, does anyone see a problem with running it like this, other than it looks fugly?
Here's a before and after pic with the axel moved forward 1"
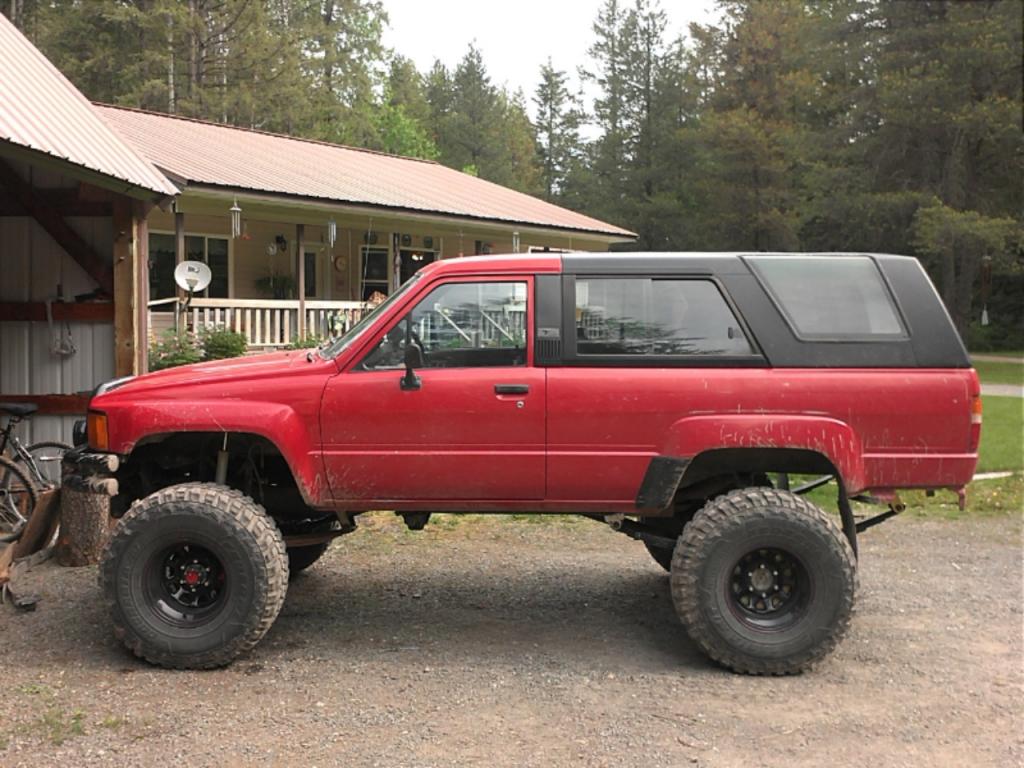
^^^before with the axel moved back, wheel base extended 1" but tire making contact with rear of fenderwell when flexed
^^^after using rear most hole on the 3 hole spring perch moving the axel forward 1" (to factory location) should resolve rubbing issues, but now have fugly u bolt flip kit, lol.
what do u guys think? leave it or move it back 1 " and trim the wheel well where it rubs. I need to make a decision before mounting and welding my shock tabs in place. Thanks for your input!
Ed

^^^before at 10 degrees

^^^after cutting off the old perches, rotating the axel up 7 degrees, new 3 hole axel perches set at stock specs at -5 degrees...notice my U bolts, I used the rear most hole on the spring perch so I could move the axel forward 1" which worked, should solve my rubbing issue, but I don't like the looks of the u bolts, the nut looks like it's only making contact with the washer on one side do to the angle. It's tightened down good, does anyone see a problem with running it like this, other than it looks fugly?
Here's a before and after pic with the axel moved forward 1"

^^^before with the axel moved back, wheel base extended 1" but tire making contact with rear of fenderwell when flexed

^^^after using rear most hole on the 3 hole spring perch moving the axel forward 1" (to factory location) should resolve rubbing issues, but now have fugly u bolt flip kit, lol.
what do u guys think? leave it or move it back 1 " and trim the wheel well where it rubs. I need to make a decision before mounting and welding my shock tabs in place. Thanks for your input!
Ed
Last edited by rustED; Jun 5, 2014 at 06:40 AM.
Jun 5, 2014 | 08:28 AM
#932
Thread Starter
Registered User
iTrader: (2)
Joined: Sep 2010
Posts: 2,716
Likes: 7
From: Tri-Cities, Wa
Lol, thanks Red Wagon, that's 2 votes to move axel back and trim excessive fat, good enough for me!
Thanks guys for your input!
Last edited by rustED; Jun 5, 2014 at 08:32 AM.
Jun 5, 2014 | 12:00 PM
#933
Thread Starter
Registered User
iTrader: (2)
Joined: Sep 2010
Posts: 2,716
Likes: 7
From: Tri-Cities, Wa
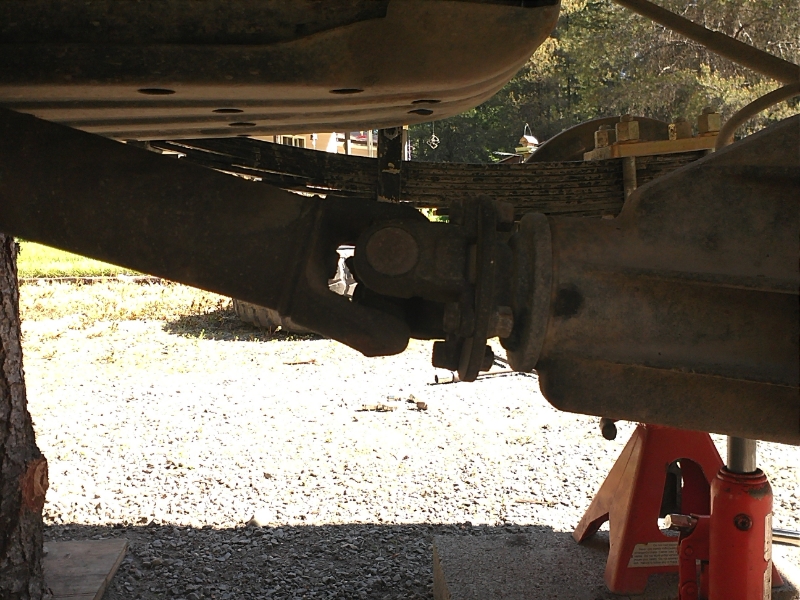
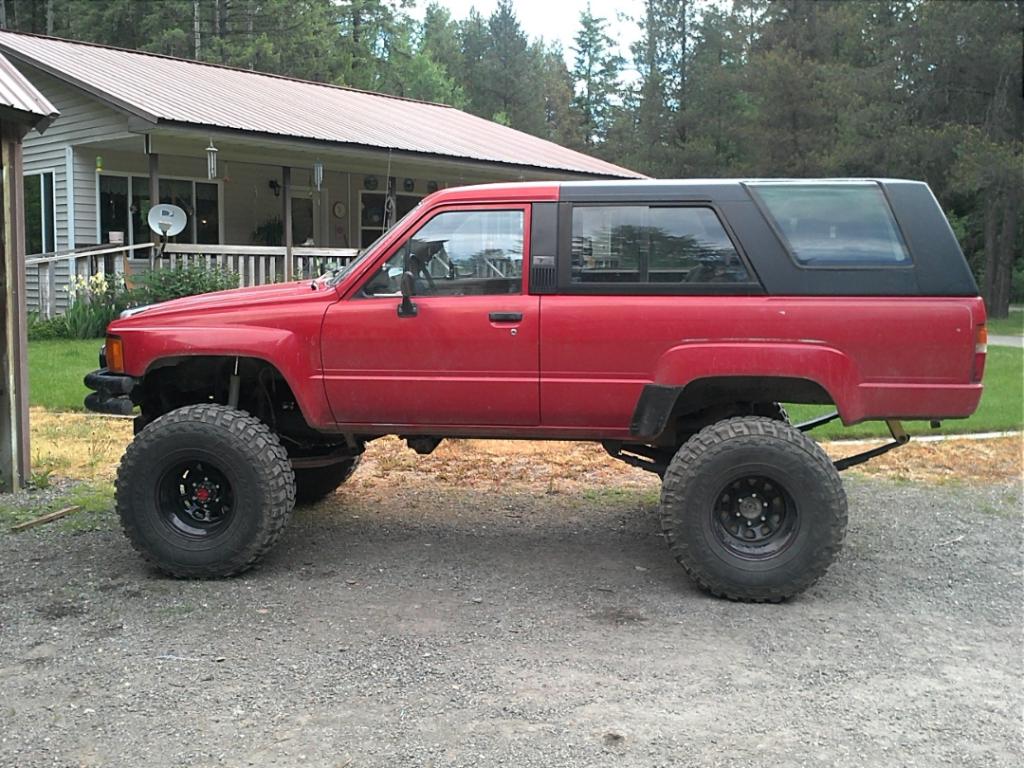
I don't know why I didn't think of this idea sooner (DUH) I just measured back 1 inch and drilled a new hole in the plate.


that's a lot better, I'm happy with that!
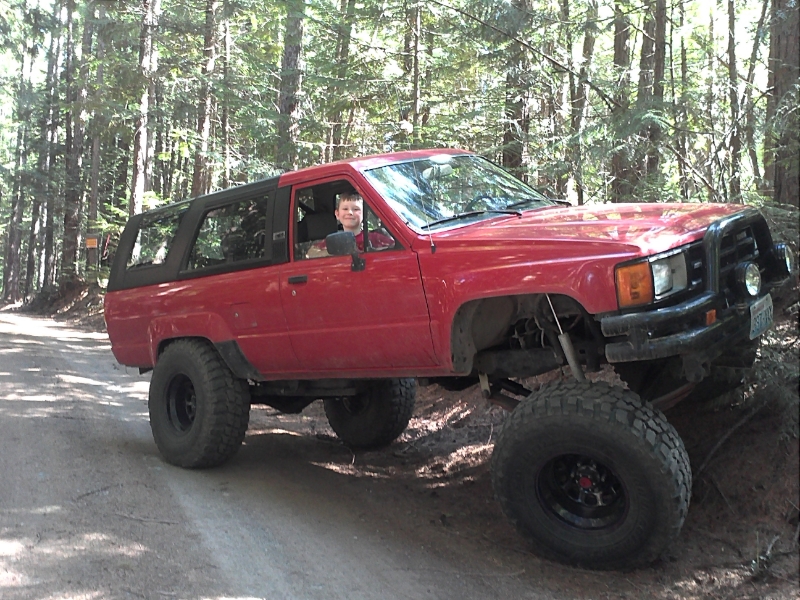
^^^Here's my helper, I got his approval!


I can flex it out more now before it barely makes contact, might still need to trim, I'll wait till after I get the shocks mounted.


that's a lot better, I'm happy with that!


^^^Here's my helper, I got his approval!


I can flex it out more now before it barely makes contact, might still need to trim, I'll wait till after I get the shocks mounted.
Last edited by rustED; Jun 5, 2014 at 12:05 PM.
Jun 6, 2014 | 12:02 AM
#935
Thread Starter
Registered User
iTrader: (2)
Joined: Sep 2010
Posts: 2,716
Likes: 7
From: Tri-Cities, Wa
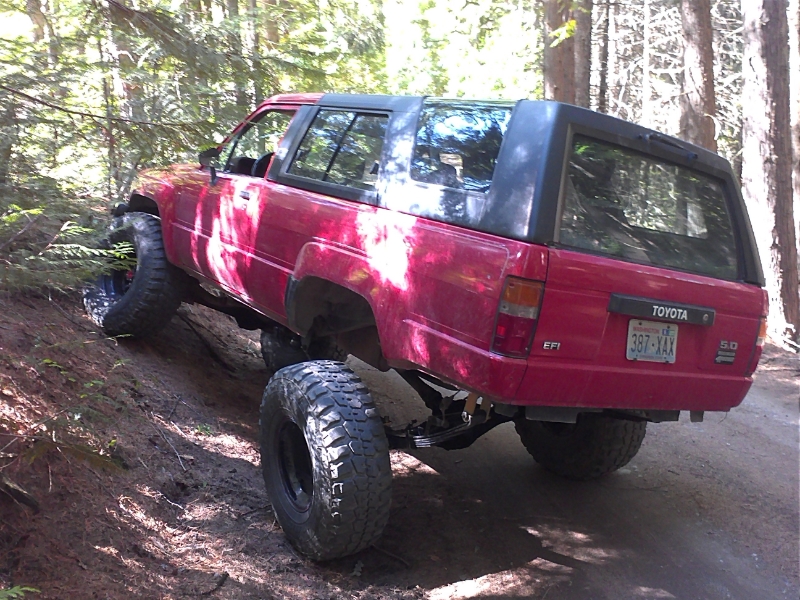
Thanks man! Yeah that was a pretty easy fix, I don't know why I didn't think of it sooner, lol. I drove the runner to work today, there was no noticeable difference in the way it drove after changing the pinion angle.
Tomorrow I'll get the shock tabs welded on and the rear shocks mounted.
Jun 6, 2014 | 04:25 AM
#936

Registered User


Joined: May 2008
Posts: 523
Likes: 1
Thanks man! Yeah that was a pretty easy fix, I don't know why I didn't think of it sooner, lol. I drove the runner to work today, there was no noticeable difference in the way it drove after changing the pinion angle. Tomorrow I'll get the shock tabs welded on and the rear shocks mounted.
Jun 6, 2014 | 12:31 PM
#938
Thread Starter
Registered User
iTrader: (2)
Joined: Sep 2010
Posts: 2,716
Likes: 7
From: Tri-Cities, Wa
Actually, it might be a good idea to mount a camera under there if you can to see what it's doing under load. I remember seeing this a few years ago on SuperDuties: http://s209.photobucket.com/albums/b...t=Axlewrap.flv
Jun 6, 2014 | 12:37 PM
#939
Thread Starter
Registered User
iTrader: (2)
Joined: Sep 2010
Posts: 2,716
Likes: 7
From: Tri-Cities, Wa
Thanks, I'm pretty happy with how it turned out!
I got the shock tabs welded up today, shocks are finally mounted, should make a big difference in handling, been driving without them for the past week, lol. Next on my to do list is installing my new aluminum radiator, 14" electric fan and shroud!
I got the shock tabs welded up today, shocks are finally mounted, should make a big difference in handling, been driving without them for the past week, lol. Next on my to do list is installing my new aluminum radiator, 14" electric fan and shroud!
Last edited by rustED; Jun 6, 2014 at 12:39 PM.


