
rustED's 86' V8-Runner Build-up Thread
 Oct 22, 2013 | 06:36 PM
#761
Thread Starter
Registered User
iTrader: (2)
Joined: Sep 2010
Posts: 2,716
Likes: 7
From: Tri-Cities, Wa
Once you get the Clipse out in the fabric of, you will see very clearly if there are any compromised or close to compromised areas of the backrest portion of the frame. The way we getting these trucks and out, they have a vulnerable point at the bottom right. Obviously I'm a bigger guy, so I'm sure that was a factor in my chair frame breaking. However, I've owned the truck for 13 years, and even just last year when I first remove the cover, I noticed that they tried to use a bracket with u bolts to hold the two pieces together. It worked for a time but the seat eventually gave way and Halloween to it. Further yet, it began to give me trouble reclining......
Most of the phone was in OK condition, but a specially around the bolsters, as most anyone knows, they are really worn thin ... I have a really wide back and even though the first gen 4 runner and early 2nd gen pickups have the most forgiving bolsters, when I start off road and really dig into them left to right, they can end up really bruising up my ribs. So, I took a portion of super dense 1 inch foam from Joann's fabrics, cut out pieces and use it he civ to wrap it around the bolster arms, which you will see clearly see work on a split farm mechanical method, pulling in and out as you turn the wheel which in turn its the bolsters in or out.
The other problem is that the backrest and back springs do tend to wear out a bit, but they were pretty close to stock... So I took another large portions of 1 inch super dense foam and cut it out to fit almost like a ti up to the very top of the seat, under the main fabric and just on top of the factory foam. This brought my back out a little bit from the backrest and subsequently kept my floating rib from constantly getting that tiny bit of pressure from the bolsters, which over 600 miles or so can really start to annoy. It's also very comfortable to have your back supported. I pull the lumbar adjustment just one click and that really helps support the lower back.
Over the last couple years, since I did this, I've come up with a couple other ideas, one of which is to install it the 2nd Gen 4runner seat foam that I pulled carefully they donor seat that I gotta pick your part. The rump and backrest portions are in perfect condition with no tears, as I carefully removed the clips that hold the foam in place. I think I would like to pull the one inch super dense foam that I installed, and try the factory phone over my own. As was mentioned, it is difficult enough to get the fabric on, so I'm sure it's going to give me a little trouble getting it over the added foam.... But I'm going to make it work, because I got to say, these are by far the most comfortable seat I've ever tried. They just fit perfectly and have good cushion in the rump where it counts on the tailbone, especially my tailbone which was severely fractured around 16 years ago. Not forgetting to mention, my back is somewhat of a disaster with for 6 millimeter herniated discs, a couple of fractures that really act up when its cold and as I mentioned, the tailbone. Those combined with all the soft tissue and fracture injuries I sustained during that should have been fatal accident, have left me with a lot of sensitivity just sitting in one place for a long. Of time. So, I need to be as comfortable as possible! I have Sat for over an hour at 4 Wheel Parts and other stores that demo their finest seats... All of them, with exception of one Corbeau, give me the sense in my nerves that overtime they will become very much and knowing and more importantly no more comfortable than the original first gen 4runner seats that I have . If you are a slender guy, it might not be a terrible idea to just do a swap to something like the Scion tC seats, which in my humble opinion were probably the most comfortable swap that I tried.
I have some junk seats and a sewing machine and want to try giving it a shot on reupholstering. I have never done it but am planning on it being a winter project. I have priced having them reupholstered and it is expensive. I have tried several different brands of seat coverings and have not liked any that fit great.
Oct 22, 2013 | 06:58 PM
#762
Thread Starter
Registered User
iTrader: (2)
Joined: Sep 2010
Posts: 2,716
Likes: 7
From: Tri-Cities, Wa
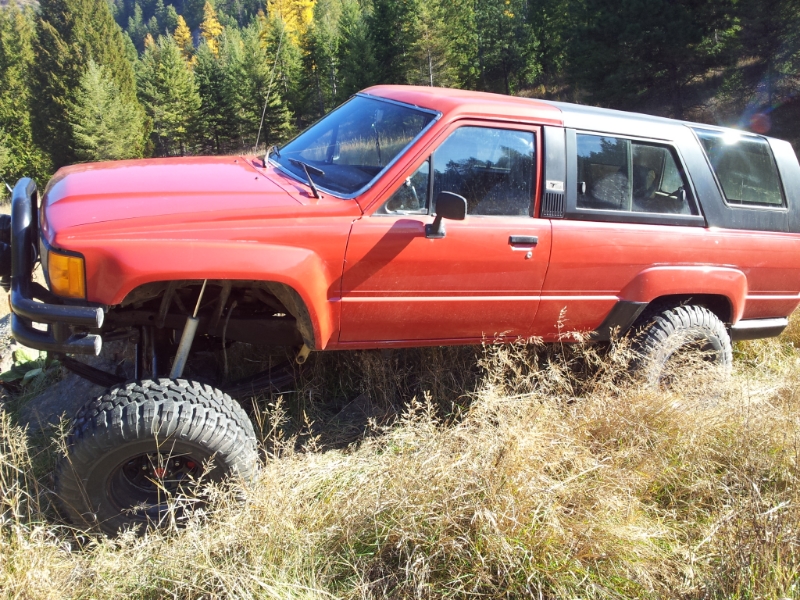
Today I took the 4runner down and flexed it out so I could take some measurements and figure out where and how to build my front bump stops. It's been over a year since I did my SAS and I'm finally getting around to doing this, lol, I had been waiting to do this because I wanted to buy a U-bolt flip kit, but figured I can always buy that down the road if I decide it is necessary.
I didn't have any blocks and couldn't jack my front end up high enough to get it even remotely close to flattening out my front springs, so I drove down my driveway to a pile of boulders and flexed it out and took my measurements there. I took a bunch of flex pics, but for some reason I can't get my laptop to recognize my cellphone so that I can import them and then upload them to photobucket. I got the passenger side bump stop built and welded to the frame. I built out of 2x2" square tubing, then welded a 3"x3" by 1/4" thick flat plate to it to make the flat surface area that the rubber bump stop will contact. Tomorrow I will build the drive rside bump stop and weld it to the frame, hopefully I can figure out whats wrong with my phone/ computer and get some pics posted up!
I didn't have any blocks and couldn't jack my front end up high enough to get it even remotely close to flattening out my front springs, so I drove down my driveway to a pile of boulders and flexed it out and took my measurements there. I took a bunch of flex pics, but for some reason I can't get my laptop to recognize my cellphone so that I can import them and then upload them to photobucket. I got the passenger side bump stop built and welded to the frame. I built out of 2x2" square tubing, then welded a 3"x3" by 1/4" thick flat plate to it to make the flat surface area that the rubber bump stop will contact. Tomorrow I will build the drive rside bump stop and weld it to the frame, hopefully I can figure out whats wrong with my phone/ computer and get some pics posted up!
Oct 29, 2013 | 07:33 PM
#763
Thread Starter
Registered User
iTrader: (2)
Joined: Sep 2010
Posts: 2,716
Likes: 7
From: Tri-Cities, Wa
Finally got my cell phone figured out, here's some flex pics from the other day.
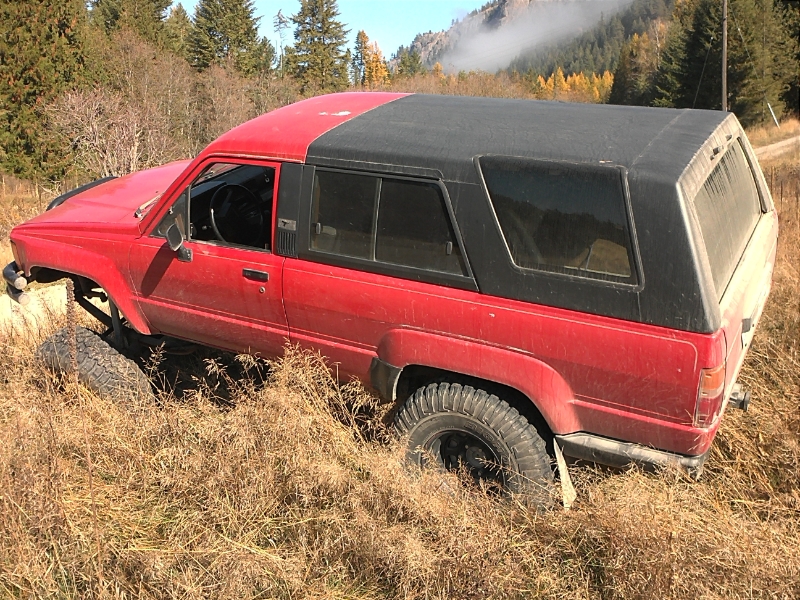
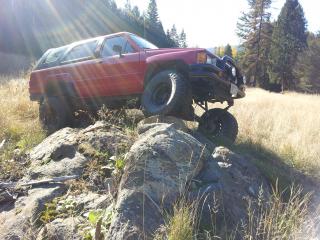

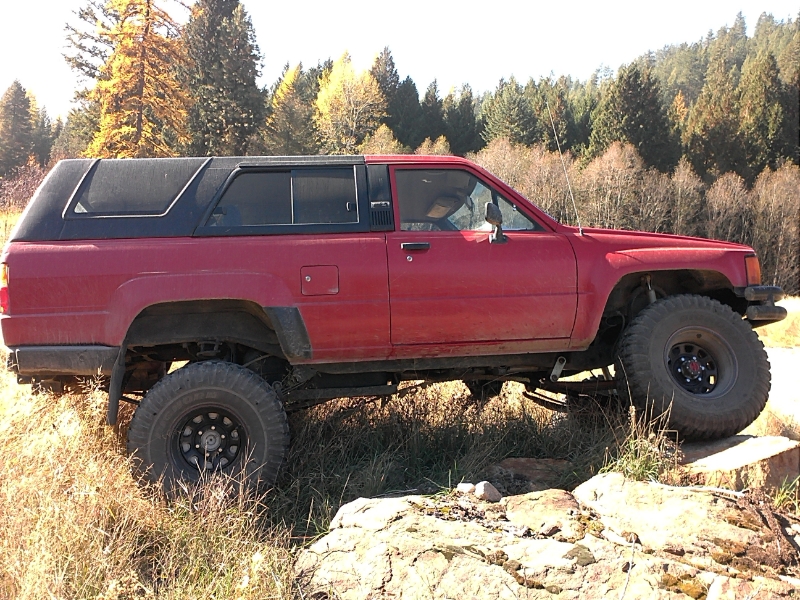

I'm kinda frustrated with myself on the bumpstops. I was really happy with how they turned out, then I went to test it out, and they were about an inch to inch and a half shorter than what I wanted, didn't even make contact, somewhere along the way I messed up on my measurements (wish I would have tack welded them in place and tested it out before fully welding them in place!)...I hate to cut them off and start over,I'm going to have to think about this one for a bit, lol. Overall I'm really happy with the front suspension, I still need spring clamps for the front leaf pack. On the rear I took some measurements and decided to relocate my upper shock mounts. I am still running my old rancho shocks in the rear, and they were nearly fully extended, so I welded up some new shock tabs and gained 4" of up travel, still need to do the passenger side tomorrow. I will eventually upgrade the rear suspension, but for now it will do.


I'm kinda frustrated with myself on the bumpstops. I was really happy with how they turned out, then I went to test it out, and they were about an inch to inch and a half shorter than what I wanted, didn't even make contact, somewhere along the way I messed up on my measurements (wish I would have tack welded them in place and tested it out before fully welding them in place!)...I hate to cut them off and start over,I'm going to have to think about this one for a bit, lol. Overall I'm really happy with the front suspension, I still need spring clamps for the front leaf pack. On the rear I took some measurements and decided to relocate my upper shock mounts. I am still running my old rancho shocks in the rear, and they were nearly fully extended, so I welded up some new shock tabs and gained 4" of up travel, still need to do the passenger side tomorrow. I will eventually upgrade the rear suspension, but for now it will do.
Last edited by rustED; Oct 29, 2013 at 11:05 PM.
Oct 30, 2013 | 06:17 AM
#764
Registered User
Joined: Apr 2012
Posts: 2,817
Likes: 2
From: Los Angeles CA
Omg finally some action shots! Damn your 4Runner us looking clean Ed. As for the bump stops problem why don't u try doing what I did and flex it out till u only have about 1" left of travel then measure out how long u need the bump stops. Im pretty sure I toom pix on my thread. Let me know if u need the pictures and ill look through my photobucket.
Oct 31, 2013 | 11:25 AM
#765
Thread Starter
Registered User
iTrader: (2)
Joined: Sep 2010
Posts: 2,716
Likes: 7
From: Tri-Cities, Wa
Omg finally some action shots! Damn your 4Runner us looking clean Ed. As for the bump stops problem why don't u try doing what I did and flex it out till u only have about 1" left of travel then measure out how long u need the bump stops. Im pretty sure I toom pix on my thread. Let me know if u need the pictures and ill look through my photobucket.
I'm thinking maybe I'll go ahead and buy the U-bolt flip kit for the front, (I already have a set of new polyurethane bump stops from TG that I haven't used yet) then instead of welding the bump stop directly to the flip kit plate, maybe I could build it up 1-1/2" taller to make up the difference... I don't know, I'll have to see what it looks like first, don't want it to look like crap, I just hate to cut off and redo the upper stop, but if I have to to make it look and function properly I will.
Nov 29, 2013 | 01:40 PM
#768
Thread Starter
Registered User
iTrader: (2)
Joined: Sep 2010
Posts: 2,716
Likes: 7
From: Tri-Cities, Wa
Thanks for the compliments man, I appreciate it! From your signature it looks like you got a couple of cool yotas to start build threads on!
I haven't really done anything of interest on my 4runner lately, mostly due to lack of funds, but also because of the weather, it's been so cold here lately that it's hard for me to get motivated, lol, wish I had a nice warm heated shop to work in this time of year! I did finally get a CD player mounted in it though. What took me so long was that someone had hacked the original bezel pretty bad, so I had temporarily mounted my oil pressure, volts and temp gages there. I had another bezel, (just missing the ash tray) so I swapped them, this one is grey instead of black, so I'll have to go back and paint it when the weather warms up. Now I need to find a place to relocate my gages. I like the looks of those A-pillar's with the instrument pods built in (like Chuckar has in his truck) but can't afford it at this time. Was thinking of building an enclosure similar to the inclinometers but smaller and mounting my gages on top of the dash. Also I'm planning on building a new center console out of 14gage sheet metal to replace my factory one. My main reason is I want more storage, I want to be able to lock it, and I want a functional arm rest and cup holder. I already started a build thread on the console in the "FAB SHOP" section, but will update here as well as soon as I make some progress, lol.

^^^here's a before pic of where my gages were temporarily mounted, below my gages I had 2 ON/OFF toggle switches mounted, one manually turns on my electric fans, the other is for my KC lights on the front bumper.

^^^here is the bezel that I am using, just need to find an ash tray for it, and go back and paint at a later time. It's in good shape other than the hole someone drilled in the middle of it. I popped out the little rectangular inserts, and my ON/OFF toggle switches fit in there perfectly! I had to trim a little bit of material from inside the opening at each end to make the CD player fit.

^^^here's the Sony CD player installed, I'm just running the dash speakers for now (they've already been replaced by the PO with an unknown brand and sound pretty good) I will eventually get some rear speakers mounted, not going to go to crazy with the sound system like on some of my past vehicles, my hearing is already pretty bad from years of loud music, shooting guns, and running power tools without hearing protection, so I'm staying pretty basic on this one, lol.
Last edited by rustED; Nov 29, 2013 at 02:24 PM.
Dec 5, 2013 | 11:51 AM
#770
Thread Starter
Registered User
iTrader: (2)
Joined: Sep 2010
Posts: 2,716
Likes: 7
From: Tri-Cities, Wa
Thanks man. I think I kinda jumped the gun starting a thread on the console, lol. I haven't made very much progress on it, it's just been to cold! I did however get some of the pieces cut out, just need to get some wire for my welder and start tacking it together, I'll do an update with pics as soon as I make some progress.
Dec 5, 2013 | 12:51 PM
#771
Registered User
Joined: Apr 2012
Posts: 2,817
Likes: 2
From: Los Angeles CA
Dash bezzle looks nice dude. Only one thing... Did you intentionally leave it gray? They sell dash paint that'll work great for that. I believe your stock color for the bezzle with a brown Interior is supposed to be black.
Dec 6, 2013 | 12:11 AM
#773
Thread Starter
Registered User
iTrader: (2)
Joined: Sep 2010
Posts: 2,716
Likes: 7
From: Tri-Cities, Wa
Thanks guys, yeah I plan to go back and paint it black, it's just to cold to paint right now, tomorrow it's supposed to be close to -20* with the wind chill factor! My wife won't let me paint in the house, lol.
Dec 6, 2013 | 11:44 AM
#775
Thread Starter
Registered User
iTrader: (2)
Joined: Sep 2010
Posts: 2,716
Likes: 7
From: Tri-Cities, Wa
LOL, Yeah I miss the weather that you guys have in California! I lived in San Jose for awhile, I don't think it got much below the high 50's during the winter that I was living there, lol. It was 1* this morning when I took my daughter down to catch the bus lol. But I'm sure there are other forum members on here that have colder temps than what I'm dealing with, so I guess I can't complain to much!
Dec 6, 2013 | 12:53 PM
#776
Registered User
Joined: Apr 2012
Posts: 2,817
Likes: 2
From: Los Angeles CA
Today we had 50-54* in Down Town Los Angeles. It wasn't too cold. But the thing that got to me was that we had some strong winds. And that cold breeze made everything seem colder. Lol
Obviously its nothing compared to winds with -20* or 1* but that was cold haha
Obviously its nothing compared to winds with -20* or 1* but that was cold haha
Dec 17, 2013 | 06:32 PM
#777
Thread Starter
Registered User
iTrader: (2)
Joined: Sep 2010
Posts: 2,716
Likes: 7
From: Tri-Cities, Wa
Well the weather is back up to the mid-30's so I guess I can't use that for an excuse anymore, lol. I finally got started on the center console. I've probably redesigned it in my head a dozen times already, so I'm kinda glad I got a late start on it due to the weather. Like I mentioned earlier, it's going to be lockable, have more storage, be taller, so that the arm rest is actually functional, I'm adding at least one cupholder, and might try to incorporate my oil pressure, temperature and volt gauges into it somehow.

^^^Started out with a scrap piece of 14 ga sheet metal 21"L x8"W
took the grinder to it with a skinny wheel and made notches where I wanted to make my bends.
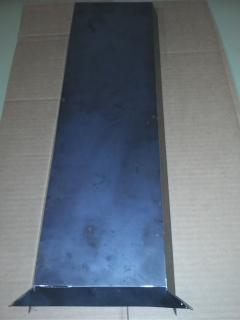
^^^I don't have a bending brake, so I clamped the piece down to a table and made my bends

^^^here it is when I was done, this is the bottom or floor of the console, it hugs the carpeted hump in the floor so there won't be any large gaps between the floor and the bottom of the console. One problem I have already encountered is with the seat belts. I wanted to make the storage portion of the console as wide as I could, it's still only going to be 5-1/2" inches wide, but I'm having interference with the seat belts, (where they bolt into the floor) I will probably make about a 1/2" spacer to space the belt away from the console.
Last edited by rustED; Dec 17, 2013 at 06:43 PM.
Dec 18, 2013 | 04:56 AM
#778
Registered User
Joined: Apr 2012
Posts: 2,817
Likes: 2
From: Los Angeles CA
Nice job Ed. keep up the good work.
Hey I just laughed when you mentioned 30* weather. Haha! We have been having 75-80 all week. Heck last night when i went to bed i saw the weather was was 64 degrees at 10pm. Yea I'm gonna jump on my knock sensor problem this saturday since we're having such great weather.
Its amazing how people are having snow storms throughout the country and we are still having scattered summer weather lol
Dec 18, 2013 | 11:42 AM
#780
Thread Starter
Registered User
iTrader: (2)
Joined: Sep 2010
Posts: 2,716
Likes: 7
From: Tri-Cities, Wa
Nice job Ed. keep up the good work.
Hey I just laughed when you mentioned 30* weather. Haha! We have been having 75-80 all week. Heck last night when i went to bed i saw the weather was was 64 degrees at 10pm. Yea I'm gonna jump on my knock sensor problem this saturday since we're having such great weather.
Its amazing how people are having snow storms throughout the country and we are still having scattered summer weather lol
Hey I just laughed when you mentioned 30* weather. Haha! We have been having 75-80 all week. Heck last night when i went to bed i saw the weather was was 64 degrees at 10pm. Yea I'm gonna jump on my knock sensor problem this saturday since we're having such great weather.
Its amazing how people are having snow storms throughout the country and we are still having scattered summer weather lol
Thanks Richard, I didn't get a whole lot done, but a little progress is better than none, lol. Man I would love to just have a few days in the low 50's, lol, I can't believe you guys are still have 70-80 degree weather, I envy you! Good luck on your knock sensor, I read on your thread that you got some practice in at the PNP so that should really help you out when you go to replace yours, hope it goes smoothly for you!
Thanks Mark, yeah I can deal with the 30* weather, it's when it gets down in the teens and colder where I give up, lol!
Hope you and hour family have a happy holidays too!


