When you click on links to various merchants on this site and make a purchase, this can result in this site earning a commission. Affiliate programs and affiliations include, but are not limited to, the eBay Partner Network.
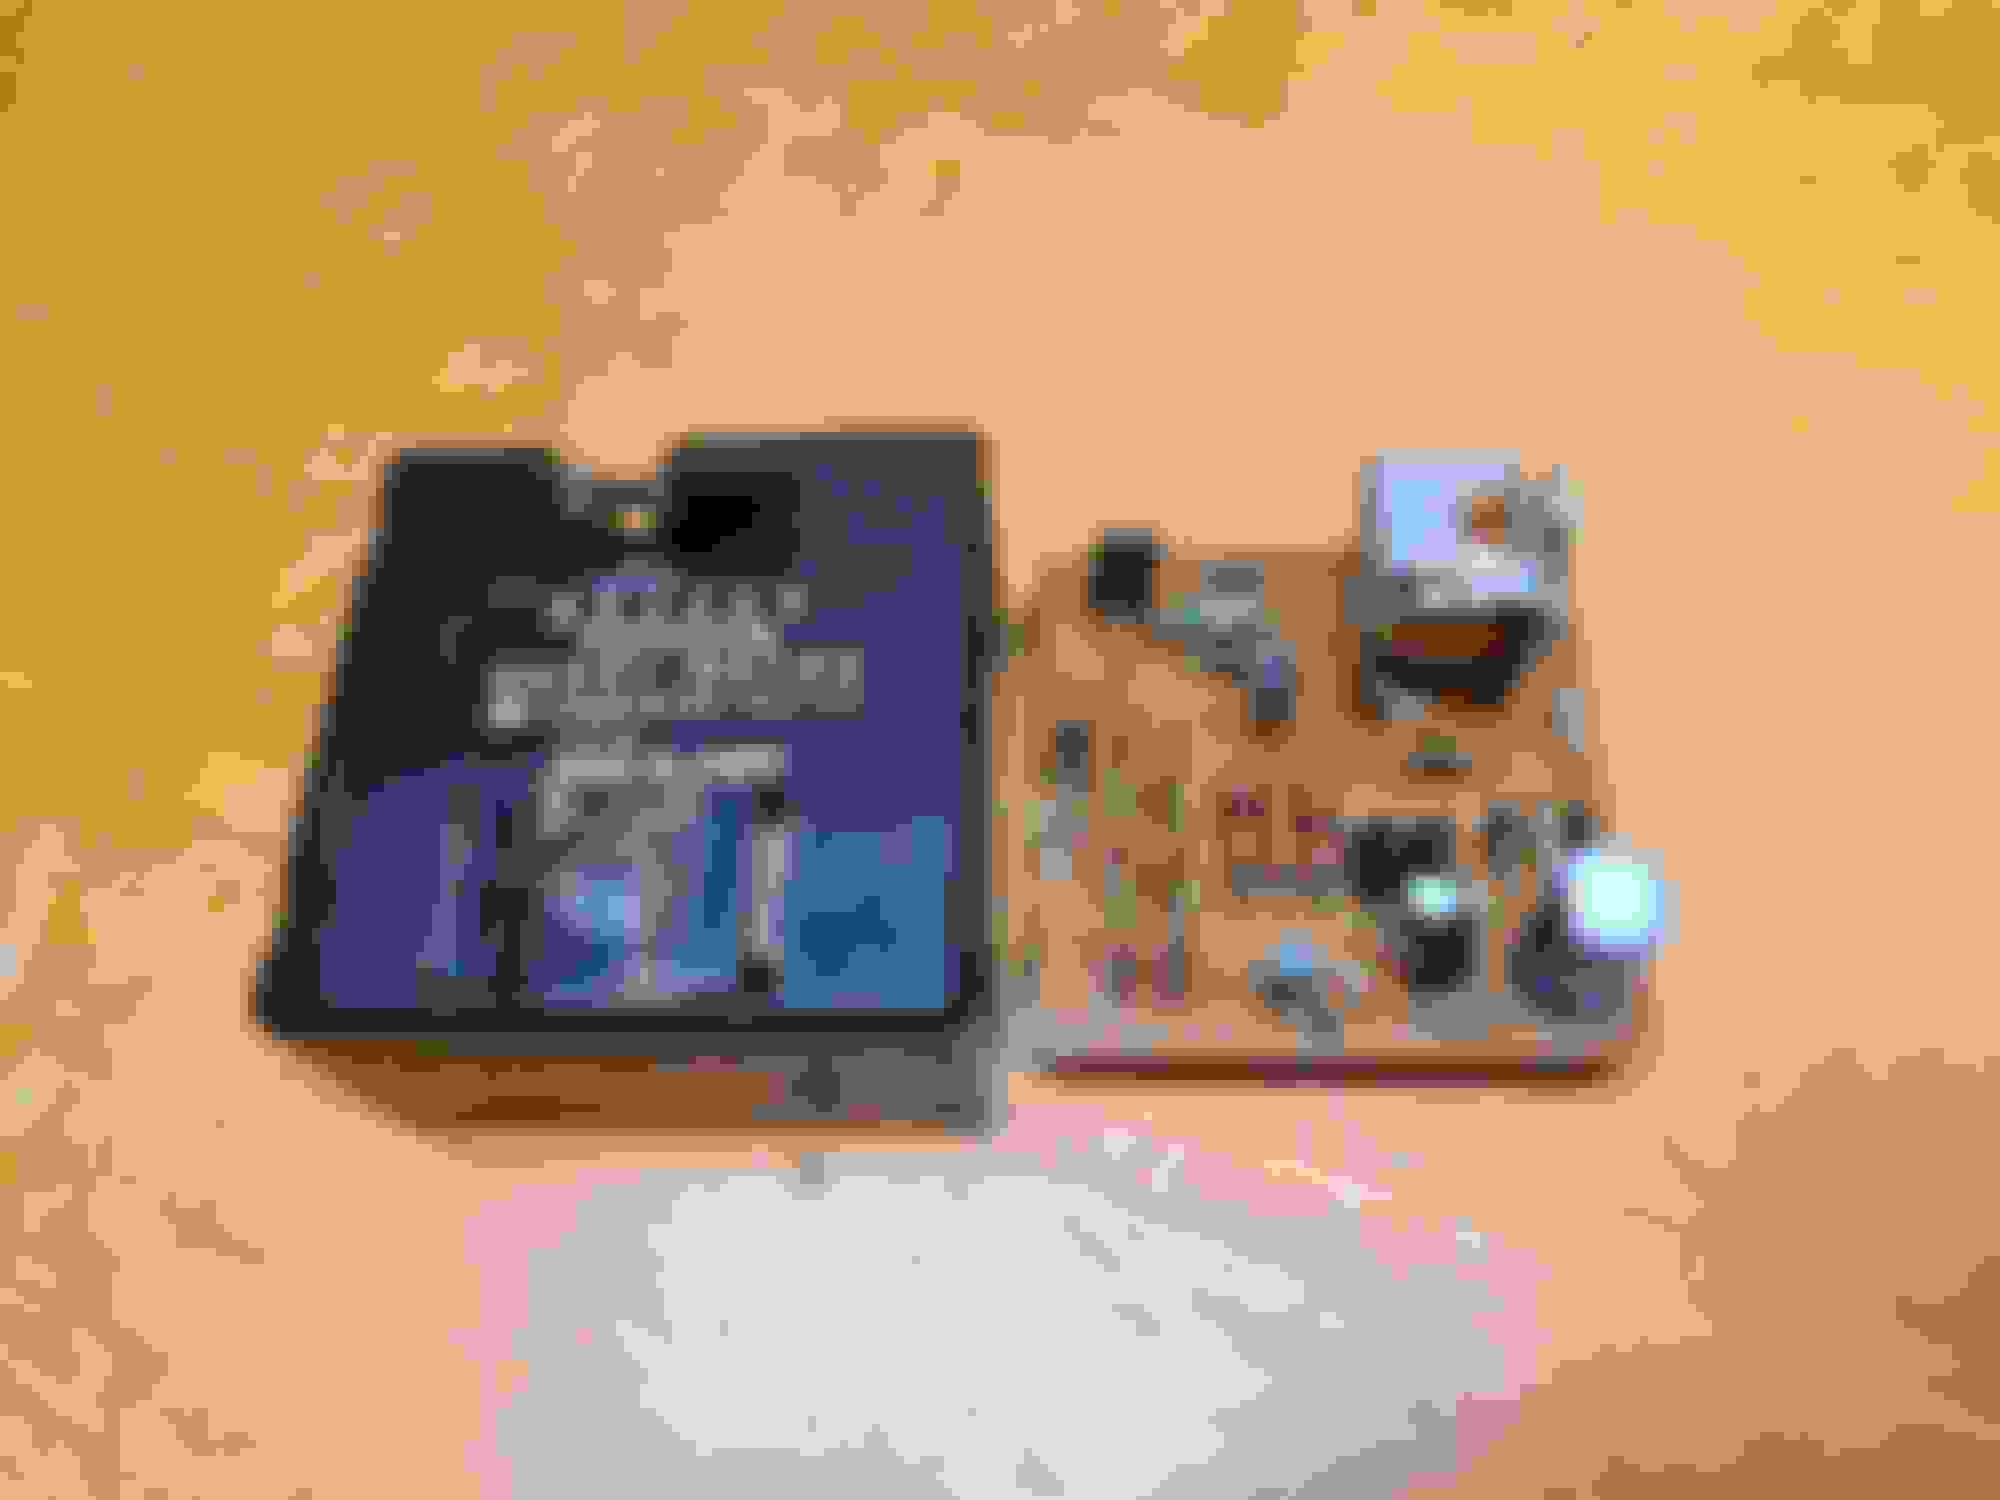
Another small success today. My heater only worked on High, which pointed the finger to the resistor. I took out the old resistor, and it certainly looked like it's seen better days:
And lo and behold, works like a charm. So satisfying for $10 and an hour's work.
i've replaced this on both of my '87s, using the oem toyota part. indeed, it is satisfying to have all 4 blower settings available. the nice thing is that it is a very easy part to replace.
i've replaced this on both of my '87s, using the oem toyota part. indeed, it is satisfying to have all 4 blower settings available. the nice thing is that it is a very easy part to replace.
Indeed, and thanks for your previous pointer on where to find the resistor. Once you contort yourself deep enough under the glove box to see it, it's just a matter of one screw and one connector to get it out. Easy!
Thanks! Huge improvement, and he did a good job with it. His next assignment will be a bit more complex, he'll be stitching the entire seat back from the pieces I'll give him.
Last edited by 4Runner4Leon; Aug 18, 2024 at 03:26 PM.
I finally figured out the power window issue. With the replacement door lock control module in place, I was now getting 12V to the master power window switch, as expected. But some windows worked in one direction, but not other. Yet when I applied 12V to either power window motor, the windows went up and down like gangbusters. So, obviously it was an issue with the power window switches.
I rechecked all the contacts again with my DVM, and noticed that one of them was close to 5 ohms, as I mentioned in post 178. And sure enough, that was the passenger "window up" contact, which was the one that didn't work properly. Earlier, I didn't think that the 5 ohm resistance would have a big impact, but then I measured the resistance of the power window motors, and found them to be 1.5-2 ohms. So, with a 12V supply and a 2 ohm resistance, the motors should be getting 6A of current through them. But, add a 5 ohm resistance from the switches, and the current drops to under 2A. No wonder the windows were sluggish or simply stalled; most of the power was being dissipated in the switch as heat.
So I again took apart the master switch, cleaned and readjusted the contacts, and now that switch works great on both windows in both directions. But the passenger side switch did not want to raise the passenger window. Unfortunately that switch was epoxied and could not be disassembled. Or I should say that I tried to disassemble it, but the switch disintegrated. So I have a replacement switch on the way to me.
In the meantime, I decided to try to figure out why my dome light was not coming on when the driver side door was opened (it came on just fine with the passenger door open). Yet I knew that the driver door switch worked, because the courtesy light on the door came on with the driver door open. Some guidance from the 1st Gen 4Runner Mafia FB group led me to look at the Seat Belt Warning Relay, aka the Buzzer, that's mounted right off the steering column. According to the schematic, the driver side door switch needs that relay to be operational for it to trigger the dome light. Sure enough, someone clipped two wires leading to that relay, probably to avoid the world's most obnoxious buzzing sound:
I spliced the wires back together, and was indeed treated to that horrible "chipmunk in a vise" sound that others have mentioned (I'll spare you the sound clip). So, I took the buzzer apart:
Some folks just bend down the contact below to disable the buzzing sound:
I decided to stick two layers of electrical tape in there, in case someone ever wants to make it operational again:
So now the dome light works with the driver door open. And an unexpected benefit, the "fasten belts" light now works:
Last edited by 4Runner4Leon; Aug 24, 2024 at 07:10 AM.
I didn't like the mats in the truck; they didn't fit well, and got in the way of the pedals. Plus they are not ideal for the wet Portland weather. So I got some Llyods mats, they fit incredibly well without any trimming.
My boot is ok, it has a little tear on it and I’m careful when I change my cap and rotor. Unfortunately even with tears people think they are covered in gold. I must have missed the listing on eBay I have seen a couple decent ones but man it’s hard to spend 75 or higher on it…..
My boot is ok, it has a little tear on it and I�m careful when I change my cap and rotor. Unfortunately even with tears people think they are covered in gold. I must have missed the listing on eBay I have seen a couple decent ones but man it�s hard to spend 75 or higher on it�..
I've been busy working on cleaning up the interior. With the seats and the console out for refurbishment, I decided to refresh the paint on the shifter and 4WD sticks:
I decided to remove the sticks rather than painting in place, which would give me the chance to also replace the shifter bushings. In my truck, the shifter was held down by a cap with 4 M6 bolts:
The 4WD stick was held down by a snap ring:
After removing them, I scuffed up the paint with some sandpaper:
And gave them a few coats of gloss black paint and clear:
As it turned out, the shifter bushings have already been upgraded, so one less project for me!
I lightly coated the rubbing surfaces with some silicone grease, and reassembled. On to the next project!
Last edited by 4Runner4Leon; Oct 13, 2024 at 06:10 AM.
, though there is one significant error in it (more on this later). Rather than spending time trying to reuse the clip that holds the cable in place though, I bought two replacement clips. That allowed me to just cut the original clip rather than trying to pry it out without breaking it:
I lined up the groove of the cable with the guide, as shown in the video:
And secured it with a clip. However, when moving the temperature lever, I saw that the cable sheath was moving slightly, which did not seem right. The guide was not properly holding the cable, because the groove was not really engaging into the guide. After some head scratching, I decided that the video was wrong, and that the groove in the cable sheath needs to align not with the guide, but with the little step under the clip seat, like this:
There's a corresponding step in the clip itself, which leads to a very secure clamping of the cable sheath:
So I cut out the new clip and repositioned the cable to line up with the step. After doing this, I read the comments in the video and saw that someone mentioned this error. Oh well, good thing I bought two clips! I secured the cable with the clip, and this is how it looked:
The reason my cable was damaged was because the water valve was basically frozen. The seller of the truck did a nice job painting the old valve, but that's like putting lipstick on a pig if the valve is frozen. Here's the new water valve:
I moved the temperature lever from hot to cold to adjust the cable position to correspond with water valve being open and closed:
Then I squeezed the clamp at the water valve to lock the cable into place. Another project done!
Last edited by 4Runner4Leon; Oct 13, 2024 at 06:51 AM.
I've been doing a lot of work on the interior. One of the best investments I made recently was to have a local body shop make a custom mix of SEM Color Coat paint to match my gray interior. I've seen folks call out some standard SEM and Duplicolor colors, but in my experience none of them were a good enough match. So for $100, I got a full quart of perfectly matched paint, which I have already used on numerous parts (more to come).
I got some new OEM hardware for the door trim, still available from Toyota.
Door lock buttons:
Bezels for the buttons:
Inner door handles:
Bezels for the inner door handles (only the front ones are available, the passenger side rear bezel is not available, so I painted my old one):
I used my custom mixed paint to paint the seat belt sleeves, since they were the light gray version:
I also replaced a burned out courtesy bulb on the driver's door:
The seats are finally done - not perfect, but a huge improvement from what I started with. I didn't take many pictures along the way, but here's an example of what the driver side foam looked like:
And what I replaced it with:
Some samples of old upholstery and the replacement pieces:
So I bought a donor console on Ebay which had good clevises, and transplanted into mine. I also bought a nice fully intact shifter bezel. And a lettering kit from Mo Faraz, similar to the one used on the stalks. I also bought some new parts from Toyota - lid stopper:
Screws:
And most satisfying, for a whopping $1, are the cushion pads:
I cleaned and painted all the plastic, restored the ash tray, powder coated the hinges, and applied the lettering, followed by a clear coat. Looks 1000 times better:
I still need to get a replacement shifter boot - so far I tried two upholstery shops, both of whom failed miserably. So I may just keep my current one, but perhaps paint it to match the gray.
I also found out that the bracket that holds the front of the console and the shifter bezel together is missing in my truck (should be just behind the 4WD shifter boot), so I need to source one somewhere:
Last edited by 4Runner4Leon; Jan 7, 2025 at 02:51 PM.

 Aug 17, 2024 | 12:58 PM


 I have seen a couple decent ones but man it’s hard to spend 75 or higher on it…..


