
LifterCatcher's 1993 4Runner Build-Up Thread
 Oct 30, 2010 | 08:38 AM
#101
Thread Starter
Registered User
Joined: Aug 2010
Posts: 224
Likes: 1
From: Columbia, Mo
Love the idea man. Some things to consider. When you change your oil maybe try to get a drain plug with a hose to fit through the skid plate so you don't have to remove it every time you change your oil. Might take longer for the oil to drain but better than pulling off the skid plate every time. Also think about adding some bracing to it to make it stronger. Like this one here.
https://www.yotatech.com/forums/f88/...-build-219910/
maybe not soooo much bracing but you get the point.
https://www.yotatech.com/forums/f88/...-build-219910/
maybe not soooo much bracing but you get the point.
 Thanks.
 Chris
Nov 4, 2010 | 12:09 PM
#102
Registered User
Joined: Nov 2010
Posts: 41
Likes: 0
From: california
 Nov 9, 2010 | 05:58 AM
#103
Thread Starter
Registered User
Joined: Aug 2010
Posts: 224
Likes: 1
From: Columbia, Mo
I will try and take some close up pics of small areas and crevices to give you a better idea.
Chris
Nov 9, 2010 | 06:21 AM
#104
Thread Starter
Registered User
Joined: Aug 2010
Posts: 224
Likes: 1
From: Columbia, Mo
Update time everyone!
This week was awesome! I drove into Kansas City on Tuesday and met my Dad who flew in from Florida, and the rest of the Fam to watch and support my younger brother who was competing in the Champion Colt breaking Challenge at the American Royal. Here are a few pics.


He placed 2nd with only a point separating him from first place. It was a week long competition and he ROCKED it.
Before I left for KC I hit up craigs list to see if anyone was selling some Yota parts that I could snag up while in the area, and WOW did I get lucky. I found a list that had a few Yota items for sale including a 1st Gen 4Runner roll cage that a guy was selling for $25.00. Gave him a call and told him I would take it Best part is that I knew I would have room for the cage because I would be towing my new M101a1 Trailer.
My Dad and I headed to fort Riley early Wednesday morning and made the trip just fine even in the 30+mph wind gusts. The wind had me a little nervous for the return trip with the trailer, and after a of of research people say the trailer is big and heavy.
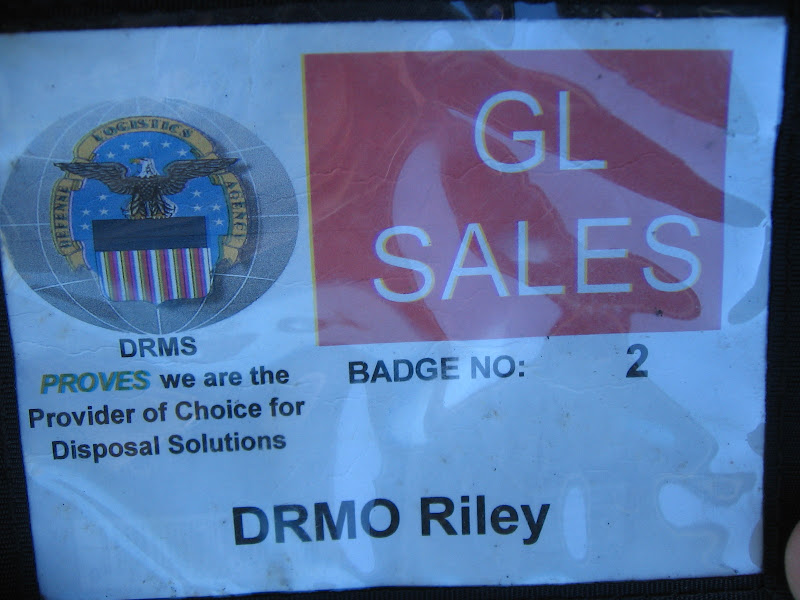
The trailer pickup at the base went super smooth once we found the DRMO on the base. The base was huge and we got a little lost and it took us about thirty minutes on base to find the DRMO. Once we did we hooked up the trailer and hit the road.
I know you guys are itching for PIC's and my Dad snapped a ton and as soon as he gets them saved to his PC I will make sure to post them up.
The trailer pulls and rides like a freaking dream!!!! Even with the way underpowered 3Slow I hardly knew it was back there. We made it back to KC charging through the Kansas western plains winds with no problems at all.
Later that night I called the guy selling them 1st gen roll cage and my Dad and I headed out to pick it up. On arrival to this guys house I was in Toyota heaven!!!! He has been wheeling Yota's for 20+ years and is a Super nice guy. I went with intentions of picking up a roll cage and I left with................................. wait for it........................
A Roll cage
1985 Solid front axle (complete) with Super winch manual hubs and 4.10's
a second complete 1985 solid front axle with AISIN manual locking hubs with 4.10's
and a gear driven mint top shift transfer case.
All for $250.00 SUPER STOKED!!!!
Pics to follow FO SHO!
Chris
This week was awesome! I drove into Kansas City on Tuesday and met my Dad who flew in from Florida, and the rest of the Fam to watch and support my younger brother who was competing in the Champion Colt breaking Challenge at the American Royal. Here are a few pics.
He placed 2nd with only a point separating him from first place. It was a week long competition and he ROCKED it.
Before I left for KC I hit up craigs list to see if anyone was selling some Yota parts that I could snag up while in the area, and WOW did I get lucky. I found a list that had a few Yota items for sale including a 1st Gen 4Runner roll cage that a guy was selling for $25.00. Gave him a call and told him I would take it
Best part is that I knew I would have room for the cage because I would be towing my new M101a1 Trailer. My Dad and I headed to fort Riley early Wednesday morning and made the trip just fine even in the 30+mph wind gusts. The wind had me a little nervous for the return trip with the trailer, and after a of of research people say the trailer is big and heavy.
The trailer pickup at the base went super smooth once we found the DRMO on the base. The base was huge and we got a little lost and it took us about thirty minutes on base to find the DRMO. Once we did we hooked up the trailer and hit the road.
I know you guys are itching for PIC's and my Dad snapped a ton and as soon as he gets them saved to his PC I will make sure to post them up.
The trailer pulls and rides like a freaking dream!!!! Even with the way underpowered 3Slow I hardly knew it was back there. We made it back to KC charging through the Kansas western plains winds with no problems at all.
Later that night I called the guy selling them 1st gen roll cage and my Dad and I headed out to pick it up. On arrival to this guys house I was in Toyota heaven!!!! He has been wheeling Yota's for 20+ years and is a Super nice guy. I went with intentions of picking up a roll cage and I left with................................. wait for it........................
A Roll cage
1985 Solid front axle (complete) with Super winch manual hubs and 4.10's
a second complete 1985 solid front axle with AISIN manual locking hubs with 4.10's
and a gear driven mint top shift transfer case.
All for $250.00 SUPER STOKED!!!!
Pics to follow FO SHO!
Chris
Nov 9, 2010 | 06:30 AM
#106
so you're sasing the runner eventually? Happy for you man and for 250 you made out like a bandit! I soooo want pics of the trailer. When you sas that thing hit me up i might come out and help you with it if needed. Well you know sit there and watch and maybe turn a bolt or two while you do all the work and i'll take the credit.
Nov 21, 2010 | 03:25 PM
#108
Thread Starter
Registered User
Joined: Aug 2010
Posts: 224
Likes: 1
From: Columbia, Mo
so you're sasing the runner eventually? Happy for you man and for 250 you made out like a bandit! I soooo want pics of the trailer. When you sas that thing hit me up i might come out and help you with it if needed. Well you know sit there and watch and maybe turn a bolt or two while you do all the work and i'll take the credit.
I am in no rush and I have been doing as much research as possible to learn everything. I leaning more towards RUF rather than the high rise trail gear kit, plus I think I can source/fab most of the kit myself we shall see I have a few pics I snapped of the trailer and will post them asap! I have been busy with other side projects and have not had a chance to take some good pics of the trailer, but I gotta tell ya man the trailer is awesome. It tows like a dream and I hardly know its back there. Even with two complete front axles and a bunch of gear it tows and rides like a dream.
The plan is to swap the tires and rims for some smaller ones and it should be perfect.
Chris
Nov 21, 2010 | 04:11 PM
#109
Thread Starter
Registered User
Joined: Aug 2010
Posts: 224
Likes: 1
From: Columbia, Mo
Ok everyone I think its about time for a little update I owe you all that..........
My Dad has about 800 pics on his camera from the trip and I have been nagging him to send them my way. I snapped just a few with my little pos camera but here we go.
(I still need to flip the pintel hitch over to lower the tounge height and it will be perfect.)
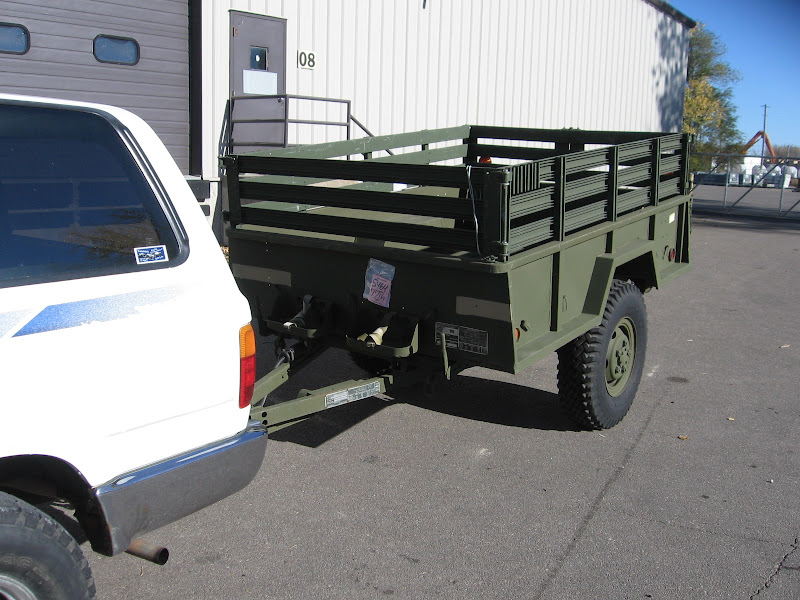
The trailer is in perfect shape, and cannot believe it is 26 years old
The side rails create a lot of drag when pulling this trailer, I found with the side rails removed I only lost 2mpg pulling the trailer down the high way at 55-60 mph. Freaking awesome! The trailer is also the perfect width to be towed behind a 4Runner.
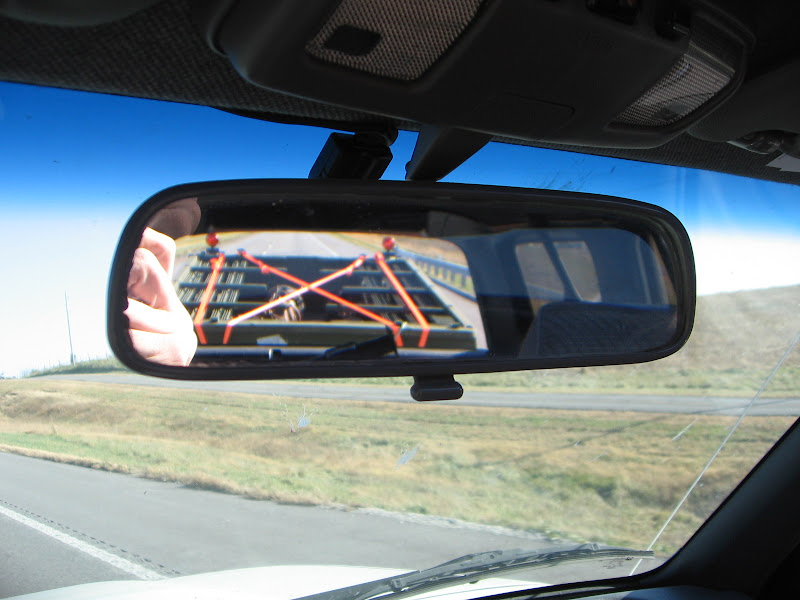
Here is a rear viwe mirror shot of how I pulled it from Kansas City to Columbia loaded with two 85 front axles, a T-Case and a 1st gen roll bar Its a little hard to tell from this pic but the trailers side rails fit perfect on the top of the trailer. This trailer was very well thought out when built in 1984.
I know I don't look it but I am super excited to be pulling the new trailer and all my new goodies home!
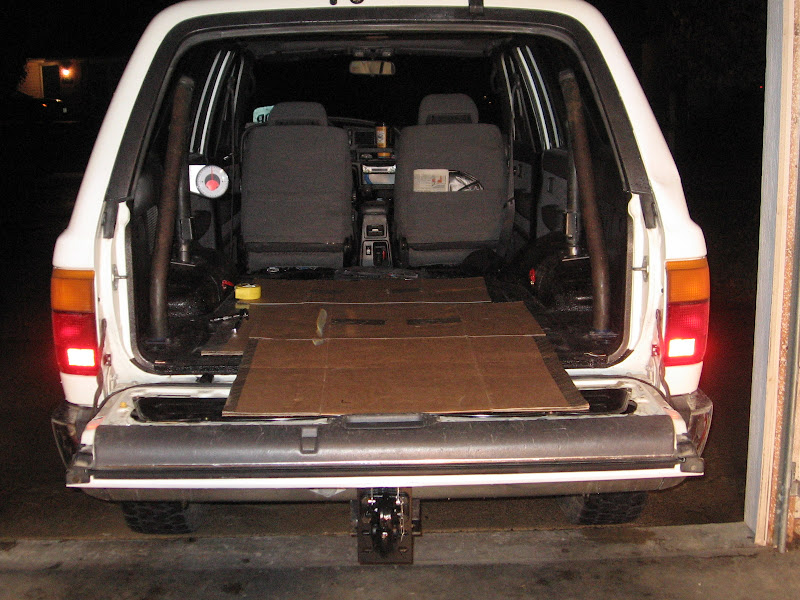
Now its time to start my first real Fabrication project Fit a 1st gen roll bar in my 2nd gen 4Runner.
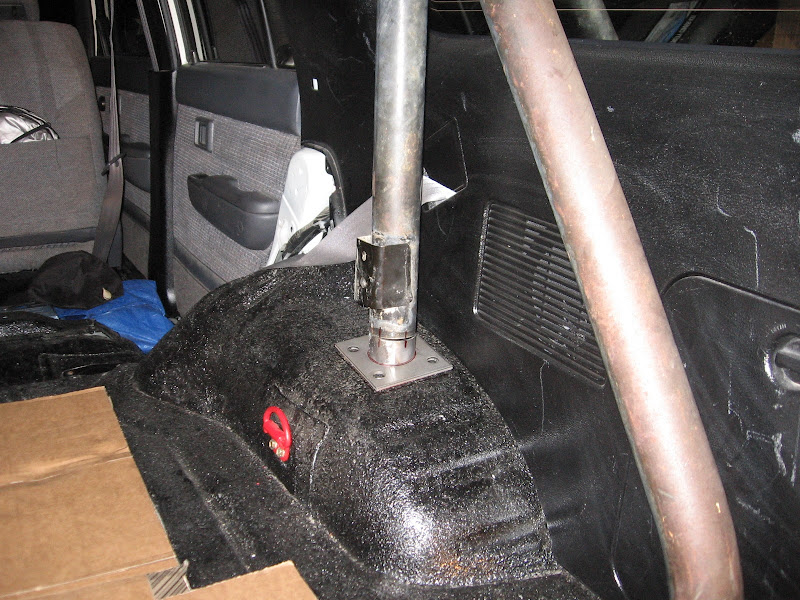
First things first on the rear legs I did not like that the mounting flanges only had two mounting holes and the plates were pretty dinky. I decided to use some bigger mounting plates with four hole. I know the roll bar is more for looks and to be able to mount items to, but I just liked the idea of bigger base plates.
I have read a lot of threads that show the 1st gen roll bar being installed in 3rd gen 4Runners but no installs into a 2nd gen, the 2nd gen is a little more tricky because the passenger side wheel well is shaped different than the drivers side wheel well because of the fuel filler neck. This caused me to have the mount the legs of the roll bar farther back to the rear of the rig. The only problem with this is finding a flat spot for the rear legs to mount to.
The research that I did some cut off X amount from the front and rear legs to get the roll bar to fit. Some just cut off 2" from the rear legs to get the roll bar to fit. Well the 2nd gen being a little different caused me to have to do a little more measuring and fitting.
I did not want to cut the rear legs at all because this would cause the front legs angle to change from 90deg. I am a stickler for straight lines and parallel lines so I could not let the front legs be anything more than 90deg.
Fitting the new plates and making sure I stayed at 90deg.
Fitting is done not its time to tack weld it in place pull it out and weld it complete then sand and paint.
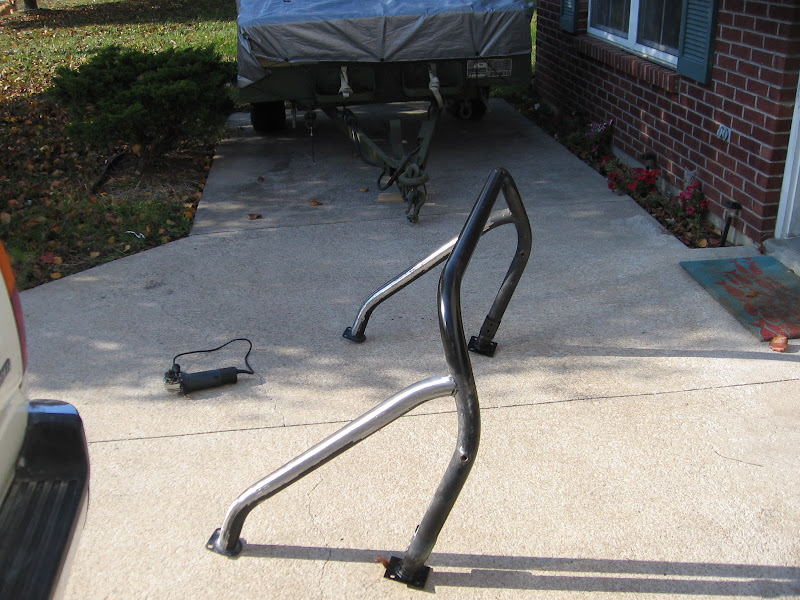
All welded and getting sanded, my poor little Harbor Freight grinder couldn't take it and it actually caught fire.
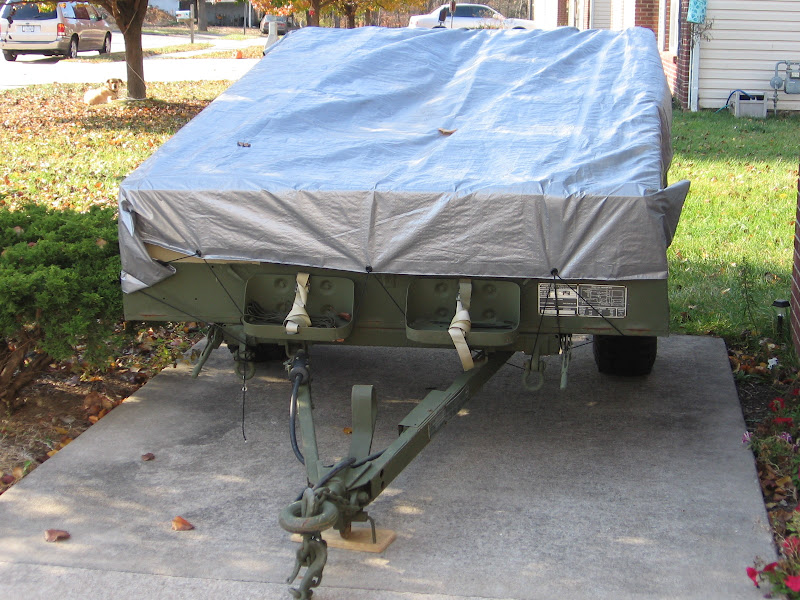
Trailer home in its new parking spot ready for the winter.
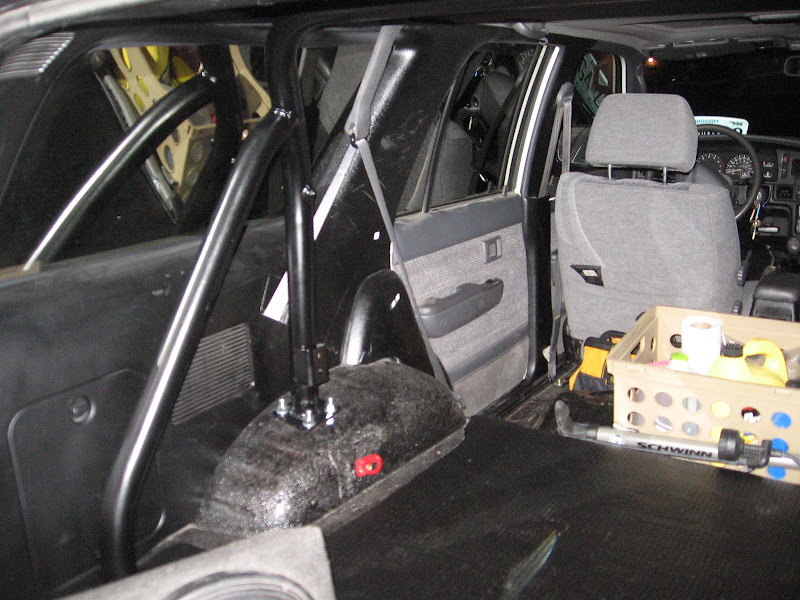
Painted and moutned it fits like a glove. Its also nice and high and no space is spared.
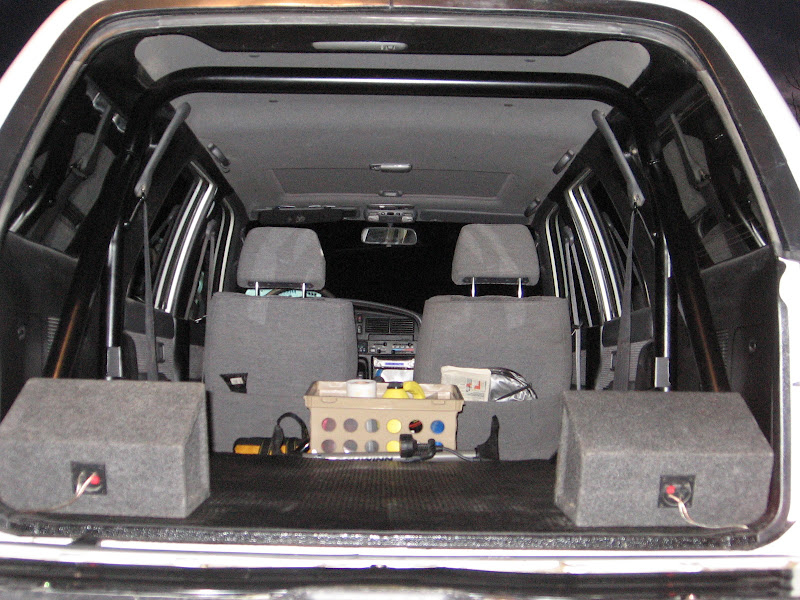
DONE!
I owe you all that..........My Dad has about 800 pics on his camera from the trip and I have been nagging him to send them my way. I snapped just a few with my little pos camera but here we go.
(I still need to flip the pintel hitch over to lower the tounge height and it will be perfect.)
The trailer is in perfect shape, and cannot believe it is 26 years old
The side rails create a lot of drag when pulling this trailer, I found with the side rails removed I only lost 2mpg pulling the trailer down the high way at 55-60 mph. Freaking awesome! The trailer is also the perfect width to be towed behind a 4Runner.
Here is a rear viwe mirror shot of how I pulled it from Kansas City to Columbia loaded with two 85 front axles, a T-Case and a 1st gen roll bar
Its a little hard to tell from this pic but the trailers side rails fit perfect on the top of the trailer. This trailer was very well thought out when built in 1984. I know I don't look it but I am super excited to be pulling the new trailer and all my new goodies home!
Now its time to start my first real Fabrication project
Fit a 1st gen roll bar in my 2nd gen 4Runner. First things first on the rear legs I did not like that the mounting flanges only had two mounting holes and the plates were pretty dinky. I decided to use some bigger mounting plates with four hole. I know the roll bar is more for looks and to be able to mount items to, but I just liked the idea of bigger base plates.
I have read a lot of threads that show the 1st gen roll bar being installed in 3rd gen 4Runners but no installs into a 2nd gen, the 2nd gen is a little more tricky because the passenger side wheel well is shaped different than the drivers side wheel well because of the fuel filler neck. This caused me to have the mount the legs of the roll bar farther back to the rear of the rig. The only problem with this is finding a flat spot for the rear legs to mount to.
The research that I did some cut off X amount from the front and rear legs to get the roll bar to fit. Some just cut off 2" from the rear legs to get the roll bar to fit. Well the 2nd gen being a little different caused me to have to do a little more measuring and fitting.
I did not want to cut the rear legs at all because this would cause the front legs angle to change from 90deg. I am a stickler for straight lines and parallel lines so I could not let the front legs be anything more than 90deg.
Fitting the new plates and making sure I stayed at 90deg.
Fitting is done not its time to tack weld it in place pull it out and weld it complete then sand and paint.
All welded and getting sanded, my poor little Harbor Freight grinder couldn't take it and it actually caught fire.
Trailer home in its new parking spot ready for the winter.
Painted and moutned
it fits like a glove. Its also nice and high and no space is spared. DONE!
Last edited by LifterCatcher; Nov 21, 2010 at 04:12 PM.
Nov 21, 2010 | 05:23 PM
#110
niiiiiiiice! The harbor freight grinders can suck bid time when you need em. Trailer looks good man and like you said very clean. So what's the plans for it? check out this guy's build for his trailer. http://www.ttora.com/forum/showthrea...hlight=trailer
Maybe give you some ideas. I like the harbor freight by you lots bigger with more stuff. Or at least that's how i remember it. Been awhile.
Maybe give you some ideas. I like the harbor freight by you lots bigger with more stuff. Or at least that's how i remember it. Been awhile.
Nov 21, 2010 | 07:06 PM
#111
Thread Starter
Registered User
Joined: Aug 2010
Posts: 224
Likes: 1
From: Columbia, Mo
niiiiiiiice! The harbor freight grinders can suck bid time when you need em. Trailer looks good man and like you said very clean. So what's the plans for it? check out this guy's build for his trailer. http://www.ttora.com/forum/showthrea...hlight=trailer
Maybe give you some ideas. I like the harbor freight by you lots bigger with more stuff. Or at least that's how i remember it. Been awhile.
Maybe give you some ideas. I like the harbor freight by you lots bigger with more stuff. Or at least that's how i remember it. Been awhile.
Plus the xmas season is here and work is going to start taking ever minute of my spare time. Ya that HF grinder was the little $7.99 one I upgraded to the $16.99 one lol and for $4.99 more I got the two year service plan so when this one catches fire I just bring it back and get a new one.
The HF here in COMO is pretty big and has a ton of junk.
Chris
Nov 27, 2010 | 07:44 AM
#112
Thread Starter
Registered User
Joined: Aug 2010
Posts: 224
Likes: 1
From: Columbia, Mo
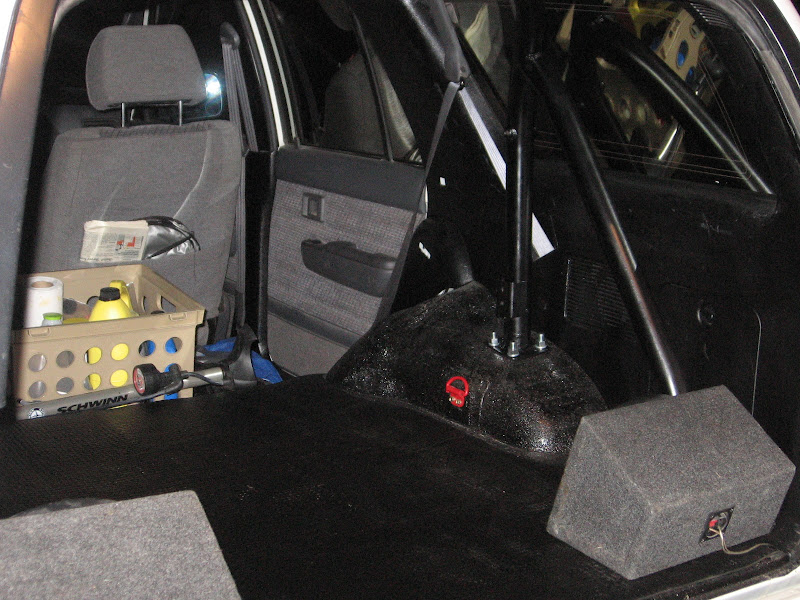
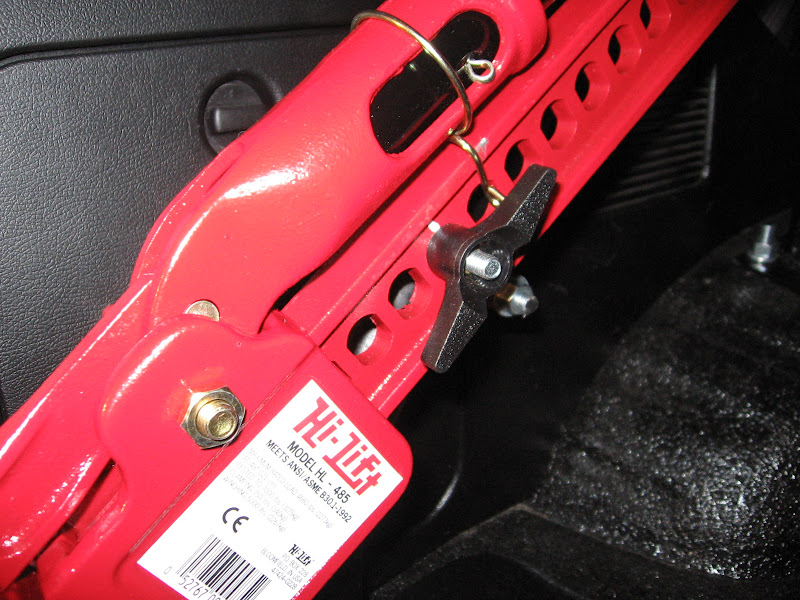
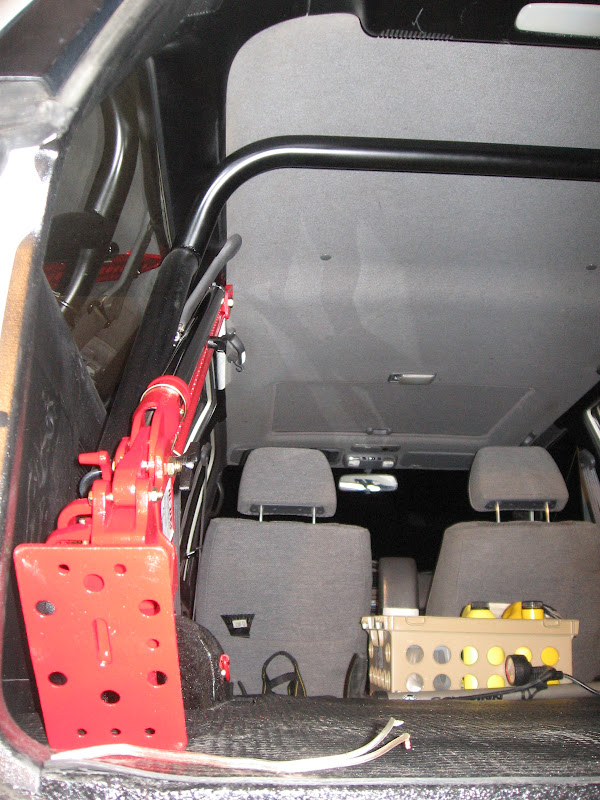
Nothing that spectacular on the build front but I was able to pick up a Hi-Lift jack and get it mounted up I happened to stop by a local farm supply store yesterday on Black Friday and they had them on sale, so I picked one up.
I used 4Crawlers idea of mounting the jack to the roll cage but went a different route with the hardware to mount it. I used a long U-Bolt and then a plate from a 2" exhaust clamp. Cut off one side of the long U-Bolt and then screwed on a twist handle and it turned out awesome!
Very study mount it does not move around and take about 5 seconds to take it off the mount.
Here are some pics.
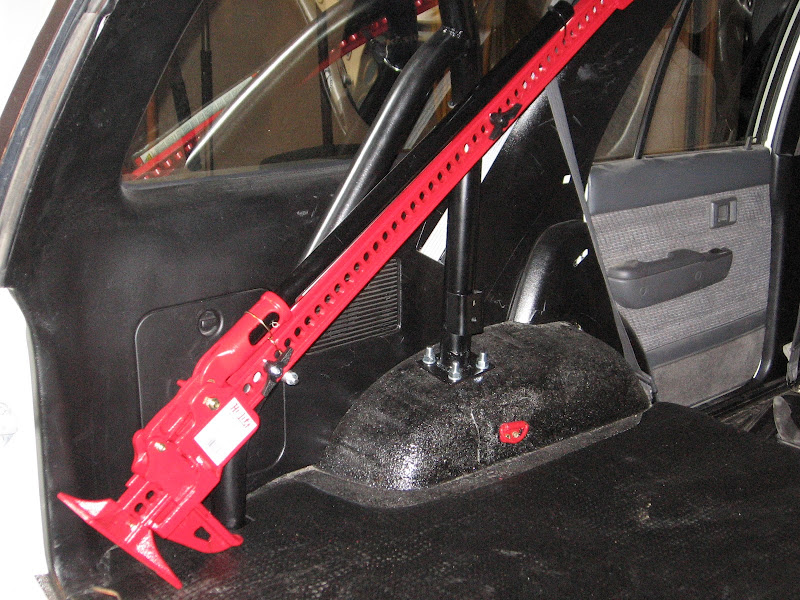
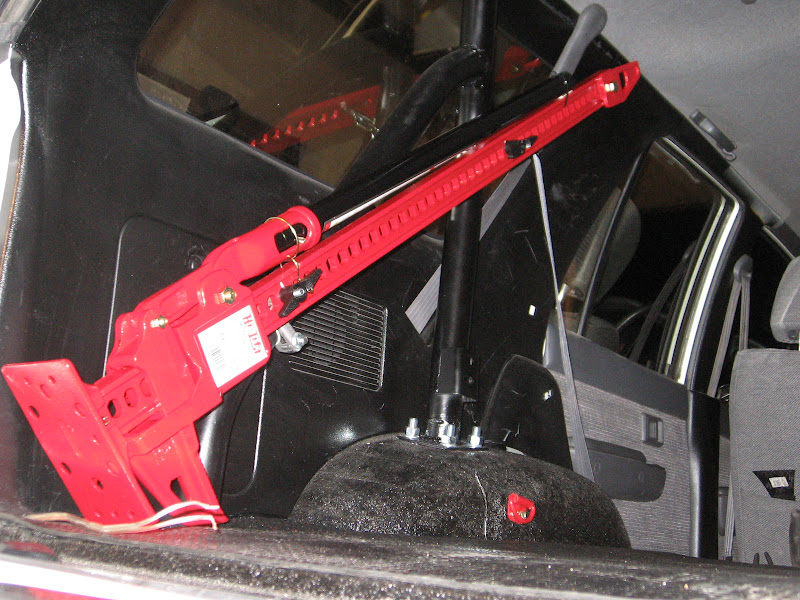
(don't mind the speaker wire)

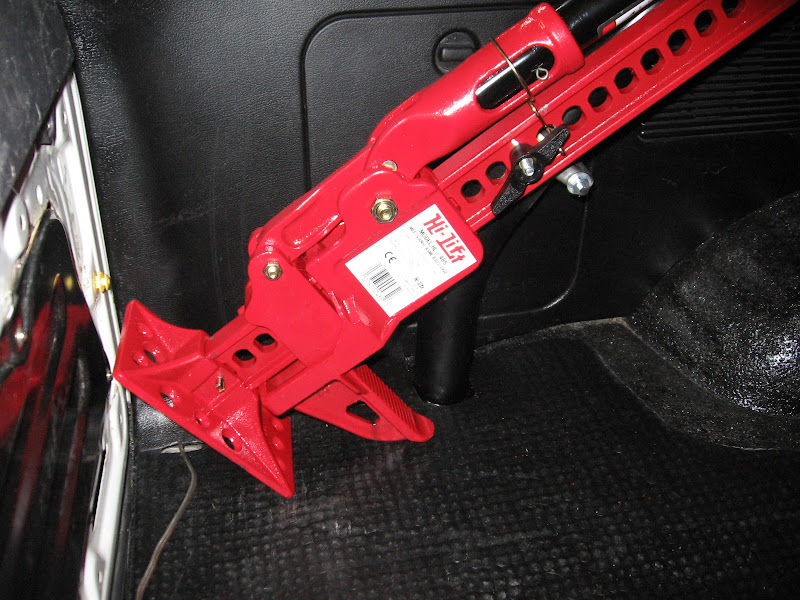
Chris
I happened to stop by a local farm supply store yesterday on Black Friday and they had them on sale, so I picked one up. I used 4Crawlers idea of mounting the jack to the roll cage but went a different route with the hardware to mount it. I used a long U-Bolt and then a plate from a 2" exhaust clamp. Cut off one side of the long U-Bolt and then screwed on a twist handle and it turned out awesome!
Very study mount it does not move around and take about 5 seconds to take it off the mount.
Here are some pics.
(don't mind the speaker wire)
Chris
Last edited by LifterCatcher; Nov 27, 2010 at 08:05 AM.
Nov 28, 2010 | 07:40 PM
#113
Thread Starter
Registered User
Joined: Aug 2010
Posts: 224
Likes: 1
From: Columbia, Mo
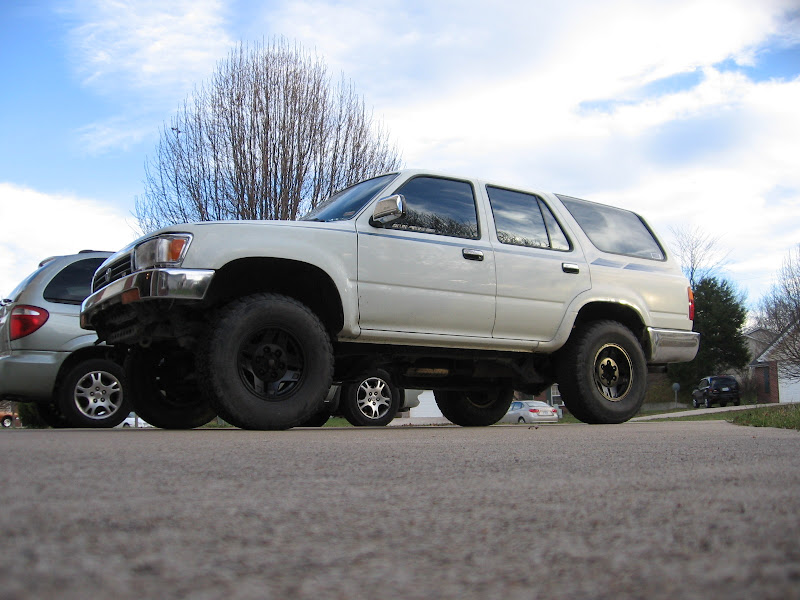
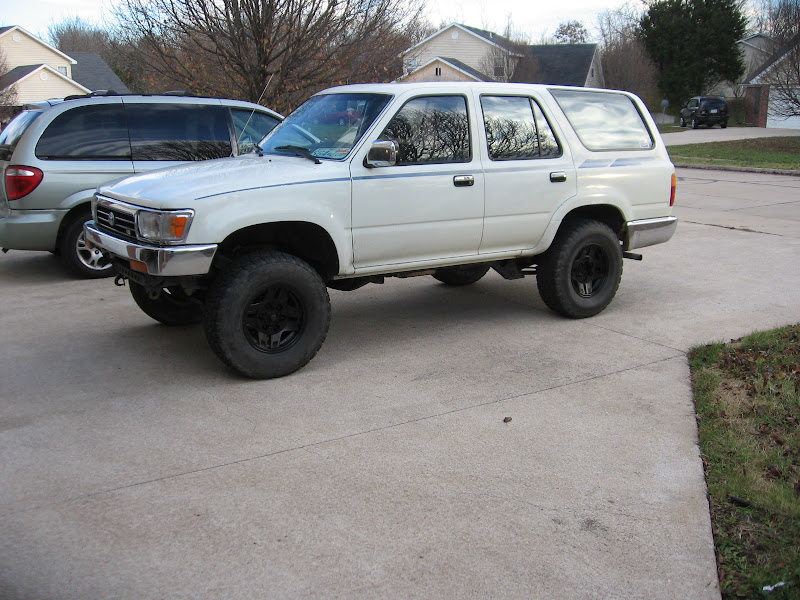
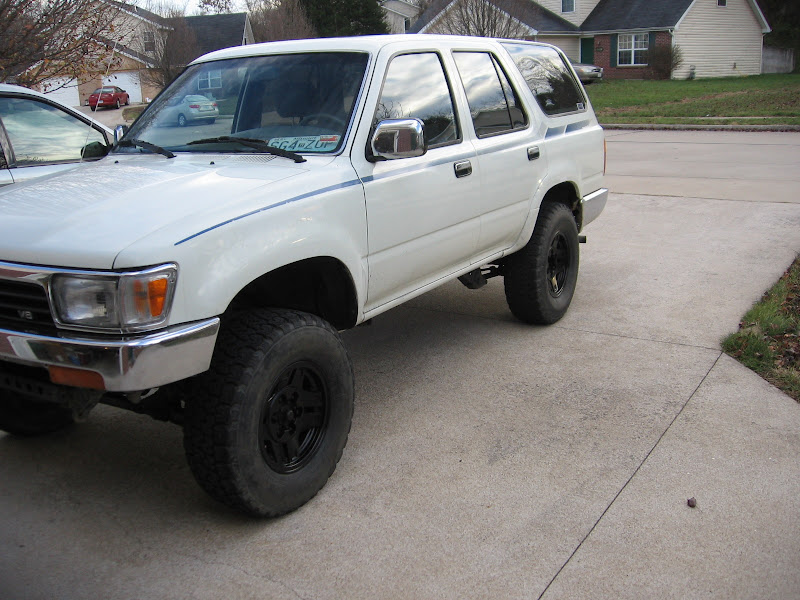
Well today I decided to paint my rims black I love the new look.
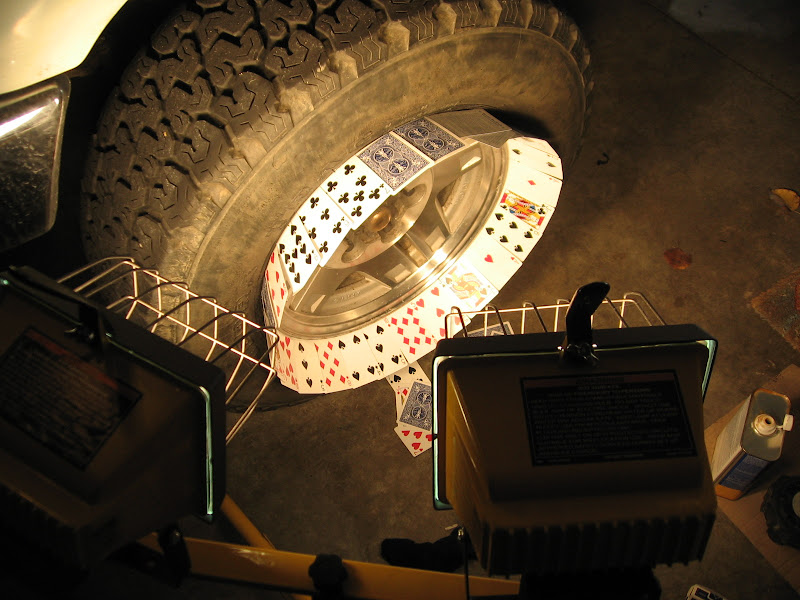
(Cards anyone?)
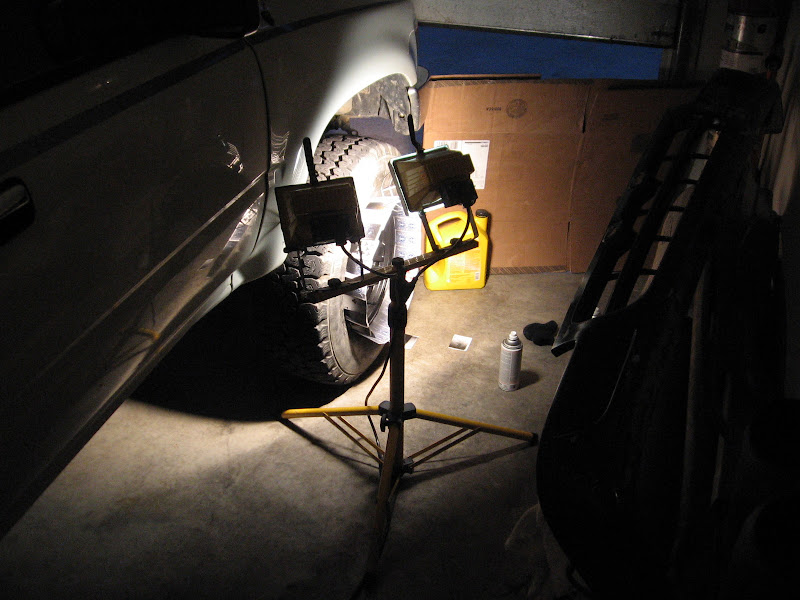
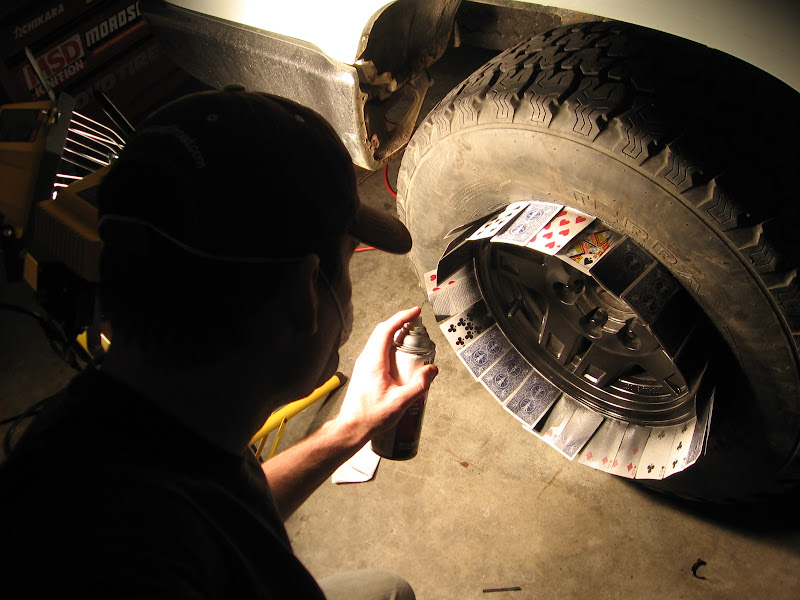
Started to lose light pretty fast but I was able to snap a couple of pics outside. I will take some more tomorrow in the bright sun light. I think it turned out great. Next is to black out ALL of the chrome, and not joking when I say ALL, door handles, front grill, both bumpers, mirrors ALL
I love the new look. (Cards anyone?)
Started to lose light pretty fast but I was able to snap a couple of pics outside. I will take some more tomorrow in the bright sun light. I think it turned out great. Next is to black out ALL of the chrome, and not joking when I say ALL, door handles, front grill, both bumpers, mirrors ALL
Last edited by LifterCatcher; Nov 28, 2010 at 07:42 PM.
Nov 28, 2010 | 07:56 PM
#114
Registered User
Joined: Jan 2010
Posts: 268
Likes: 1
From: Sacramento
Well today I decided to paint my rims black I love the new look.
(Cards anyone?)
Started to lose light pretty fast but I was able to snap a couple of pics outside. I will take some more tomorrow in the bright sun light. I think it turned out great. Next is to black out ALL of the chrome, and not joking when I say ALL, door handles, front grill, both bumpers, mirrors ALL
I love the new look. (Cards anyone?)
Started to lose light pretty fast but I was able to snap a couple of pics outside. I will take some more tomorrow in the bright sun light. I think it turned out great. Next is to black out ALL of the chrome, and not joking when I say ALL, door handles, front grill, both bumpers, mirrors ALL
Nov 28, 2010 | 09:33 PM
#115
Thread Starter
Registered User
Joined: Aug 2010
Posts: 224
Likes: 1
From: Columbia, Mo
Chris
Last edited by LifterCatcher; Nov 28, 2010 at 09:43 PM.
 Dec 11, 2010 | 11:47 AM
#117
Thread Starter
Registered User
Joined: Aug 2010
Posts: 224
Likes: 1
From: Columbia, Mo
Not to many updates at the moment, I have been working a ton of hours due to Xmas bing right around the corner.
However, I am building a on board air co2 system it's about 90% complete just waiting on the mounting bracket to arrive. Best part is that I paid about $125.00 for the entire setup
Will post pics as soon as its complete.
However, I am building a on board air co2 system it's about 90% complete just waiting on the mounting bracket to arrive. Best part is that I paid about $125.00 for the entire setup
Will post pics as soon as its complete.
Jan 4, 2011 | 02:48 PM
#118
Thread Starter
Registered User
Joined: Aug 2010
Posts: 224
Likes: 1
From: Columbia, Mo
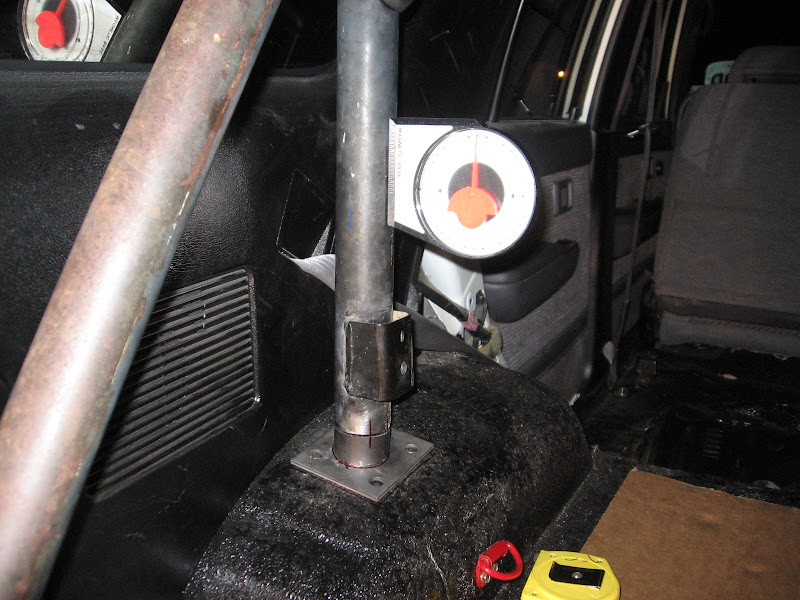
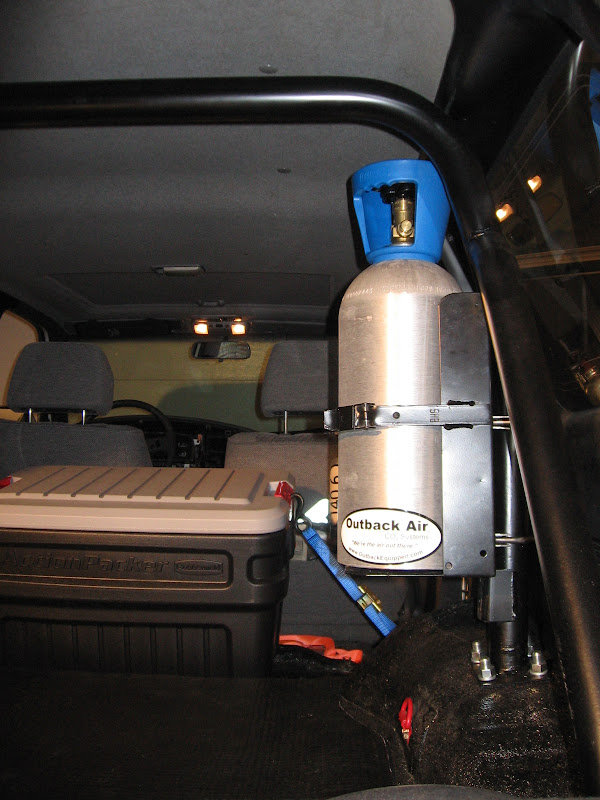
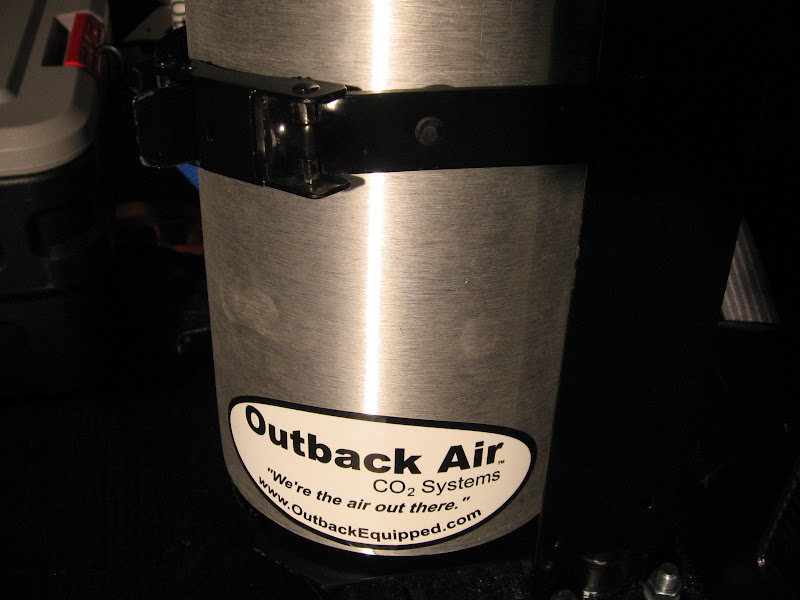
Wow it been forever since I have made a update. The Christmas season has been NUTS and I am sure glad its over time to get back to a regular schedule. Over the Holiday I was able to do a little to the runner but not much. I finally completed my co2 on board air (OBA) system.
I was able to build the complete system from scratch for under $150.00
I will post more details and links to the places I used to purchase the items so that everyone else can piece together a awesome system on the cheap. Here are a few pic of the system completed and mounted.
I used the 1st Gen Roll bar to mount the tank in the vertical position using a heavy duty fire extinguisher vehicle mount. I went this route for a few different reasons, one its takes no tools to remove the tank from the bracket and I can have the bottle out in about 2 seconds. Its a very secure solid bracket that will not turn the co2 bottle into a deadly missile in the event of a collision. The bracket can also be locked using a pad lock if I ever decide to mount the bottle outside of the runner.
Ok that is enough for now here are some pics.


Still trying to figure something out for the 6x9 speakers but that is not high on the to-do list at the moment
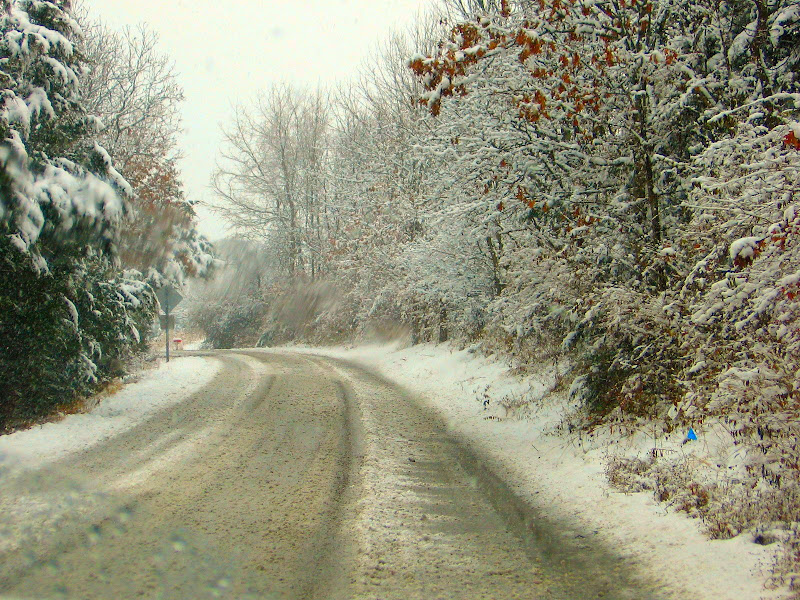
Almost forgot we got one awesome white Christmas here in Central Missouri and Christmas Eve I was able to drive some back roads in the heavy snow, it was a blast here are a few pics.


time to get back to a regular schedule. Over the Holiday I was able to do a little to the runner but not much. I finally completed my co2 on board air (OBA) system. I was able to build the complete system from scratch for under $150.00
I will post more details and links to the places I used to purchase the items so that everyone else can piece together a awesome system on the cheap. Here are a few pic of the system completed and mounted.
I used the 1st Gen Roll bar to mount the tank in the vertical position using a heavy duty fire extinguisher vehicle mount. I went this route for a few different reasons, one its takes no tools to remove the tank from the bracket and I can have the bottle out in about 2 seconds. Its a very secure solid bracket that will not turn the co2 bottle into a deadly missile in the event of a collision. The bracket can also be locked using a pad lock if I ever decide to mount the bottle outside of the runner.
Ok that is enough for now here are some pics.
Still trying to figure something out for the 6x9 speakers but that is not high on the to-do list at the moment
Almost forgot we got one awesome white Christmas here in Central Missouri and Christmas Eve I was able to drive some back roads in the heavy snow, it was a blast here are a few pics.
Last edited by LifterCatcher; Jan 4, 2011 at 03:03 PM.
Jan 4, 2011 | 04:52 PM
#119
nice set up Chris. Merry Christmas and happy new year hope all was well for you and yours. i'm looking at spring time for a wheeling trip and i'll let you know when and where.
Aaron
Aaron


