
LifterCatcher's 1993 4Runner Build-Up Thread
 Oct 18, 2010 | 08:04 PM
#82
Thread Starter
Registered User
Joined: Aug 2010
Posts: 224
Likes: 1
From: Columbia, Mo
Oct 18, 2010 | 08:19 PM
#83
Registered User
Joined: Jun 2010
Posts: 494
Likes: 3
From: Oak Harbor, WA
Your truck is looking great man, and that trailer is awesome, and you got a really good price.
If you decide to make that gauge pod for your ceiling you should definitely post a writeup on how to do it. I'd love to have one of those in my Runner, maybe another under my stereo and above the 4WD lever in that little nook.
If you decide to make that gauge pod for your ceiling you should definitely post a writeup on how to do it. I'd love to have one of those in my Runner, maybe another under my stereo and above the 4WD lever in that little nook.
Oct 18, 2010 | 08:24 PM
#84
Thread Starter
Registered User
Joined: Aug 2010
Posts: 224
Likes: 1
From: Columbia, Mo
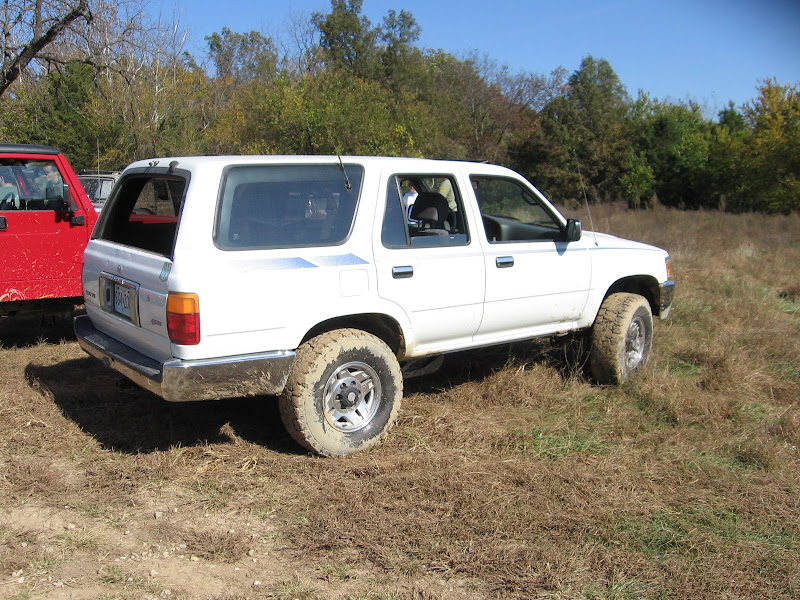
Well over the weekend I made a trip with a group of buddies to Potowatami off road park in Fulton, MO and then camped with a friend in the Mark Twain national forest it was a great time. First time out wheeling with the rig and it did great 

So on the way to work today while sitting at a stop light I notice some white smoke coming out of the hood. ˟˟˟˟ pull over real quick pop the hood and take a look. I see some coolant around the rear of the intake mani but can't really see where it was coming from.
Limp it home and tear into it. Pull the intake mani, and found that two of the coolant hoses attached to the water distribution block had leaks. While the intake manifold was off I decided to replace the PCV valve and while I was at it I decided to mount the PCV in a remote easy to access location so I don't have to pull the intake mani to change it in the future.
Here are some pics
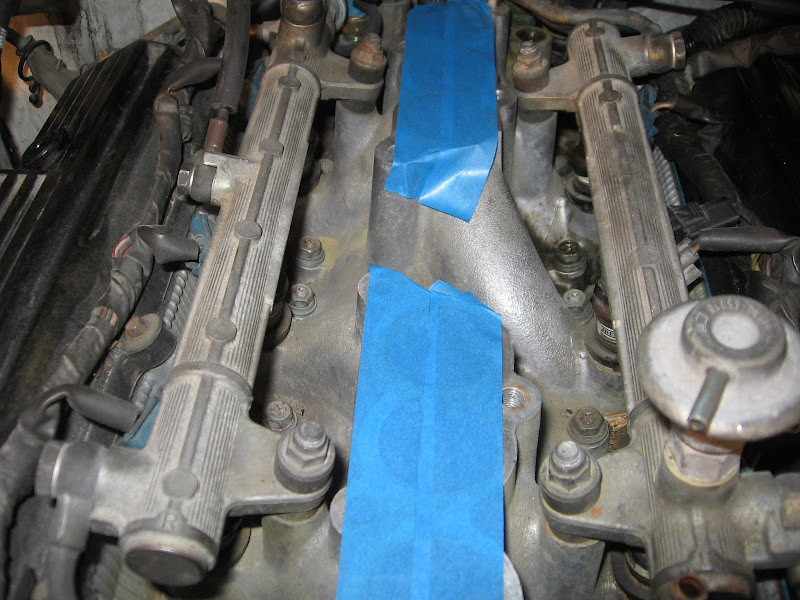
(Intake Manifold removed and the lower intake tapped off so nothing falls in.)
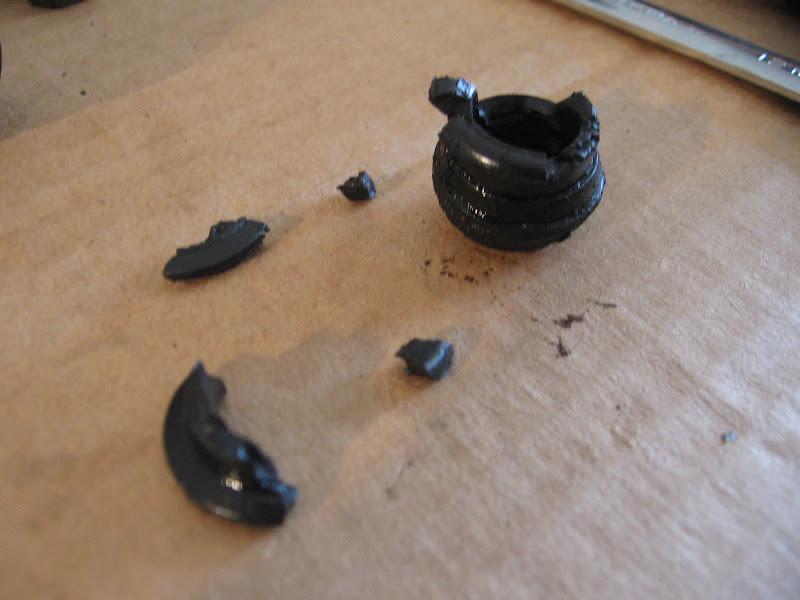
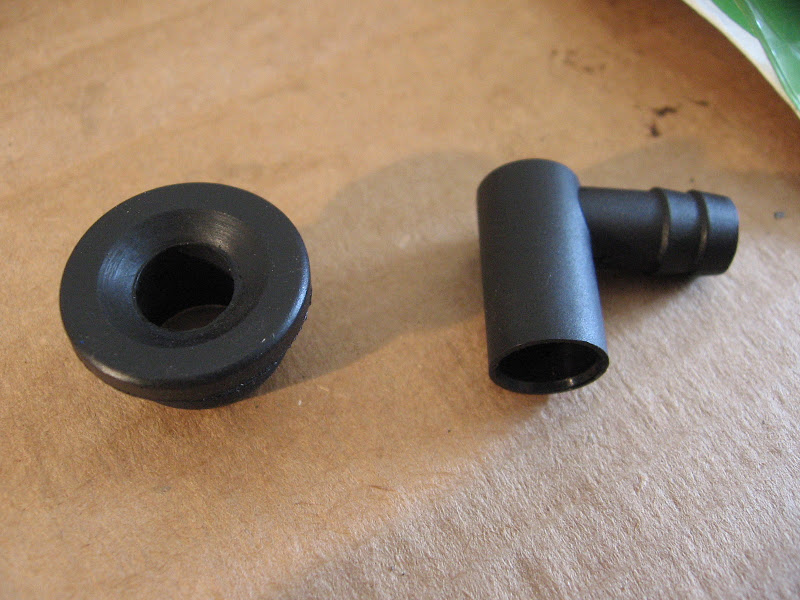
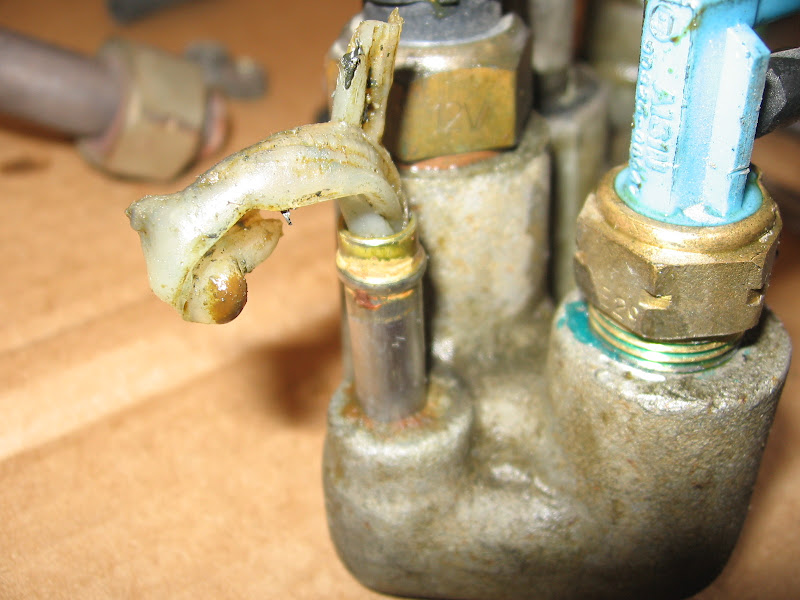
(what is left of the grommet that the pcv valve mounts into, this was no longer soft rubber it was rock hard.)
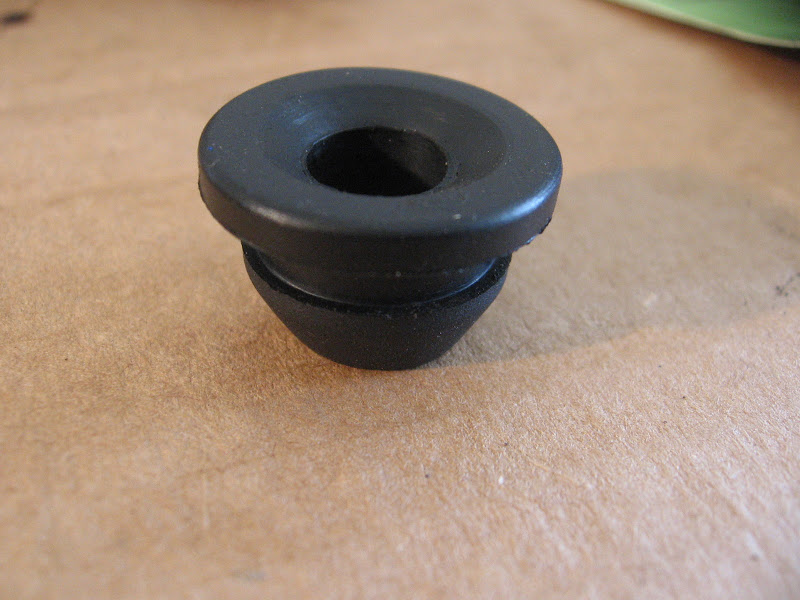
(New grommet much better.)
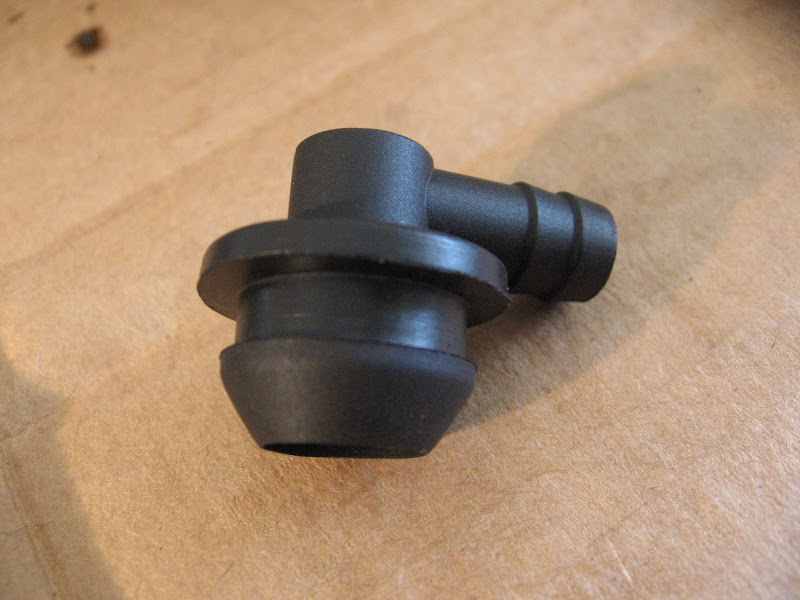
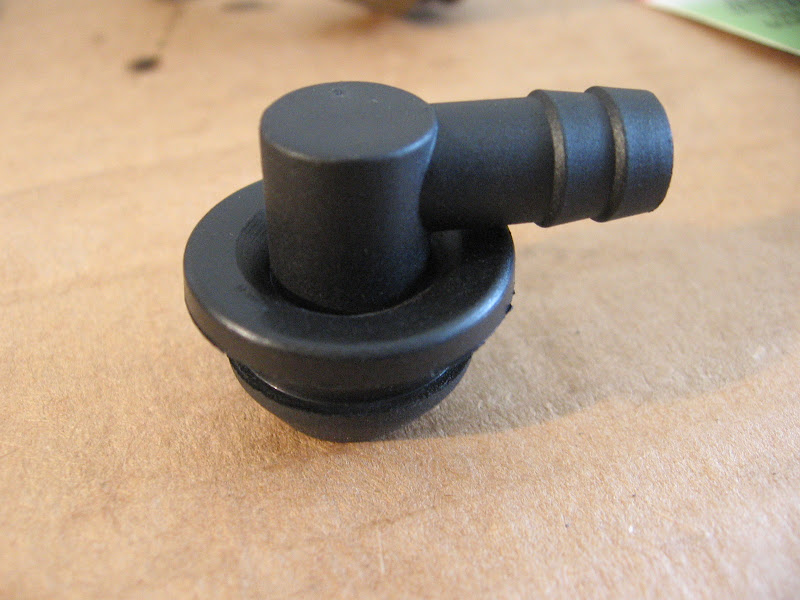
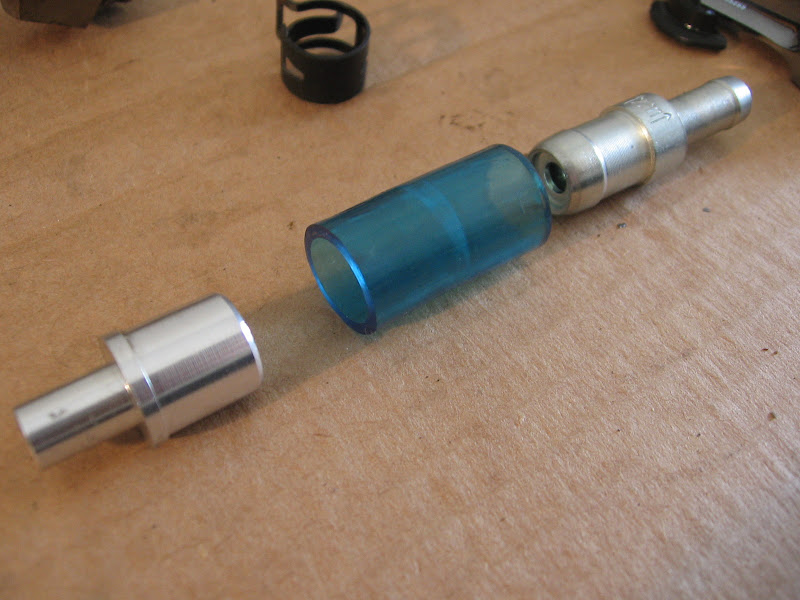
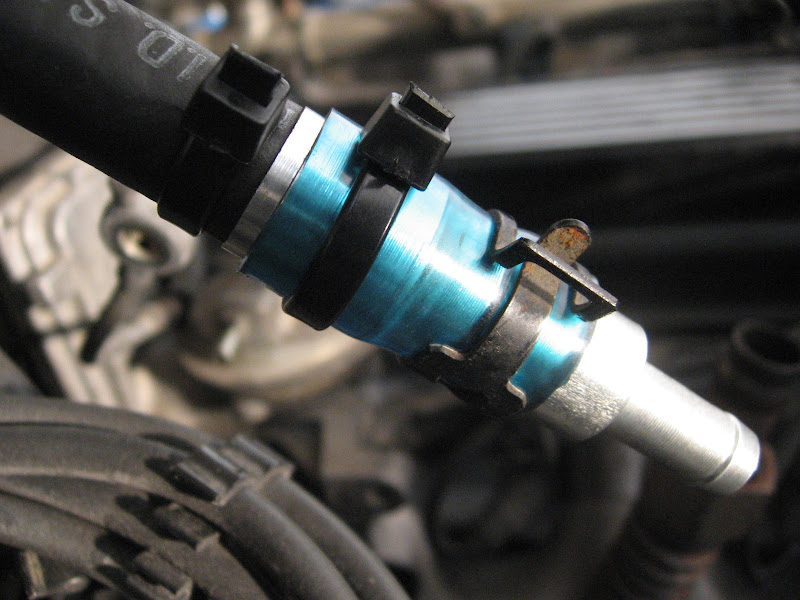
(90deg elbow will be used in the grommet then a rubber hose will relocate the PCV)

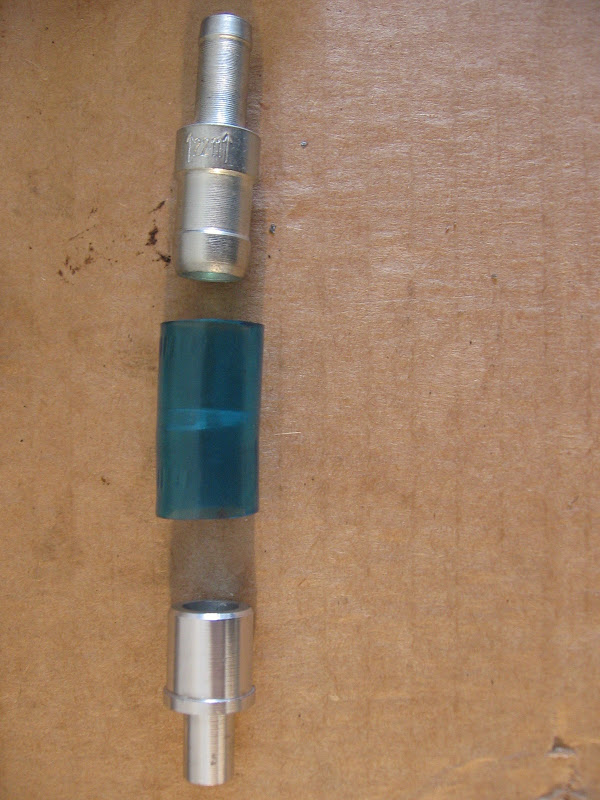
(New PCV Valve top and reducer bellow)
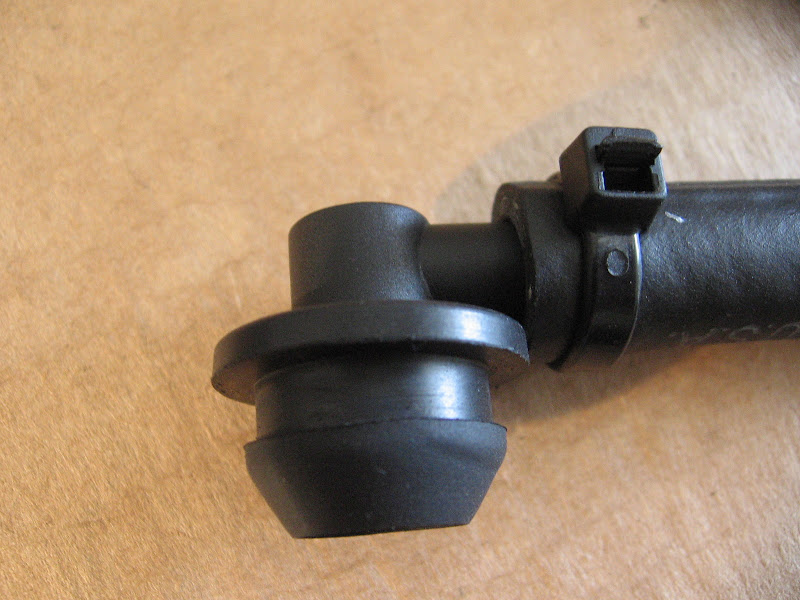
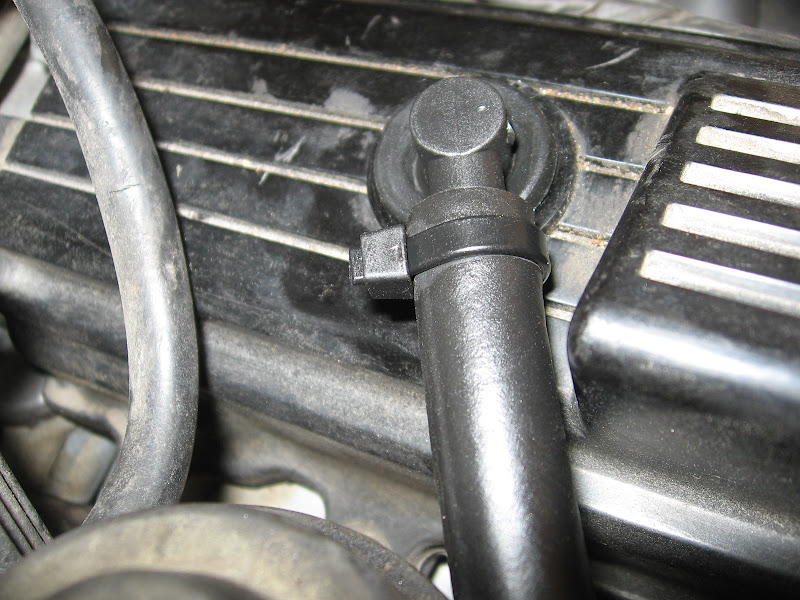
(all mounted and ready to go)
When I pulled the water distribution block I noticed something very ODD in the water bypass tube!!!!!
( Silicone sealant made its way and got jammed in the tube allowing no coolant to flow YIKES have no idea where this came from.)

(That was jammed all the way down in the tube I had to use a dental pic to get it out.)
I was able to use some 1/4 coolant hose from Auto zone to replace both of the coolant lines totaling $6.00. The dealer wanted over $150.00 for the two lines. Id say I did pretty good. Put it all back together and took it for a short spin, no leaks and the temp was stable.
That is all for now.
Chris
So on the way to work today while sitting at a stop light I notice some white smoke coming out of the hood. ˟˟˟˟ pull over real quick pop the hood and take a look. I see some coolant around the rear of the intake mani but can't really see where it was coming from.
Limp it home and tear into it. Pull the intake mani, and found that two of the coolant hoses attached to the water distribution block had leaks. While the intake manifold was off I decided to replace the PCV valve and while I was at it I decided to mount the PCV in a remote easy to access location so I don't have to pull the intake mani to change it in the future.
Here are some pics
(Intake Manifold removed and the lower intake tapped off so nothing falls in.)
(what is left of the grommet that the pcv valve mounts into, this was no longer soft rubber it was rock hard.)
(New grommet much better.)
(90deg elbow will be used in the grommet then a rubber hose will relocate the PCV)
(New PCV Valve top and reducer bellow)
(all mounted and ready to go)
When I pulled the water distribution block I noticed something very ODD in the water bypass tube!!!!!
( Silicone sealant made its way and got jammed in the tube allowing no coolant to flow YIKES have no idea where this came from.)
(That was jammed all the way down in the tube I had to use a dental pic to get it out.)
I was able to use some 1/4 coolant hose from Auto zone to replace both of the coolant lines totaling $6.00. The dealer wanted over $150.00 for the two lines. Id say I did pretty good. Put it all back together and took it for a short spin, no leaks and the temp was stable.
That is all for now.
Chris
Last edited by LifterCatcher; Oct 18, 2010 at 08:32 PM.
Oct 19, 2010 | 04:33 AM
#85
wow way to catch it before it got bad huh. Hey Chris check out my new thread, you're never going to believe what happened to me saturday! https://www.yotatech.com/forums/f116...ew-one-222309/ By the way fishing was good, We went to a tributary of the moraeu river and caught some nice bass and crappie. I'll let you know next time i'm headed that way.
Oct 19, 2010 | 06:11 AM
#86
Thread Starter
Registered User
Joined: Aug 2010
Posts: 224
Likes: 1
From: Columbia, Mo
Your truck is looking great man, and that trailer is awesome, and you got a really good price.
If you decide to make that gauge pod for your ceiling you should definitely post a writeup on how to do it. I'd love to have one of those in my Runner, maybe another under my stereo and above the 4WD lever in that little nook.
If you decide to make that gauge pod for your ceiling you should definitely post a writeup on how to do it. I'd love to have one of those in my Runner, maybe another under my stereo and above the 4WD lever in that little nook.
wow way to catch it before it got bad huh. Hey Chris check out my new thread, you're never going to believe what happened to me saturday! https://www.yotatech.com/forums/f116...ew-one-222309/ By the way fishing was good, We went to a tributary of the moraeu river and caught some nice bass and crappie. I'll let you know next time i'm headed that way.
Chris
Oct 25, 2010 | 01:01 PM
#87
Thread Starter
Registered User
Joined: Aug 2010
Posts: 224
Likes: 1
From: Columbia, Mo
Well after the last wheeling trip I have put the following in a list to do first.
1. Armor (skid plates & Rock Sliders) and maybe a rear bumper.
2. Rear Locker (it will be an Aussie Locker)
3. Lift 1.5" Ball Joint spacers up front and OME 901's in the rear with new shocks.
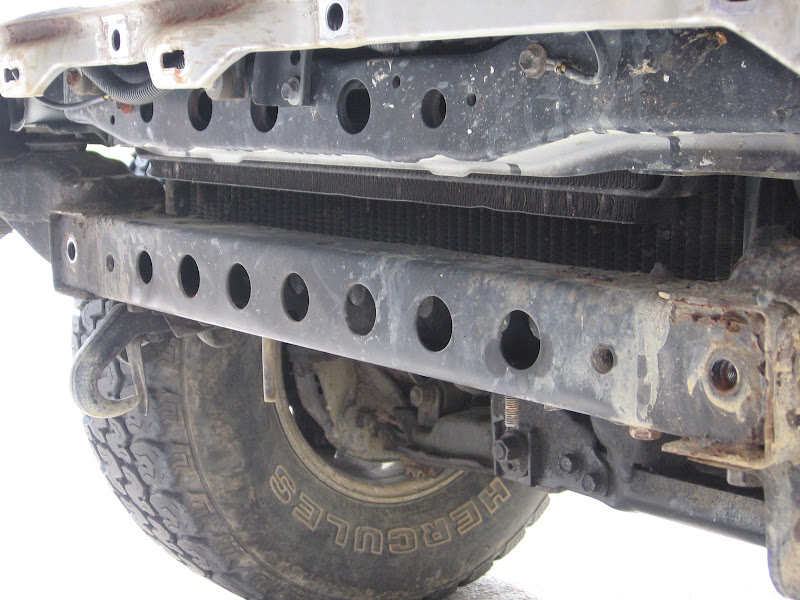
So with Armor being first on the list it's time I get started. First I want to brace the front end better. I want to do this only once and with the plan to have a winch and bumper up front mine as well do this first

(Lower removed)
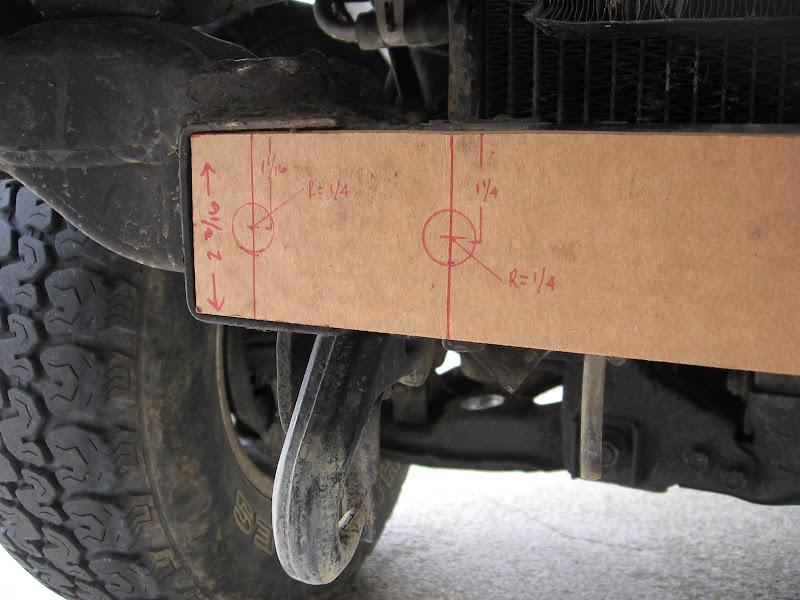
(card board Fab gotta love it.)
So here is a pic of a front frame brace for a '84-'89 truck from front range fabrication.

The 4Runner design will not use the mounting tabs on the top, instead I will use a slide over brace that can be welded on to add extra bite.
Here are some 3D models that I made up and took to a metal shop to have cut out of 1/4 plate steel
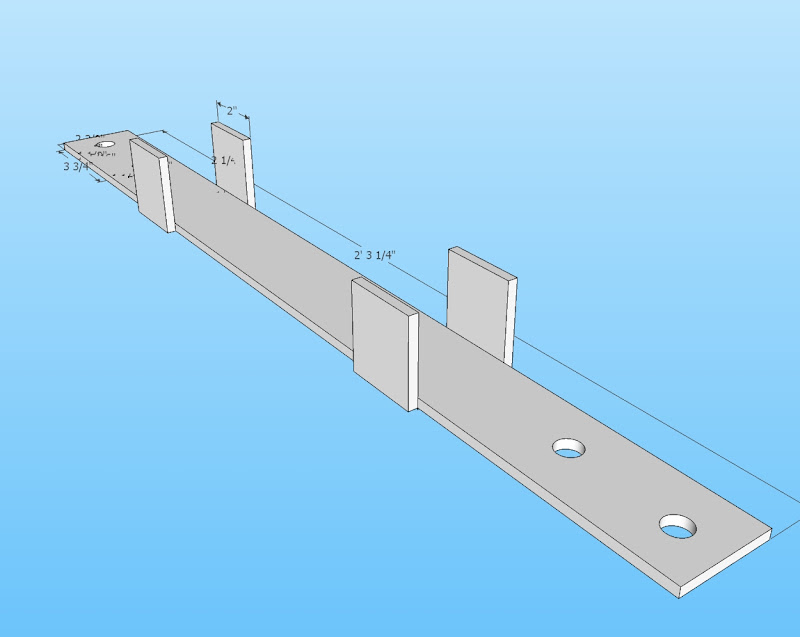
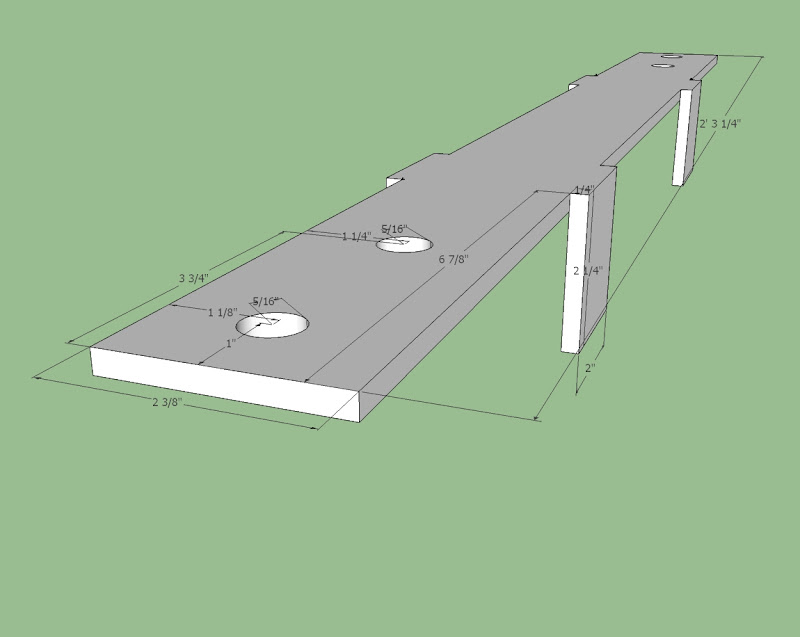
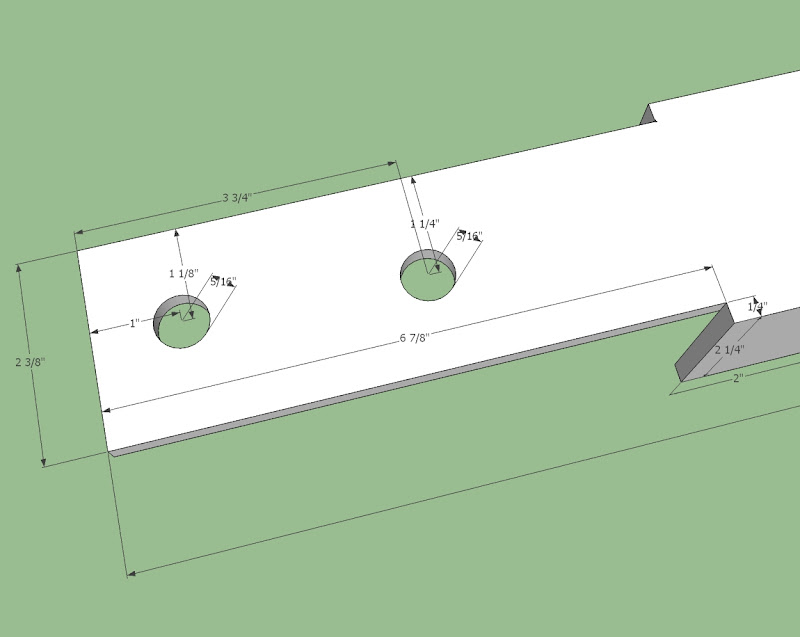
I dropped the drawings off at the metal shop today and they will have it back to me in about a week
On another note the M101A1 trailer paper work just went through and I will be picking it up this week.
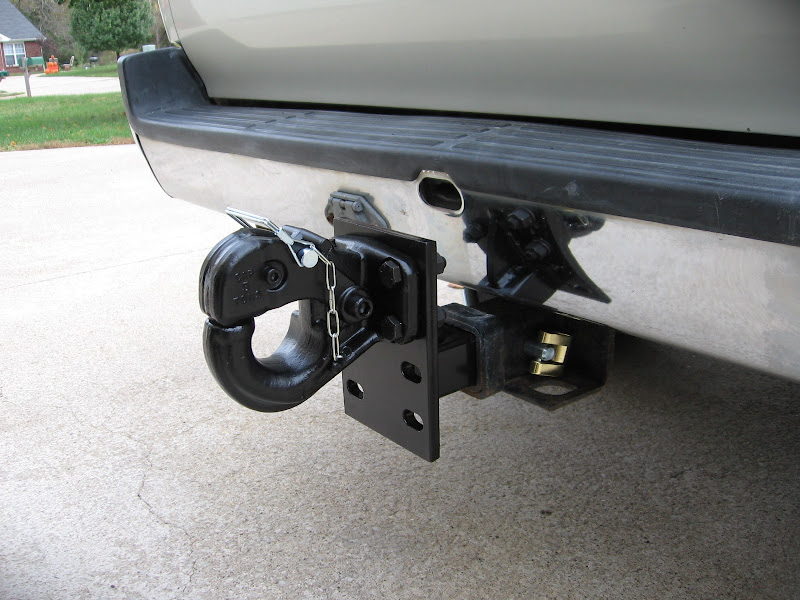
I got my Pintel and Clevis hitch all ready here are some pics.
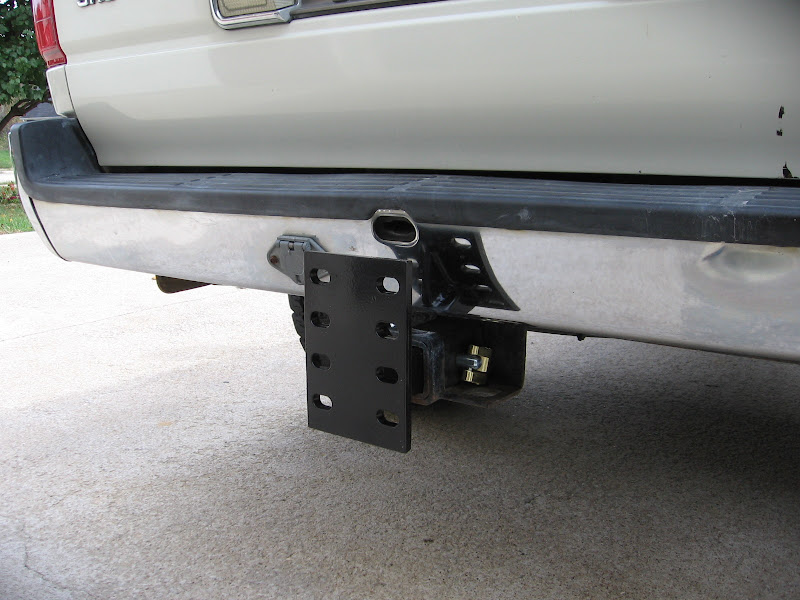
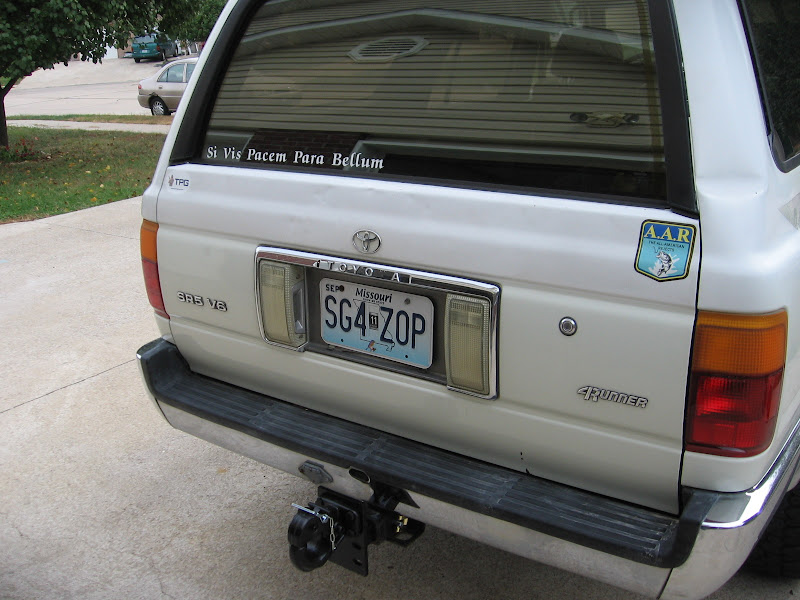
(Also notice the new stickers )
)

1. Armor (skid plates & Rock Sliders) and maybe a rear bumper.
2. Rear Locker (it will be an Aussie Locker)
3. Lift 1.5" Ball Joint spacers up front and OME 901's in the rear with new shocks.
So with Armor being first on the list it's time I get started. First I want to brace the front end better. I want to do this only once and with the plan to have a winch and bumper up front mine as well do this first
(Lower removed)
(card board Fab gotta love it.)
So here is a pic of a front frame brace for a '84-'89 truck from front range fabrication.
The 4Runner design will not use the mounting tabs on the top, instead I will use a slide over brace that can be welded on to add extra bite.
Here are some 3D models that I made up and took to a metal shop to have cut out of 1/4 plate steel
I dropped the drawings off at the metal shop today and they will have it back to me in about a week
On another note the M101A1 trailer paper work just went through and I will be picking it up this week.
I got my Pintel and Clevis hitch all ready here are some pics.
(Also notice the new stickers
)
Last edited by LifterCatcher; Oct 25, 2010 at 01:04 PM.
 Oct 27, 2010 | 12:18 AM
#90

Registered User
Joined: Jan 2010
Posts: 96
Likes: 0
From: Northwest Arkansas
nice fab, oh and that junk in your coolant was very likely from a water pump change, that junk plugged my HG and that's why i'm rebuilding it myself...which is nearly done....
looking forward to trailer info...woot
looking forward to trailer info...woot
 more awesome stuff, keep it comin brotha!
 Oct 27, 2010 | 11:13 AM
#94
Thread Starter
Registered User
Joined: Aug 2010
Posts: 224
Likes: 1
From: Columbia, Mo
You got it
I agree, I guess I am lucky that it got stuck in the water bypass passage and didn't make it into the head or block. Good work on DIY head gasket repair.
I love pictures and will be taking a ton more. Lockers are awesome and I cannot wait to get them but before I do I want to make sure the truck has lots of armour.
Thanks it was a ˟˟˟˟˟ ton of work but really worth it in the end.
Chris
Chris
Oct 28, 2010 | 09:37 PM
#97
Thread Starter
Registered User
Joined: Aug 2010
Posts: 224
Likes: 1
From: Columbia, Mo
Today I was able to start fabbing up my front skid plate that I am going to build. The skid is based off of Budbuilt's skid but I will be adding some ideas that I have.
Here are some pics of the mock up.


(one area that I am going to tweak is have the sides come out farther to protect the lower A-Arm bolts.)


Here are some pics of the mock up.
(one area that I am going to tweak is have the sides come out farther to protect the lower A-Arm bolts.)
Last edited by LifterCatcher; Feb 4, 2011 at 02:16 PM.

 Oct 29, 2010 | 08:56 AM
#100
Love the idea man. Some things to consider. When you change your oil maybe try to get a drain plug with a hose to fit through the skid plate so you don't have to remove it every time you change your oil. Might take longer for the oil to drain but better than pulling off the skid plate every time. Also think about adding some bracing to it to make it stronger. Like this one here.
https://www.yotatech.com/forums/f88/...-build-219910/
maybe not soooo much bracing but you get the point.
https://www.yotatech.com/forums/f88/...-build-219910/
maybe not soooo much bracing but you get the point.


