
Gevo's 91 4Runner Build Thread
 Oct 24, 2013 | 07:27 PM
#101

Registered User
Joined: Mar 2013
Posts: 1,047
Likes: 1
From: Central TX
Those harbor freight ones I'm pretty sure are only supposed to take water... Not industrial quality in any sense. The one I mentioned w/ a tub and sander -- the guy is cleaning a head... Further down in the comments I think is where someone suggested running two sanders for right frequency...
Good/better diy directions: http://www.bjultrasonic.com/ultrason...sonic-cleaner/
Good/better diy directions: http://www.bjultrasonic.com/ultrason...sonic-cleaner/
Last edited by RSR; Oct 24, 2013 at 07:29 PM.
Oct 26, 2013 | 06:18 PM
#102

Thread Starter
Registered User
Joined: Sep 2013
Posts: 1,631
Likes: 110
well I've been powering through the cleaning of all the parts.. it's been a hell of a pain but I am very nearly done 
Update on engine work. I spent last two full days working on it, once each day got stuck on an item which took me much to long to resolve.. but hopefully tomorrow night it will be back in to car
Update on engine work. I spent last two full days working on it, once each day got stuck on an item which took me much to long to resolve.. but hopefully tomorrow night it will be back in to car
Oct 27, 2013 | 10:19 AM
#103
Thread Starter
Registered User
Joined: Sep 2013
Posts: 1,631
Likes: 110
Hi Guys I want to see what your advice is. the fsm says to install plenum and throttle body and then install the engine into the car.. should I do it this way or instal the engine then the plenum... or it doesnt matter? Thanks
Thanks
Oct 27, 2013 | 02:38 PM
#105
Registered User
Joined: Mar 2013
Posts: 1,047
Likes: 1
From: Central TX
Probably easier to do it first. Hooking up those throttle body coolant hoses is pretty tight when doing it while on the engine. Also, removing/installing the plenum is when folks break the TVV valve nubs off and have to replace that $60 part...
Oct 28, 2013 | 01:40 PM
#106
Thread Starter
Registered User
Joined: Sep 2013
Posts: 1,631
Likes: 110
The problem is that my engine harness is still at my buddy's house, he is 're-building' it for me. I don't see how I can connect my injectors to the harness, and the knock sensor, with the plenum on.
And, to add, i'm quite pissed off at the engine rebuilding place. They have done a great job as far as I can tell for 99% of it.. but they put in the engine bypass pipe without properly cleaning it and one of the passages (the one that goes to that u-shaped bypass hose) is clogged. I can not get anything to get through the passageway, it's got to many turns. I can't clean it out. I purchased some acid hoping it will eat it's way through, but it didn't. Really the only option I have is to put a T in the other bypass hose and bring it over....
And, to add, i'm quite pissed off at the engine rebuilding place. They have done a great job as far as I can tell for 99% of it.. but they put in the engine bypass pipe without properly cleaning it and one of the passages (the one that goes to that u-shaped bypass hose) is clogged. I can not get anything to get through the passageway, it's got to many turns. I can't clean it out. I purchased some acid hoping it will eat it's way through, but it didn't. Really the only option I have is to put a T in the other bypass hose and bring it over....
Nov 5, 2013 | 02:18 PM
#107
Thread Starter
Registered User
Joined: Sep 2013
Posts: 1,631
Likes: 110
SO, little update on what became my own little 're-build thread'
I got my engine all built up with the various components and put it back in the car. Time consuming for a one man job! I ran into some snags, losing track of which VSV goes to which part of the ADD actuator, some parts that were damaged during delivery... not knowing what i was doing with the engine re-install.. lol..
I 'fixed' my broken power steering vacuum pressure valve... some jb weld and 2 part from local hardware store.. saved $70.. tested the valve, works great!

my engine hoist became a manually controlled robot assistant

I spent a lot of time making sure i put the right spacer/washer on the right side of the flywheel.. difficult to find info btw!

**CAUTION!! Some helpful info for you guys.. if you buy the Monroe steering stabilizer for the 3.0 4X4, beware that the bolt that holds the left side onto the steering control arms causes an interference issue with the stop block of the pitman arm. In the following picture you can see it in the very bottom left corner. The new bolt makes the stabilizer stick to far forward and interfere with the stop block when steering left. I had to go to hardware store to find a sleeve to use on the old bolt.

Heads had two of these... machien shop gonna get a mouthful about it! Nothing thread inserts didn't fix.

If you are re-doing your heads, for your engine's sake clean the valve covers THOROUGHLY!! Mine were severely bad, charred, hardened oil had built up behind the baffle plates. They are pricey, so I melted the plastic stubs holding the baffle plates and pulled them out. I'm glad I did, cleaned it all up very nicely and plastic welded the baffle plates back on. Satisfied

And here is the car, after a run in with the neighbors cat, resting..

I have to install the plenum, various hoses, radiators for coolant and tranny oil. Engine harness ran into problems with two broken connectors I can not find
Anyway, just documenting my progress, issues and ideas for any possible future use.
I wish someone here would tell me which is VSV2 and 4 in the hood
Here is my dedicated friend

I got my engine all built up with the various components and put it back in the car. Time consuming for a one man job! I ran into some snags, losing track of which VSV goes to which part of the ADD actuator, some parts that were damaged during delivery... not knowing what i was doing with the engine re-install.. lol..
I 'fixed' my broken power steering vacuum pressure valve... some jb weld and 2 part from local hardware store.. saved $70.. tested the valve, works great!
my engine hoist became a manually controlled robot assistant
I spent a lot of time making sure i put the right spacer/washer on the right side of the flywheel.. difficult to find info btw!
**CAUTION!! Some helpful info for you guys.. if you buy the Monroe steering stabilizer for the 3.0 4X4, beware that the bolt that holds the left side onto the steering control arms causes an interference issue with the stop block of the pitman arm. In the following picture you can see it in the very bottom left corner. The new bolt makes the stabilizer stick to far forward and interfere with the stop block when steering left. I had to go to hardware store to find a sleeve to use on the old bolt.
Heads had two of these... machien shop gonna get a mouthful about it! Nothing thread inserts didn't fix.
If you are re-doing your heads, for your engine's sake clean the valve covers THOROUGHLY!! Mine were severely bad, charred, hardened oil had built up behind the baffle plates. They are pricey, so I melted the plastic stubs holding the baffle plates and pulled them out. I'm glad I did, cleaned it all up very nicely and plastic welded the baffle plates back on. Satisfied
And here is the car, after a run in with the neighbors cat, resting..
I have to install the plenum, various hoses, radiators for coolant and tranny oil. Engine harness ran into problems with two broken connectors I can not find
Anyway, just documenting my progress, issues and ideas for any possible future use.
I wish someone here would tell me which is VSV2 and 4 in the hood
Here is my dedicated friend
Nov 15, 2013 | 07:25 AM
#108
Thread Starter
Registered User
Joined: Sep 2013
Posts: 1,631
Likes: 110
Hey Guys, I need your guys' opinions.
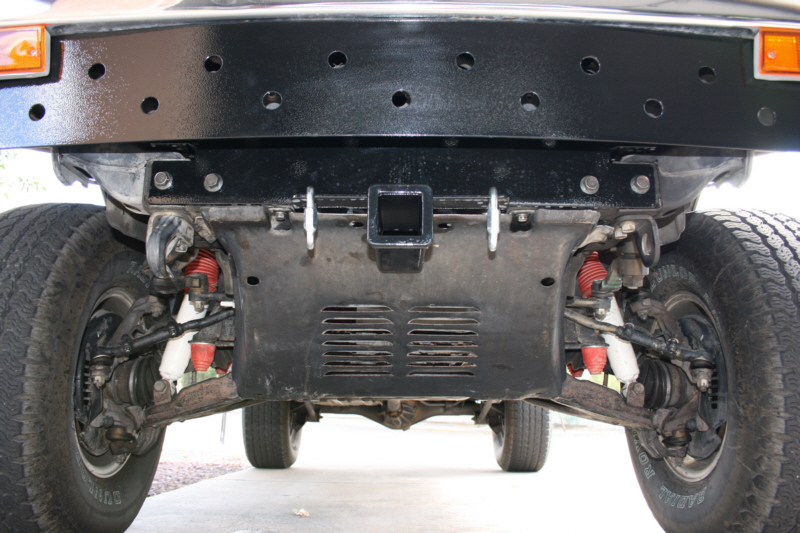
The problem is this... I couldn't find anywhere in the grill area to fit my aftermarket tranny oil cooler. Looking at the car from the front, behind the grill to the right of the electric fan there is SOME room, but I have to manipulate the AC gas lines and that cylinder thing, and if I modify the shady plastic grill I may be able to fit it.. but even then it is not ideal because about 1/3 of the cooler ends up behind the bumper.. no air flow... So, no good!
The only other option I could think of last night was to utilize the slotted skid plate in the front... (see image below) and mount the oil cooler above the slotted portion on the inside. I tested air flow through the slots with an air compressor and feel it will be sufficient. It isn't my favorite idea, but I can't think of another way to fit this oil cooler and avoid the hassle of searching for a new one.
So, you guys think this will work?
Nov 16, 2013 | 12:05 AM
#109
Registered User
Joined: Mar 2013
Posts: 1,047
Likes: 1
From: Central TX
Your bends in your AC lines on driver side are different than on our pickups. We basically have about the same space as passenger side -- you don't. Our lines run along the bottom of the condensor, while yours jog across the condensor then down and then over. Also, pickups don't come w/ the fan so most folks mount them there...
Personally, I'd shy away from behind the skid plate. Plus if you do reading, you need to position it in a way that forces air through it. Reading through other's results, you'll big difference for cooling mounted a half an inch away from radiator vs. almost touching or touching w/ weatherstripping in between to seal but not damage...
What might work is the space between your radiator and condenser. Some have utilized that space but it might be too thick for your current cooler.
Or you could always delete your factory fan and mount a smaller one directly to your A/C condensor on the drivers side.
Nov 18, 2013 | 07:56 AM
#110
Thread Starter
Registered User
Joined: Sep 2013
Posts: 1,631
Likes: 110
Thanks for your thoughts RSR,
My friend finished rebuilding my harness so I spent what time I had this weekend putting that back together... not the most fun i've had on this so far. lol..
For the oil cooler, I agree with you that down there is not the best place, but, I am out of options.. no space between rad and condenser, nothing will fit there that I tell.. Either I have to install a different electric fan as you said, or heavily modify the AC piping forward of the condenser AND modify the plastic grill mounting to the body... I really don't want to heavily modify anything and would much prefer to keep the factory fan...
My brother had another idea, to route an air duct to the oil cooler, this way I can mount it 'anywhere' it fits... trouble is the same though... where does it fit? lol.. I didn't research this thoroughly enough before I got the cooler, but I am adamant to make it work.
SO, I am settling on mocking up some mounts and installing the cooler underneath and make it so I am able to channel the air over it in a sealed system... I'll mount it first, to get it off the driveway and use it finally, then go from there.
Thanks again (this is actually kind of fun, new territory for me.. lol )
My friend finished rebuilding my harness so I spent what time I had this weekend putting that back together... not the most fun i've had on this so far. lol..
For the oil cooler, I agree with you that down there is not the best place, but, I am out of options.. no space between rad and condenser, nothing will fit there that I tell.. Either I have to install a different electric fan as you said, or heavily modify the AC piping forward of the condenser AND modify the plastic grill mounting to the body... I really don't want to heavily modify anything and would much prefer to keep the factory fan...
My brother had another idea, to route an air duct to the oil cooler, this way I can mount it 'anywhere' it fits... trouble is the same though... where does it fit? lol.. I didn't research this thoroughly enough before I got the cooler, but I am adamant to make it work.
SO, I am settling on mocking up some mounts and installing the cooler underneath and make it so I am able to channel the air over it in a sealed system... I'll mount it first, to get it off the driveway and use it finally, then go from there.
Thanks again
(this is actually kind of fun, new territory for me.. lol )
Last edited by Gevo; Nov 21, 2013 at 07:16 AM.
Nov 21, 2013 | 07:27 AM
#111
Thread Starter
Registered User
Joined: Sep 2013
Posts: 1,631
Likes: 110
Hi guys, just updating the progress here.. Again, ever so slow but I do NOT want to do this twice.
ok, so my awesome friend handed me this finished re-built harness

I put the passenger side under-body connections out to be able to route the beast in the hood.

I tried to find new a connector for the ECT sensor, but meanwhile I did a good rigged up connection that will last.

squeezing the un-factory like harness into place while making sure there is no stress on any part of the wiring.

And finally most of the engine portion is in place. I didn't take any more pictures, but after this I did install the plenum and throttle body. I figure couple more days of work and I will be able to start her up

As you guys can see my valve covers look crappy. I cleaned the crap out of them, but decided I didn't want to paint them due to the high likelyhood of the paint failing since the surface was in no good condition. Any ideas to make this look better?
As always any thoughts, suggestions.. etc.. are appreciated
ok, so my awesome friend handed me this finished re-built harness
I put the passenger side under-body connections out to be able to route the beast in the hood.
I tried to find new a connector for the ECT sensor, but meanwhile I did a good rigged up connection that will last.
squeezing the un-factory like harness into place while making sure there is no stress on any part of the wiring.
And finally most of the engine portion is in place. I didn't take any more pictures, but after this I did install the plenum and throttle body. I figure couple more days of work and I will be able to start her up
As you guys can see my valve covers look crappy. I cleaned the crap out of them, but decided I didn't want to paint them due to the high likelyhood of the paint failing since the surface was in no good condition. Any ideas to make this look better?
As always any thoughts, suggestions.. etc.. are appreciated
Nov 30, 2013 | 10:33 AM
#113
Thread Starter
Registered User
Joined: Sep 2013
Posts: 1,631
Likes: 110
Well, I've finally been able to work on the truck some more and made some good progress. But, inevitably I do have a question...
My friend ripped the harness out and didn't keep track of what goes where, figured how hard can it be so I didn't complain... well, i'm in some doodoo..
The white and brown (i think it's brown?) connectors in this picture can't find a home! The white one had a number, I searched and it is the "housing connector, F" .. whatever that is.
Any idea anyone? On my way to parents house to work on it some more today.. I'll try to follow the colors of the wire, but I can't find a wiring schematic that shows teh colors... what am I missing? help!
Thanks!
Nov 30, 2013 | 10:52 PM
#114
Thread Starter
Registered User
Joined: Sep 2013
Posts: 1,631
Likes: 110
This thread is much more of me thinking out loud than anything else. lol. Well, I found 2 of the three connectors. The big white (gray??) one with 9 connectors still elluded me... I followed the wiring diagram here http://snjschmidt.com/wiring/Wire_routing_3vze_1.jpg and I THINK it may be the P1 Greay, to the transmission. Well, I hope so, I'll find out tomorrow morning
Nov 30, 2013 | 11:07 PM
#115
Thread Starter
Registered User
Joined: Sep 2013
Posts: 1,631
Likes: 110
Also, as an update to the rebuild. I was not able to install everything today, mainly due to spending a lot of time trying to find where the electrical connectors went.
Everything is going in well.
Some points worth of note: I purchased LCengineerings vacuum hose kit. beware, the kit does not include enough 1/8 hose. In fact, I am 3-4 feet short, it came with 17-ft.
Note to self: Make sure to connect the vac hoses to the TVV valved before installing the plenum this was a pain !!!
I decided to use the tranny oil cooler built into the main radiator for now.. So i can have some time to find a good mounting location for it.
Tomorrow I hope to start the engine finally. Just have a couple of hoses, the intake air box/hose and fill it up with all the fluids...
Everything is going in well.
Some points worth of note: I purchased LCengineerings vacuum hose kit. beware, the kit does not include enough 1/8 hose. In fact, I am 3-4 feet short, it came with 17-ft.
Note to self: Make sure to connect the vac hoses to the TVV valved before installing the plenum
this was a pain !!!I decided to use the tranny oil cooler built into the main radiator for now.. So i can have some time to find a good mounting location for it.
Tomorrow I hope to start the engine finally. Just have a couple of hoses, the intake air box/hose and fill it up with all the fluids...
 Dec 1, 2013 | 10:41 PM
#117
Thread Starter
Registered User
Joined: Sep 2013
Posts: 1,631
Likes: 110
Good to hear sturmcrow I usually just post about my problems/questions and their solutions for my own future reference and others like me searching in the future .
Well today as usual I ran into a couple of time consuming snags. Good news is I was right about that rogue connector, thanks to the FSM wiring diagram and few cups of coffee. For the future connevtor number 10686 connects to the transmission on the passenger side and its difficult to get to! Ill post pic soon.
Some new snags were the tranny oil pan bolts, missing magnets, tranny fluid fill tube connection point and throttle cable connection to tranny housing o ring. All of which I was able to solve with a time consuming trip to the hardware store.
Then I got carried away with redoing the battery terminal connectors amd subsequent wires. Lol. Anyway all in all im 1 hour of fluid filling away from starting her up!
Gave up tonight to start on fresh mind so I dont screw something up!
I usually just post about my problems/questions and their solutions for my own future reference and others like me searching in the future . Well today as usual I ran into a couple of time consuming snags. Good news is I was right about that rogue connector, thanks to the FSM wiring diagram and few cups of coffee. For the future connevtor number 10686 connects to the transmission on the passenger side and its difficult to get to! Ill post pic soon.
Some new snags were the tranny oil pan bolts, missing magnets, tranny fluid fill tube connection point and throttle cable connection to tranny housing o ring. All of which I was able to solve with a time consuming trip to the hardware store.
Then I got carried away with redoing the battery terminal connectors amd subsequent wires. Lol. Anyway all in all im 1 hour of fluid filling away from starting her up!
Gave up tonight to start on fresh mind so I dont screw something up!
Dec 2, 2013 | 06:04 AM
#118
Thread Starter
Registered User
Joined: Sep 2013
Posts: 1,631
Likes: 110
Yeap, that's right.. this is how I found that tranny connection. Mirror mirror on the... end of a collapsable wand...? This may seem like a little deal to you all who have known this and sat in front of your computers laughing at me since I first complained about it.... but it's a huge deal to me! I have learned some lessons during this rebuild I shall carry with me forever!!

This may seem like a little deal to you all who have known this and sat in front of your computers laughing at me since I first complained about it.... but it's a huge deal to me! I have learned some lessons during this rebuild I shall carry with me forever!!
Dec 7, 2013 | 08:53 PM
#119
Thread Starter
Registered User
Joined: Sep 2013
Posts: 1,631
Likes: 110
Well, everything is back in with the exception of the heater core. I bypassed the heater core until I get around to taking the dash out.
However, the car didn't start. My biggest fear while I went to crank the first was banging noises from the engine, but it cranked over very smoothely. But, didn't start. So, I started to check the ignition system and made a thread about it so the solution could be usefull for the future without digging around this thread for it.
https://www.yotatech.com/forums/f116...esting-275774/
Don't really have any pics, but it's all back together so.. thats what it looks like. lol
Dec 25, 2013 | 10:06 PM
#120
Thread Starter
Registered User
Joined: Sep 2013
Posts: 1,631
Likes: 110
Ok everybody. Just to keep this up to date. I haven't had to much time to work on the car through the holidays and what time I did have went to diagnosing the no spark condition. That problem was solved and I wrote out the process in this thread.
https://www.yotatech.com/forums/f116...esting-275774/
Here is my progress otherwise.
I've ordered a new TPS connector (this was the cause of the no spark, shorting VC and E2 .. BAD!!). Also, I ordered a new ECT sensor connector since it doesn't even have one now. lol.
The engine starts, once it starts the first time after a few seconds of cranking the other times it starts and idles beautifully. I have to get it 'professionally' timed. I'm PRETTY sure I put the distributor back as per FSM but I may be one tooth off on the the little distributor gear. To get it to idle well I had to adjust the distributor all the way clockwise (meaning the bolt is at the top of the slot now). Since I have never used a timing light and or timed an engine.. I don't mind a mechanic doing it for me. Perhaps the distributor is in a tooth off, we'll see. The aftermarket one didnt have the distinctive mark on the gears as the original.
Another problem which I am pretty sure is tied in to the TPS sensor connector missing the yellow wire and the timing, is that it pretty much doesnt have any power right now. On throttle snap and quick release it wants to quit.. etc.. I double checked the timing chain and cam gears being in the right places at TDC, all was good.
The other problem currently is my transmission. I thought If i didnt think about it for a while the problem would go away.. but, it didn't and I'm pretty sure I jacked it up/
Here is where it started.
Before I knew anything about these tranny's, and a few minutes away from the house where I purchased the 4Runner, I stopped by a gas station to check the fluids. Tranny was definitely pretty cool still, so when i checked the oil level it was low. I walked into the gas station shop, and since the connection was slow on my smsart phone I didnt do research for which oil to put in.. I ended up getting "ATF fluid".. adding about a quart. Till this moment the vehicle shifted into reverse and forward and everything was very smooth. However, here I put it in reverse and it had NO power. The ground was level there, so it went backwards just a little and i got out. THen same thing at my apt parking lot and that was it for reverse. I drove it up my parents driveway soonafter and it hadn't been started for a few months.
Anyway, the problem persisted and after this it started a tranny oil leak from a tiny weep hole. It shifts into the forward gears very clean and smooth. But again no power in the reverse gear.
Can putting to much oil, and/or wrong oil type cause such a situation? blowing out some seal I assum? Pressure plate?
I'm stuck in the middle of the two problem with the truck. It has no power and I dont want to damage the engine running it this way until the timing and sensor connectors are put on..... but i have no reverse so once it's at the mechanic shop they will have to push it back everytime... lol.
OK! once the engine is running at 100% health, I will tackle removing the dash, replacing the heater core and getting the dash repaired.
After that, new carpet and new seats. Open door panels and clean and insulate as appropriate... also grease window track hardware. Also I need to figure out what I want to do with my front grille, bumper and headlights.
Good news by the way! I let her get nice and warm to check thermostat operations.. it all worked out. AND NO LEAKS!!!! Yet
as always, your thoughts and suggestions about any the work so far, and the future work mentioned are more than welcome. Specifically if you have a $200 solution to my grill and bumper problem (with nice offroad style bumper!)
AND a video. I started recording as soon as it turned on the first time. You will see some temporary ground wires carefully routed away from the fan, and one old hose that I didn't have one to replace with at the time. Also, you'll notice the stutter when throttling up. I don't care if anyone sees the license plate, so what?
http://www.youtube.com/watch?v=vbDFH...ature=youtu.be


