
Gevo's 91 4Runner Build Thread
 Oct 10, 2013 | 07:46 AM
#81

Thread Starter
Registered User
Joined: Sep 2013
Posts: 1,631
Likes: 110
Just some more update from my project. I stopped by the machine shop to check out the block and heads. Took some pics, thought I'd share.
Everything seemed to be in good shape actually. Block is solid, and scratch free. Some sludgy oils sitting around in the corners.. heads are in good shape too.


Everything seemed to be in good shape actually. Block is solid, and scratch free. Some sludgy oils sitting around in the corners.. heads are in good shape too.
Oct 11, 2013 | 02:42 PM
#82

Registered User
Joined: Mar 2013
Posts: 1,047
Likes: 1
From: Central TX
Might be worth thinking about cam regrinds and/or going with oversized valves while you have it all torn down. Being an SOHC engine, these valves are actually one of the most restrictive points of the intake/exhaust system. I want to say folks have cited somewhere between 15-30 hp to be found in redoing your valves/cams/heads on this engine -- probably to the lower end if not further porting your block and heads, but just a if you want to since I can't remember if mentioned previously.
Oct 11, 2013 | 07:44 PM
#83
Thread Starter
Registered User
Joined: Sep 2013
Posts: 1,631
Likes: 110
RSR, even if i decided to do so it's to late now. They should be done with the whole engine reman by wed. But, to be honest, if i ever wanted to do performance upgrades, I would put a bigger engine in it, the 3.4 seems like a good deal
So, today I had a hell of a time rebuilding the steering gear. The FSM is more or less straight forward about it, but it turns out you need a piston ring compressor tool for one of the rings. I didn't have this, but I think I fared well.
Also, a recommendation to others would be to get one of the particular o-rings OEM. The one that came with my rebuild kit was a half a hair to big and trust me, that was enough for it not to work. I'll point it out on the diagram later, and also will post couple pics.
I am afraid the steering shaft isn't perfectly round though... and it may leak still :/
Oct 16, 2013 | 07:37 AM
#84
Thread Starter
Registered User
Joined: Sep 2013
Posts: 1,631
Likes: 110
Ok, everyone, to follow through with this.. If you are unlucky enough to rebuild your steering gear, the steering gear rebuild kits are not perfect. Everythign eventually works though, except the following o-ring. In the image, at the bottom of the gear housing, where the cross shaft goes through, from top to bottom you have "O-ring, Teflon ring, spacer, snap ring, oil seal"... that O-ring size is very specific, no room for error, and the one in the kit was to thick so the teflon ring did not fit with the o-ring into the gear housing.... maybe this will be useful for someone someday 

Oct 16, 2013 | 07:46 AM
#85
Thread Starter
Registered User
Joined: Sep 2013
Posts: 1,631
Likes: 110
And here are the final products of the two components that I have completed. To be honest, I purchased a new steering pump, it was fairly cheap. But I spent hours cleaning all of the components that attach to it. And I spent many more hours cleaning and rebuilding the steering gear.. which I don't think is gonna be without leaks... oh well..


Oct 18, 2013 | 06:18 AM
#86
Thread Starter
Registered User
Joined: Sep 2013
Posts: 1,631
Likes: 110
Hi guys... I need some help.
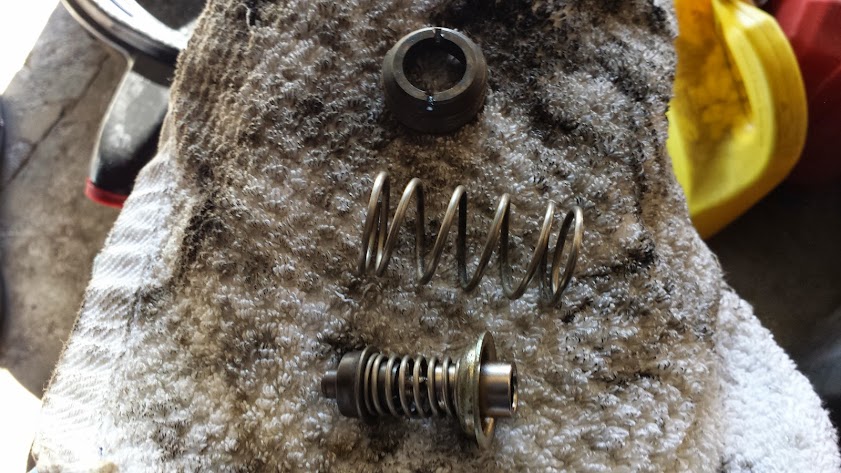
I tried to use the FSM to guide me through the re-installation of the throttle body components that I had removed for cleaning. Well this component requires some specifics that I can't find. The big screw holding some parts down needs to go in a specific amount. I didn't take a picture of this part before removing it the parts in the second picture go in the big round hole on the top left of the throttle body in this picture.

Your help is much appreciated
I tried to use the FSM to guide me through the re-installation of the throttle body components that I had removed for cleaning. Well this component requires some specifics that I can't find. The big screw holding some parts down needs to go in a specific amount. I didn't take a picture of this part before removing it
the parts in the second picture go in the big round hole on the top left of the throttle body in this picture.Your help is much appreciated
Oct 21, 2013 | 06:54 AM
#88
Registered User
Joined: Sep 2012
Posts: 1,172
Likes: 1
From: Roseville, CA
I'm not sure if anyone else has taken apart their throttle body like that. Is that the opposite side of the idle mixture adjustment screw? I figure there's only one way that will work, just put it together again and then mess with it after you have the engine running it if runs rough.
Oct 21, 2013 | 09:10 AM
#89
Registered User
Joined: Mar 2013
Posts: 1,047
Likes: 1
From: Central TX
I'm not sure if anyone else has taken apart their throttle body like that. Is that the opposite side of the idle mixture adjustment screw? I figure there's only one way that will work, just put it together again and then mess with it after you have the engine running it if runs rough.
And might as well replace that idle screw gasket while you're in there (opposite side, take your current gasket to the local parts store to match).
Oct 21, 2013 | 09:27 AM
#90
Thread Starter
Registered User
Joined: Sep 2013
Posts: 1,631
Likes: 110
Leave it up to me to make my life difficult
Ok, thanks guys.. I'll try the 'trial and error' method as it appears there is no literature online to solve my problem.. Here is a pic of what's inside.. not great pic...

Ok, thanks guys.. I'll try the 'trial and error' method as it appears there is no literature online to solve my problem.. Here is a pic of what's inside.. not great pic...
Oct 21, 2013 | 09:59 AM
#91
Registered User
Joined: Mar 2013
Posts: 1,047
Likes: 1
From: Central TX
Sorry, I was wrong, that's part of your throttle body coolant passage. I think it needs adjusted relatively precisely, but haven't messed with mine... Sorry I can't be of more help.
https://www.yotatech.com/forums/f116...assage-201693/
EDIT: Researching futher -- so long as fluid flows through, you should be good. Doesn't appear that TPS reads temps related to the coolant, but I could be wrong...
http://www.toyotanation.com/forum/32...nt-bypass.html
http://www.ls1howto.com/index.php?article=13
Last edited by RSR; Oct 21, 2013 at 10:29 AM.
Oct 21, 2013 | 10:30 AM
#93
Registered User
Joined: Sep 2012
Posts: 1,172
Likes: 1
From: Roseville, CA
Yeah, now that you say that you're right. I was looking at the picture figuring that was the top, but that's the bottom.
You'll want to get that one right. The TPS doesn't read the temps but it is heat-sensitive, I believe. I put incorrect hosing and pinched the line so fluid didn't flow and then 3 days later my TPS was shot. It was a cheapo aftermarket so it's possible it just failed, but I think the stress of no cooling killed it faster.
You'll want to get that one right. The TPS doesn't read the temps but it is heat-sensitive, I believe. I put incorrect hosing and pinched the line so fluid didn't flow and then 3 days later my TPS was shot. It was a cheapo aftermarket so it's possible it just failed, but I think the stress of no cooling killed it faster.
Oct 21, 2013 | 10:38 AM
#95
Thread Starter
Registered User
Joined: Sep 2013
Posts: 1,631
Likes: 110
I'll try to keep it.. I'll be making a quick run to the toyota dealer to get a few gaskets for the oil cooler.. apparently not part of rebuild.. anyway, I'll see if anyone there may have a few pointers...
Gamefreak.. I would be really surprised if the TPS broke down from heat.. probably the cheapo factor was the problem
here is the engine as of last night.. slow progress.. but I get very anal when I'm cleaning the parts to reinstall.. mineral spirits bath, wire brush, wipe, parts cleaner spray, wipe, paint.. install.. lol..
Oct 21, 2013 | 10:43 AM
#96
Registered User
Joined: Mar 2013
Posts: 1,047
Likes: 1
From: Central TX
On that oil cooler, if you have access to an ultrasonic cleaner (parts washer would work, but isn't ideal w/ all the internal fins), I think that's the route to go...
I used carb cleaner on mine, but it was a pain to get it into all the internal, nooks and crannies and chambers, took several cans to clean it out, and was a pain to get all the carb cleaner out (an air compressor would be ideal to push remaining cleaner out once it's coming out clean, but I ended up using water first and then blew all the water out w/ a can of compressed air [don't have a proper air compressor] -- figured worst case a little bit of water in the oil is preferable to a little bit of carb cleaner and water remaining in the coolant portion is a non issue...). There was quite a bit of junk in mine despite oil flow running directly from filter to cooler before heading to the engine.
I'd replace your coolant hoses on that oil cooler too while out of the engine. The top hose is a royal pain to install the spring clamps on when on the truck.
Last edited by RSR; Oct 21, 2013 at 10:49 AM.
Oct 21, 2013 | 01:16 PM
#97
Thread Starter
Registered User
Joined: Sep 2013
Posts: 1,631
Likes: 110
I wish I had an uktrasonic cleaner. Would make all this less painful. I spent over an hr and 2 spray cleaners cleaning it. Its such a terr I ble design and mine to was just full of deposits of sorts. I think its broken up enough that a couple quick oil changes should rinse it out once engine is running. Ill do the final rinse with oil. This goes to show that its worth not to skimo on oil filters--!!!
I wish I was at home working on this.. lol
I wish I was at home working on this.. lol
Oct 22, 2013 | 02:41 PM
#98
Registered User
Joined: Mar 2013
Posts: 1,047
Likes: 1
From: Central TX
There's a youtube where a guy hooks two electric sanders up to a plastic tub and the frequencies supposedly combined are "ultrasonic". Worst case it causes a lot of vibration which should help. Others swear by simple green boiling on the stove... Not sure what's best, but even prior to your post, I've been thinking that I might want to clean it out again after I do my next oil change. If they were't $500 bucks new, I probably would have just replaced it...
Oct 22, 2013 | 03:43 PM
#99

Registered User

Joined: Sep 2007
Posts: 8,384
Likes: 875
From: San Francisco East Bay
Oh, fer cryin' out loud. If you want one, they are there for the asking. http://www.harborfreight.com/ultraso...aner-3305.html


