
the dragons 88 runner buildup/rebuild
 May 3, 2013 | 05:48 AM
#623
Registered User
Joined: Apr 2012
Posts: 2,817
Likes: 2
From: Los Angeles CA
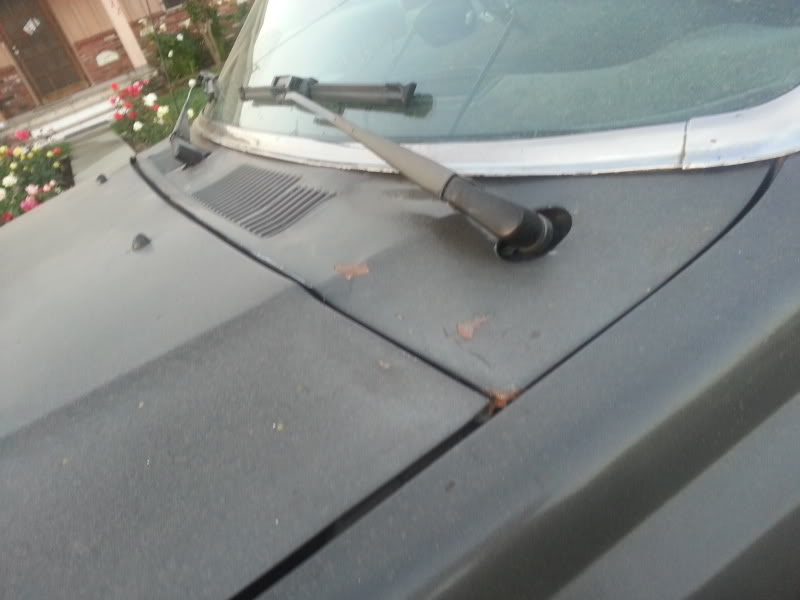
The hood and the front vent in front of the windshield either need ti be replaced or fixed. I'll eventually find some decent black or charcoal gray replacements.
I was telling Mark the other day that I think the P.O. had to have crashed the front end. Not a horrible crash. But something definitely happened because the truck has a salvage title. It wasnt only the hood and vent that was damaged. The firewall part behind the grill was also messed up some(which is why my grill is shifted about 1/4" toward the passenger side. The crash must had pulled that part off to the side a bit. You can see they attemped to straighten stuff out, but a half ass job on an old beater must had been fine for them.


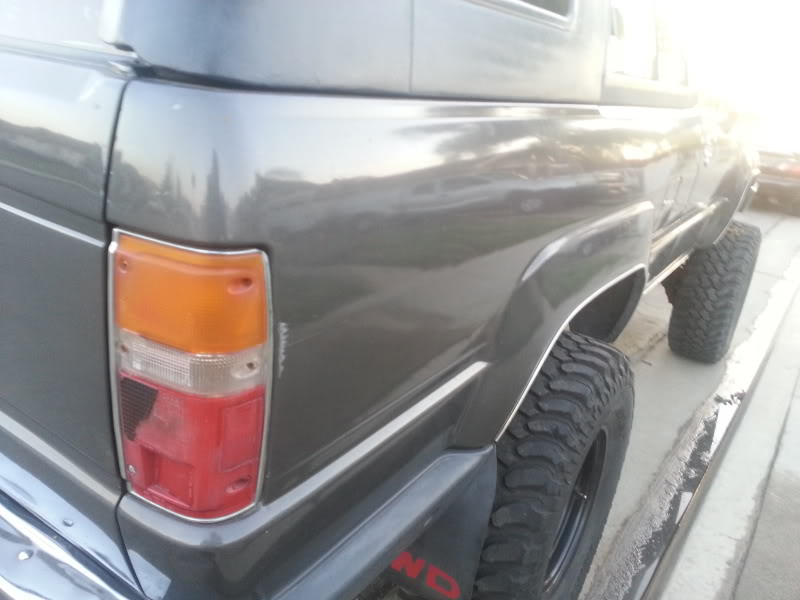
And this scrape is right next to the passenger tail light. I accidentally rubbed the wall on my driveway about 1"and that was the result it measures about 0.5"x2"

Last edited by Redeth005; May 3, 2013 at 05:58 AM.
May 3, 2013 | 07:57 AM
#624
I wish I had the cash to front ya on that stuff, cuz both those 1st gens at the yard had good vents, core supports, fenders, doors, tailgates (not for u, but I know ppl need em) and the last one had taillights but a lil faded, still crack free though. It even had clean corner lights.
You'll get it one day, and its not that noticeable,.....just hate that u have to pull on the vent when closing and opening the hood
You'll get it one day, and its not that noticeable,.....just hate that u have to pull on the vent when closing and opening the hood
May 3, 2013 | 09:48 AM
#625
To bad you are not in my part of the country, I would give you a hand with that. I am sure it seems intimdating to you now, but that would be easily fixed. You might find one in the yard with the same factory color and who would know?
If you ever swap out the hood, that would be an excellent candidate for you to practice on. If you dont have your AC hooked up, and depending on how bad your core supprt is bent up. You could get you a Spot Weld Cutter and get the spot welds out and replace the core support.
My 86 core support is bolted in now and I have no intentions of ever having it welded back. Seen it done a few times and if I need to pull the drivetrain, It is so Sweeettt pulling everything at once. Motor,tranny, tcase, It is outta there!!!
May 3, 2013 | 10:02 AM
#626
I hope I can find a needee for that piece, shouldnt be a problem, its mint. Congratz, and kudos to Terry as usual! 
Wish I could grab every one that comes in there whole for a couple hundy....., but it's not the case. They want too much, but it would be worth it I guess if I could find a way to ship all that stuff for cheaper.
Thanks for chatting with me and looking up those prices. I cant hardly ever get any reception there for data or Internet. and that's funny, because that's one of the main reasons I got the stupid super phone in the first place! Haha, actually it's a great thing and it's been very helpful to me from day one. Ended up being hardly anything more on monthly fees so I think it was well worth it.
both of the 1st gen 4runners I saw there had excellent doors, fenders, 1 hood was really good, the vent behind the hood on both of them, the corner lights and tail lights, well they were faded a little but in otherwise good condition. All the stuff I got a secret for now but I did pretty good considering the situation I was facing physically, and literally, which you know all about as per our conversation. Take care buddy, always love talking to you, Terry, Jason, Richard, Greggo, rad 4 runner, and many others from this site!
May 3, 2013 | 10:48 AM
#627
Thread Starter
Registered User
Joined: Jul 2012
Posts: 2,365
Likes: 4
From: Idaho
It looks good most of the time because of the angle I take the pictures. I usually make it so the glare covers up the dents lol
The hood and the front vent in front of the windshield either need ti be replaced or fixed. I'll eventually find some decent black or charcoal gray replacements.
I was telling Mark the other day that I think the P.O. had to have crashed the front end. Not a horrible crash. But something definitely happened because the truck has a salvage title. It wasnt only the hood and vent that was damaged. The firewall part behind the grill was also messed up some(which is why my grill is shifted about 1/4" toward the passenger side. The crash must had pulled that part off to the side a bit. You can see they attemped to straighten stuff out, but a half ass job on an old beater must had been fine for them.


And this scrape is right next to the passenger tail light. I accidentally rubbed the wall on my driveway about 1"and that was the result it measures about 0.5"x2"

The hood and the front vent in front of the windshield either need ti be replaced or fixed. I'll eventually find some decent black or charcoal gray replacements.
I was telling Mark the other day that I think the P.O. had to have crashed the front end. Not a horrible crash. But something definitely happened because the truck has a salvage title. It wasnt only the hood and vent that was damaged. The firewall part behind the grill was also messed up some(which is why my grill is shifted about 1/4" toward the passenger side. The crash must had pulled that part off to the side a bit. You can see they attemped to straighten stuff out, but a half ass job on an old beater must had been fine for them.
And this scrape is right next to the passenger tail light. I accidentally rubbed the wall on my driveway about 1"and that was the result it measures about 0.5"x2"
the vent you should take off fix that bent spot on the passenger side sand down an repaint not hard at all
but your hood hitting it shows the hood needs adjusting not hard but can be fiddely having to loosen an tighten an check several times as for the core support if its back too far grab hold an yank they are actually easily bent now the side to side thats a little more involved but not difficult
hood dents that takes time an work
Last edited by Cyberhorn The Dragon; May 3, 2013 at 11:32 AM.
May 4, 2013 | 05:16 PM
#628
Thread Starter
Registered User
Joined: Jul 2012
Posts: 2,365
Likes: 4
From: Idaho
well today the tail gate got its final sanding some spot putty for a couple gouges an a line that showed up in the fiberglass filler


trying to figure out the best way to hang the gate up for painting it has to stay that way 24 hrs at least

then i sprayed the inside with rustoliem royal red rattle can an kris (mr PLEASE let me use the spray guns on it id like to practice lol) using his new gravity fed gun sprayed the first coat of color bit of a learning curve rustolium needs more than 15% thinning to go through a HVLP gun something like 45% but we got a fair coat on her now 24 hr flash time


some orange peel but next picture shows it leveling out a bit i expect to have to wet sand before the final coat (my ever helpful little dragoness admiring the red paint

couple bugs in the finish AGH darn gnats!! why are you attracted to wet paint!!

also gave the runner her first genuine soapy bath LOL she was very VERY dusty of course a storm blew up wind nearly knocking me over also got her 5 gal of fresh fuel which she didnt know what to do with LOL stumbled a bit but then was AHHH

trying to figure out the best way to hang the gate up for painting it has to stay that way 24 hrs at least
then i sprayed the inside with rustoliem royal red rattle can an kris (mr PLEASE let me use the spray guns on it id like to practice lol) using his new gravity fed gun sprayed the first coat of color bit of a learning curve rustolium needs more than 15% thinning to go through a HVLP gun something like 45% but we got a fair coat on her now 24 hr flash time
some orange peel but next picture shows it leveling out a bit i expect to have to wet sand before the final coat (my ever helpful little dragoness admiring the red paint
couple bugs in the finish AGH darn gnats!! why are you attracted to wet paint!!
also gave the runner her first genuine soapy bath LOL she was very VERY dusty of course a storm blew up wind nearly knocking me over also got her 5 gal of fresh fuel which she didnt know what to do with LOL stumbled a bit but then was AHHH
May 5, 2013 | 07:14 PM
#630
Thread Starter
Registered User
Joined: Jul 2012
Posts: 2,365
Likes: 4
From: Idaho
sanded the tailgate with 220 in the expectation of getting another coat of paint BUT kris isnt feeling well so that got put on the back burner

SO i cleaned the regulator assembly an greased it up moves MUCH faster now (i got clever hooked up the key switch the gate closure switch latch and the regulator the red C clamp is holding the ground on the metal) also rewraped the harness a bit thats inside the gate that leads to the key switch

then looking at the busted climate controls i decided to dig in an get it fixed

the bulb in mine was burnt out new one came from the vanity mirror lights in an old 90 escort were having hauled off monday (tossed a rod) bulb fit an worked so i put the green sock back on an might take it back off or see if i can fit a colored LED in there)
put things back together with the new face plate i got from redeth a LONG time ago (i polished it up a lot)

SO i cleaned the regulator assembly an greased it up moves MUCH faster now (i got clever hooked up the key switch the gate closure switch latch and the regulator the red C clamp is holding the ground on the metal) also rewraped the harness a bit thats inside the gate that leads to the key switch
then looking at the busted climate controls i decided to dig in an get it fixed
the bulb in mine was burnt out new one came from the vanity mirror lights in an old 90 escort were having hauled off monday (tossed a rod) bulb fit an worked so i put the green sock back on an might take it back off or see if i can fit a colored LED in there)
put things back together with the new face plate i got from redeth a LONG time ago (i polished it up a lot)
May 5, 2013 | 09:18 PM
#631
Registered User
Joined: Apr 2012
Posts: 2,817
Likes: 2
From: Los Angeles CA
------------------------------------------
well the scuff is actually an easy fix pull the tail light scuff the area tape off a 12 inch hole with paper an tape hit it with factory color fogging it a bit as you get away from the spot after its totally hard a couple days buff with polishing compound to blend into the original paint
the vent you should take off fix that bent spot on the passenger side sand down an repaint not hard at all
but your hood hitting it shows the hood needs adjusting not hard but can be fiddely having to loosen an tighten an check several times as for the core support if its back too far grab hold an yank they are actually easily bent now the side to side thats a little more involved but not difficult
hood dents that takes time an work
Last edited by Redeth005; May 5, 2013 at 09:24 PM.
May 5, 2013 | 10:11 PM
#632
Thread Starter
Registered User
Joined: Jul 2012
Posts: 2,365
Likes: 4
From: Idaho
Oh wow! That was almost 8 or 9 months ago! Glad to see you ended up using it lol. You definitely needed it. What else did I send you? Was it the map light and the SR5 door pockets?
------------------------------------------
Thanks Dragon. One I definitely wanna do is the rear near the tail light. And if you say that should be easy then maybe I will try that one as my first intro to body work lol.
------------------------------------------
Thanks Dragon. One I definitely wanna do is the rear near the tail light. And if you say that should be easy then maybe I will try that one as my first intro to body work lol.
see if you can get one of those cans of duplicolor factory colors with your silver gray color masking tape an paper
Last edited by Cyberhorn The Dragon; May 5, 2013 at 10:13 PM.
May 7, 2013 | 03:52 AM
#633
Tailgate is looking good. Is the girl doing all the work and you taking credit? lol.. It is nice when they are helping when they can. I will post later about the bracket. I got it somewhere for the maplight. Probably wont be today as I have to get the plate removed from my gum and I will be to sore to play on the computer. Supposed to be a nice day today. Snow one day and nice the next. Some one told me this is May but not sure that I believe them.
May 7, 2013 | 11:17 AM
#634
Thread Starter
Registered User
Joined: Jul 2012
Posts: 2,365
Likes: 4
From: Idaho
Tailgate is looking good. Is the girl doing all the work and you taking credit? lol.. It is nice when they are helping when they can. I will post later about the bracket. I got it somewhere for the maplight. Probably wont be today as I have to get the plate removed from my gum and I will be to sore to play on the computer. Supposed to be a nice day today. Snow one day and nice the next. Some one told me this is May but not sure that I believe them.
no she was getting that oooh i wana touch the still sticky paint look LOL
i know is it may? i dunno... someones been messin round with my calender or something
May 8, 2013 | 12:51 AM
#635
I got the plate removed. I am hoping that it stays closed this time. Doc said it looked good but time will tell. This has been a year and a half, so I am not completely confident in it just yet. Still has some more healing and filling in on the gum. Still hoping.
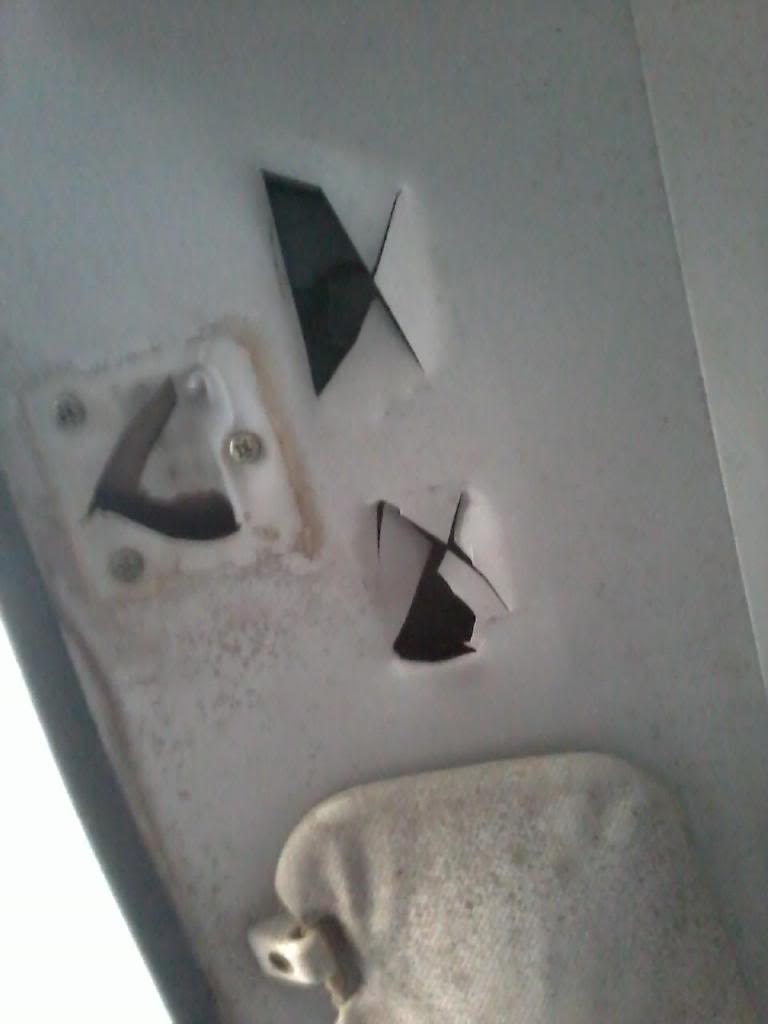
On the maplight, you can peel the rubber molding back from the drivers side to the domelight area. Then peel the headliner back and with the old dome light in, it will mount up and the bolt holes are already there. It has been a while since I did this, but it isnt bad to install. When you get the plate mounted, you can feel where the maplights will go and I just cut an "X" so as not to cut any excess off.
Copied...
I had the windshield out and so I peeled the headliner back a little and slid it in. Then put the trimming back in to hold the liner back in place.
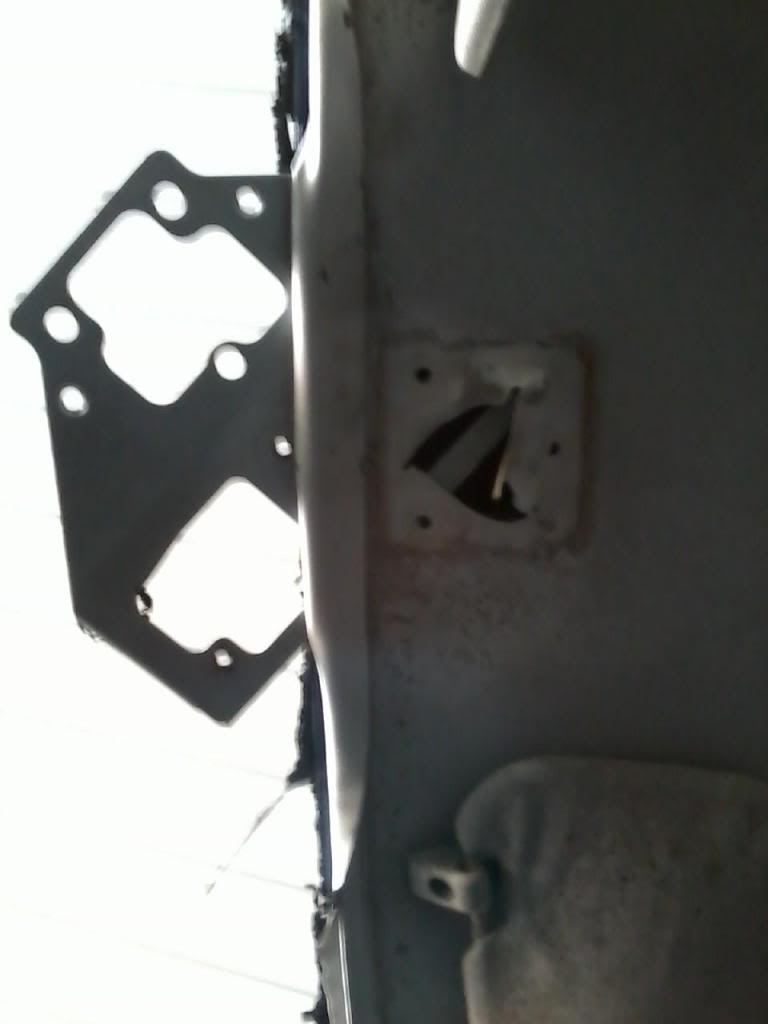
Then where the mirror goes I usd the mirror screws to hold it so I could cut the liner for the recess for the light assembly.
Here it is mounted. I still need to run the wiring. I have always added a standard cab pick up to my 4runners or extended cab trucks as the light that mounts in the center isnt much use for the driver. I run the wire to the top left corner for electrical. I show this in my 88 build and when I do it on this one I will update it. Been cleaning the headliner and have aways to go.
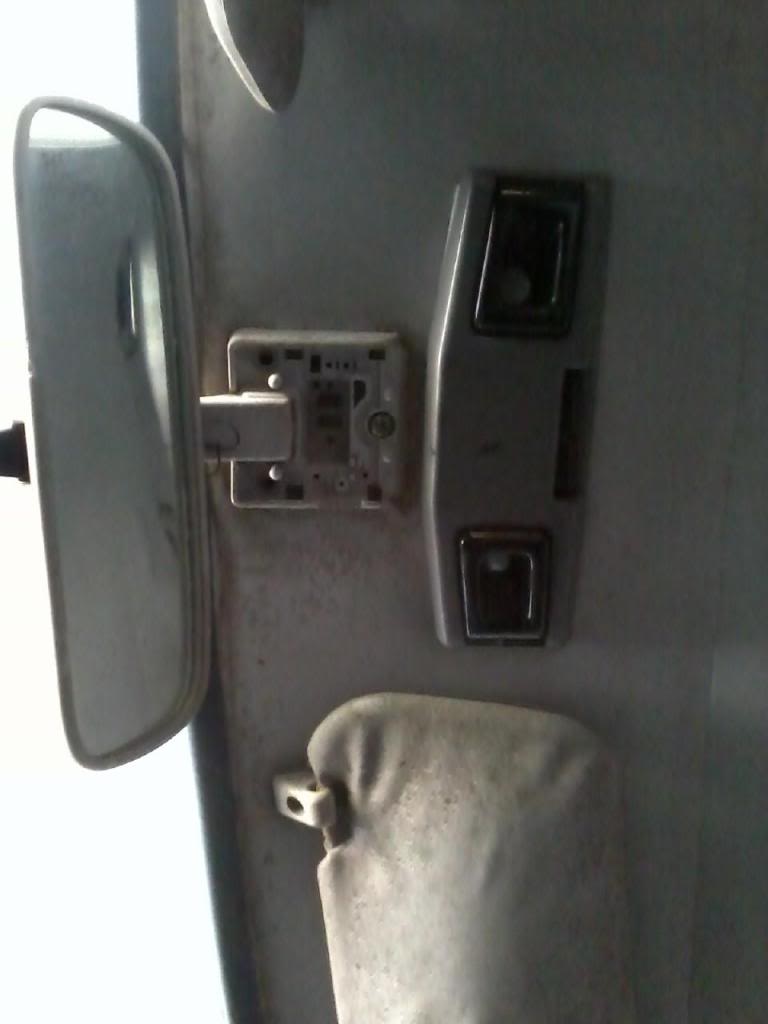
On the maplight, you can peel the rubber molding back from the drivers side to the domelight area. Then peel the headliner back and with the old dome light in, it will mount up and the bolt holes are already there. It has been a while since I did this, but it isnt bad to install. When you get the plate mounted, you can feel where the maplights will go and I just cut an "X" so as not to cut any excess off.
Copied...
I had the windshield out and so I peeled the headliner back a little and slid it in. Then put the trimming back in to hold the liner back in place.
Then where the mirror goes I usd the mirror screws to hold it so I could cut the liner for the recess for the light assembly.
Here it is mounted. I still need to run the wiring. I have always added a standard cab pick up to my 4runners or extended cab trucks as the light that mounts in the center isnt much use for the driver. I run the wire to the top left corner for electrical. I show this in my 88 build and when I do it on this one I will update it. Been cleaning the headliner and have aways to go.
May 8, 2013 | 12:53 AM
#636
Also you will need the standard cab wiring and I tap the wiring into the top left corner of the windshield into the wiring for the domelight that runs down the A pillar. The headliner is held in place by the rubber trimming and is easily reinstalled.
May 8, 2013 | 01:37 AM
#637
Thread Starter
Registered User
Joined: Jul 2012
Posts: 2,365
Likes: 4
From: Idaho
YAY great news on the tooth hole! heres hopin it stays shut!
HMmm looking at it i could mount the bracket mark the spots an cut the headliner which needs to be done for the maplight an slip the bracket in via that slit im extremely wary of trying to get the plastic trim off near the wind shield do ya think that could work terry? i have to cut a pair of holes for the maplight connecting them would let it slip in that way
i dont have any wire yet (an need to make my own connectors) but i do plan on eventually putting in the mirror dome light behind the map light is it easier to run the wires to the side pillar an not the dome light at the back of the roof?
Last edited by Cyberhorn The Dragon; May 8, 2013 at 01:39 AM.
May 8, 2013 | 02:41 AM
#638
The plastic inbetween the windshield and door or the A pillar if that is the correct name, is held on by two tabs. One is about 2inches from the top and the next one is about half way down. There is a 3rd tab that is down by the dash. Once the top two tabs are popped out the 3rd one lifts up about 3/8th of an inch and out toward the passenger side.
The tabs are halfway in on the trim or about an 1 1/2 or so. Take a small flat blade screw driver and gently try to get the tip next to the tabs and pry out on them until it releases. You will need to do that for the top two.
I have some trims laying loose and will get a picture of the tabs I am talking about up later tonite.
On the bracket, just slip it in between the headliner and the metal roof. I bolt just the bracket up and get it mounted like it is on the second picture. Then you can do your cuts for the maplight and then install the dome light and then the maplights after making your cuts.
May 8, 2013 | 10:16 AM
#639
Thread Starter
Registered User
Joined: Jul 2012
Posts: 2,365
Likes: 4
From: Idaho
The plastic inbetween the windshield and door or the A pillar if that is the correct name, is held on by two tabs. One is about 2inches from the top and the next one is about half way down. There is a 3rd tab that is down by the dash. Once the top two tabs are popped out the 3rd one lifts up about 3/8th of an inch and out toward the passenger side.
The tabs are halfway in on the trim or about an 1 1/2 or so. Take a small flat blade screw driver and gently try to get the tip next to the tabs and pry out on them until it releases. You will need to do that for the top two.
I have some trims laying loose and will get a picture of the tabs I am talking about up later tonite.
On the bracket, just slip it in between the headliner and the metal roof. I bolt just the bracket up and get it mounted like it is on the second picture. Then you can do your cuts for the maplight and then install the dome light and then the maplights after making your cuts.
The tabs are halfway in on the trim or about an 1 1/2 or so. Take a small flat blade screw driver and gently try to get the tip next to the tabs and pry out on them until it releases. You will need to do that for the top two.
I have some trims laying loose and will get a picture of the tabs I am talking about up later tonite.
On the bracket, just slip it in between the headliner and the metal roof. I bolt just the bracket up and get it mounted like it is on the second picture. Then you can do your cuts for the maplight and then install the dome light and then the maplights after making your cuts.
oookay
May 8, 2013 | 02:53 PM
#640
24 hours later and the hole came back in my gum. My dental surgeon is just going to be thrilled when I call him tomorrow. I thought I felt it getting weak. Yeah!!! grrr...
Here is the trim. The top to just pop out. Loosen them first. The one by my thumb is lifted up after the top two are out. I have 4 trims and each one is missing the bottom clip. Something I get to add to my salvage yard list.
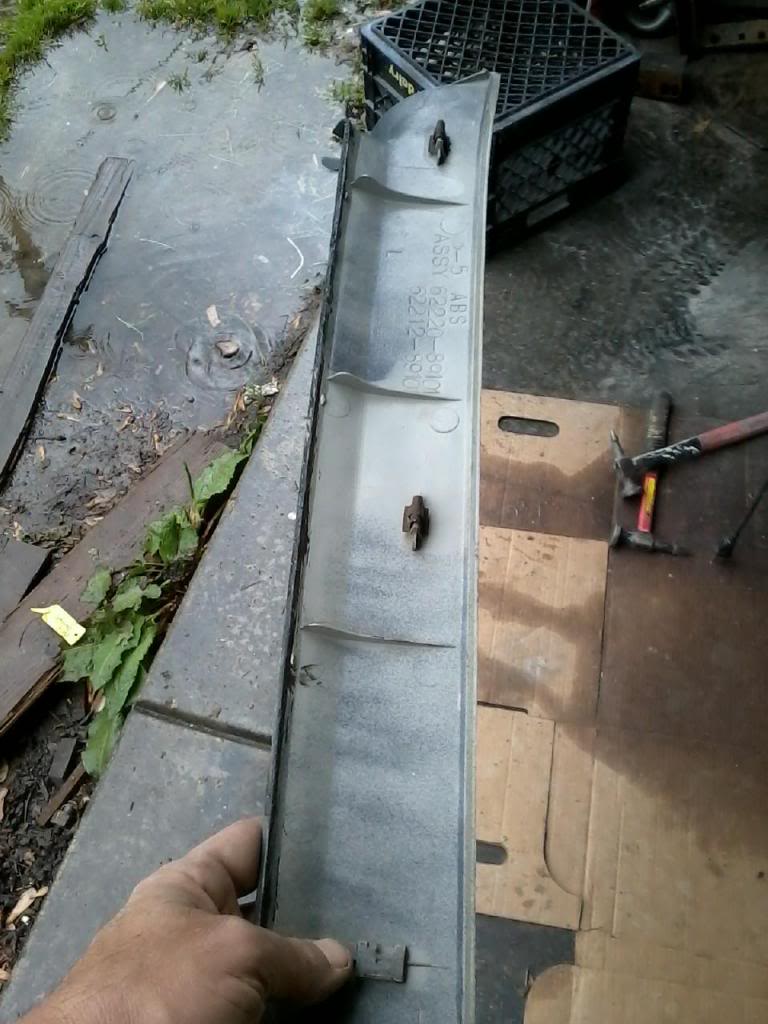
Here is the trim. The top to just pop out. Loosen them first. The one by my thumb is lifted up after the top two are out. I have 4 trims and each one is missing the bottom clip. Something I get to add to my salvage yard list.


