
BlazeN8's 1986 4Runner Build-Up Thread
 Nov 26, 2013 | 09:59 PM
#301
Thread Starter
Registered User
Joined: Jun 2009
Posts: 977
Likes: 4
From: Southern California
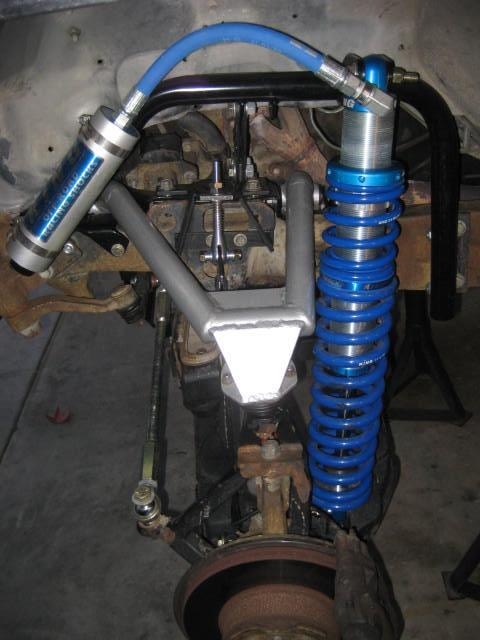
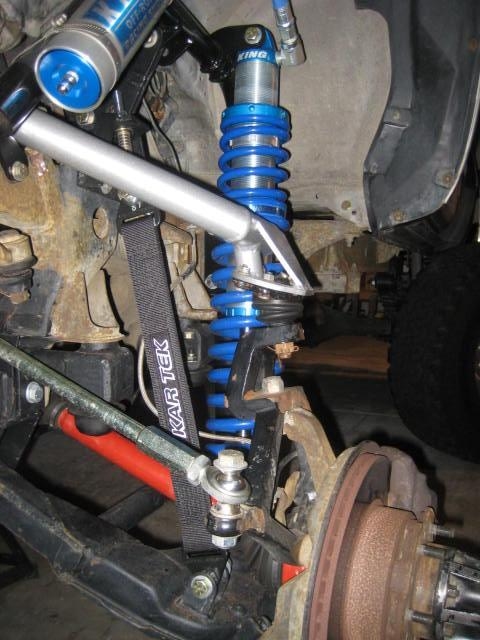
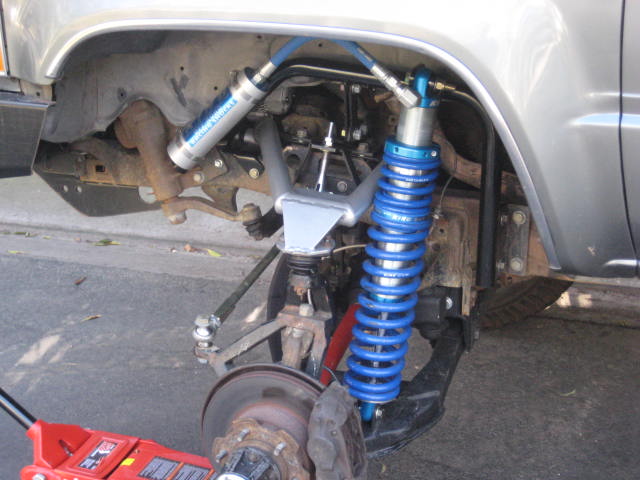
The Mega Travel is designed to cycle 15" of wheel travel. The shock hoops measure out mounting points for the shock to be 28-1/4" extended and 18-1/4" collapsed.
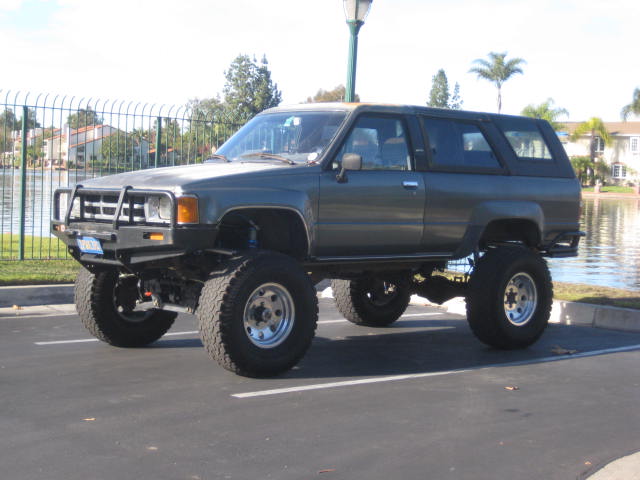
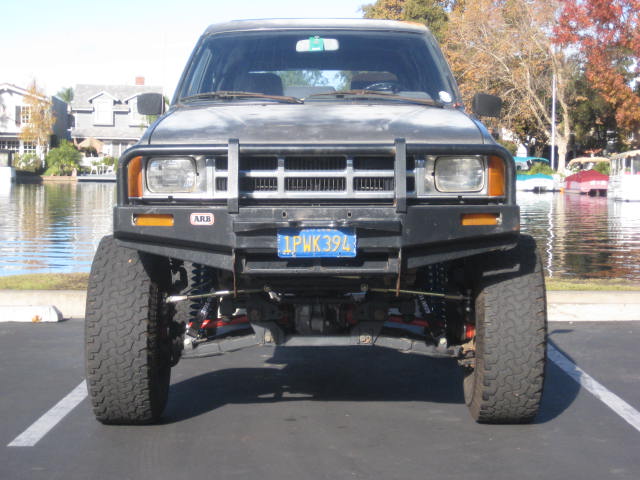
For those just tuning in, what your seeing here is 6" suspension lift and 1" Body Lift. The Tires are 315/75/R16 (35")
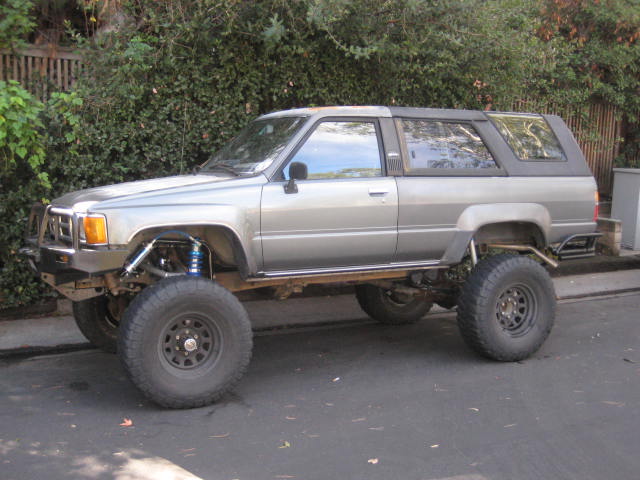
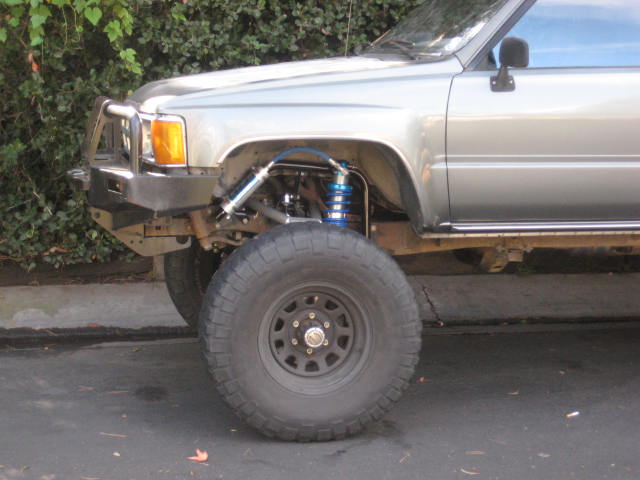
For those just tuning in, what your seeing here is 6" suspension lift and 1" Body Lift. The Tires are 315/75/R16 (35")
Last edited by BlazeN8; Nov 27, 2013 at 07:42 PM.
Dec 1, 2013 | 08:22 PM
#303
Thread Starter
Registered User
Joined: Jun 2009
Posts: 977
Likes: 4
From: Southern California
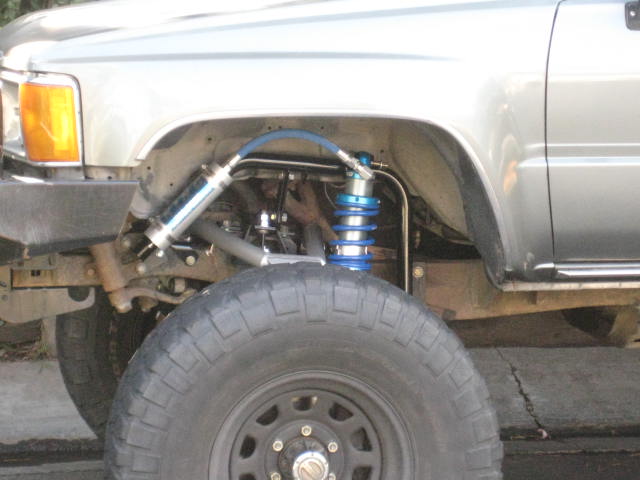
Toyo, here is a photo of the coil spring with the front suspension stuffed as best I could get given the available terrain. The bright sunlight vs. shadow makes it hard to see but its still legible. There is plenty of shaft exposed so no the shock isn't bottomed out. The coils are compressed fairly tight but there is probably about 2" more to go before coil bind. Perhaps the spring compressed this far is so loaded there just isn't enough weight remaining to compress the spring anymore; especially with the front of the rig pointed up hill.
Another factor that may be worth mentioning is when I set the front ride height I had to match the rear to keep it level. The 6" lift springs have not settled like I anticipated. If I had a do over I would have gone with less lift in the rear. Then I would be able to lower the front an inch or two and remove all pre-load to the main coil spring.
Perhaps going with a longer main spring (18 and not 16) and dropping the spring rate from 500 to 400? Anyway, I can't be too discouraged setting up the shocks and springs on a new suspension geometry will take some trial and error to get it tuned correctly. I think its almost there for a pre-run application but for slow speed flex I need to keep at it.


 Dec 9, 2013 | 09:18 PM
#305
Thread Starter
Registered User
Joined: Jun 2009
Posts: 977
Likes: 4
From: Southern California
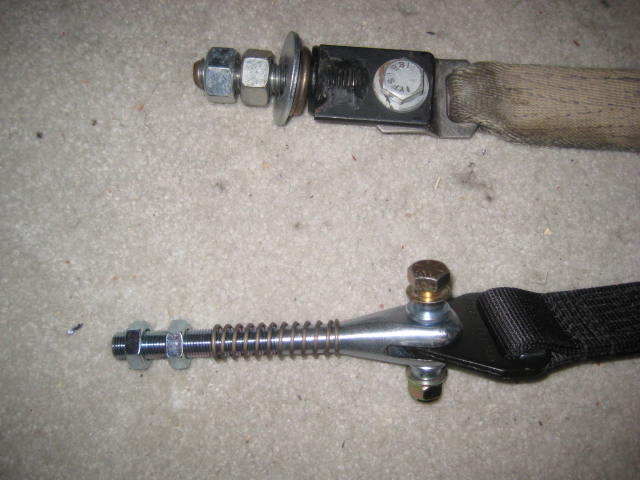
I made some progress on the build. Last week I made a trip to KarTek and had them look over my 4 Runner. We brain stormed about how to maximize flex. I also picked up some new Limit Straps w/ Adjustable Clevis. Today I had some time to put the 4 Runner on jack stands and make adjustments and instal the new straps.
The old limit straps were off the 1985 desert truck. They must have been on there for decades as this truck was built back in the late 1980s early 1990s. The truck was like museum exhibit when I first got it. The stretch characteristics of the old straps were unknown but they made a nice mock up and place holder. The new straps are 18" long and will allow 1.5" of stretch. The Adjustable Clevis is nice for fine tune adjustments. I attached the clevis to the factory upper pin style shock mount location and the other end of the strap to the LCA factory shock mount.
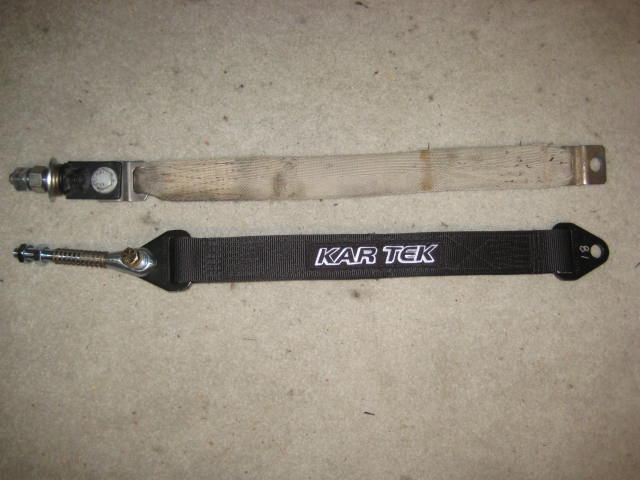
Check out the new clevis compared to my home made ones!
The old limit straps were off the 1985 desert truck. They must have been on there for decades as this truck was built back in the late 1980s early 1990s. The truck was like museum exhibit when I first got it. The stretch characteristics of the old straps were unknown but they made a nice mock up and place holder. The new straps are 18" long and will allow 1.5" of stretch. The Adjustable Clevis is nice for fine tune adjustments. I attached the clevis to the factory upper pin style shock mount location and the other end of the strap to the LCA factory shock mount.
Check out the new clevis compared to my home made ones!
Dec 9, 2013 | 09:28 PM
#306
Thread Starter
Registered User
Joined: Jun 2009
Posts: 977
Likes: 4
From: Southern California
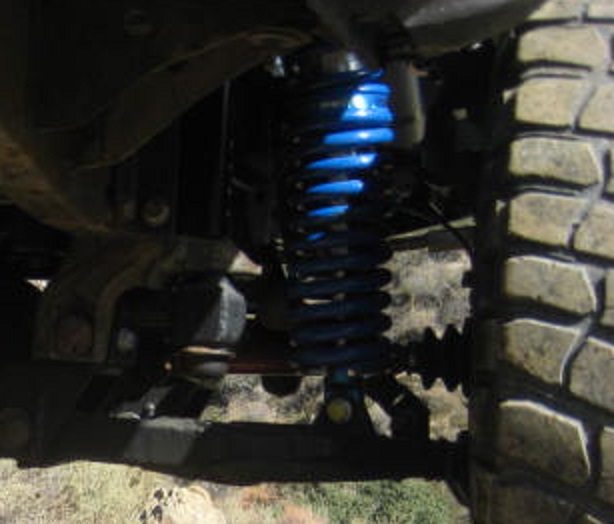
With the recommendations from KarTek and conversations with King I may have found additional up travel. King had built my shocks / springs for less than 1" of pre-load to the main spring (16" 500lb) and the tender spring (6" 500lb) to take up the slack so the main spring wouldn't rattle at full droop. My actual set up only used 3/8" pre-load. This minimal amount of pre-load gives good handling characteristics for street, pre-running, trail, etc. But to maximize for flex and articulation this will be sacrificed. A flexy trail rig front end will dive under braking, lift on acceleration, and roll in the corners! Is this what I can expect with my IFS rig?
The changes I am making are as follows. I am no longer using the secondary lock out nuts supporting the main spring and the adjustment collar for the tender spring. Now the main spring and tender spring are supported only on the adjustment collar. This means I needed to add 2-1/4" of pre-load to set the ride height. This will give more spring travel. That is the theory anyway? I'll post some photos and test results in the near future once I get a chance to hit the dirt.
The changes I am making are as follows. I am no longer using the secondary lock out nuts supporting the main spring and the adjustment collar for the tender spring. Now the main spring and tender spring are supported only on the adjustment collar. This means I needed to add 2-1/4" of pre-load to set the ride height. This will give more spring travel. That is the theory anyway? I'll post some photos and test results in the near future once I get a chance to hit the dirt.
Dec 9, 2013 | 11:19 PM
#307
Registered User
Joined: Mar 2011
Posts: 505
Likes: 1
From: Socal
Do you have a pic of the front end at ride height?
I remember when I had my front arms set up parallel to the ground my truck handled awesome. very little body roll. Of course im a few inches higher now in the front and back so I get some body roll. As for dive and lift I know I have some but I dont notice it anymore.
Part of the reason why I want to install that 4" lift is so I can lower my preload down and get my Control arms parallel again without sacrificing ride height. Of course my COG will still be higher.... And your COG is much higher..
I second the quick disconnect sway bar... Im planning on rigging up a quick disconnect sway bar and quick disconnect air bag system for towing after I get a full soft leaf pack...
Keep at it! tuning is half the fun
Last edited by Zpd426; Dec 9, 2013 at 11:33 PM.
Dec 10, 2013 | 06:43 AM
#308
Registered User
Joined: Aug 2011
Posts: 1,507
Likes: 2
From: Fraser Valley, British Columbia
Quick discos are a good idea. I have the 4Crawler ones but need new ones. The pins need refining though. The ball holding them in seized so I could not get them out. They also moved linking over with a thud making my sway bar not very effective. I think I set them up poorly.
I think a cotter pin to retain the pin through the Heim joint would be better next time.
When I got it correct I could not get the pins out after having the LT installed. When I went wheeling the new flex made the rear flex more and it mangled the mount on the frame for the sway bar connection to the frame.
I had to pull them out. It was early on in my road trip too. Made that body roll freaky with a roof top tent on.
Almost home now so Im looking forward to getting it fixed.
Last edited by Red Wagon; Dec 10, 2013 at 06:46 AM.


 Dec 10, 2013 | 11:34 AM
#311
Thread Starter
Registered User
Joined: Jun 2009
Posts: 977
Likes: 4
From: Southern California
I had loaded most of my gear, full tank of gas, and a couple of 35lb dumb bells so the rear has settled about where I want it. Up front, the angle of the LCAs is just about right. I estimate I am sitting at about 60 percent up travel and 40 percent down travel.
I also swapped wheels and tires with some Craigslist finds. Wheels are American Eagle series 058, 16x8 w/ 4" Backspace, $200. Tires are BFG A/T 315/75/R16, $180, 30% tread remaining. Had them mounted and balanced at Tucker Tire. It was a bro deal for $20. Not bad, complete package for $400.
The new set up has such a nice street ride coming from the M/Ts. I was also wanting something lighter and better for the Baja 250 trip coming up in March. Better for pre-running!
Dec 14, 2013 | 09:23 PM
#315
Thread Starter
Registered User
Joined: Jun 2009
Posts: 977
Likes: 4
From: Southern California
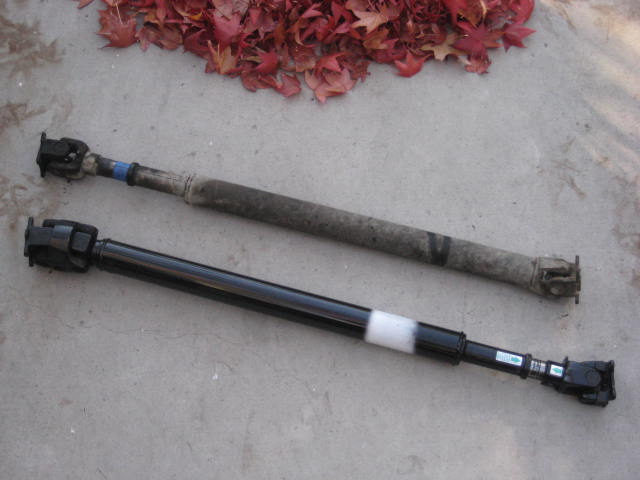
I am fairly happy with the stance. It feels tall. CG is high. I am still getting a feel for it. Unfortunately, the driveshaft has been on its way out for a while. The vibration on the freeway keeps me to just short trips. It really started acting up on the way home from Pismo. Adding the shims to the rear leaf pack really helped, but both the front and rear U-joints are done. And the companion flange at the T-case output has loosened up. The nut is loose and would fall off if not for the crown of the nut being staked over. Oh, and some gear oil is leaking.
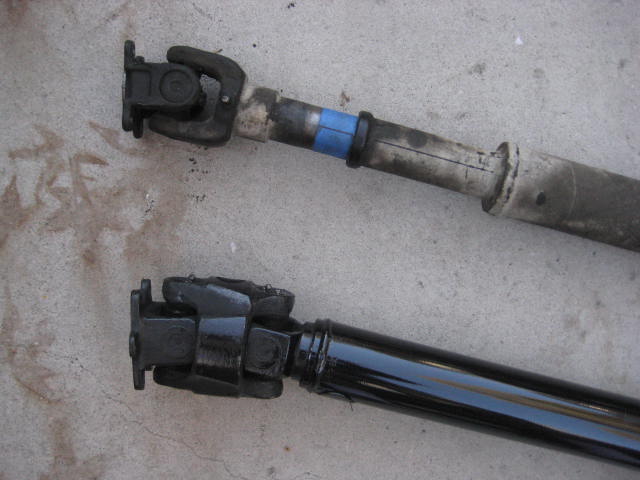
I removed the driveshaft and took it over to Driveshafts Unlimited. Wade confirmed the U-joints were toast and he had told me last time it needed to be lengthened so now is the time to do it. However, I brought a spare IFS front CV (double cardan) type drive shaft with as a possible substitute.
This substitute front driveshaft was low miles and in excellent condition. Since I was having a new propeller shaft tube cut to length and welded to the tube yokes why not do it to a unit with a double CV and good U-joints.
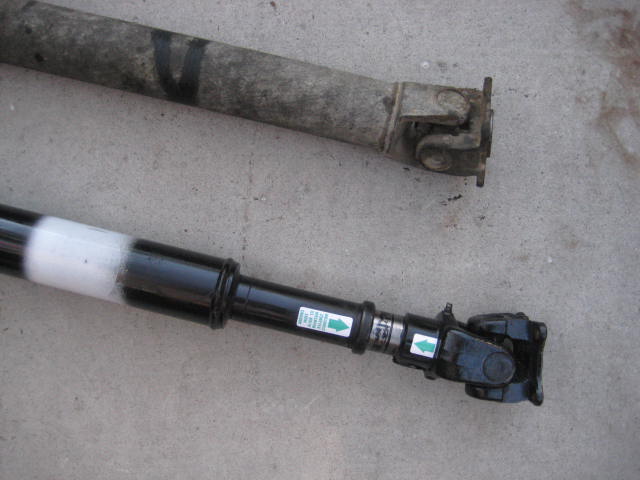
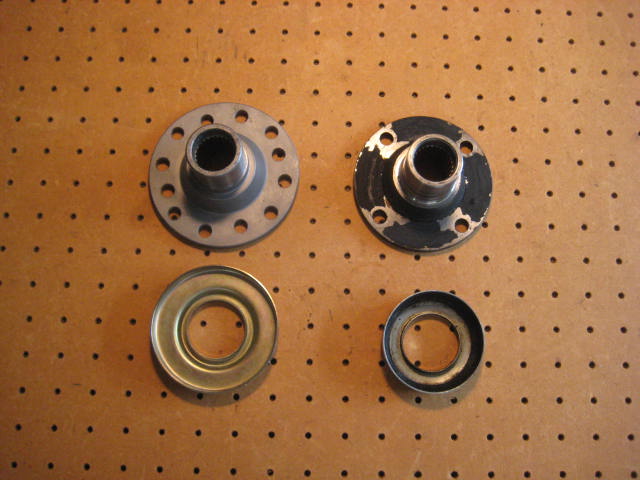
There are flange yoke bolt pattern differences between the two driveshafts but when I had the locker and gears put in the rear diff the upgrade companion flange came with multiple patterns. Since I was re-sealing the tail end of the transfer case and swapping around drive shafts I ordered a new companion flange with multiple bolt patterns.
I positioned the old and new driveshafts together and compared the assembly. I know the double CV on the new driveshaft wasn't a high angle one, I hope its enough. Should have measured it. Ooops! Keeping my fingers crossed.
I removed the driveshaft and took it over to Driveshafts Unlimited. Wade confirmed the U-joints were toast and he had told me last time it needed to be lengthened so now is the time to do it. However, I brought a spare IFS front CV (double cardan) type drive shaft with as a possible substitute.
This substitute front driveshaft was low miles and in excellent condition. Since I was having a new propeller shaft tube cut to length and welded to the tube yokes why not do it to a unit with a double CV and good U-joints.
There are flange yoke bolt pattern differences between the two driveshafts but when I had the locker and gears put in the rear diff the upgrade companion flange came with multiple patterns. Since I was re-sealing the tail end of the transfer case and swapping around drive shafts I ordered a new companion flange with multiple bolt patterns.
I positioned the old and new driveshafts together and compared the assembly. I know the double CV on the new driveshaft wasn't a high angle one, I hope its enough. Should have measured it. Ooops! Keeping my fingers crossed.
Dec 16, 2013 | 07:18 PM
#316
Thread Starter
Registered User
Joined: Jun 2009
Posts: 977
Likes: 4
From: Southern California
The companion flange for the T-case output arrived today via FedEx. The dust cap had different diameters so I got out the three jaw puller and swapped them out. Other than that it bolted in without any issues. I ran out of time installing the driveshaft so I'll have to get to that later in the week.
Dec 25, 2013 | 07:35 PM
#317
Thread Starter
Registered User
Joined: Jun 2009
Posts: 977
Likes: 4
From: Southern California
Merry Christmas! I've been out of town for the holidays but now I am back. Before I left I installed the drive shaft, which went off without a hitch. I also drove it a couple of times and I have to say it sure is nice having a tight and balanced drive shaft. Its so smooth and quite even at highway speeds. With A/T tires and the drive shaft dialed in I am feeling its time for a road trip. I may head to the desert for New Years. Probably Ocotillo Wells.
Dec 26, 2013 | 09:46 PM
#318
Thread Starter
Registered User
Joined: Jun 2009
Posts: 977
Likes: 4
From: Southern California
From drawing board, to mock up, to a couple of prototypes variations I think its evolved fairly nicely. Here is a photo of the mock up on the frame section.

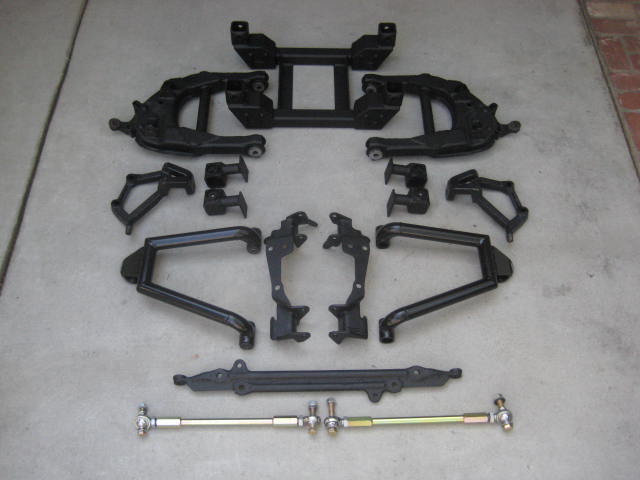
Here are the main parts the kit. The subframe, LCAs, spindle spacers, bump stop brackets, UCAs, UCA pivot relocation brackets, centerlink, and steering linkages.
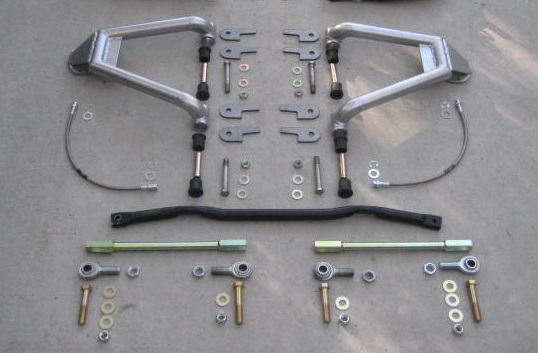
Here is the revised and updated "upper" portion of the kit.
Here are the main parts the kit. The subframe, LCAs, spindle spacers, bump stop brackets, UCAs, UCA pivot relocation brackets, centerlink, and steering linkages.
Here is the revised and updated "upper" portion of the kit.
Last edited by BlazeN8; Dec 26, 2013 at 09:52 PM.
Dec 26, 2013 | 10:14 PM
#319
Registered User
Joined: Aug 2011
Posts: 1,507
Likes: 2
From: Fraser Valley, British Columbia
oOHHH.
I am DEFINATELY interested in the new part of the kit. I've put many miles on between retorquing the bolts on the bracket for the version I have.
How has testing been on it?
Exciting. What is the cost estimate on the updated section and when can we order?
Good work buddy.
EDIT///
Is there an existing customer discount?
Dec 27, 2013 | 05:24 PM
#320
Thread Starter
Registered User
Joined: Jun 2009
Posts: 977
Likes: 4
From: Southern California
Red Wagon,
Testing has been going well but I'm lagging a bit. Pismo trip in September and a half dozen trips to Holy Jim Canyon (my most local spot) I am heading out to Ocotillo Wells tomorrow. I will be chasing my friend and his son through the desert. Mostly pre-running type wheeling. I will be staying on a friends property and will have a trailer and recovery equipment in case something breaks. He has a track on the property for hot laps and his backyard is BLM. Since I am not caged and no safety equipment I will be fairly mellow. Since its just a threesome and none of us are photo or video literate there probably wont be much photo documentation. I'll bring my camera and take a few shots but it won't be action.
I have a lot of unknowns before I can do an accurate price estimate on the Mega Travel. There is no estimate on completion date for a production model either. I'm still evaluating and testing the prototypes.
Since your an existing customer I could probably help you sell your existing kit if you upgrade? I get interest in people wanting used kits and could send them your way.


