
TinMan's 1985 4Runner Build-Up Thread
 Nov 5, 2010 | 06:08 AM
#61
Thread Starter
Registered User
Joined: Jul 2009
Posts: 832
Likes: 0
From: Eastern NC
Afterf measuring everything again last night i decided to leave the rear end alone. I am just not going to fully weld the spring perches on. They will b welded good enough, just not enough to make it a real pain if i decide to move them to center the axle.
I then mocked in the the rear disk bakes. Good thing i checked because one caliper was missing the brake line bolt and banjo washers. TG is sending them out.
I went with Elvota's way of removing the return line from the old LSPV. And removing the T fitting on the front brakes then welding on an L fitting in it's place. I need order the proportioning valve from summit today.
For the stainless flexible lines with the rear disc kit I reused some of the rubber line holds that i removed from the 87 that i parted out. I am also going to put a line holder on the edge of each U bolt plate.
Tonight i will put in the shocks and measure for bump stops, and then tear it all back apart for welding and paint.
I know pics or it did not happen. I'll get some tonight.
Last edited by TinMan; Nov 5, 2010 at 06:29 AM.
Nov 18, 2010 | 06:46 PM
#62
Thread Starter
Registered User
Joined: Jul 2009
Posts: 832
Likes: 0
From: Eastern NC
It has been a while but I have been able to get some stuff done.
Got the upper shock mount made.

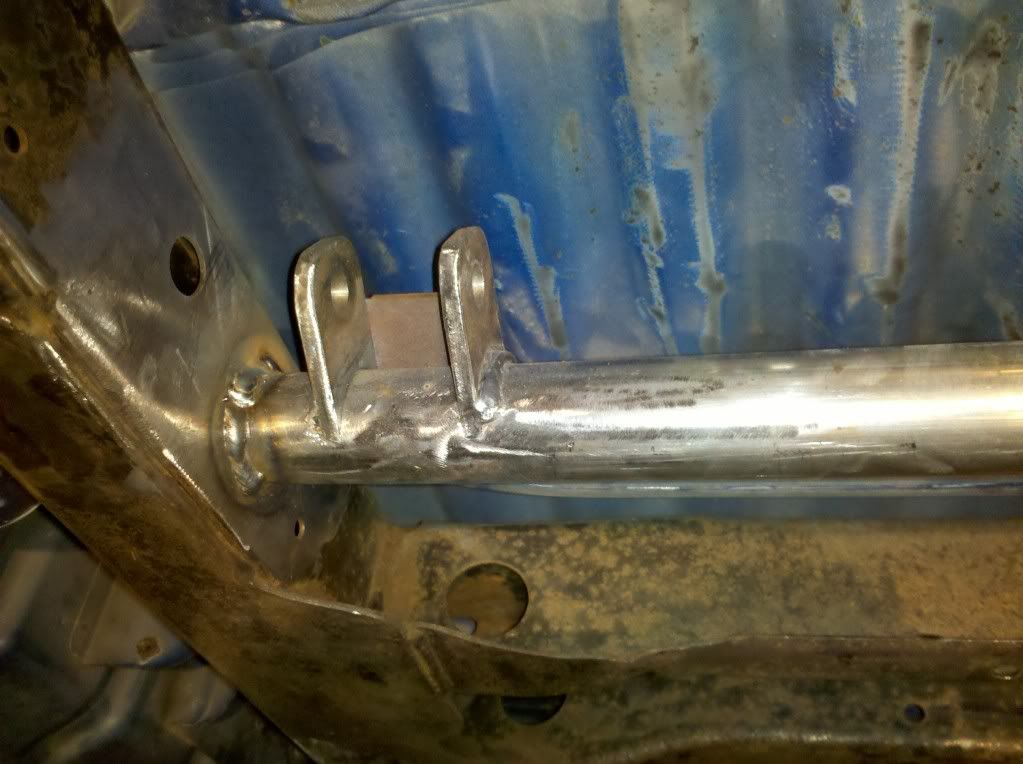
Got all the welding done on the axle and frame mounts.


I got the back half of the frame, under belly and washed down with Marine Clean. With any luck I will be able the Metal Ready tomorrow, and then get the POR15 on it all. I am still undecided on what I want to use to under coat it. I am leaning toward Eastwood's under coat and frame seal kit. Seems well thought out, and reasonable priced.
Christmas came a little early for me this year.
35/12.50 KM2's and procomp rock crawlers.


later
Got the upper shock mount made.
Got all the welding done on the axle and frame mounts.
I got the back half of the frame, under belly and washed down with Marine Clean. With any luck I will be able the Metal Ready tomorrow, and then get the POR15 on it all. I am still undecided on what I want to use to under coat it. I am leaning toward Eastwood's under coat and frame seal kit. Seems well thought out, and reasonable priced.
Christmas came a little early for me this year.
35/12.50 KM2's and procomp rock crawlers.
later
Nov 26, 2010 | 09:39 AM
#67
Thread Starter
Registered User
Joined: Jul 2009
Posts: 832
Likes: 0
From: Eastern NC
The day before Thanksgiving I was able to hang some parts for the last time.
Got the rear axle hung.


I still have some touch up painting to do on the axle, make the bump stops, and another coat of POR on the frame. I hope to get the bump stops done tonight.
I am pretty sure that am going to use Eastwoods under coating, and rust protector on the inside of the frame and underside of the body.
Later
Got the rear axle hung.
I still have some touch up painting to do on the axle, make the bump stops, and another coat of POR on the frame. I hope to get the bump stops done tonight.
I am pretty sure that am going to use Eastwoods under coating, and rust protector on the inside of the frame and underside of the body.
Later

 Nov 26, 2010 | 08:22 PM
#70
Thread Starter
Registered User
Joined: Jul 2009
Posts: 832
Likes: 0
From: Eastern NC
Thanks guys, but it is far from perfection. But my goal is a rock solid runner that will take me about anywhere I want to go, and still be a reliable DD.
I will start on the front tomorrow. We'll see if I can get it done any faster than the rear. I should be able to start to get more time on it.
Thanks
I will start on the front tomorrow. We'll see if I can get it done any faster than the rear. I should be able to start to get more time on it.
Thanks


 Nov 27, 2010 | 07:53 PM
#73
Thread Starter
Registered User
Joined: Jul 2009
Posts: 832
Likes: 0
From: Eastern NC
Thanks Slacker.
Irab, maybe a snorkel someday, but that will done the road a bit.
I buttoned up a few more things on the rear end this morning.


Then I decided to finish the rear bumper.

Got the drivers side protection done. Took me a while because I was trying bend up what I had in my head, then when right when I got a good start, the cheap HF notcher I have took a crap, and took my only 1 3/4" hole saw with it. I should have just drove the hour to lowes and got another one. Would have saved a lot of hassle. I'll post up some pics tomorrow. Passenger side should go a little faster.
And I thought I post a pic of what has been taking a lot of my time. My first Grandson. We don't get him as much as we would like.

Later
Irab, maybe a snorkel someday, but that will done the road a bit.
I buttoned up a few more things on the rear end this morning.
Then I decided to finish the rear bumper.
Got the drivers side protection done. Took me a while because I was trying bend up what I had in my head, then when right when I got a good start, the cheap HF notcher I have took a crap, and took my only 1 3/4" hole saw with it. I should have just drove the hour to lowes and got another one. Would have saved a lot of hassle. I'll post up some pics tomorrow. Passenger side should go a little faster.
And I thought I post a pic of what has been taking a lot of my time. My first Grandson. We don't get him as much as we would like.
Later
Dec 3, 2010 | 01:41 AM
#76
Thread Starter
Registered User
Joined: Jul 2009
Posts: 832
Likes: 0
From: Eastern NC
Finally finished the rear bumper,


I need to find out what the state law is on bumper hight. I might need to make a insert for the hitch that will drop down to that hight. I also need to add a bracket for the trailer light plug. other than that she is ready to clean and paint.
I also got the front end ripped out, axle cleaned up.

I tacked on all the goodies last night. I forgot to take a picture of it though. Tonight I will start to weld it all up. Then on to cleaning up the front half of the frame, and cutting off the brackets I no longer need on there.
Later
I need to find out what the state law is on bumper hight. I might need to make a insert for the hitch that will drop down to that hight. I also need to add a bracket for the trailer light plug. other than that she is ready to clean and paint.
I also got the front end ripped out, axle cleaned up.
I tacked on all the goodies last night. I forgot to take a picture of it though. Tonight I will start to weld it all up. Then on to cleaning up the front half of the frame, and cutting off the brackets I no longer need on there.
Later
Dec 3, 2010 | 05:26 AM
#77
nice bumper. looks like an addicted... but it ain't! are you going to paint it?
the bumper law in va is 28" from road to bottom of the bumper (front & back). in north carolina, no restrictions. in north dakota, the limit is 14 feet
the bumper law in va is 28" from road to bottom of the bumper (front & back). in north carolina, no restrictions. in north dakota, the limit is 14 feet
Dec 8, 2010 | 06:23 PM
#80
Thread Starter
Registered User
Joined: Jul 2009
Posts: 832
Likes: 0
From: Eastern NC
So a little update.
With Christmas coming I have been trying to help the wife out a little. So I have only been able to get an hour or so a night in garage to wind down some, then shower and bed.
but I was able to get the front axle all welded up.


Now to spend the nights cleaning, sandblasting, and painting the knuckle assemblies. Then put it back together and start on the front half of the frame. With any luck I will be done with the front axle by next weekend.
Later
With Christmas coming I have been trying to help the wife out a little. So I have only been able to get an hour or so a night in garage to wind down some, then shower and bed.
but I was able to get the front axle all welded up.
Now to spend the nights cleaning, sandblasting, and painting the knuckle assemblies. Then put it back together and start on the front half of the frame. With any luck I will be done with the front axle by next weekend.
Later


