
TinMan's 1985 4Runner Build-Up Thread
 Oct 14, 2010 | 03:27 AM
#41
Registered User
Joined: Dec 2006
Posts: 2,880
Likes: 2
From: Olympia, WA
I applaud youre attention to detail man!
33s are gonna be way to small tho, heres my rollout with TG 3" SAS.. mind you its got a 2" body lift but still..33's are not gonna do it bro
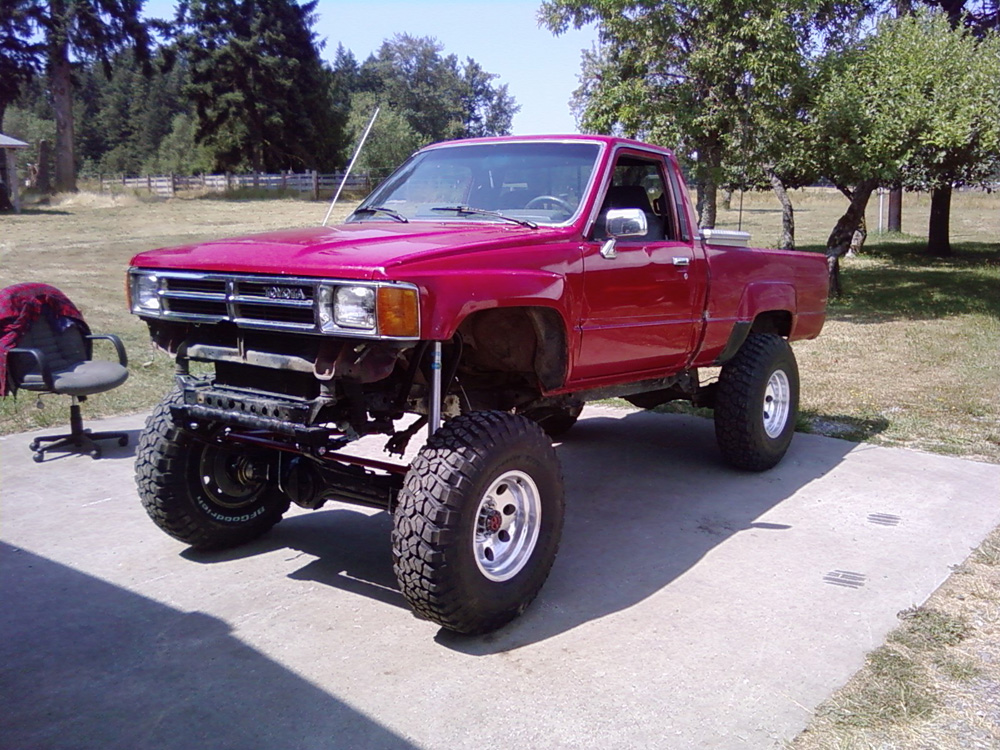
I had the same thoughts as you.. yes those are brand new 33 km2s ! lol
37's fit much nicer
33s are gonna be way to small tho, heres my rollout with TG 3" SAS.. mind you its got a 2" body lift but still..33's are not gonna do it bro
I had the same thoughts as you.. yes those are brand new 33 km2s ! lol
37's fit much nicer
Oct 17, 2010 | 06:11 PM
#42
Thread Starter
Registered User
Joined: Jul 2009
Posts: 832
Likes: 0
From: Eastern NC
Been a little busy lately lots of traveling with the high school band, family in, and work. But have been able to find a little time for prep.
Underside it striped,


Old 85 axle housing is out,

IFS rear from the 87 is cleaned, 3rd removed and ready for me to start prepping it.

Hopefully parts will start rolling in this week.
I need to safely raise the body about 4" so I can strip the top of the frame, POR15, and install new body bushings. Does anyone have suggestions? Keep in mind I pretty much work alone.
Later
Underside it striped,
Old 85 axle housing is out,
IFS rear from the 87 is cleaned, 3rd removed and ready for me to start prepping it.
Hopefully parts will start rolling in this week.
I need to safely raise the body about 4" so I can strip the top of the frame, POR15, and install new body bushings. Does anyone have suggestions? Keep in mind I pretty much work alone.
Later
Oct 17, 2010 | 06:14 PM
#43
Thread Starter
Registered User
Joined: Jul 2009
Posts: 832
Likes: 0
From: Eastern NC
Drew thanks for the pics. There is a good deal on some 33/10.5/15 KM2's on here right now. If I end up with those that will save a bunch of money that I can put other places. Then Maybe 35's next year. I would really like to have MT/R's But the KM2's get good reviews also.
Later
Later
Oct 23, 2010 | 05:38 PM
#45
Thread Starter
Registered User
Joined: Jul 2009
Posts: 832
Likes: 0
From: Eastern NC
Picked up some goodies yesterday. Been dealing with East Coast Gear Supply out of Durham NC. Good guys to deal with.
V6 rear diff, 4.88 Grizzly
4 cylinder front diff, 4.88 Grizzly
TG 5" classic rear
Tg 4" classic front
4.7 transfer gears
Do in this week are the twin sticks from TG.
Front axle gussets
diff armor, front and rear
Rear disk brake kit
1" Bore master cylinder
Transfer case E brake
Picked up new rear wheel bearings and seals locally, still waiting on the O rings to come in from Toyota.
Got quite a bit done today.
IFS rear axle is ready to reassemble, and start on the rear suspension.
Most of the frame from the front fenders back have been hit with a grinder and wire wheel. Made quite a mess.
Body has been unbolted and is ready to be lifted up. I havethe two front and rear bolts holding it on.
I think I am going to get the suspension rolling, and level, then get some of the boys from work over to lift it up. Get some blocks under it. finish stripping the frame, and POR15. Anyway it goes its a lot of work.
I'll post up some pictures tomorrow.
Later


 Oct 23, 2010 | 06:21 PM
#47
Thread Starter
Registered User
Joined: Jul 2009
Posts: 832
Likes: 0
From: Eastern NC
Thanks Slacker, it will not be the caliber of your trekker, but I hope to get a long time out of it when done.
I took the head off the engine I had built for this runner, and put on the 94 I am driving while the runner is down. Getting ready to send the other head off and have it checked. In the mean time, after all the talk on here about head gaskets, and rings. I think I am going to go ahead and pull the pistons and put in a set of NPR rings, and Nippon head gasket set. Cant hurt and really does not cost that much.
I took the head off the engine I had built for this runner, and put on the 94 I am driving while the runner is down. Getting ready to send the other head off and have it checked. In the mean time, after all the talk on here about head gaskets, and rings. I think I am going to go ahead and pull the pistons and put in a set of NPR rings, and Nippon head gasket set. Cant hurt and really does not cost that much.
Oct 24, 2010 | 06:28 PM
#48
Thread Starter
Registered User
Joined: Jul 2009
Posts: 832
Likes: 0
From: Eastern NC
As promised some pictures. Don't expect to much. I just kind of putted around in the garage today. Did some cleaning and organizing, But did manage to get some stuff done today.


Found that the under side of the body is starting to show a lot of surface rust spots. And the factory under coating was cracking, flaking and holding water in those areas. So I took the wire wheel to it all. I need to get a stiffer wire wheel for my die grander in order to really get the surface rust spots off the bottom of the body. I think I will keep working in my spare time. Then once the suspension it in and the body is lifted up I'll clean it all, hit those spots with POR15, and maybe try something like lizard skin on it.
I will be able to put the rear axle into mock up mode tomorrow. And start on the rear springs.
Later

 Oct 25, 2010 | 05:01 PM
#50
[QUOTE=TinMan;51579035]Thanks Slacker, it will not be the caliber of your trekker, but I hope to get a long time out of it when done.
QUOTE]
I'm sure it will last a long time ..
.
QUOTE]
I'm sure it will last a long time ..
.
Last edited by slacker; Oct 25, 2010 at 05:04 PM.


 Oct 26, 2010 | 01:34 AM
#53
Thread Starter
Registered User
Joined: Jul 2009
Posts: 832
Likes: 0
From: Eastern NC
Yeah I have thought about chromoly rear axles. And I am sure it will happen. That is one of the reasons that I decided to go ahead and do rear disk brakes. It will make getting into the rear axle so much easier. But right now I am going to use the money I would have spent on Chrome rear axles in other other area's.
Oct 26, 2010 | 08:02 AM
#54

Registered User
Joined: Oct 2010
Posts: 3
Likes: 0
Hi Tin man.
Good write up. I have a 85 4wd long bed. I noticed a 18th" gap in the manual transmission mount between where it is mounted to the frame and transmission. I was wondering if there is supposed to be a gap or is the lg bolt backing out. I am also replacing the drive shaft support. There are flanges at either end of the shaft that are to big to fit the new support over to get it on the shaft. I have it on order. Do you happen to know how it installs. Perhaps it is a 2 piece unit.
Thanks for your help. There are not too many 85s out there, your post caught my attention.
Gordon R
Oct 27, 2010 | 02:37 AM
#56
Registered User
Joined: Dec 2006
Posts: 2,880
Likes: 2
From: Olympia, WA
I have rear disc brakes and chromoly axles, trust me its probably the best money spent besides doing my SAS. REcently ruined a wheel bearing in a recovery of my truck out of a ravine. Was able to replace the bearing at home without any special jigs just a press .. remove and install.
Worth every penny
I had replaced two rear warped axle shafts originally which is why i went to chromoly.
Worth every penny
I had replaced two rear warped axle shafts originally which is why i went to chromoly.
Nov 3, 2010 | 05:34 PM
#60
Thread Starter
Registered User
Joined: Jul 2009
Posts: 832
Likes: 0
From: Eastern NC
I have only been able to get a few hours during the recent weeks to work on the runner.
I started on the rear first. I figured it would be easier and get it done faster, but I have run into a few little snags.
Checking, double checking and triple checking all measurement. I got the front spring hangers tacked in, and shackle mounts tacked in, hung the springs, put the mocked up rear end in. Put the rotors on, mounted the tires, and started rechecking. Had to cut the tacks on the shackle mounts and set the angles to 25*. Rotated the pinion up to point at the output shaft of the T case. Stood back at a good distance and noticed the passenger side tire is about 1" outside fender well and the drivers side was even with the fender well.
So I started measuring again. everything looked good. Cycled the rear end and that setteled the shackle angle to 35* so I reset it to 25* again.
Spent some time with a tape measure and plumb bobs.
Tires are the same distance from the back of the front tires to front of the rear tires on each side. Axles seem to be square to each other.
So I put a plumb bob from axle center o the frame down to the leaf on each side. And that proved my visual was right. The leafs are an inch out to the passenger side.
As best as I can figure, the frame must be twisted a little bit.
The truck has always sat 3/8 lower on the driver rear side. When I got it I figured it was because the springs were sagging. I put the OME leafs on, and it still sagged 3/8" on that side. But the shackle angle was pretty close to same. And visually they lined up. Now after the 5" TG rears are on, it still is 3/8" the drivers side rear. And the shackle angles are the same and they line up with each other.
So this week and weekend I am going to confirm all measurements one more time. If it all checks out again, I am going pull the axle move the spring perches 1/2" to the passenger side. Make a 3/8" spacer to go on the drivers side spring perch put it all back and check again.
This is why the directions say to tack it all into place and check everything first. I thought about trailering it to a frame shop when the front end it mocked in. But I figure if I am to wheel this thing hard at all that might be a waist of money.
Later
Last edited by TinMan; Nov 3, 2010 at 05:41 PM.


