
85 Extra Cab Saved from Crusher
 Nov 30, 2015 | 12:24 PM
#821
Thread Starter
Super Moderator
iTrader: (1)
Joined: Aug 2008
Posts: 11,787
Likes: 28
From: Anderson Missouri
I have run into an issue with my rims but it has worked out for the better. A friend of mine has 3 of these rims which I have been wanting to get. As I understand it, these were the SR5 rims back in the day. Solid axle rims have a deeper offset. I still need to find one and think I know where one might be to match it up.

Last edited by Terrys87; Nov 30, 2015 at 12:51 PM.
Dec 1, 2015 | 12:42 AM
#822
Thread Starter
Super Moderator
iTrader: (1)
Joined: Aug 2008
Posts: 11,787
Likes: 28
From: Anderson Missouri
Yea!!! As I suspected that I have a wire not matching up and my fuel gauge not working is because the Pins apparently are different from an SR5 gauge to a non SR5 gauge. I found the below quote on Toyota nation but no description on how to fix it.
Quote:
Update:
-Oil gauge in the SR5 cluster I got was dead, I left the original oil sender in and wired it to the check engine light, problem solved.
-Coolant temp sender was missing on the new engine, replaced it and hooked up the wire, problem solved.
-Fuel gauge sender wire was on the wrong connector pin for the SR5 cluster, moved it, problem solved.
Your truck is an 87 and the wiring may be the same or different from an 86 which is the wiring diagrams that I will be refering to. Depending what options you have on your truck the testing procedures will vary. Do you have full instrumentation (Tach, Oil pressure gauge, water temperature gauge and fuel gauge, volt gauge, brake light, etc.) or does your truck have a combination of gauges and idiot lights (oil pressure light, temperature gauge and fuel gauge, alt light , brake light, etc.)? The reason I ask this is because all of the gauges, lights, etc. in your dash are connected to a common Buss and are fed from the 15 amp engine fuse, so I'm going to ask a couple of stupid questions, is there continuity across this fuse and have you verified 12v from the fuse to the combination meter (terminal A (white connector)11 yellow wire). If none of these lights are coming on when you turn the key on, then you do not have 12v. feeding the combination meter. If you do have 12v. then:- The 86 FSM that I have checks the gauges for a Combination meter with a tach using a 3.4 watt 12v. bulb in series with the sender lead to ground, so obviously these gauges need some resistance to ground in order to work. If you have a combination meter without a tach the tests use an analog dc voltmeter. My FSM does not have any test procedure where you directly ground the sender lead to test the gauge, so it would stand to reason a dc. voltmeter does not have the proper resistance. On the fuel gauge you have three terminals (Ig, Fu and E) and on the temp gauge you have three terminals (Ig, Tu and E), the FSM provides definite resistance specs between each of these terminals for both gauges.
Fuel:- Ig-Fu approx. 83ohms, Fu-E approx. 156 ohms, Ig-E approx. 239 ohms
Temp:-Ig-Tu approx. 135 ohms, Tu-E approx. 138 ohms, Ig-E approx. 273 ohms
Ig is the 12v. source, Fu and Tu go to the senders of each gauge, E is a common between only these two gauges and it connects to terminal A4 (22re 5 spd & 22r) or terminal A5 (22re auto & 22rte) white/black wire that goes to ground under the left kick panel.
If you are only having problems with these two gauges and everything else seems to be operating properly, then this may be the common link, check for continuity between E on both gauges this will verify that the printed circuit is ok between them. Check for continuity between E and any body ground, if everything else is ok this should reflect as poor or non continuity. Lift the ground under the kick panel, check for continuity from E (combo meter) to the ring terminal to verify the wiring. If this ground circuit is intact clean the ring terminal and the body metal where it connects and reconnect, hopefully this solves your problem. If it doesn't you will have to get into replacing parts.
Last edited by Terrys87; Dec 1, 2015 at 01:03 AM.
Dec 3, 2015 | 02:28 PM
#823
Thread Starter
Super Moderator
iTrader: (1)
Joined: Aug 2008
Posts: 11,787
Likes: 28
From: Anderson Missouri
I got new tires on the three 85 rims that I have. On the rear passenger side is a chrome rim that is similar but is not an exact match but it will work until I can find one. Gove the truck a bath today but it needs a good handwashing and waxing.
Picture did not turn out to well and will get a better one later. The new headlights make the front end look better and I have another bumper to put on later.
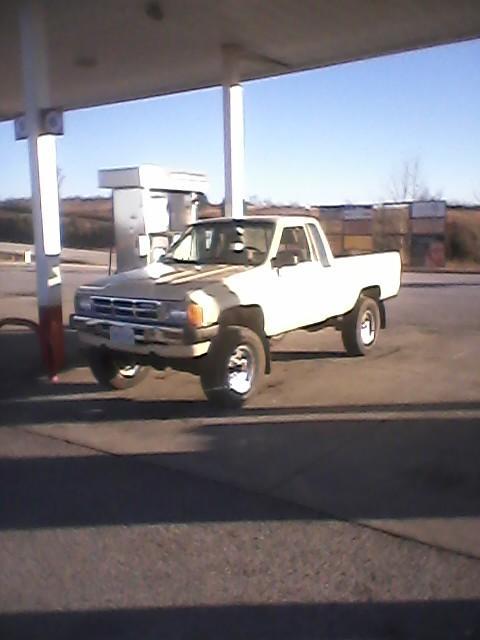
Picture did not turn out to well and will get a better one later. The new headlights make the front end look better and I have another bumper to put on later.

 Dec 4, 2015 | 02:10 AM
#825
Thread Starter
Super Moderator
iTrader: (1)
Joined: Aug 2008
Posts: 11,787
Likes: 28
From: Anderson Missouri
Thanks cwilder... It is slow going and been a workout to get it to where I want it to be. Post a picture of our truck on here, I always like to see others projects. There will be several issues that will need to be fixed on these old trucks but most are easily fixed on them and just takes a little time. Yotatech has plenty of information on here to get it back on the road again. Welcome to Yotatech.
Dec 4, 2015 | 03:41 AM
#826
Registered User


Joined: Mar 2012
Posts: 7,130
Likes: 683
Are you still working on this? Will be out of town this weekend but will try to look at schematic. I have the one for 1988 4Runner.
Hi cwilder,
Welcome to Yotatech! Yes, like Terry said, we're happy to help.
Dec 4, 2015 | 09:49 AM
#828
Thread Starter
Super Moderator
iTrader: (1)
Joined: Aug 2008
Posts: 11,787
Likes: 28
From: Anderson Missouri
A friend of mine came over and helped me adjust the carburator and timing. I was having a tough time getting the timing set and the vacuum advance was not working correctly. He knows these better then I do. I had a junk 22r distributor that has the shaft broken but the advance works on it. Mine was working but like it should. We took the advance and put it on mine and now it runs great.
I went and top the fuel tank off after driving it around and the fuel gauge went to full. Not sure if it is working now or not yet. Still dont have confidence in it just yet. I did not do anything to it to make it work so will have to wait and see.
With the new tires and shocks it made a world of difference on the way it handles. The steering is slow to return to the straight postion but it has two steering stablizers on it. I am wondering if I can remove one of the extras and if that would fix that problem. Should only need one.
I was getting ready to see just how fast this truck would do with all the work I have into it and wound up coming across 2 highway patrol. Will have to find out later. Upon seeing them I tried to fasten my seat belt and that is when I found out that 2nd gen trucks seat belts wont click into the 3rd gen connector. Nothing that a cut off saw should be able to fix. I just need to narrow the metal tab some.
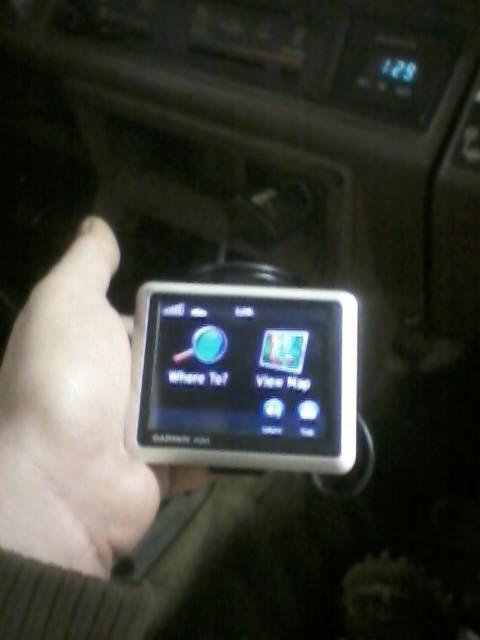
Left front brake caliper is leaking and it is a new one so will be looking into that here very shortly. I need to fix my cigarette lighter so I can use my Garmin and see how far off the speedometer is off by.
I still have 1001 things to do on the interior and look into why my power to the automatic choke isnt working. It is starting to feel and act like a truck again. Tonite is its maiden voyage to work. Plan on using it to pick up some firewood for the shop on the way home. That cutting firewood is well worth paying for someone else to cut it. First real load the truck will have on it since getting it running.
I went and top the fuel tank off after driving it around and the fuel gauge went to full. Not sure if it is working now or not yet. Still dont have confidence in it just yet. I did not do anything to it to make it work so will have to wait and see.
With the new tires and shocks it made a world of difference on the way it handles. The steering is slow to return to the straight postion but it has two steering stablizers on it. I am wondering if I can remove one of the extras and if that would fix that problem. Should only need one.
I was getting ready to see just how fast this truck would do with all the work I have into it and wound up coming across 2 highway patrol. Will have to find out later. Upon seeing them I tried to fasten my seat belt and that is when I found out that 2nd gen trucks seat belts wont click into the 3rd gen connector. Nothing that a cut off saw should be able to fix. I just need to narrow the metal tab some.
Left front brake caliper is leaking and it is a new one so will be looking into that here very shortly. I need to fix my cigarette lighter so I can use my Garmin and see how far off the speedometer is off by.
I still have 1001 things to do on the interior and look into why my power to the automatic choke isnt working. It is starting to feel and act like a truck again. Tonite is its maiden voyage to work. Plan on using it to pick up some firewood for the shop on the way home. That cutting firewood is well worth paying for someone else to cut it. First real load the truck will have on it since getting it running.
Last edited by Terrys87; Dec 4, 2015 at 09:51 AM.
Dec 4, 2015 | 11:20 PM
#829
Thread Starter
Super Moderator
iTrader: (1)
Joined: Aug 2008
Posts: 11,787
Likes: 28
From: Anderson Missouri
The wheels I got had some rust on them. I found on Stacey Davids tips to use aluminum foil wadded up and water. I got it in my Tips thread. Worked real well.

I got the front drive shaft in, removed one of the steering stabilizer which is mostly a shock absorber. Whoever installed it did not install it correctly. Hoping that makes some improvement in the steering. It made it maiden voyage with out breaking down on me on the way to work. Wahoo!!!
Install front drive shaft...done
Clean Rims...................done
Removed stabilizer........done
Install front bumper.......done
Install new ignition........done
Repair cigarette lighter...done
Work on SR5 cluster
Dome light...................done
Map light
Cargo Light
Head liner......Working on.
Driver window track
Oil pan leak................done?
Driver caliper leak........done
Detail under side.........done
Heater Control light.....done
Oil Pressure gauge......done
Water Temp gauge......done
Weld up exhaust pipe
Two bolts for gas tank..done
Clean Engine bay
Detail front hubs........done
Seat belts
Interior trim...Working on.
Body Gaps
Buff
Detail rear wheel caps.. Mostly done.
Tail light screws......................done
Platic clips
Parking Brake Light..................done
Look at Heater
4WD Light
Change diff oil
Extend diff breathers
Detail hub dials
Salvage yard
Seat belt
Rear Bumper brackets
Dome Light

I got the front drive shaft in, removed one of the steering stabilizer which is mostly a shock absorber. Whoever installed it did not install it correctly. Hoping that makes some improvement in the steering. It made it maiden voyage with out breaking down on me on the way to work. Wahoo!!!

Install front drive shaft...done
Clean Rims...................done
Removed stabilizer........done
Install front bumper.......done
Install new ignition........done
Repair cigarette lighter...done
Work on SR5 cluster
Dome light...................done
Map light
Cargo Light
Head liner......Working on.
Driver window track
Oil pan leak................done?
Driver caliper leak........done
Detail under side.........done
Heater Control light.....done
Oil Pressure gauge......done
Water Temp gauge......done
Weld up exhaust pipe
Two bolts for gas tank..done
Clean Engine bay
Detail front hubs........done
Seat belts
Interior trim...Working on.
Body Gaps
Buff
Detail rear wheel caps.. Mostly done.
Tail light screws......................done
Platic clips
Parking Brake Light..................done
Look at Heater
4WD Light
Change diff oil
Extend diff breathers
Detail hub dials
Salvage yard
Seat belt
Rear Bumper brackets
Dome Light
Last edited by Terrys87; Dec 10, 2015 at 08:25 AM.
Dec 5, 2015 | 10:33 PM
#830
Thread Starter
Super Moderator
iTrader: (1)
Joined: Aug 2008
Posts: 11,787
Likes: 28
From: Anderson Missouri
Truck did great and got its first load of fire wood for the shop. I don't care for winter but when I am working in the shop and it is to miserable being outside, heat sure makes winter more enjoyable when I am there. I used to could not wait for winter to be over but a warm shop really makes winter more bearable.
I did not notice it until driving to work today that I have the 5th gear whine. Maybe once I get carpet installed it might not be noticeable. I only notice it when I get to 60 mile per hour or faster so carpet might cover the noise. If it is still noisy I will replace the transmission. The excitement is already building up on a tranny swap, Not!!! Carpet will move up on the list faster just to conceal the noise.
My old ignition switch was acting up so I tried to clean it up and make it work and things went from bad to worse so I was using a screw driver to operate the key switch. Will looking for some other parts I found a spare I had and not have a working key switch again.
The kiddos were not so excited about unloading the wood. Having a truck is nice and will never be without one again. Luckily I have a trailer that will work in the place of a truck but still no much nicer having a truck. Picture looks terrible. I will check my camera lens.
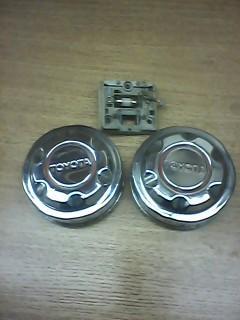
Autozone did not have the LED dome light so got one from Oriellys. I will see how it works. I had to clean the contacts on the dome light to get it to operate. I did the aluminum foil on the rear center caps. I will paint the red at a later time as I have other things I want to work on. Chrome cleaned up real nice.
I got my dome light working. Sylvania DE3175. I will need to replace my light switch as when I turn it to full time, I have to wiggle the switch to get it to work. It is loose and just needs to be replaced. I will add that to the salvage list. LED is Light Emitting Diode, in the electronic world, basically Diode mean electric can only flow one way. If it does not work when you install it, just flip the bulb around. It took me a minute to remember that, doh!!! Much better then the factory bulb.
I did not notice it until driving to work today that I have the 5th gear whine. Maybe once I get carpet installed it might not be noticeable. I only notice it when I get to 60 mile per hour or faster so carpet might cover the noise. If it is still noisy I will replace the transmission. The excitement is already building up on a tranny swap, Not!!! Carpet will move up on the list faster just to conceal the noise.
My old ignition switch was acting up so I tried to clean it up and make it work and things went from bad to worse so I was using a screw driver to operate the key switch. Will looking for some other parts I found a spare I had and not have a working key switch again.
The kiddos were not so excited about unloading the wood. Having a truck is nice and will never be without one again. Luckily I have a trailer that will work in the place of a truck but still no much nicer having a truck. Picture looks terrible. I will check my camera lens.

Autozone did not have the LED dome light so got one from Oriellys. I will see how it works. I had to clean the contacts on the dome light to get it to operate. I did the aluminum foil on the rear center caps. I will paint the red at a later time as I have other things I want to work on. Chrome cleaned up real nice.

I got my dome light working. Sylvania DE3175. I will need to replace my light switch as when I turn it to full time, I have to wiggle the switch to get it to work. It is loose and just needs to be replaced. I will add that to the salvage list. LED is Light Emitting Diode, in the electronic world, basically Diode mean electric can only flow one way. If it does not work when you install it, just flip the bulb around. It took me a minute to remember that, doh!!! Much better then the factory bulb.
Last edited by Terrys87; Dec 17, 2015 at 07:27 AM.
Dec 5, 2015 | 11:45 PM
#831
Thread Starter
Super Moderator
iTrader: (1)
Joined: Aug 2008
Posts: 11,787
Likes: 28
From: Anderson Missouri
I had to replace my Park Brake Sensor. I have been trying to keep my rear brakes adjusted properly by setting my parking brake and keep forgetting to release them. Finally got tired of that and got the sensor on. This is a spare I have with the sensor I needed. Someone cut the cable.
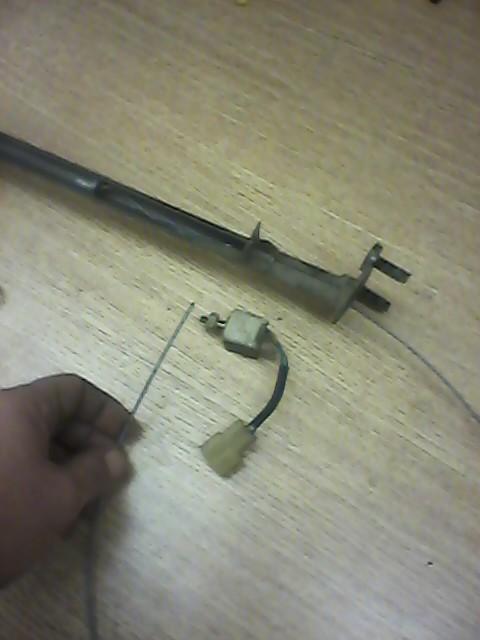
Someone in their infinite wisdom cut the cable. The cable will break where it enters the handle. This is a spare handle I have but used the sensor off of it. Normally if I have to work on the parking brake assembly, I undo the clip just forward of the gas tank and a few clips along the frame. Then I remove two bolts on the firewall on the engine bay and the two bolts that hold it to the dash.
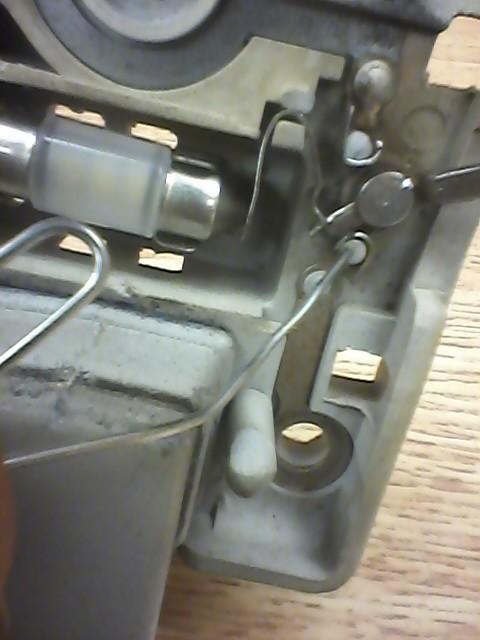
Remove the sensor and the two silver shiny tabs at the top where my fingers are at, you have to manipulate them to where the handle can slide further down to get access to the slug that holds the cable in the handle. This is where it will normally break.

I did not want to have to wait to go to the bone yard to get another mirror mount. With a little bending of the contact around post, I was able to get good enough contact to make it work. Paper clip is showing how I created a little gap to make it work.

Someone in their infinite wisdom cut the cable. The cable will break where it enters the handle. This is a spare handle I have but used the sensor off of it. Normally if I have to work on the parking brake assembly, I undo the clip just forward of the gas tank and a few clips along the frame. Then I remove two bolts on the firewall on the engine bay and the two bolts that hold it to the dash.
Remove the sensor and the two silver shiny tabs at the top where my fingers are at, you have to manipulate them to where the handle can slide further down to get access to the slug that holds the cable in the handle. This is where it will normally break.

I did not want to have to wait to go to the bone yard to get another mirror mount. With a little bending of the contact around post, I was able to get good enough contact to make it work. Paper clip is showing how I created a little gap to make it work.

Last edited by Terrys87; Dec 6, 2015 at 01:26 AM.
Dec 6, 2015 | 05:18 AM
#832

Trick looks great terry!! Glad you finally got to use it.
I really miss having a Toyota Truck. Don't get me wrong, I love my 4Runner, but if it weren't for the extra seats in the back for my family, I would swap a truck body on the frame.
Pretty interesting write up on the E-brake setup. I've always wondered how it worked.
I really miss having a Toyota Truck. Don't get me wrong, I love my 4Runner, but if it weren't for the extra seats in the back for my family, I would swap a truck body on the frame.
Pretty interesting write up on the E-brake setup. I've always wondered how it worked.
Dec 6, 2015 | 11:36 PM
#833
Thread Starter
Super Moderator
iTrader: (1)
Joined: Aug 2008
Posts: 11,787
Likes: 28
From: Anderson Missouri
Thanks Mark...I have a few hundred more steps to go to get it to where I want it to be, slowly but surely. Extra seats would be nice but this is going to be my work truck and don't think any of the family will ever be in it to much.
I will add some more information to the E-brake setup as I do a lot of copying and pasting on the front page to answer questions. If you don't know a few of the tricks the E-brake can be difficult to work on. I always undo it at the bracket at the tank and remove the whole assembly. Trying to connect it while attached and bent over on the floor is a pain in the back.
Seen on your thread about the steering and body roll. I don't know much to help on the body roll but on the steering, I think once you get some miles on it, it will get better. I was not happy with mine at first but the miles and use are getting it better. You have new springs and I also think the bearings on the axle all play a part and need some wear and tear on them to get better feel.
Toms truck I did a while back rides so much better then mine but I think once I go with a stock set up it will get nearly as good as his. At one time I was thinking of starting over with an IFS truck but it is getting better each day. I think once I go with stock springs and shocks it will be as good as his. I will say the more use I have put mine to the better it is getting. Give your springs and bearings some time to break in and I think it will make a big difference.
Dec 6, 2015 | 11:45 PM
#834
Thread Starter
Super Moderator
iTrader: (1)
Joined: Aug 2008
Posts: 11,787
Likes: 28
From: Anderson Missouri
I got to try out the 4 wheel drive in it. I have a hill that I can test it on and it did great. The 4WD indicator light worked so that was one less thing to chase out. After getting done with that I bumped one of the stereo wires and heard an arc. Sure enough the clock stopped working. Did some looking and someone had butchered the wiring on it. One I had not noticed. I will look at one of my other trucks and see what that plug goes to and it fixed.
I did get my cigarette lighter working. Had to fix a connector on it too. I don't use an aftermarket cigarette lighter in the factory one. Toyota made a weak design on it. It works great for phone chargers and Garmin but not for the actual lighter. I like to throw in an easy fix in between a hard fix. Makes you feel like you are making some kind of progress.
I had a complete gray interior but decided it would not go with the exterior color so switching over to tan. Still piecing it together and starting to work on getting the map light installed and working on a few other issues. May not seem like much but each fix still takes some time and effort and one step closer to getting it done.
Wanted Garmin to check my miles per hour. Interior is still a long ways to go but one more fix is done.
 Dec 7, 2015 | 03:10 AM
#835
Truck looks great! I'm glad you're getting to drive it. Crazy how it was so close to the graveyard and now most people would just assume it's a "survivor". Well it is. Just not in the sense most people say it. Congrats. And yes buying fire wood is a great move. The convenience is awesome and it feels good knowing youre supporting the utmost of local business. Can't get any more local lol.
Dec 8, 2015 | 12:26 AM
#837
Thread Starter
Super Moderator
iTrader: (1)
Joined: Aug 2008
Posts: 11,787
Likes: 28
From: Anderson Missouri
Thanks bootscootboogie...This truck has been a battle. Seems like I have some difficulties but I am slowly getting it done. Finally getting some time to work on it. Wood heat in the shop is so nice.
Thanks Ed... I need one more for the passenger rear but the one I have on it looks quite similar that most probably would not notice. Part of the excitement is chasing down the parts and finding it. Once it is together it doesn't seem like much when you have it all together.
Thanks Ed... I need one more for the passenger rear but the one I have on it looks quite similar that most probably would not notice. Part of the excitement is chasing down the parts and finding it. Once it is together it doesn't seem like much when you have it all together.
Dec 8, 2015 | 12:39 AM
#838
Thread Starter
Super Moderator
iTrader: (1)
Joined: Aug 2008
Posts: 11,787
Likes: 28
From: Anderson Missouri
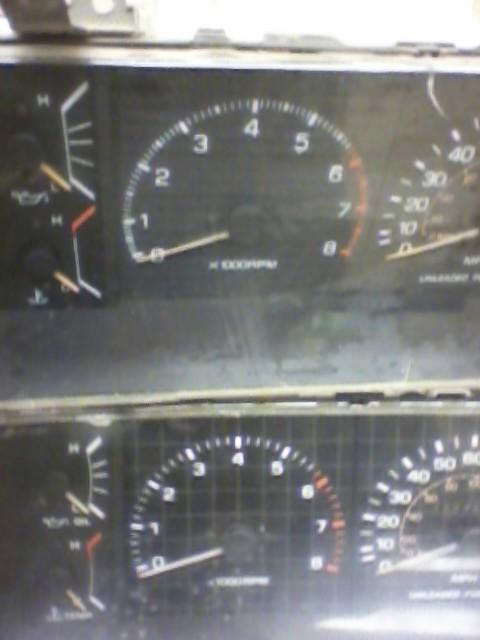
For those of us that remember the 55 mile speed limit was, I had a hash mark SR5 gauge that went to 110 mph. My speedometer was off by 15 miles an hour. I did not realize that the hash mark gauge came in 110 and 85 mph range. I swapped in another SR5 that went to 85 and now my miles are just off by less then 5 miles an hour. Feel better about not having to use my Garmin for the speed.
The hash mark gauge is my least favorite one as it is a real pain to set the mileage. I will not pull the needle off of a hash mark gauge. The needle has splines that are formed into the needle and usually will snap. Wheelie Pete You tube video has a way of correcting the mileage and I will correct my mileage later.
Here is the difference in the SR5 gauges. Some have the horizontal lines which I prefer as you can remove the needle to set it to the correct mileage. The hash mark is the one you cant. I also learned the hash mark does come in 85 and 110 mph limits.
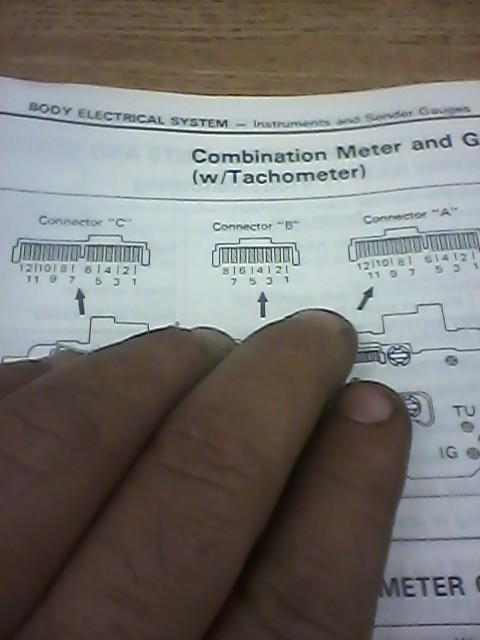
I did get a tough problem fixed done. My oil and water temp gauges were not working. The FSM has the plugs marked A,B,C. They are marked backwards. I have a lot of time wrapped up into trouble shooting this as the wire that go to the plugs look quite similar. I was working with a Yellow wire with a red stripe and did not notice the hash mark on the wiring. Long story short I ran a long jumper wire from the end of the wire to the sensors and did a resistance check from the wire to the plug on the back of the gauge.
Not the first problem I have seen in the FSM. Plugs are labeled backwards.
Now my 4WD light is not working. Probably a bad bulb. I will take care of it when I correct the mileage and clean the lens. I did detail underneath some. I had to paint the gas tank as I did not paint it up when I switched tanks from EFI to Carb.
The hash mark gauge is my least favorite one as it is a real pain to set the mileage. I will not pull the needle off of a hash mark gauge. The needle has splines that are formed into the needle and usually will snap. Wheelie Pete You tube video has a way of correcting the mileage and I will correct my mileage later.
Here is the difference in the SR5 gauges. Some have the horizontal lines which I prefer as you can remove the needle to set it to the correct mileage. The hash mark is the one you cant. I also learned the hash mark does come in 85 and 110 mph limits.

I did get a tough problem fixed done. My oil and water temp gauges were not working. The FSM has the plugs marked A,B,C. They are marked backwards. I have a lot of time wrapped up into trouble shooting this as the wire that go to the plugs look quite similar. I was working with a Yellow wire with a red stripe and did not notice the hash mark on the wiring. Long story short I ran a long jumper wire from the end of the wire to the sensors and did a resistance check from the wire to the plug on the back of the gauge.
Not the first problem I have seen in the FSM. Plugs are labeled backwards.

Now my 4WD light is not working. Probably a bad bulb. I will take care of it when I correct the mileage and clean the lens. I did detail underneath some. I had to paint the gas tank as I did not paint it up when I switched tanks from EFI to Carb.
Last edited by Terrys87; Dec 8, 2015 at 01:49 AM.
Dec 9, 2015 | 01:16 PM
#839
Thread Starter
Super Moderator
iTrader: (1)
Joined: Aug 2008
Posts: 11,787
Likes: 28
From: Anderson Missouri
Anyone know of a company where you can get new speedometer gears to correct the reading on a gauge? Mine is 4-5 miles off and would like it to be closer.
I pulled a dumbutt move. I changed gear oils on a truck recently and must of thought it was on this one. Transmission was extremely low. I know I need to do the differentials fluids and will be getting to that soon. One reason I do like to go to a quick lube and have them to check all of my fluids and especially during the winter, I use quick lube shops for oil changes. I have one that I trust real well.
With each fix, truck is running better and really starting to enjoy this truck. I have a few wind noises that should be an easy fix. Interior still has some rattles as I dont have everything in it and fastened down as I need to. I did get an offer from a person while filling it up to buy it. I need to go thru and add up what I have into it but am thinking about $4-4500 into it and even at a dollar an hour that I got into it that I would just as soon as keep it.
One of my co-workers is working on a 49 Ford coupe on a 2000 S-10 chasis. He is a great mechanic. Another co-worker just bought a 69 Ford pick up that just needs a torque converter and the motor reinstalled for $500, he has no mechanical ability and think he got offended when I told him I think he got in over his head. I told him a five hundred dollar truck is going to have all kinds of issues that he is not aware of yet and not sure he has the gumption to see one thru and I told him 2 years or more is a common time frame for a project.
My neighbor yesterday was really proud of the 70 Chevy C-10 he bought. Cab is bolted to the frame and everything else is completely disassembled. I see some hack work done on it and I know he does not have the skills to get it back together. He is wanting to do a frame off restore on it. He has seen me with several trucks tore down and is wanting to do the same. A chevy you can build out of a parts magazine. He was asking for advice on how to go about his build. I told him to get reassembled and running as soon as possible so it doesnt feel like a money pit yard ornament and he can enjoy it.
I have owned and driven enough Toyotas that I know what to expect and each project I tie into I automatically assume 2 years and have the parts, tools and skills to do something like that. Reason I mention this is the 2 guys that I mentioned earlier have never done a project and a project for a few hundred dollars is going to need alot. If you have never done a project before, find and ask someone who knows your skill levels and help find the project that is right for you. Determination helps but can only go so far. I really like my little scrap heap that I got running but more then once I have been ready to throw a few wrenches at it. The last 10% and the details that is needed is what can really add up.
Last edited by Terrys87; Dec 9, 2015 at 01:29 PM.
Dec 10, 2015 | 07:14 AM
#840
Thread Starter
Super Moderator
iTrader: (1)
Joined: Aug 2008
Posts: 11,787
Likes: 28
From: Anderson Missouri
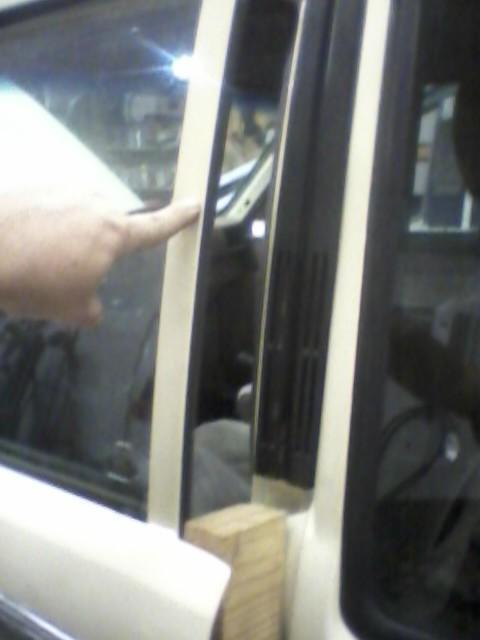
Just doing some smaller detailing. I had a wind noise at the door and it was a little out of whack. I put a block of wood and with some gentle pressure was able to get the door to seal up.
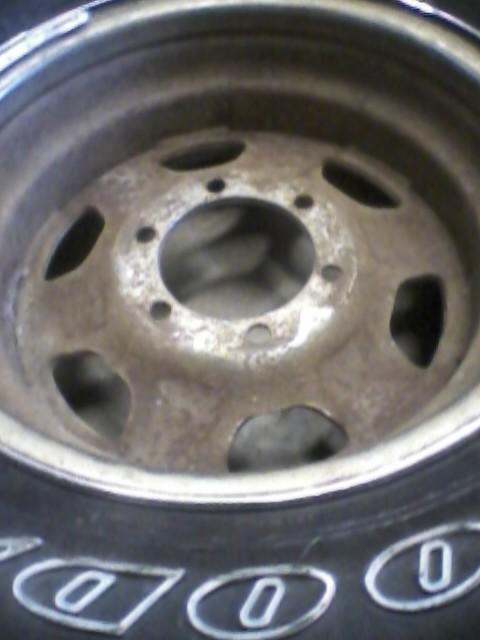
You could see thru the wheels and they are rusty on the back side. I got most of the rust off with a drill and wire brush and then followed it with aluminum foil.
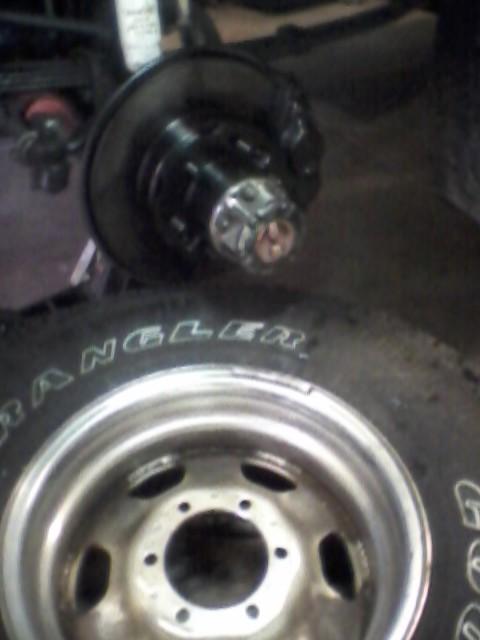
I will work on the hub and dial at a later time but does look better on the truck now. I painted the hub and brake caliper for a cleaner look, the excess I got on the disc will wear off.


