
Terrys87 83 Build Restore
 Nov 21, 2011 | 11:32 AM
#181
Thread Starter
Super Moderator
iTrader: (1)
Joined: Aug 2008
Posts: 11,787
Likes: 28
From: Anderson Missouri
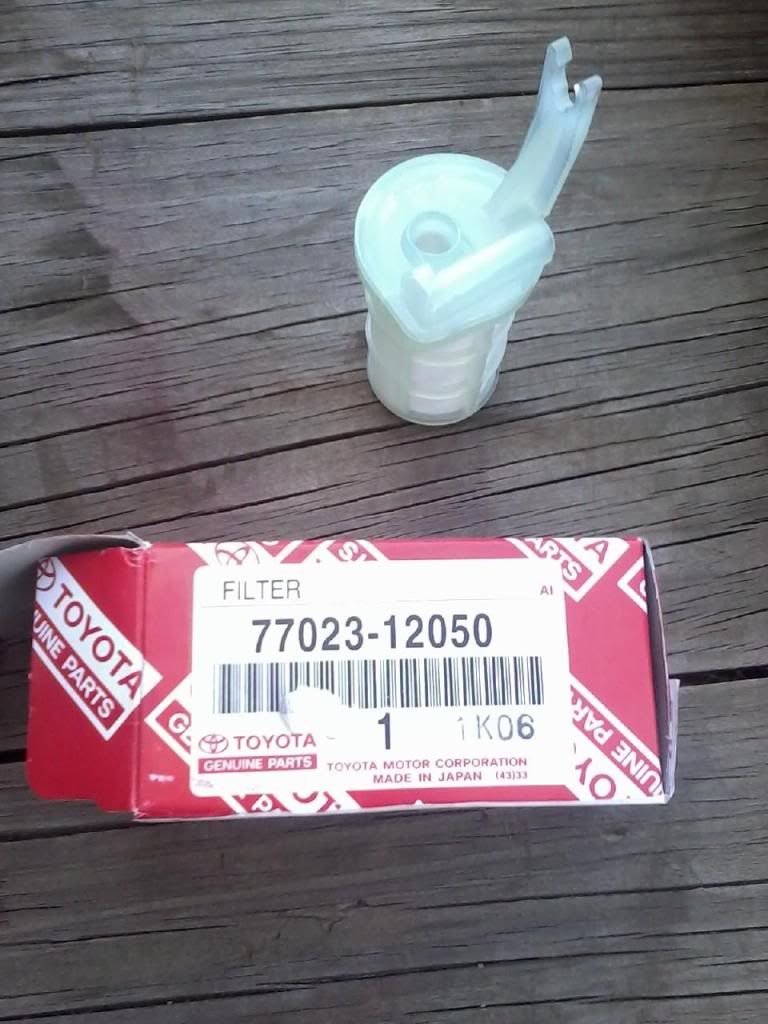
Hello JustDSM..I tried looking on ebay and other sites and could not find that filter for nothing. Guess what I found today? Hope this helps others. $4.50, a fourth of the price I paid. It was listed as a diesel. Did a search on Yotatech and others have ran into the same issue. Will update my fuel tank post with this info.
http://www.ebay.com/itm/TOYOTA-FACTO...610941&vxp=mtr
Thanks ocdropzone. I will be giving him a PM in the near future.
http://www.ebay.com/itm/TOYOTA-FACTO...610941&vxp=mtr
Thanks ocdropzone. I will be giving him a PM in the near future.
Nov 21, 2011 | 11:44 AM
#182
Registered User

Joined: Jun 2006
Posts: 2,711
Likes: 4
From: San Diego
Still a good deal... the shipping for the ebay part is $13.28, I was about to order it..
Nov 21, 2011 | 11:44 AM
#183
Thread Starter
Super Moderator
iTrader: (1)
Joined: Aug 2008
Posts: 11,787
Likes: 28
From: Anderson Missouri
Have been busy, working on the 88 with its cold start issue. Think I have it fixed. Everything tested out good and got to looking at the contacts and they had some corrosion.
I have fixed several electrical issues just by cleaning the contacts. When I was in the electronics field, I would say that I got 40% of my problems fixed just by cleaning the contacts.
Just thought I would put that out there so that if anybody else as some sensor problems, instead of just getting a new part, try cleaning the contacts first.
Been helping a friend on his truck. Weather has turned colder so I will be getting back on doing some body work on the truck. Need to finish a door in a few spots and start on the drivers fender. This is things that I can do in my dads shop til I get mine up built.
Just about got all of the carb hoses cleaned so am making steady progress.
Nov 21, 2011 | 11:46 AM
#184
Thread Starter
Super Moderator
iTrader: (1)
Joined: Aug 2008
Posts: 11,787
Likes: 28
From: Anderson Missouri
Thanks Outsane. I didnt see the shipping, it would be quicker for the cost difference to get at Toyota. Alot of their parts are reasonable. That is where I get my plugs and oil filter.
Nov 23, 2011 | 05:17 PM
#186
Registered User
Joined: Dec 2006
Posts: 383
Likes: 0
From: Las Cruces, NM
Hello JustDSM..I tried looking on ebay and other sites and could not find that filter for nothing. Guess what I found today? Hope this helps others. $4.50, a fourth of the price I paid. It was listed as a diesel. Did a search on Yotatech and others have ran into the same issue. Will update my fuel tank post with this info.
http://www.ebay.com/itm/TOYOTA-FACTO...610941&vxp=mtr
Thanks ocdropzone. I will be giving him a PM in the near future.
http://www.ebay.com/itm/TOYOTA-FACTO...610941&vxp=mtr
Thanks ocdropzone. I will be giving him a PM in the near future.
Nov 24, 2011 | 02:40 AM
#188
Thread Starter
Super Moderator
iTrader: (1)
Joined: Aug 2008
Posts: 11,787
Likes: 28
From: Anderson Missouri
Thanks Oktoberyzing..I am an orginal, factory purist kind of guy and to see something like yours really makes my day, so few of them left. Great looking truck. Wish I had the ability to do something like yours.
I have been busy on several other things and the weather, but when I catch a break, I will be hitting it hard. I started my 88 this past January and want to get this one running before this January. Just my personal goal of getting to get 2 running on their own power in a year.
Thanks JustDSM..That sounds great. I am really wanting to help find ways of making this thread helpful for others. Havent found much yet, but sure I will find something along the way. I will be getting after it again here soon.
Hello Chef..I knew you were really busy with other things and still praying for ya. Hope things are getting better.
Nov 24, 2011 | 06:28 AM
#190
Registered User
Joined: May 2009
Posts: 114
Likes: 0
From: Summit, MS
Thanks!! how bad you want to be able to do one like mine??? haha. i plan on restoring it one day. Not now of course because its the only thing i have to dd, but i just bought an 85 to fix up and dd. but i have several dents and dings in some very hard to get out places(top of cab, fenders, bed, yada yada, yada) and actually have been lookin for someone to help me. So if your willing to travel..... haha. i know that wouldnt be do-able. but the biggest problem is i had a limb fall on my cab and crush in the front, right at the windshield. It was very hard to get it back out enough to get a windshield in it. We did it, but its still nowhere near perfect. i gotta put a bed floor in it and have a quarter sized spot on the bed fixed, but other than that. the truck is actually in great shape. it'll wear a new paint job, as close to factory as i can get it, a totally redone factory interior, and some new shoes here within the next year hopefully.
Nov 26, 2011 | 06:31 AM
#191
Thread Starter
Super Moderator
iTrader: (1)
Joined: Aug 2008
Posts: 11,787
Likes: 28
From: Anderson Missouri
Hello octoberyzing...lol wish I had someone that lived closer. I like tinkering with things. Every Toyota truck I have worked on has had the top of the cab damaged on someway. I got to do the top of my cab roof. It has some really good dents in it. Luckily most will pop out from inside the cab.
Post a pick up on my thread and might have a suggestion that might help. Have you done bodywork before? Jason in tn checks my site out quite a bit and I talk to him and he does body work also. It takes patience but rewarding when done.
Post a pick up on my thread and might have a suggestion that might help. Have you done bodywork before? Jason in tn checks my site out quite a bit and I talk to him and he does body work also. It takes patience but rewarding when done.
Nov 26, 2011 | 06:37 AM
#192
Thread Starter
Super Moderator
iTrader: (1)
Joined: Aug 2008
Posts: 11,787
Likes: 28
From: Anderson Missouri
I have been working on my friends truck for awhile. I just about got it done. I would like to get the bed floor looking good. Could try POR I guess, and we have checked into getting it media balsted, but that is out of price range. Any suggestions.
Drivers side done.

Here is what I would like some suggstions on. Not bad, I just dont want the rust to come back. Sanding it out wont get down into the pits.

Drivers side done.
Here is what I would like some suggstions on. Not bad, I just dont want the rust to come back. Sanding it out wont get down into the pits.

 Nov 27, 2011 | 07:27 AM
#195
Thread Starter
Super Moderator
iTrader: (1)
Joined: Aug 2008
Posts: 11,787
Likes: 28
From: Anderson Missouri
Hello Outsane...Oktoberyzing had a tree limb to fall on the cab of his truck. Ouch!!! The bed I am doing for a friend of mine. His bed is really solid, this one isnt mine, wish I could find beds like his all day long.
Hello Oktoberyzing.. It really doesnt look that bad. That is a good candidate to learn on. You wont make it any worse and nothing that cant be fixed. It looks as though the windshield is seated well from what I can tell.
Is that a 2 or 3 inch crease or is it more like a 18-24 inch crease? I cant tell if that is a shadow or crease once it comes off of the windshield.
If you have acess to a stud welder or do it the old fashioned way. You can drill some small holes and use a sllide hammer to pull the crease up. I would go right in the center of the crease starting about an inch from the windshield.
Space your holes around 3/4 to 1 inch apart. Use your slide hammer to pull the dent up about a 1/4 inch at a time and then go to the next hole and so on until you have the crease just short of being level. You will need to leave it lower then level to fill your holes.
Also try removing your rear view mirror and light assembly and see if you can get to the back of the dent that way. If you can, you could use a pecking hammer and dolly to tap it out some. I cant tell in the picture if that would give you any access to the dent.
Once you have it close to level you will need to get the crease down to bare metal and out from it about 2 inches on each side. Then mix up some bondo. The bondo for a good rule of thumb is about an egg size of bondo to about a inch line of hardner.
Bondo says you have about 2 minutes to apply it when mixed. I do good to get a minute. It will get really gritty/rough/holes in it and you may as will stop. You will waste more bondo then you actully use as it gets sanded off. Let it set up for a good 15 minutes then start your sanding.
Here is the basic of tools. I have 4 different sanding blocks. Each one has different grit. One is 36 (the roughest) then 80,then 120 then 320 (the finest). Start with the lowest number and work your way up.
Dont worry about the other dents. Just do this one first. It will help you get the feel of how bondo works and see if you have the patience for doing it. It does take patience. I personally dont care for doing the center of the cab, and halfway between the center of the hood and fender as it will be a big flat area that flexs alot and you cant use a lot of pressure.
Being on the curve of the cab it will be solid for you to practice on. The sandpaper will kind of tell you when to go to the next finer grit of paper as it will stop putting out so much dust. (36 to 80 and so on).
On a hail ding, I use a razor blade to apply a thin layer and hit it with 120 then go to 320.
Bodywork can be intimidating at first and it takes time to get the "knack for it". Best thing to do is to jump in and do it. If you find that you like doing it, you can always buy the air tools and that will speed things up. But for very little you can start with the basics and build up later. I have 4 blocks. To save some cash you could just use one and switch each time you need to change to a different grade of paper.
I need to get some more "Long boards" as I only have one and it would be nice without changing paper on the boards each time. The bigger the dent, the longer the board you need. Try and keep the dent under your sanding blocks or board so that the non-dented area will help you level your bondo.
I am not a pro, just had someone to show me how and just started practicing. It is nice to say that I build the motors AND paint them myself. I had never done interior work and it is my next big step. I learned alot on my 88 when I did its interior. There is some flaws here and there, but it looks 10 times better then when I started, and I did it myself.
I will try and help where I can. Just remember paitence. It is nice to jump between bodywork and motor work from time to time for a change of pace.
Here is the basics.
Last edited by Terrys87; Nov 27, 2011 at 07:30 AM.
Nov 29, 2011 | 01:09 AM
#197
Thread Starter
Super Moderator
iTrader: (1)
Joined: Aug 2008
Posts: 11,787
Likes: 28
From: Anderson Missouri
Hello Outsane..lol..I need some one to do lifts and such on mine.. One of these i am going to get me a stud welder. Once I get my shop up I will start getting some of that stuff.
Nov 29, 2011 | 01:13 AM
#198
Thread Starter
Super Moderator
iTrader: (1)
Joined: Aug 2008
Posts: 11,787
Likes: 28
From: Anderson Missouri
Been a little busy. Been trying to get my shop up. The hold up has been the concrete guy to get it put down.
Probably will be another 4 or 5 days before I get to get back on the truck again. Want to make so progress on it. I am hoping to hear it run before the new year. So I better get busy on it.
Probably will be another 4 or 5 days before I get to get back on the truck again. Want to make so progress on it. I am hoping to hear it run before the new year. So I better get busy on it.


