
Terrys87 83 Build Restore

 Nov 11, 2011 | 01:11 AM
#142
Thread Starter
Super Moderator
iTrader: (1)
Joined: Aug 2008
Posts: 11,787
Likes: 28
From: Anderson Missouri
Hello Chef.. Vinegar works. I think alot would be surprised at what their gas tanks look like. I have seen some with a 1/4 inch of rust in them.
I had to replace the tank in my 88 and a new tank just wasnt in the budget. I found some ways on the net and this works great. Alot cheaper too. I will put some Red Kote on as it will leave some powdered rust in there. I will get some pics of it.
Also will do a full write up on it. A gas tank is dangerous even after being flushed or setting for 20 years. It actually scares me working on them, so I do it when it is to cold for fumes. But it has to be fixed.
Thanks Outsane.. I try to keep moving forward.
Nov 11, 2011 | 09:13 AM
#143
Sweet! 
One of my favorite threads, lately. I have many(never my own, hahaha)... but this one keeps me hungry to check in, as do Dutch's, Jasons, Brandon's, Jerry & Sons, hahaha... many more. Some, when I see a post, I just roll my eyes, lol.... I wont elaborate on the vacuous things I'm hinting at.....Cuz, well, I'm SURE many feel the same of my thread! hehehe.
Excellent, regarding the pics to come... thanks. I'm considering a couple projects and they've been sitting for A GANG O DAYZ! lol.
PS> Thanks again for SERVING, TERRY! OOHRAH! STAY SAFE! I suppose it would be fitting to wish you a HAPPY VETERANS DAY, AS WELL, RIGHT!?!?!?!?
Nov 12, 2011 | 02:51 AM
#144
YotaTech Milestone-Two Millionth Post
Joined: Jan 2009
Posts: 12,009
Likes: 122
From: Northeast Pennsylvania
you mean you aren't driving this thing yet?
hehehehe
I thoroughly enjoy seeing this truck coming back to life. Nice job on the block, looks edible.
now I'm gonna go bury my head up my butt again.
hehehehe
I thoroughly enjoy seeing this truck coming back to life. Nice job on the block, looks edible.
now I'm gonna go bury my head up my butt again.
Nov 12, 2011 | 08:23 AM
#145
Thread Starter
Super Moderator
iTrader: (1)
Joined: Aug 2008
Posts: 11,787
Likes: 28
From: Anderson Missouri
Thanks Chef.. I try to keep my thread moving. Sometimes slowly, but I have been down this road a before.
Hello Jerry.. I am so ready to drive this. Get it running and it will be bedless for a while and on square tires. It is carburated and that has been years ago since I have worked on one. Stirring up the cobwebs.
Hello Jerry.. I am so ready to drive this. Get it running and it will be bedless for a while and on square tires. It is carburated and that has been years ago since I have worked on one. Stirring up the cobwebs.
Nov 12, 2011 | 08:33 AM
#146
Registered User
Joined: May 2011
Posts: 683
Likes: 0
From: arlington oregon
if that list of costs is what it will actually be your lucky lol, im 2 grand into my 86 and aint even close to bein done lol, when i have it where i want it ill probly be 5 grand into it, sas'35's, dual tcases, new bed, and other stuff, nice seeing this thing come back to life tho, keep up the great work
Nov 12, 2011 | 08:47 AM
#147
Thread Starter
Super Moderator
iTrader: (1)
Joined: Aug 2008
Posts: 11,787
Likes: 28
From: Anderson Missouri
Starting to get the motor back together. Cleaning is really taking up the time. I am putting everything back except the oil pan.
Got the oil sending unit off. I kept letting it soak and tapping back and forth and it finally came off. On my flatbed, when I changed it to SR5 guage, it broke off and them I broke a Reverse Screw ( got a blank mind at this time) that get broken bolts out.
That was a royal pain in the rear. I found a guy who was able to get in there and weld a nut to it and get out for me.
Went to put the timing chain on the Cam sprocket and some how slipped timing. I always have a hard time getting it on there with the tentioner engaged. Had to pull the Timing Cover back off and get it. Learned a lesson on that too along time ago. When putting the timing cover on with the head on, but a little sealant on the front of the head gasket to keep it from falling down and getting bent. Had to replace a head gasket just becuse I couldnt get the one hidden bolt that connect the timing cover to the head.
All in all I feel really good about this motor, knowing what I know now, I could of just gotten away by putting it in the truck. But I wanted to see the overall condition and get a feel for it. But I am always nervous as you just never know until you hear it run. So far everything has been going good. I used some timing cover bolts off of this motor to fix another truck awhile back. Basically the head bolts and cambolts are torqued down.
I torqued the headbolts to 58 pounds. Seems like somewhere on here it is recommeded to go a little tighter. Anybody have some suggestions?
I am hoping to get to my gastank this weekend also. It is still soaking and I am about satisfied with it. I have done this a couple of other times. It will still have some slight rust in there but with the coating it will seal it all up. I will do a nice write up on it when I get further into it and more pics. Here in the midwest, with our humidity, there are some bad tanks. This works good enough for me. New tanks arent cheap and finding a good used one is nearly impossible.
Hopefully starting to look like a 22R.
Nov 12, 2011 | 08:59 AM
#148
Thread Starter
Super Moderator
iTrader: (1)
Joined: Aug 2008
Posts: 11,787
Likes: 28
From: Anderson Missouri
Hello 1986.. I usually havent missed my projects by much. But it has always been over.lol This is one reason I tend to stay in the stock/orginal rebuilds. Im a purist by nature but with projects that I tie into I dont feel to bad by some minor changes.
I know SAS is all the rage on alot of these builds on here, but I am more into the body styles. IFS works for what I need. I have had IFS into some really bad stuff and never had any problems. You just cant put the hammer down when you get into one of those situations. I havent done any serious wheeling in years, but it was all IFS. This is the first solid axle I have had and am wondering about the ride. My old butt is getting tender with age.lol But I can respect the work that goes into SASing a truck along with the jealousy of their ability to do it.lol
I know SAS is all the rage on alot of these builds on here, but I am more into the body styles. IFS works for what I need. I have had IFS into some really bad stuff and never had any problems. You just cant put the hammer down when you get into one of those situations. I havent done any serious wheeling in years, but it was all IFS. This is the first solid axle I have had and am wondering about the ride. My old butt is getting tender with age.lol But I can respect the work that goes into SASing a truck along with the jealousy of their ability to do it.lol
Nov 12, 2011 | 09:34 AM
#149
Hey Terry.... Had to breeze through cuz my Step-dad is in the Hospital(running mum's back and forth, etc., on top of life, yadda yadda, lol)... So I'm noting what I .......noted? lol......
58# is NOT adequate. Even toyota updated their FSM's and sent out memo's to the dealership foremen...... "62-65# recommended after HG replacement". I've never seen this memo, but engnbldr, etc., etc., all agree, somewhere in there is good to go!
Far as the timing kit..... All you have to do is insert a LONG/HDuty flathead Screwdriver into the right spot with a light, guiding it in there, then push back on the tensioner while someone slides the gear on, into place(I did it myself the 3rd time... PITA, but doable.). ALSO, turning back on the CAM BOLT(counterclockwise) JUST A TINY BIT, not enough to move the crank mark from 6'o'clock, will DRAMATICALLY relieve tension on the chain.(sorry, just a tip for next time? lol) Another thing that helps a lot? Loosen all the adjuster nuts/screws out to nearly the max....THEN torque the head bolts down, then put on the sprocket to cam, THEN adjust valve lash.
Just go back through the head bolts, in proper pattern, taking them on to 62#, then maybe 65# if you wish. I went to 63#, after 4 incremental torquing's....(first hand tight, then one full turn...THEN>) 20#, 35#, 50#, 63#, DONE, lol.
GOT THAT HIDDEN BOLT/TIMING COVER IN, RIGHT? lol. JK.... You're not new to this,....probably not as much as I am, anyhow! lol.
Nov 12, 2011 | 04:57 PM
#152
Registered User
Joined: Jul 2009
Posts: 832
Likes: 0
From: Eastern NC
Hey man on the rim I have good luck with rust oleum hammer metal rattle can. Sand the crap out of them, put a good etch primmer on, and spray the hammered metal paint. Seems to hold up pretty well.
Nov 13, 2011 | 01:46 AM
#153
Thread Starter
Super Moderator
iTrader: (1)
Joined: Aug 2008
Posts: 11,787
Likes: 28
From: Anderson Missouri
Hello Chef.. I appreciate the info. I knew I had read something about there being a higher torque on these. The 91 extended cab I had, after the first 2 months I owned it, I had a bad head gasket. The cause was the head bolt by the number 2 exhaust valve was finger loose. Now I make it a regular habit when tuning up and doing the valves to just retorque the head while under there.
Wish I had known of the timing chain trick on that. Thanks. When just changing a timing chain with head on and cover off it was easy. I have had several battles with the timing chain with it the other way around. I always make sure the head/cover bolt is one of the first to come off so as not to forget it.
Hello 1986toyota4x4..One of these days I need to look into a blazeland kit. I eventually want to lift a IFS. I always have liked yours bodystyle. I really think you will enjoy building it to the way you want instead of buying one. You will have more pride in it and you did it. With your determination you will get it. Enjoy following your build.
Hello Tinman..Been following along on your build. If I can get half of the results you are getting I will be really satisfied. You are doing a great job on yours. Thanks for the compliment on the motor. I am trying to get it there. I am hoping to get this truck looking as great as I can. I have had great luck with Rustoleum in the past. Glad you and Chef let me know about the torque. I enjoy building but having to go back and do rework does get old quick.
Nov 13, 2011 | 02:09 AM
#154
Thread Starter
Super Moderator
iTrader: (1)
Joined: Aug 2008
Posts: 11,787
Likes: 28
From: Anderson Missouri
How to Restore a Gas Tank
Well I have got my gas tank cleaned out really well. I still need to go back and coat it to keep grit from floating around and to keep it from rusting again. Wish I could of gotten some good before pics, but trust me it was bad.
I will go back and edit this page when I get to the next steps of getting it repaired.
I have done this a couple of other times and hope this helps someone else out there. One thing I want to mention is try to do this in the cooler weather. The fumes off of an empty gas tank is really dangerous because it is just a little bomb waiting for a spark.
In the colder weather it is safe.
Depending on how bad your rust is, you may not need to do all of these steps. This is worse case scenario.
First I get it empty and tap on the out side with a rubber hammer just to cause vibrations and to break up the big chunks. Then I add a few gallons of water and drop a couple of feet of chain and rock back and forth to break up even more rust and flush out with a hose. ( Water to avoid sparks)
Then I soak with white vinegar. On this tank I just had to soak for 4 or 5 days. I would go check on it every couple of days and finally started to see some shiney metal in there. There is still some small signs of rust but nothing like it was earlier. I then flushed it out with a water hose. As of now I am just letting it dry.
I need to get some Red Kote and there are other brands as well, I just like using this brand as I am use to it. I then pour it in and roll it around and coat everything. When done, I pour out the excess and give it a few days to dry.
This works really well and between the vinegar and Red Kote will probably have less then $40 into it. You still need to coat it as there will be grit about like sand that is just nearly impossible to get out. This will stop future rust issues. Red Kote I believe says you can just seal over the rust, but I like to get as much out as possible. I try to do it right.
Here are some other links you can try.
http://www.mopedarmy.com/wiki/Removi...rom_a_gas_tank
http://www.ehow.com/how_4540637_remo...-gas-tank.html
http://www.vjmog.com/ftopict-3687.html
I will get some pics up when I coat it.
Here are some after pics. Not the best view but it is looking through the Pickup assembly and Float assembly.

[IMG]http://i1098.photobucket.com/albums/g377/Terrys87/gastank1.jpg[/IMG
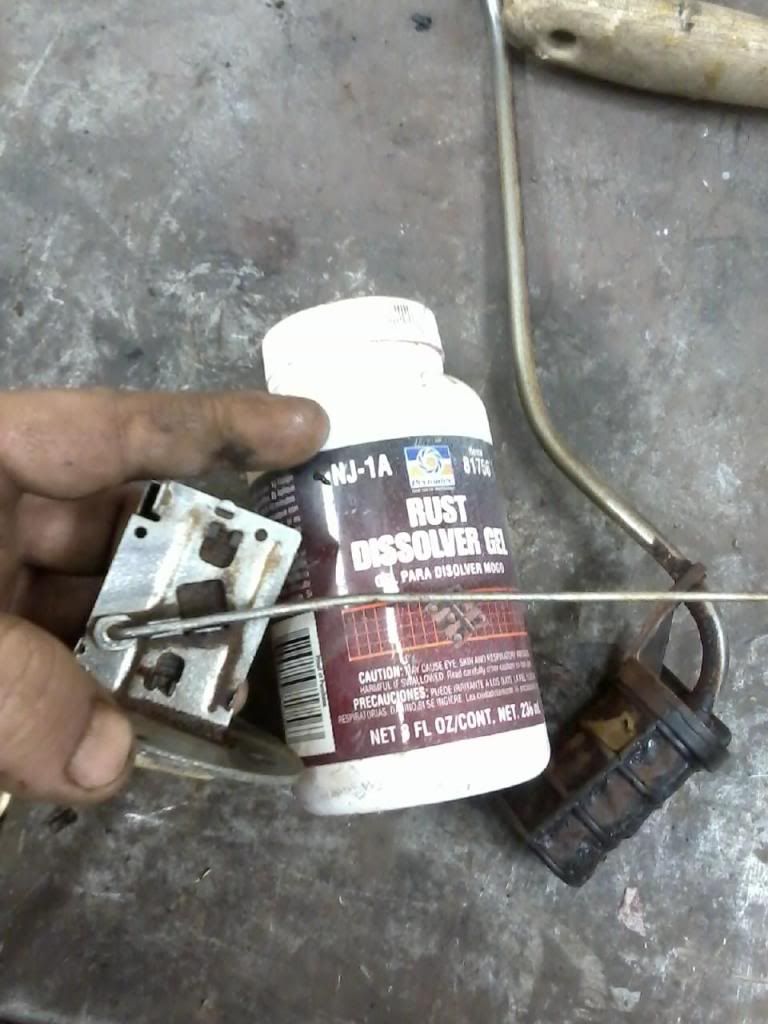
Here is the Red Kote I have been talking about.

I took a high pressure air hose and blew into the tank. That is rust dust on the tank. One reason you should seal it.

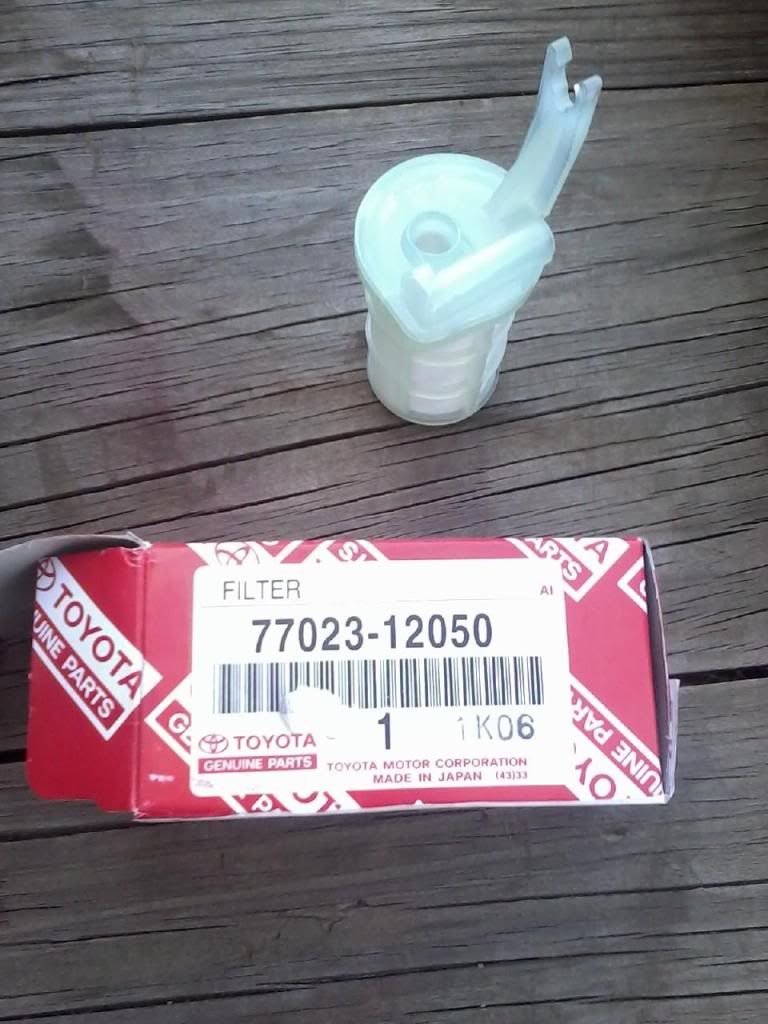
Here is what it should look like when done.

Part number for a new intank filter is #77023-12050. On ebay it is called a TOYOTA FACTORY NIB FUEL FILTER SUCTION TUBE DIESEL. It was selling for $4.50 when I finally found it. I paid $15 at Toyota.
Well I have got my gas tank cleaned out really well. I still need to go back and coat it to keep grit from floating around and to keep it from rusting again. Wish I could of gotten some good before pics, but trust me it was bad.
I will go back and edit this page when I get to the next steps of getting it repaired.
I have done this a couple of other times and hope this helps someone else out there. One thing I want to mention is try to do this in the cooler weather. The fumes off of an empty gas tank is really dangerous because it is just a little bomb waiting for a spark.
In the colder weather it is safe.
Depending on how bad your rust is, you may not need to do all of these steps. This is worse case scenario.
First I get it empty and tap on the out side with a rubber hammer just to cause vibrations and to break up the big chunks. Then I add a few gallons of water and drop a couple of feet of chain and rock back and forth to break up even more rust and flush out with a hose. ( Water to avoid sparks)
Then I soak with white vinegar. On this tank I just had to soak for 4 or 5 days. I would go check on it every couple of days and finally started to see some shiney metal in there. There is still some small signs of rust but nothing like it was earlier. I then flushed it out with a water hose. As of now I am just letting it dry.
I need to get some Red Kote and there are other brands as well, I just like using this brand as I am use to it. I then pour it in and roll it around and coat everything. When done, I pour out the excess and give it a few days to dry.
This works really well and between the vinegar and Red Kote will probably have less then $40 into it. You still need to coat it as there will be grit about like sand that is just nearly impossible to get out. This will stop future rust issues. Red Kote I believe says you can just seal over the rust, but I like to get as much out as possible. I try to do it right.
Here are some other links you can try.
http://www.mopedarmy.com/wiki/Removi...rom_a_gas_tank
http://www.ehow.com/how_4540637_remo...-gas-tank.html
http://www.vjmog.com/ftopict-3687.html
I will get some pics up when I coat it.
Here are some after pics. Not the best view but it is looking through the Pickup assembly and Float assembly.
[IMG]http://i1098.photobucket.com/albums/g377/Terrys87/gastank1.jpg[/IMG
Here is the Red Kote I have been talking about.
I took a high pressure air hose and blew into the tank. That is rust dust on the tank. One reason you should seal it.
Here is what it should look like when done.
Part number for a new intank filter is #77023-12050. On ebay it is called a TOYOTA FACTORY NIB FUEL FILTER SUCTION TUBE DIESEL. It was selling for $4.50 when I finally found it. I paid $15 at Toyota.
Last edited by Terrys87; Oct 21, 2014 at 11:15 PM.
Nov 13, 2011 | 10:26 AM
#155
Thread Starter
Super Moderator
iTrader: (1)
Joined: Aug 2008
Posts: 11,787
Likes: 28
From: Anderson Missouri
Went to get a new filter/sock for the tank and parts store doesnt have one. I have checked Ebay, Toyota parts East and several searches on the web. It may no longer be available. I will check my local Toyota dealer Monday or Tuesday.
At end of Pickup Tube. Didnt think it would be so hard to find.
At end of Pickup Tube. Didnt think it would be so hard to find.
Last edited by Terrys87; Oct 2, 2014 at 11:52 PM.
Nov 13, 2011 | 10:35 AM
#156
Thread Starter
Super Moderator
iTrader: (1)
Joined: Aug 2008
Posts: 11,787
Likes: 28
From: Anderson Missouri
Doesnt look like much. Got Oil Pump,Water Pump, Passenge Motor Mount, and Dipstick on. Got the Oil Pan and Gast Tank cleaned and painted. Got some of the EGR cleaned up. I will be making a block off plate for it. Cleaning takes ALOT of time.
Today I will be sealing up the tank and putting it back togther. I want to get a new filter on the pick up tube, but may have to come up with something else.

Today I will be sealing up the tank and putting it back togther. I want to get a new filter on the pick up tube, but may have to come up with something else.
Nov 14, 2011 | 01:46 AM
#160
Thread Starter
Super Moderator
iTrader: (1)
Joined: Aug 2008
Posts: 11,787
Likes: 28
From: Anderson Missouri
Thanks 92 Toy,Outsane and Jason. I finished my gas tank and just got done adding more info to the gas tank restore. I have been trying to make this build as helpful as I hope my 88 build is to others. I have gotten alot of PM on the 88. Just havent been able to come up with some fixes for this build yet.
I know you guys have seen my tank restore but figured I would add it to here as some truck generations dont look at other generations.
I will be putting the tank on the truck soon. I am still looking for the filter for the end of the pick up tube.Urrggh!! But if I do find it, it will be easy to go back and add it on later.
I am about as far as I can go with the motor for awhile. With Christmas and Thanksgiving coming up, it is going to slow down some. So close to hearing this thing run yet so far. Still missing some pieces.
I still have some small touch up I need to do on the passenger door and get the inner fenders and jams in primer and paint. I will probably start doing some work on the bed if I run out of other things that I can do that dont requirer any funds. I will find something to keep moving on.
I should be putting my frfiends truck in primer and get that wrapped up fairly soon. Then I will be having alot more time to add to this project.


