
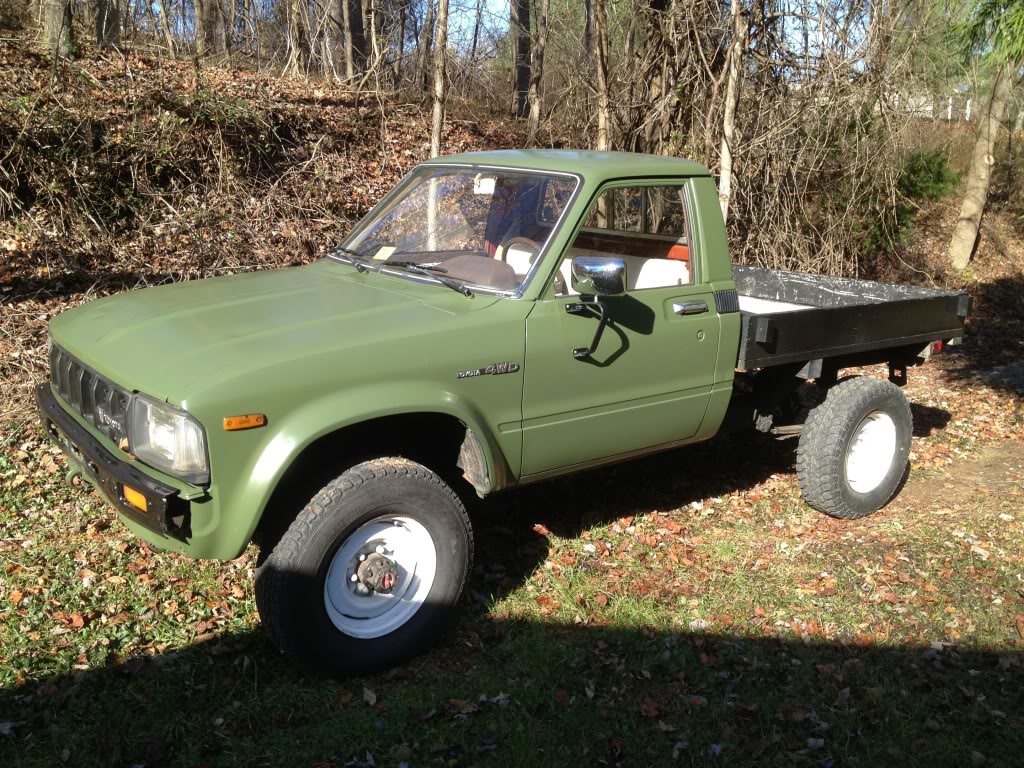
1983 Toyota Pickup.
 Nov 22, 2013 | 12:36 PM
#1

Thread Starter
Registered User
Joined: Nov 2013
Posts: 83
Likes: 0
1983 Toyota Pickup.
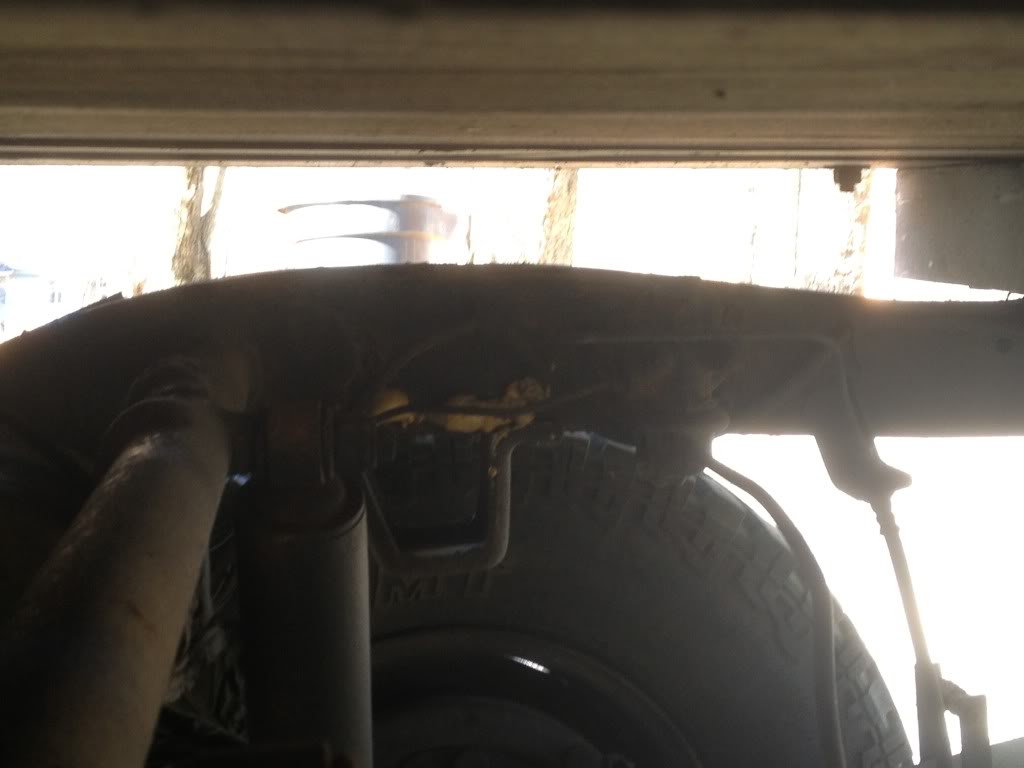
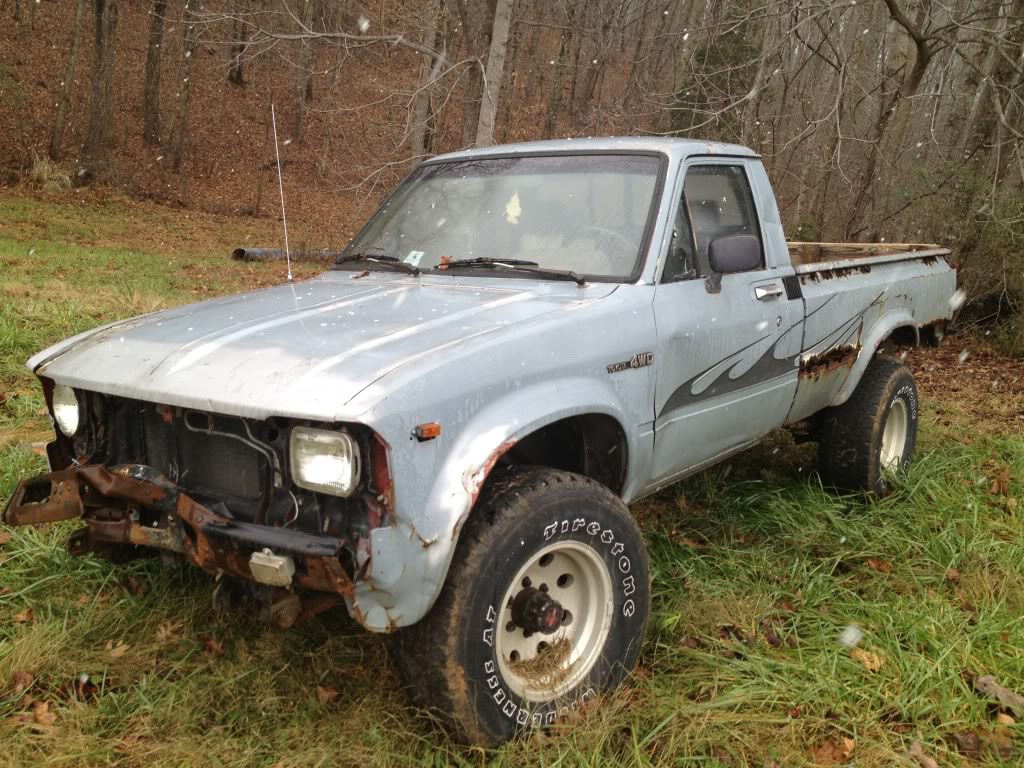
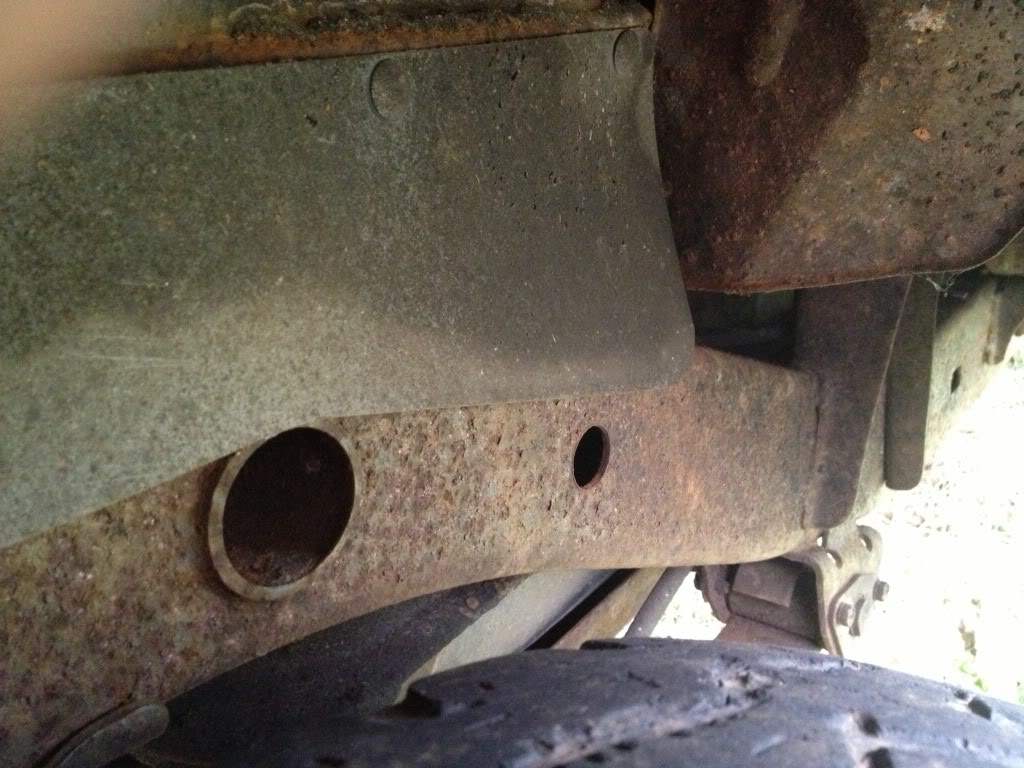
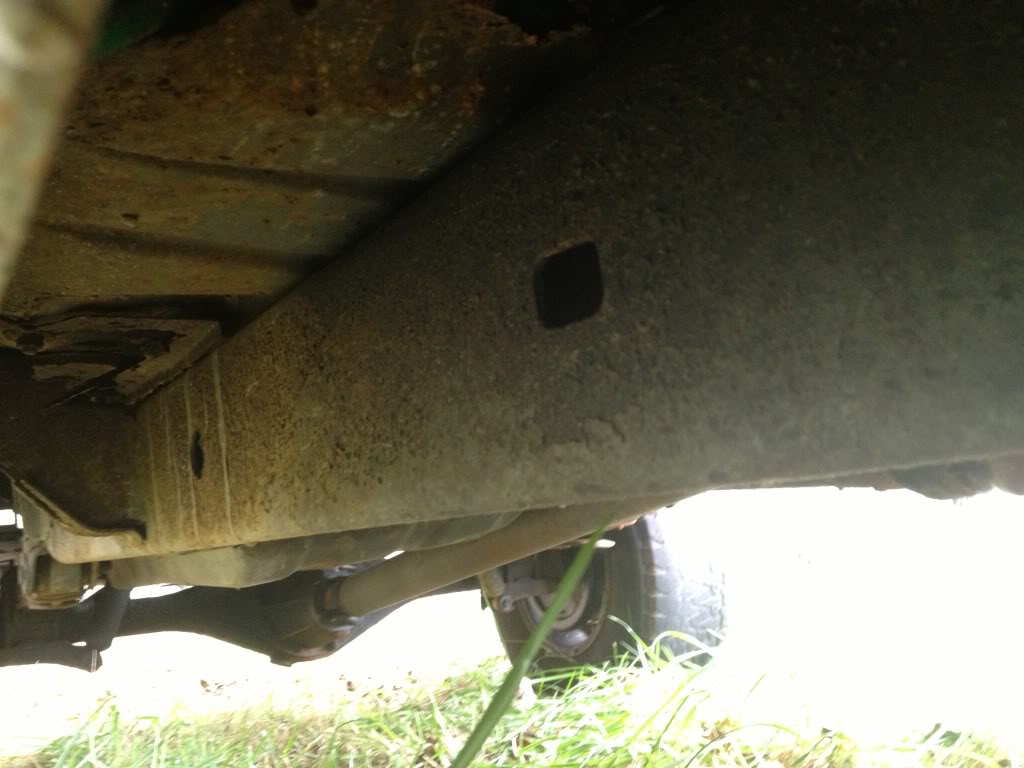
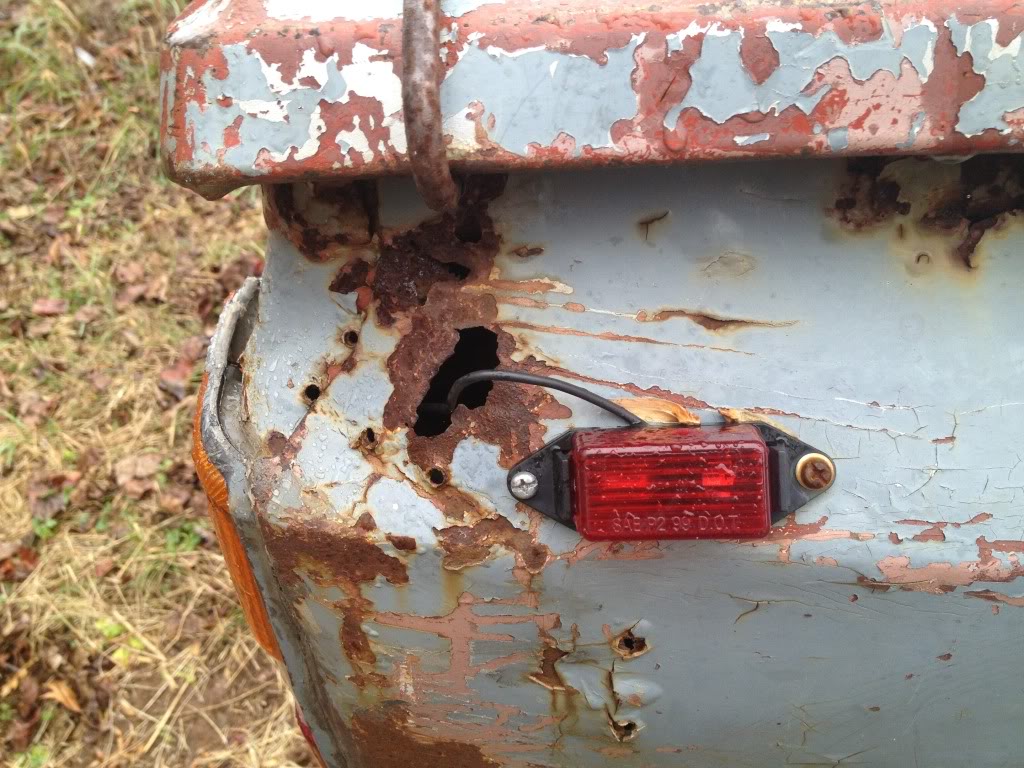
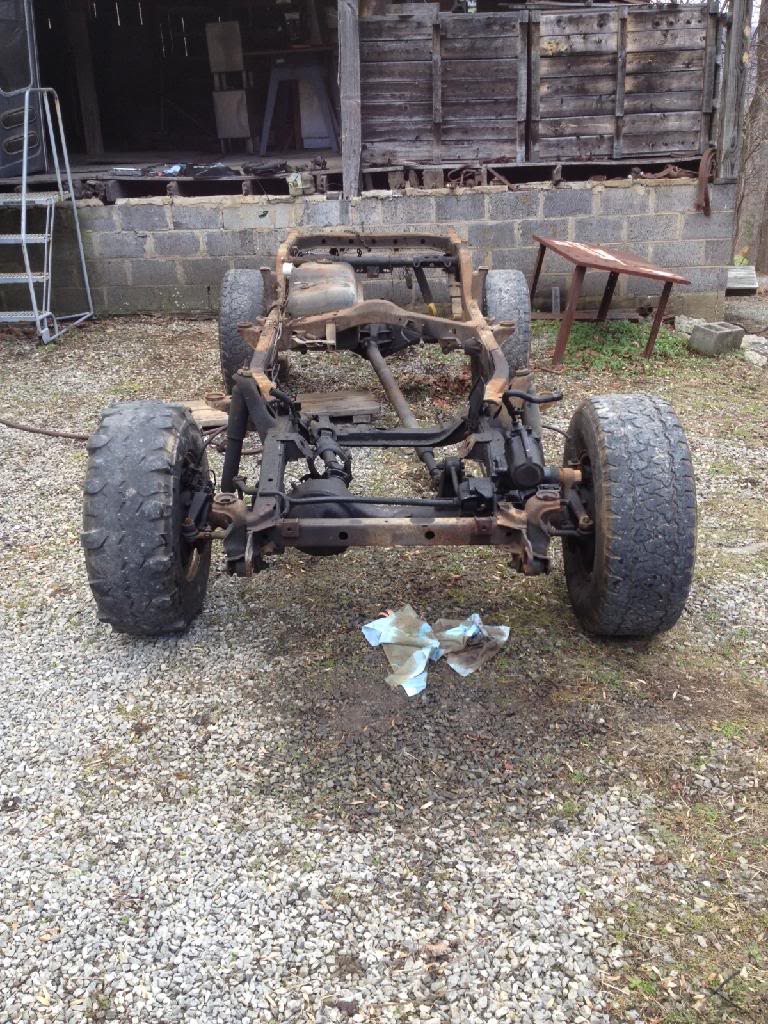
Hey all, new member here, I recently picked up an 83 pickup for $1300. Here are some pictures:

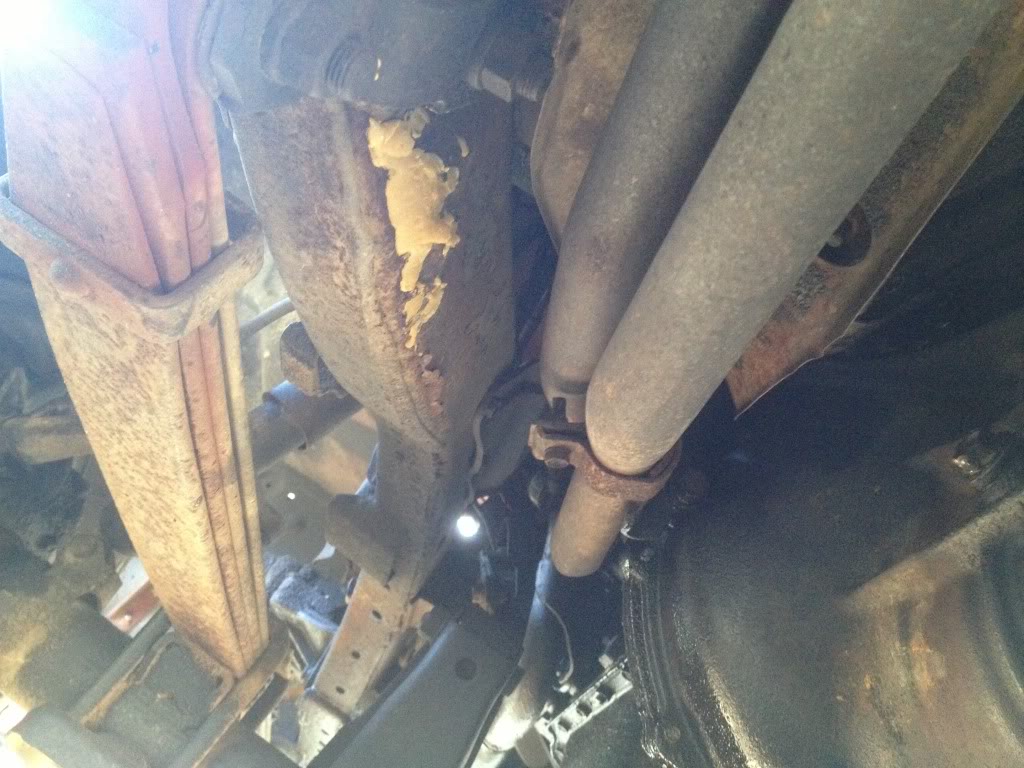
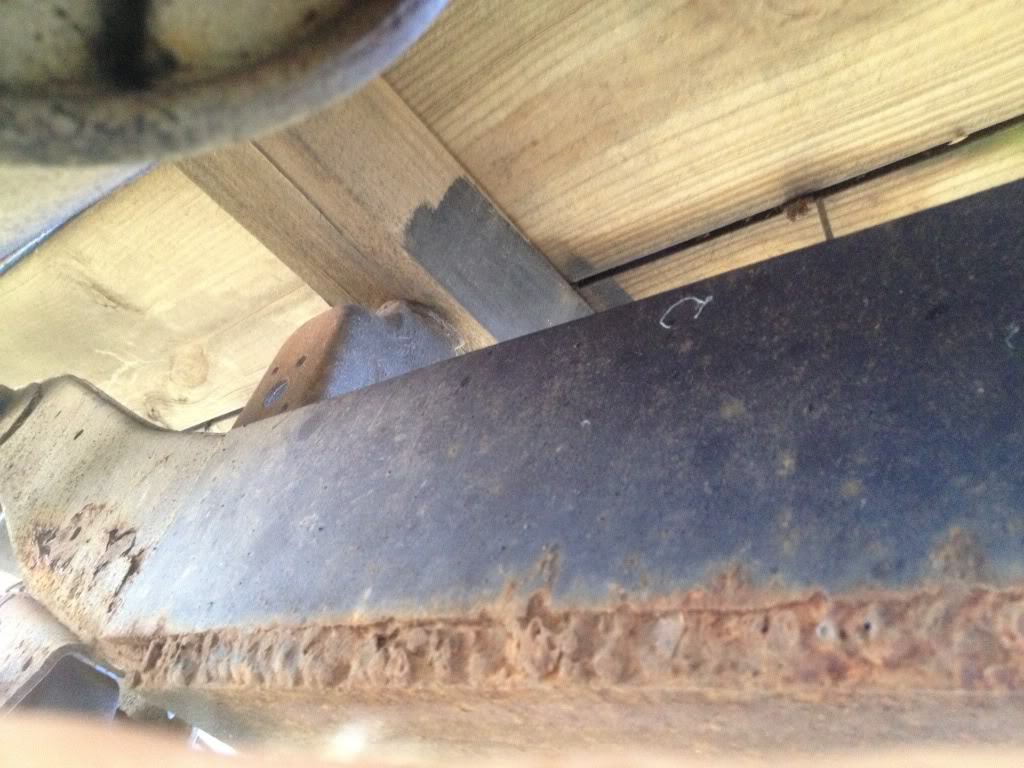
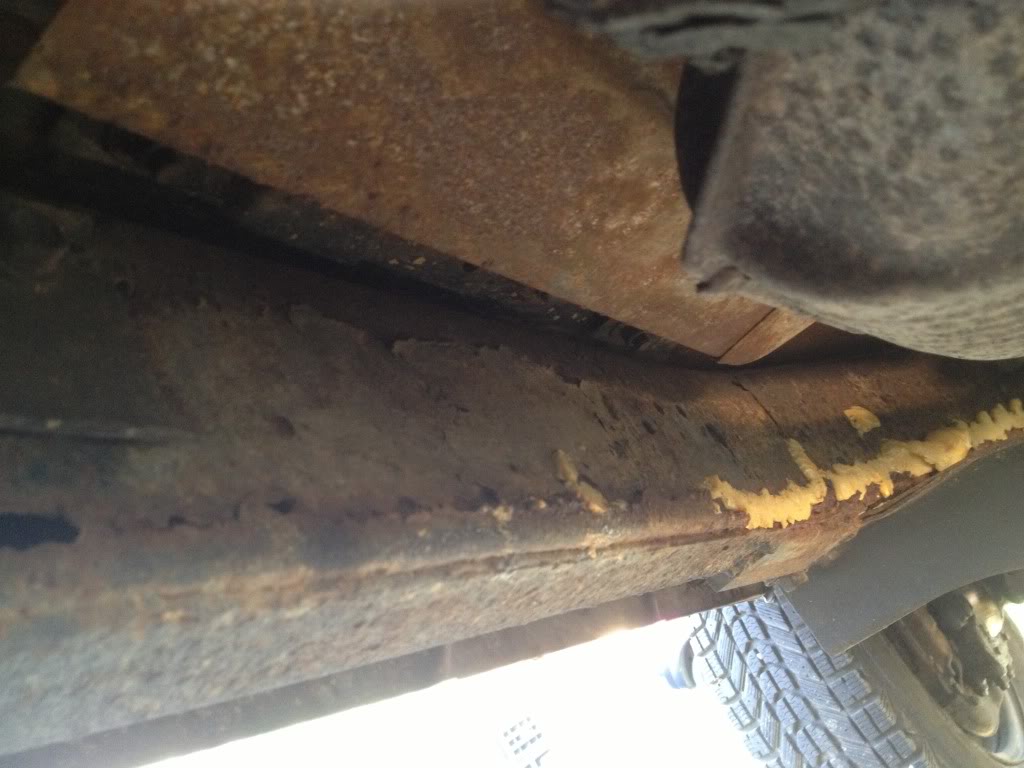
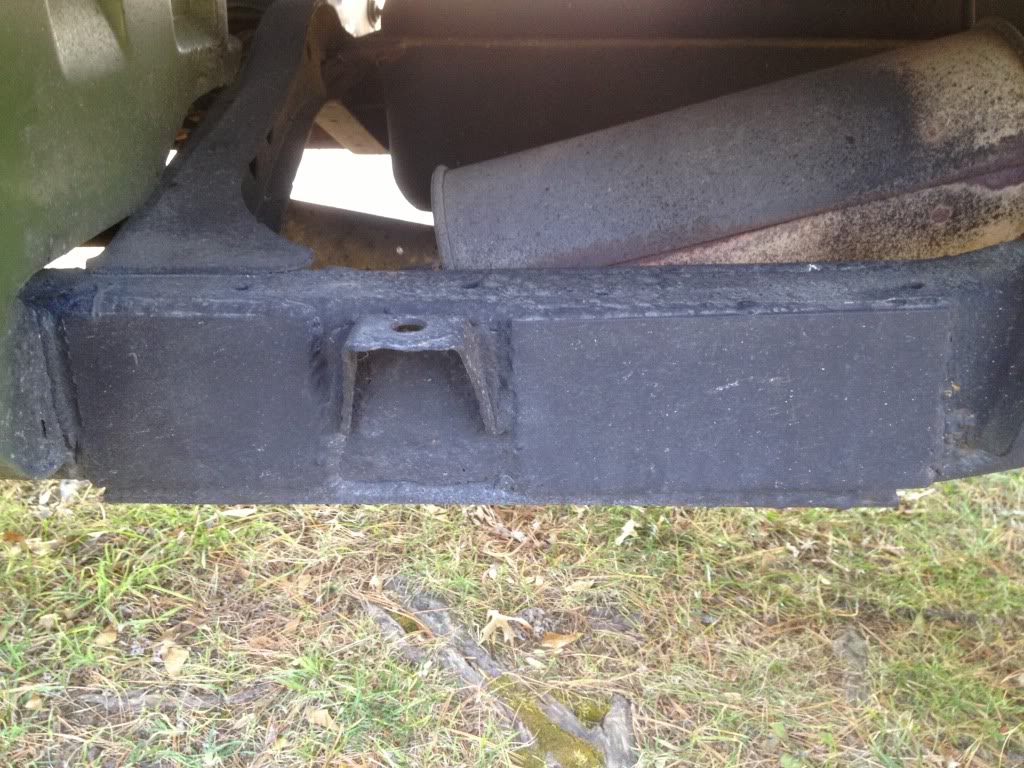
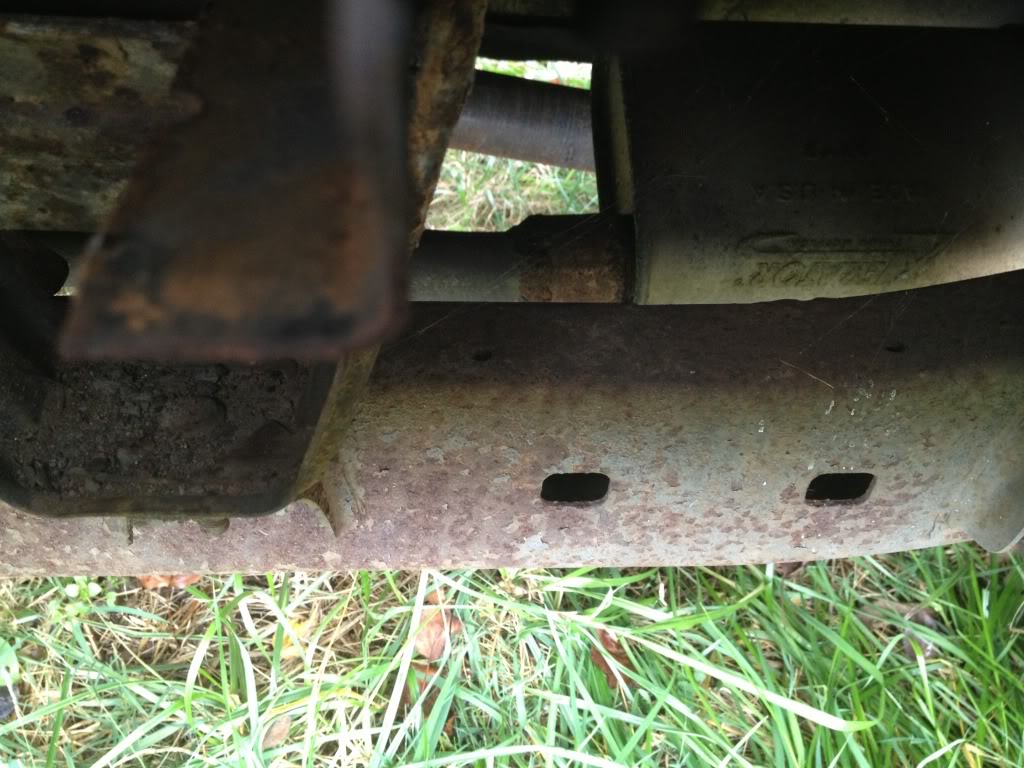
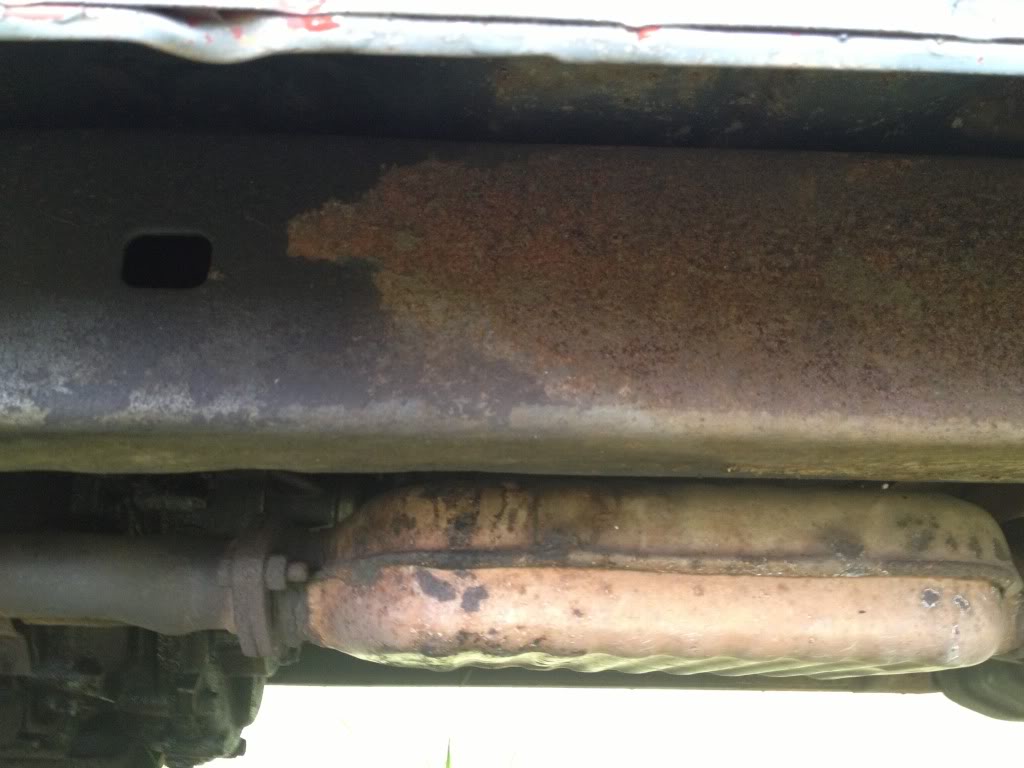
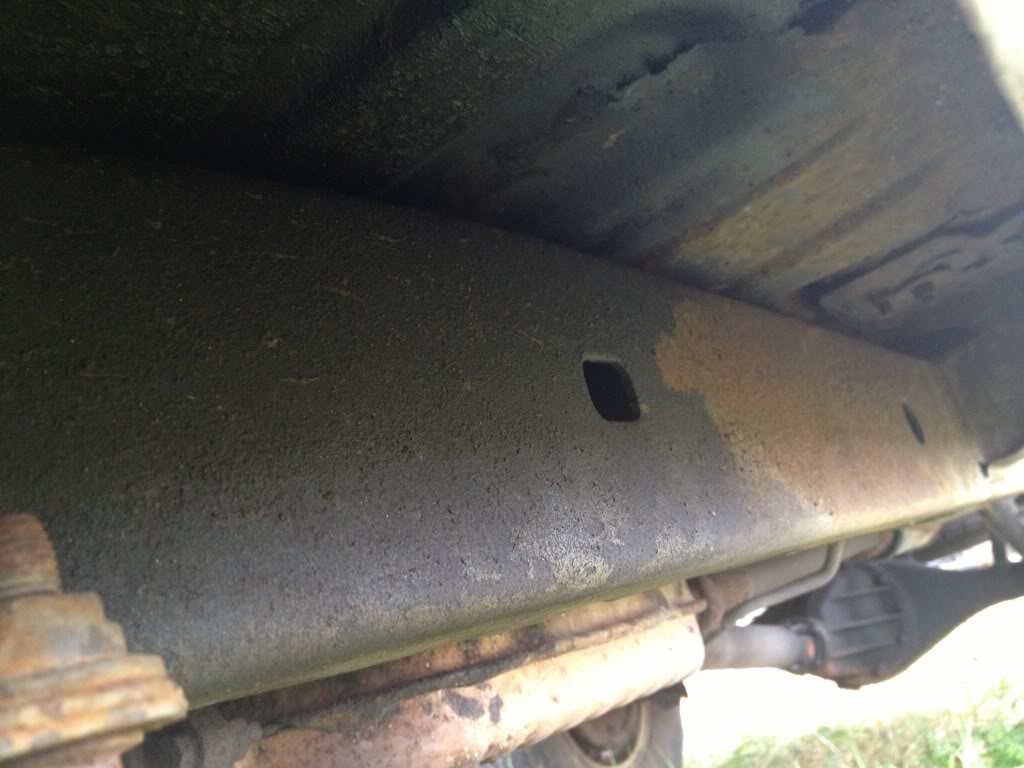
And now on to the rust.....
Let me know what you guys think. I'd like to make this into a trail worthy truck. I don't intend on restoring it.


And now on to the rust.....


Let me know what you guys think. I'd like to make this into a trail worthy truck. I don't intend on restoring it.
Last edited by Cab4you26; Feb 21, 2014 at 01:16 PM.
Nov 22, 2013 | 12:40 PM
#2
Registered User
Joined: May 2010
Posts: 2,587
Likes: 7
From: Ofallon Missouri
Welcome. She has the cancer. Looks like some stuffed her full of great foam?
Run it and she may break in half/may not. Or get to cutting and plating. I fear you may open a can o worms when you get to poking on that frame.
I would avoid highway for sure. Prolly not let kids in it at more than 20 mph.
Other than the frame looks good. Love first gens. You gonna poke on the frame some?
Nov 22, 2013 | 12:45 PM
#3

that's not too bad, a lot of our frames was worse when we started with them, and the body looks really good! To repair I suggest taking the cab and bed off, makes it a lot easier to start cutting and plating and it's not very hard to do.
Nov 22, 2013 | 12:46 PM
#4
Thread Starter
Registered User
Joined: Nov 2013
Posts: 83
Likes: 0
Oh I've already poked. In the third rust picture, I beat the frame pretty good and the side started caving in. Also, in the picture where it has been plated, behind the plate, I beat that with a hammer and it also did the same thing. I need to make some templates to get those spots covered. I'm also looking at a frame tomorrow.
Nov 22, 2013 | 01:01 PM
#6
Thread Starter
Registered User
Joined: Nov 2013
Posts: 83
Likes: 0
It runs and drives ok. I experienced death wobble for the first time in this truck, which I will address later. I went over a bridge with a big bump and it started coming on. For some reason the PO put a bungee core around the steering shaft because there is a bad vibration somewhere and he said it helped. I plan to address that later, too. It leaks some fluids. It starts up every time, though, shifts good and 4wd works well.
Trending Topics
Nov 27, 2013 | 10:28 AM
#8
Thread Starter
Registered User
Joined: Nov 2013
Posts: 83
Likes: 0
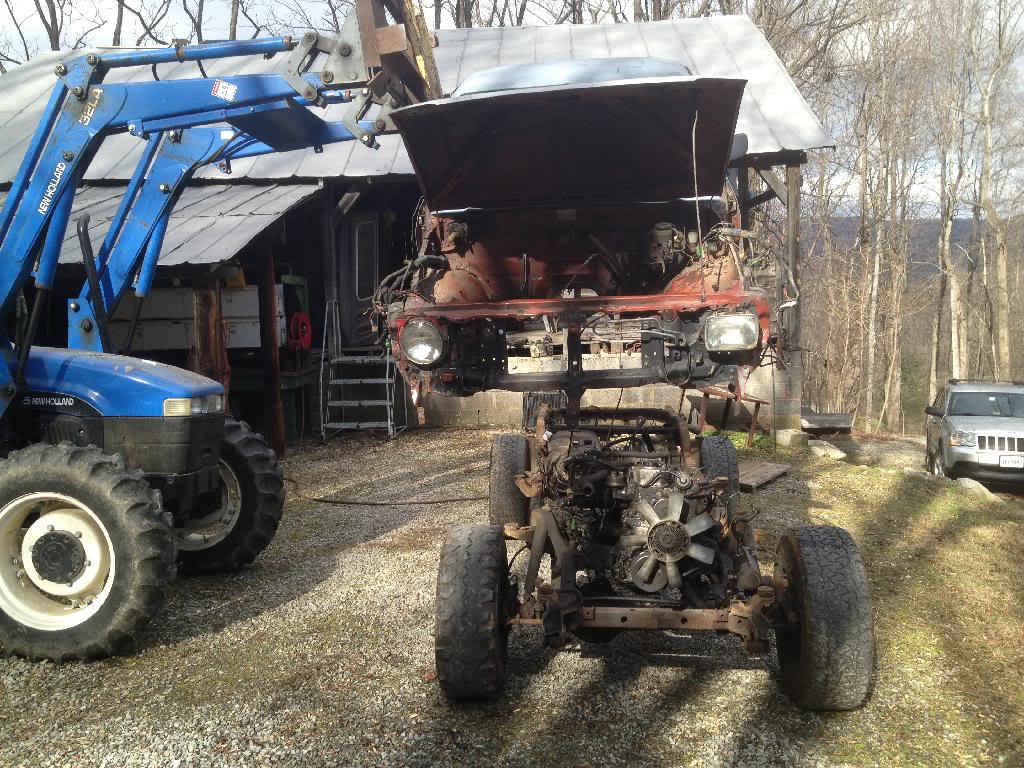
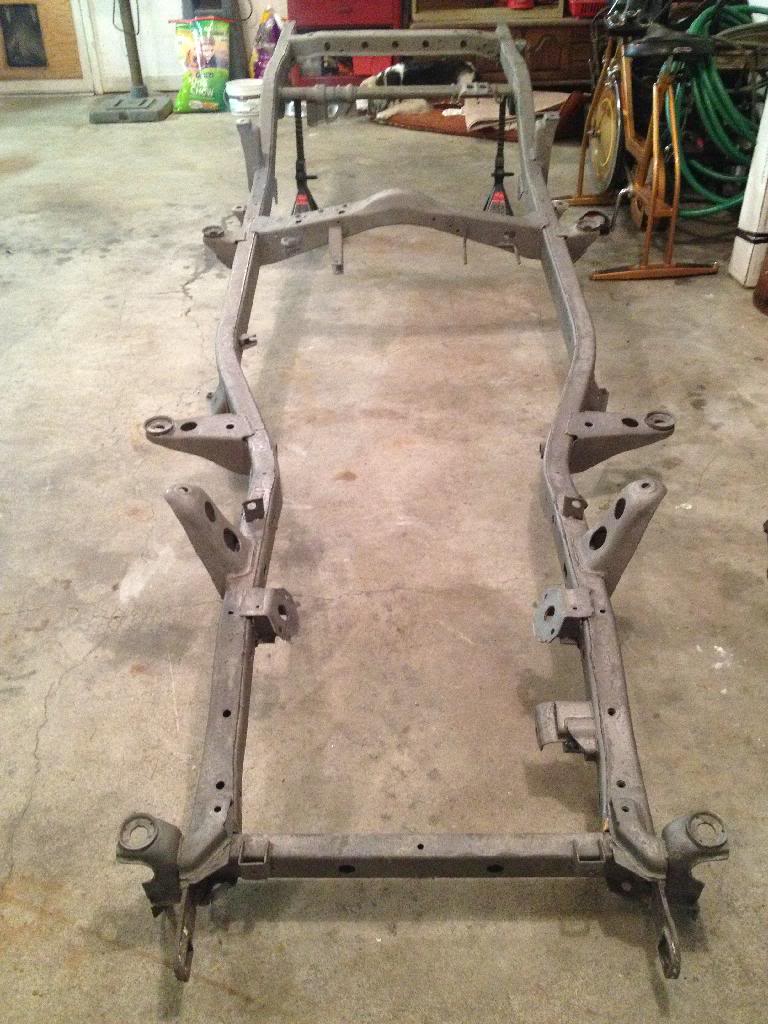
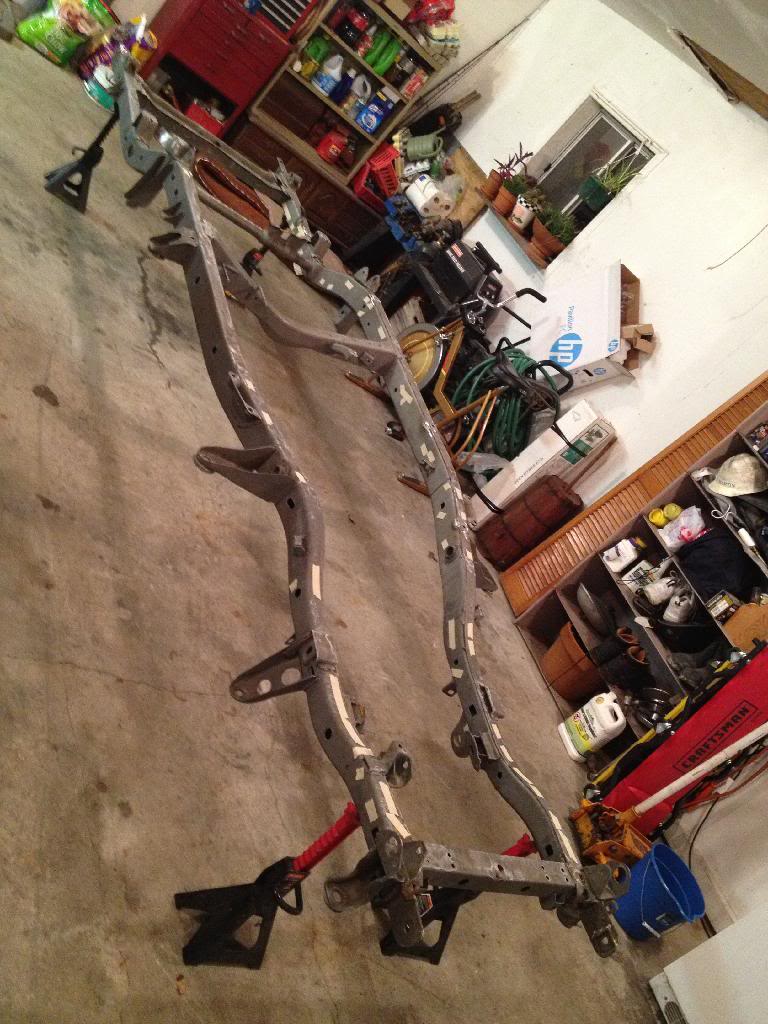
No real updates here, but a friend I work with who built this:
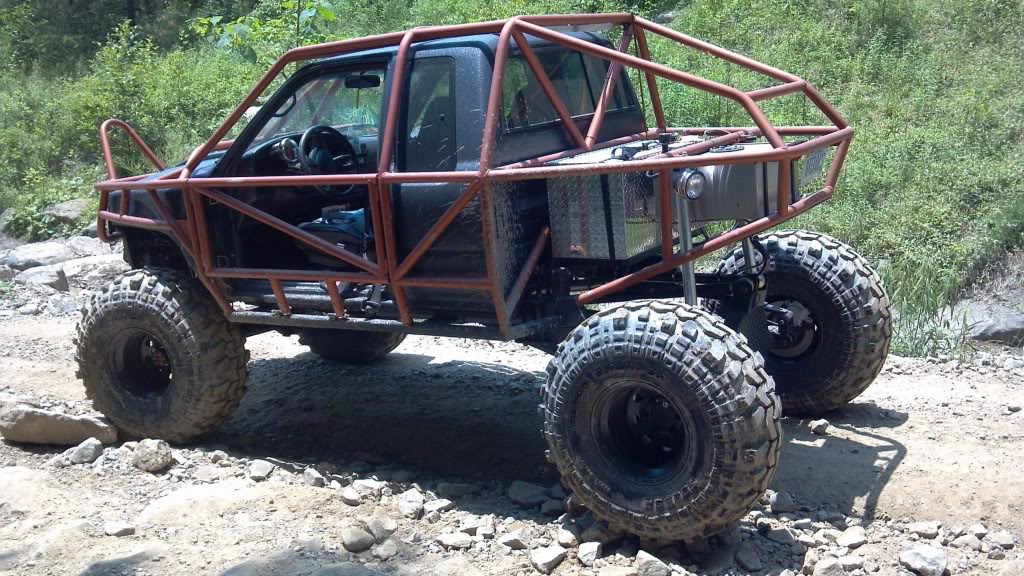
Has this:
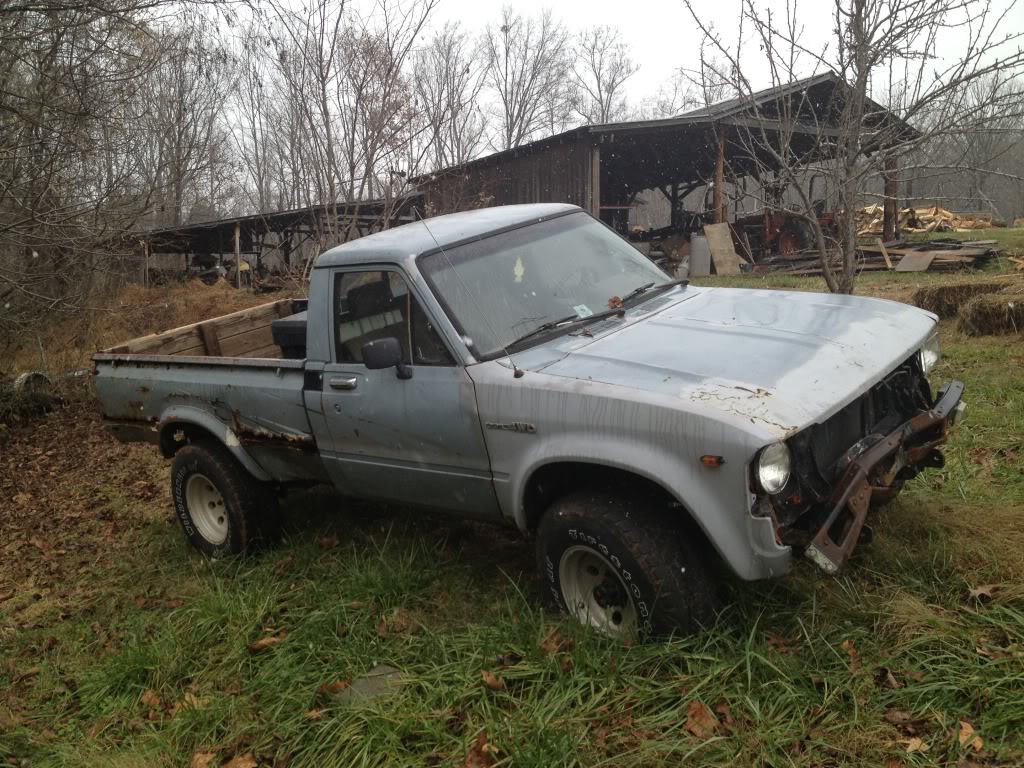
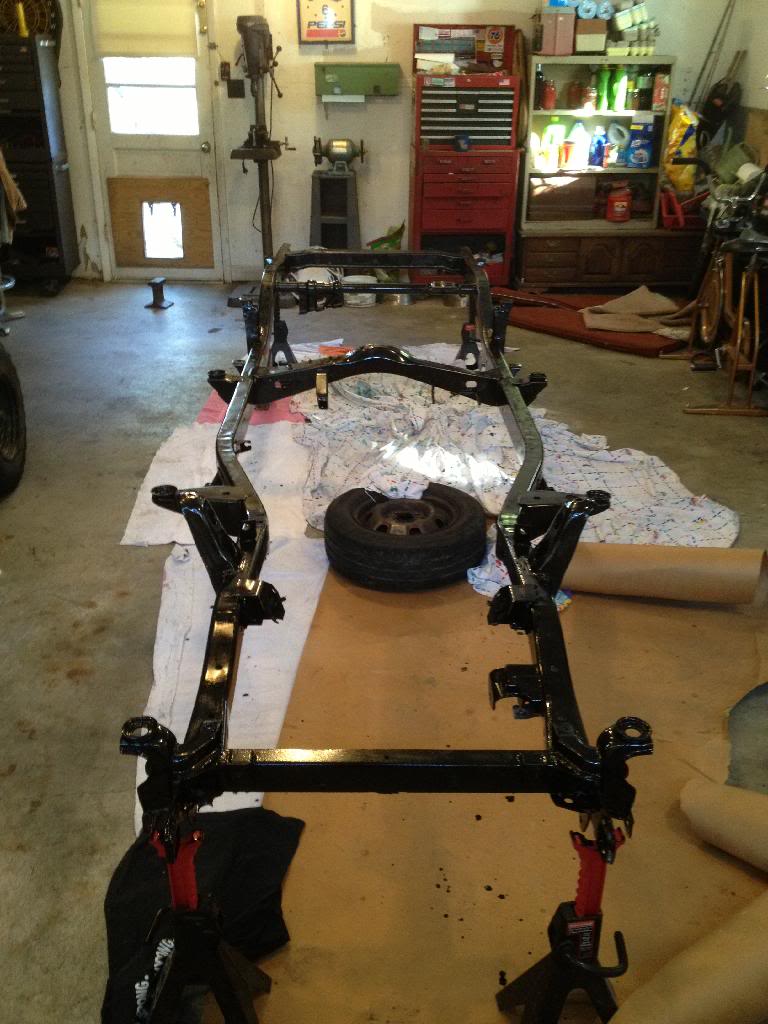
It's was a Cali truck 10 or so years ago, and has a good useable frame.
He said I could have the frame for a couple hundred. I just have to tear it apart. He wants the drivetrain for a buggy. I also have to find a place to work on it. I have to try and persuade my parents to let me use their garage LOL.
Rust is good for something!
Has this:


It's was a Cali truck 10 or so years ago, and has a good useable frame.


He said I could have the frame for a couple hundred. I just have to tear it apart. He wants the drivetrain for a buggy. I also have to find a place to work on it. I have to try and persuade my parents to let me use their garage LOL.

Rust is good for something!
Last edited by Cab4you26; Feb 21, 2014 at 01:29 PM.

 Dec 15, 2013 | 11:00 AM
#10
Thread Starter
Registered User
Joined: Nov 2013
Posts: 83
Likes: 0
I made some good progress today on the donor truck. We pulled the cab, engine, tranny, and transfer case.
I'd like to figure out a way to clean up the inside of the frame somehow. I'm planning on using POR15 for the outside, and the inside will get coated with an internal frame paint made by Eastwood.


I'd like to figure out a way to clean up the inside of the frame somehow. I'm planning on using POR15 for the outside, and the inside will get coated with an internal frame paint made by Eastwood.
Last edited by Cab4you26; Feb 21, 2014 at 01:34 PM.
Dec 18, 2013 | 06:27 AM
#11
Thread Starter
Registered User
Joined: Nov 2013
Posts: 83
Likes: 0
I removed the rest of the drivetrain yesterday down to a bare frame. There is a place in Burlington, NC that does acid dipping. The guy said it'd cost $375 to do my frame, and it'd come out as bare metal, inside and out. Since my stepdad is the one with the car trailer, if he is down for the drive, then that's probably what I'll do. If not ill just try and make it fit in the bed of my F150
Jan 16, 2014 | 05:01 PM
#14
Thread Starter
Registered User
Joined: Nov 2013
Posts: 83
Likes: 0
I picked up from frame today from being acid dipped. I made a mistake, though, that needs to be addressed before anything else. I drilled drain holes in the frame to let water and dirt get out. I've only done one side of the frame. The problem is I've drilled them 1 inch on a 2.5 inch frame. The wholesaw bit looked smaller at the time lol. Anyway, i think I'm going to weld a washer with a 0.5 inch hole in it over the 1 inch holes. That's the only thing I can think of that might save me, do you guys have any suggestions? Here are some pictures:
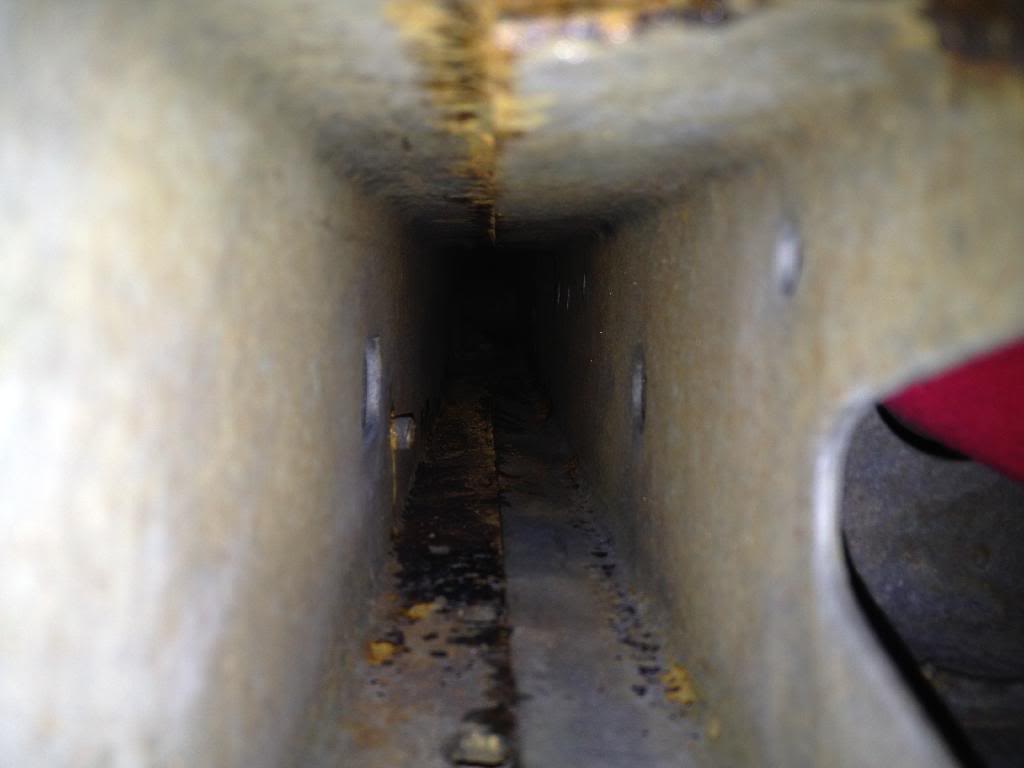
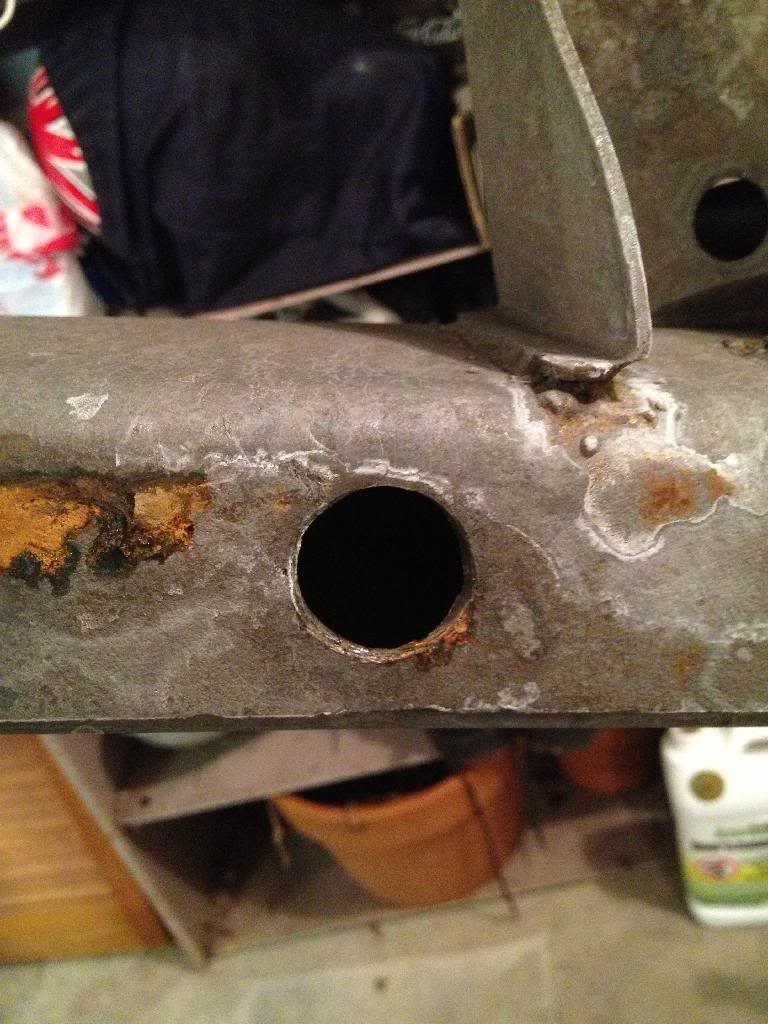
The last picture is the size of the drain holes.
Also, I found a guy with a parts truck. He has a instrument cluster with a factory tach for $80.00. And another guy has an IFS steering box for $75.00. Do these seem like fair prices? The instrument cluster seems high to me.


The last picture is the size of the drain holes.
Also, I found a guy with a parts truck. He has a instrument cluster with a factory tach for $80.00. And another guy has an IFS steering box for $75.00. Do these seem like fair prices? The instrument cluster seems high to me.
Last edited by Cab4you26; Feb 21, 2014 at 01:37 PM.
Jan 16, 2014 | 07:07 PM
#15
I wouldn't worry about the holes. It's a fully boxed frame so it has plenty of strength. Besides, you're going to want those holes to get a shutz gun in there when you go to shoot the inside of the frame with a rust inhibitor. I would also recommend drilling a hole in the bottom of the frame in the bend where is narrows just in front of the front shackle hangers. That's where water tends to collect and sit which causes rust issues. Maybe not a 1" hole but 1/2" would do. While you're at it, look at your old rusted out frame and drill a hole in the bottom of the new frame in all the locations that the old one rusted out. The old frame should be a good map to show you what you need to do to prevent rust.
As for the parts, seems like a good deal if they are in decent shape.
As for the parts, seems like a good deal if they are in decent shape.
Last edited by kawazx636; Jan 16, 2014 at 07:11 PM.
Jan 16, 2014 | 07:29 PM
#16
Thread Starter
Registered User
Joined: Nov 2013
Posts: 83
Likes: 0
Well my original thinking was if the hole is out of the bend in the frame then id be ok. So basically as long as its drilled on flat metal. I went off the rust spots in my old frame as a guide to drill my holes. There are four of them. One in the rear portion, about in the middle of the tubular bar and the crossmember for the spare tire. One of them is in front of the front spring hanger for the rear springs (there was a small hole here so I utilized it). Another in the middle of the frame, and the last one is a few inches behind the transfer case crossmember. I will get some pictures. As for the internal paint. There are plenty of holes in the sides of the frame I can take advantage of, and I can also use the drain holes. I bought two cans of the eastwood internal frame paint. It came with a 24inch hose so I should be good as far as coverage goes.
Jan 20, 2014 | 03:21 PM
#17
Thread Starter
Registered User
Joined: Nov 2013
Posts: 83
Likes: 0
Welded up the holes with some 1/2 washers today, and started painting the inside of the frame.
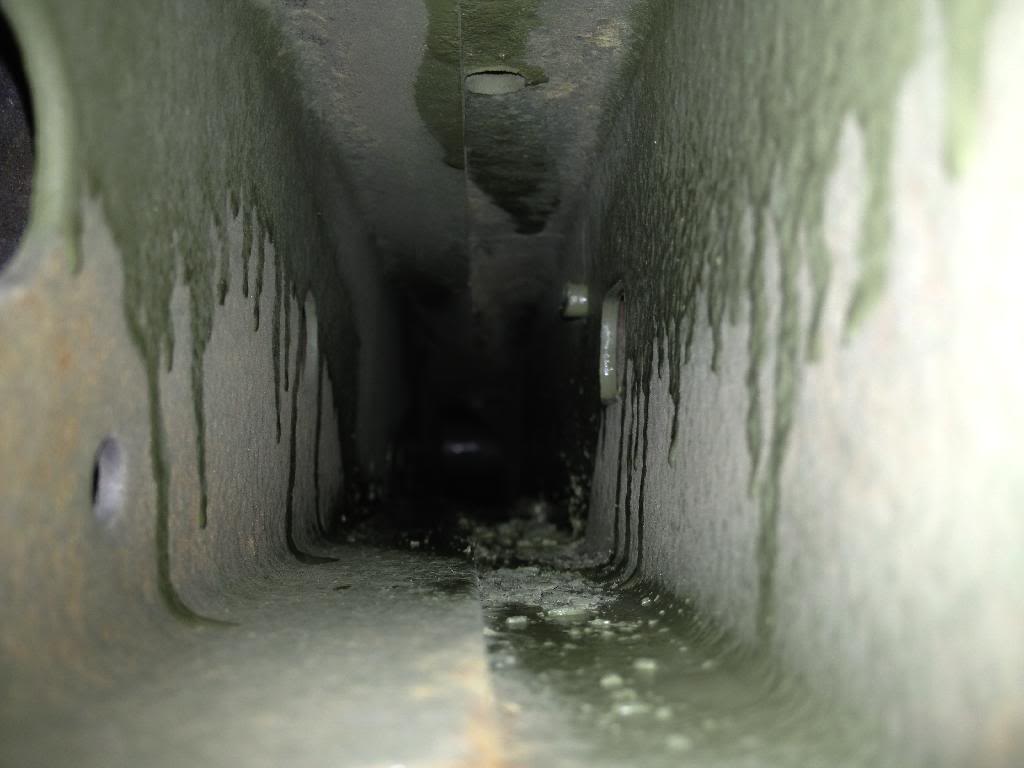
In the last picture you can see the paint coverage. The Eastwood internal frame paint is supposed to be a 360 degree nozzle. It has four holes in it. You can see where it hit the bottom, top, and sides. I used up two cans and I'm ordering some more. A friend of mine used one or two I think on a build he is doing, but I don't know how he got away with using so little. In other parts of the frame it looks like it only hit the bottom. I thought the coverage it provided was very inconsistent. Some people talked like one can last awhile, but I only got one can per side done, and it's still not even close to being fully covered. I taped the hose to a clothes hanger line to try and cover it as best I could. We'll see what happens the next time around.


In the last picture you can see the paint coverage. The Eastwood internal frame paint is supposed to be a 360 degree nozzle. It has four holes in it. You can see where it hit the bottom, top, and sides. I used up two cans and I'm ordering some more. A friend of mine used one or two I think on a build he is doing, but I don't know how he got away with using so little. In other parts of the frame it looks like it only hit the bottom. I thought the coverage it provided was very inconsistent. Some people talked like one can last awhile, but I only got one can per side done, and it's still not even close to being fully covered. I taped the hose to a clothes hanger line to try and cover it as best I could. We'll see what happens the next time around.
Feb 10, 2014 | 02:07 PM
#19
Thread Starter
Registered User
Joined: Nov 2013
Posts: 83
Likes: 0
I picked up a shutz gun and Rust Fighter made by 3m. So far I'm pleased with the results. While painting the inside of the frame I noticed a spot that had rusted through. So I cut the bad spot out and fitted a piece for it:
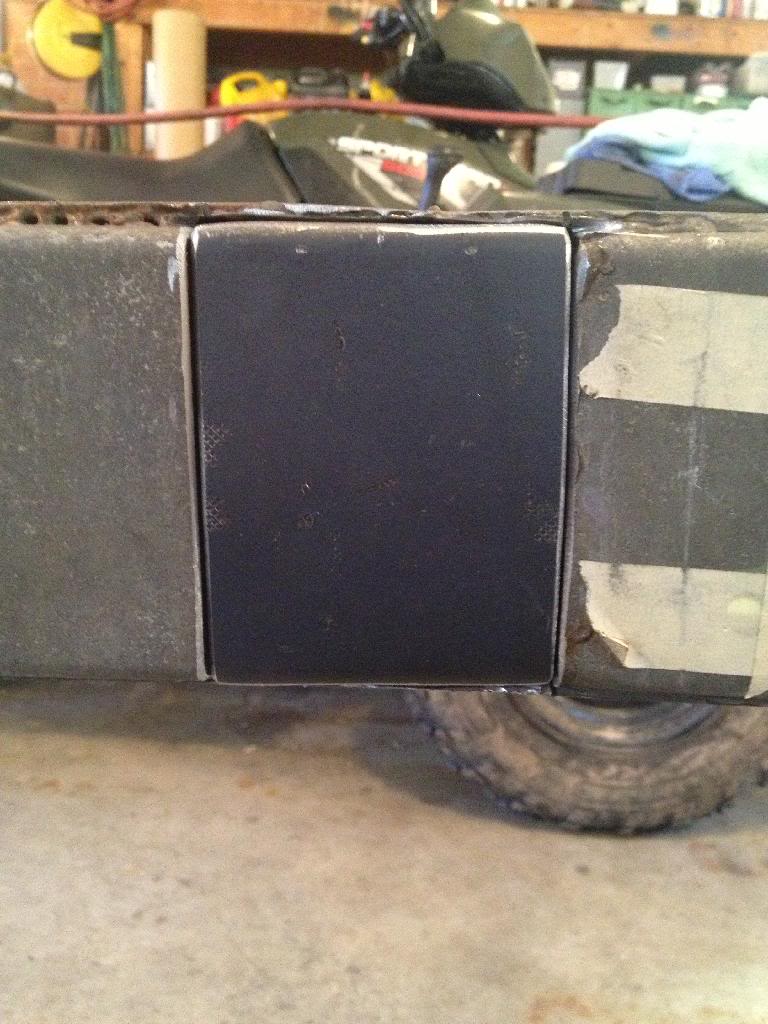
We originally tried welding it in the my stepdad's 110, but it didn't cut it:
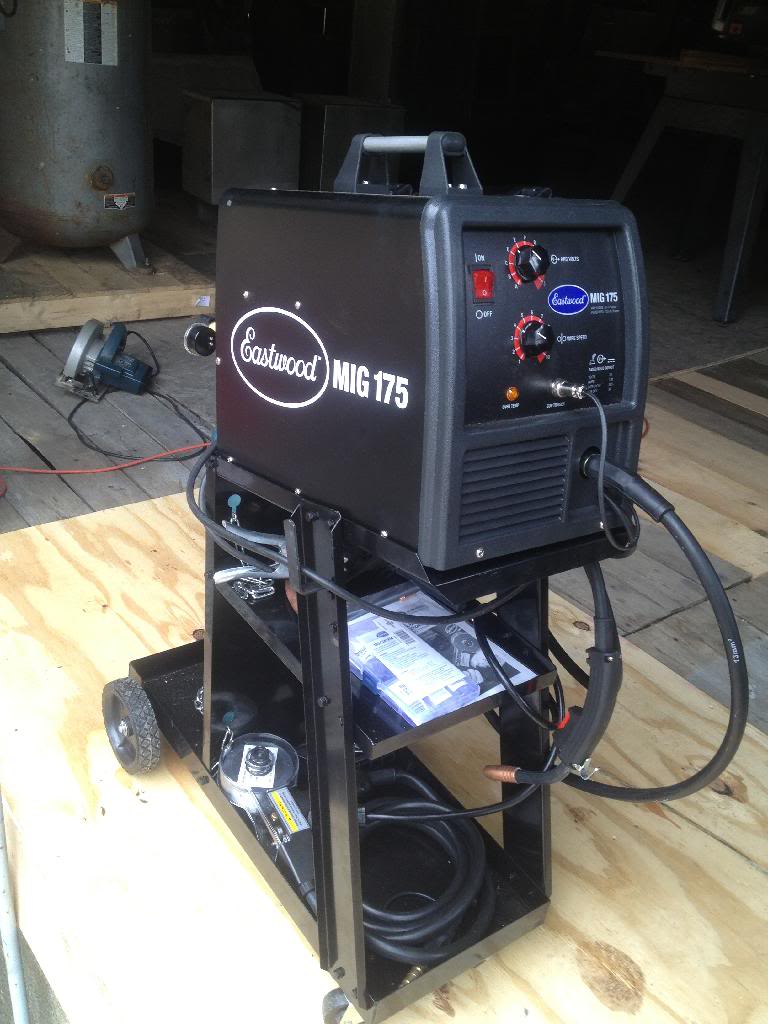
I ended up buying a welder:
My welds after day 2 and some free advice:
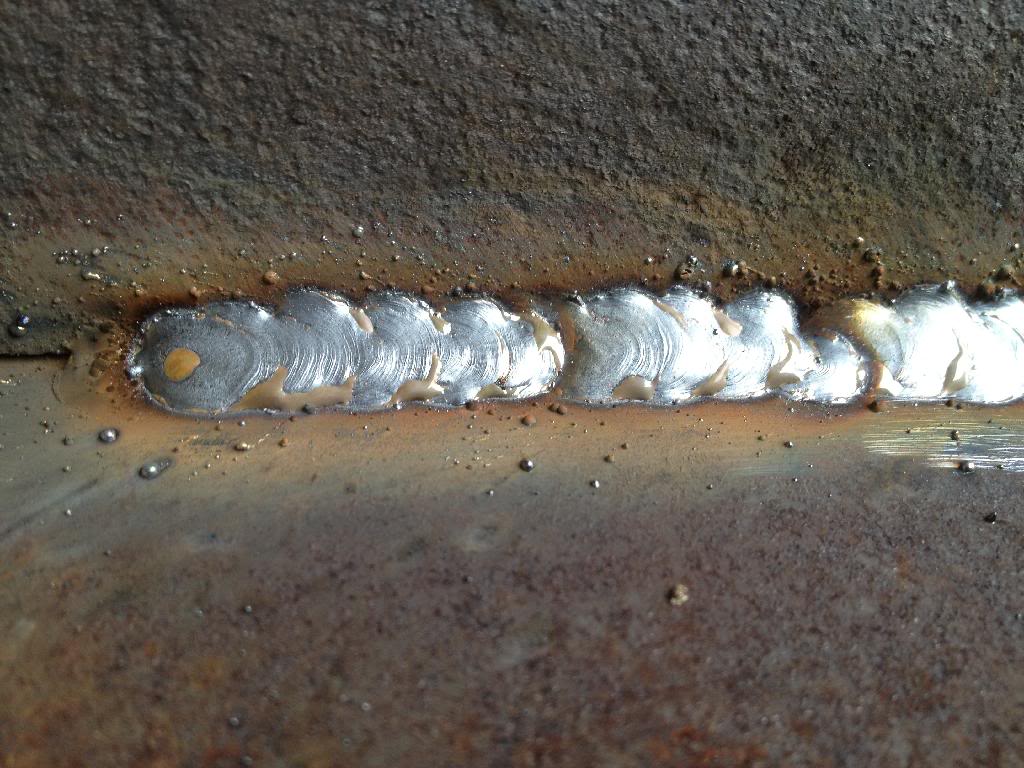
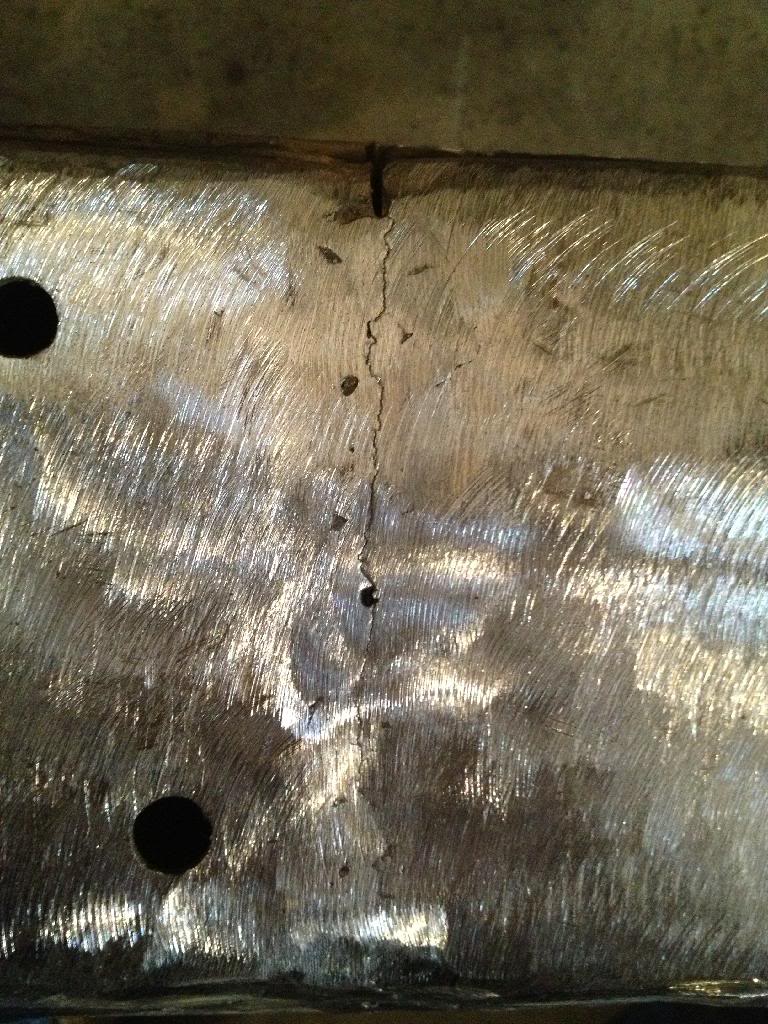
Today I ground out the crack and chamfered the edges for good penetration. I ended up blowing two holes in it. So what I did was spot weld it until it was all filled in, ground those welds down, and then made complete passes over it again.
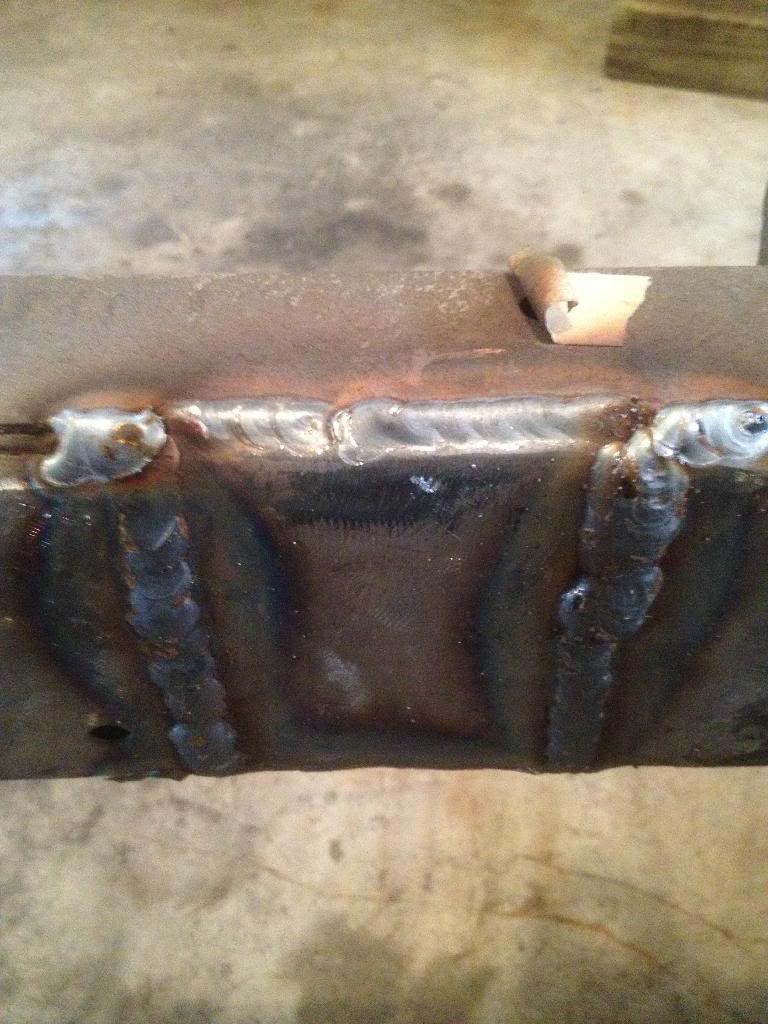
Feel free to critique my welds, and/or give advice.

We originally tried welding it in the my stepdad's 110, but it didn't cut it:

I ended up buying a welder:

My welds after day 2 and some free advice:

Today I ground out the crack and chamfered the edges for good penetration. I ended up blowing two holes in it. So what I did was spot weld it until it was all filled in, ground those welds down, and then made complete passes over it again.

Feel free to critique my welds, and/or give advice.
Feb 18, 2014 | 03:23 PM
#20
Thread Starter
Registered User
Joined: Nov 2013
Posts: 83
Likes: 0
A little update:
Grinded down the welds on the patch piece flush with the frame, finished painting the inside of the frame with 3m Rust Fighter, and I started the first coat of POR15 on the top and sides of the frame. I still haven't decided on a rear lift. I almost pulled the trigger on the TG 3in but dang $750.00 seems like a lot for what you get.
Here are some pictures.
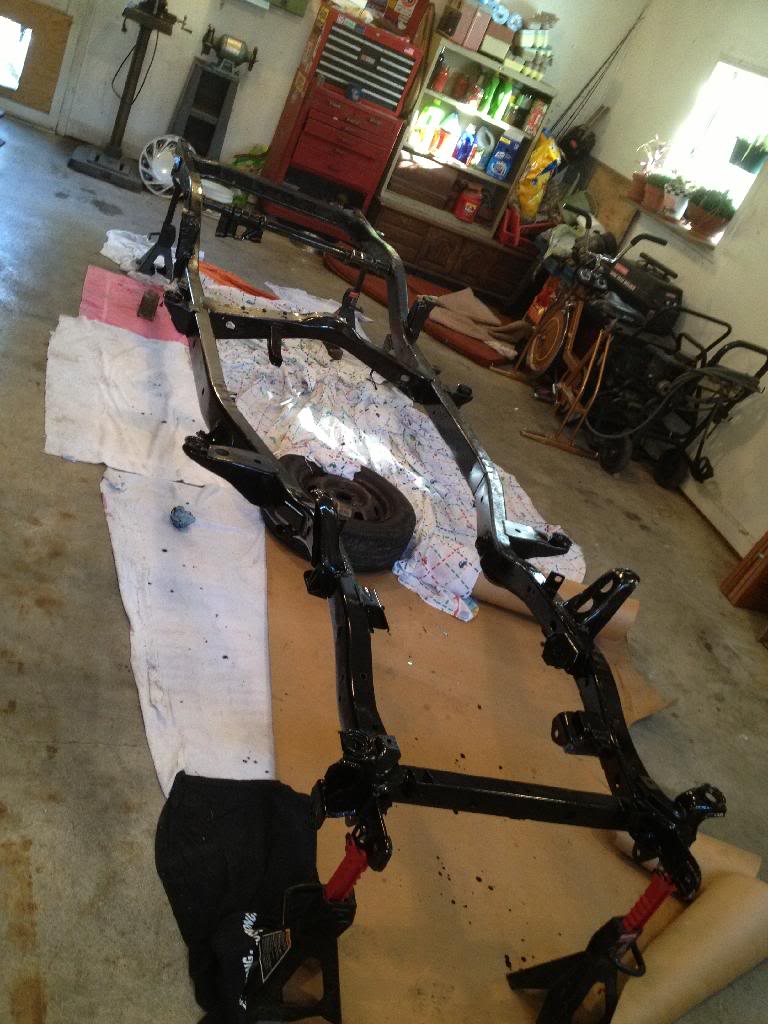


