
3.4 swap started


 Jun 11, 2006 | 12:28 PM
#62
Thread Starter
Contributing Member
Joined: Nov 2002
Posts: 10,666
Likes: 5
From: Oklahoma State
Here's the test fit of the Taurus 2 speed fan:

The shroud I made came was hitting the steering gear box, so I had to do a little grinding on the shroud to get some clearance:

Here's the backside of the shroud:

The controller is a Delta Current Control (DCC) FK35:
http://www.dccontrol.com/0820.htm
The nice thing about this controller is it is variable speed, rather than cycling on & off it will only spin the fan fast enough to keep below the temp setting. That gives it a soft start and less overall power drain on the alternator as well as keeping the engine at a more constant temp equilibrium.
I wired the DCC controller to the high speed wire of the Taurus fan motor since it will automaticlly slow the speed down when needed.
The slow speed wire of the fan motor I hooked up to a competely seperate power system so it can be used as a back-up if the DCC system fails.
With this "on-off-on" switch:

I can go from the DCC controller to the backup with the flip of a switch. The "off" setting can be used for deep water crossings to keep water from damaging the fan or throwing water up into the intake.
Edit:Just found out from Brian @ DCC the proper way to bypass the DCC controller for deep water crossings is to switch the small yellow controller input wire from 12 volt "+" to "ground". http://www.dccontrol.com/circuits.htm
I had mistakenly wired it to switch off the 12 volt positive to the main fan input (big 10 gauge wire) through a 40 amp relay, but Brian informed me that the controller needs to have the main input connected while the controller is running since it uses active switching to clamp the flyback voltage of the fan. I guess the fan is kind of like a little generator and sends a reverse voltage back though the system. In Brian's words: "What happens is that when you turn the voltage off on a motor is that it will generate a very high reverse voltage. The controller clamps this to ground byway of an active switch. If there's no voltage to the circuit board, the switch can't be activated."
Brian @ DCC has been very helpful and quickly answered many e-mails of my stupid questions.
The shroud I made came was hitting the steering gear box, so I had to do a little grinding on the shroud to get some clearance:
Here's the backside of the shroud:
The controller is a Delta Current Control (DCC) FK35:
http://www.dccontrol.com/0820.htm
The nice thing about this controller is it is variable speed, rather than cycling on & off it will only spin the fan fast enough to keep below the temp setting. That gives it a soft start and less overall power drain on the alternator as well as keeping the engine at a more constant temp equilibrium.
I wired the DCC controller to the high speed wire of the Taurus fan motor since it will automaticlly slow the speed down when needed.
The slow speed wire of the fan motor I hooked up to a competely seperate power system so it can be used as a back-up if the DCC system fails.
With this "on-off-on" switch:
I can go from the DCC controller to the backup with the flip of a switch. The "off" setting can be used for deep water crossings to keep water from damaging the fan or throwing water up into the intake.
Edit:Just found out from Brian @ DCC the proper way to bypass the DCC controller for deep water crossings is to switch the small yellow controller input wire from 12 volt "+" to "ground". http://www.dccontrol.com/circuits.htm
I had mistakenly wired it to switch off the 12 volt positive to the main fan input (big 10 gauge wire) through a 40 amp relay, but Brian informed me that the controller needs to have the main input connected while the controller is running since it uses active switching to clamp the flyback voltage of the fan. I guess the fan is kind of like a little generator and sends a reverse voltage back though the system. In Brian's words: "What happens is that when you turn the voltage off on a motor is that it will generate a very high reverse voltage. The controller clamps this to ground byway of an active switch. If there's no voltage to the circuit board, the switch can't be activated."
Brian @ DCC has been very helpful and quickly answered many e-mails of my stupid questions.
Last edited by mt_goat; Feb 2, 2008 at 08:50 AM.
Jun 12, 2006 | 10:50 AM
#63
Thread Starter
Contributing Member
Joined: Nov 2002
Posts: 10,666
Likes: 5
From: Oklahoma State
Because the swap moves the battery to the other side of the engine bay, I am upgrading the wiring that goes from the battery to the fusebox, from the fusebox to the alt, and from the battery to the body ground.
In the first case from the battery to the fusebox, this must be done since the battery is now moved 4 feet farther away. The factory wire looks to be about 8 gauge, I went with 4 gauge welding cable here (note: I am keeping a fuseable link at the battery end of this wire like the Toyota engineers do).
The factory wire from the alt to the fusebox looks to be 8 gauge too, and rather than ripping out a perfectly good 8 gauge wire (which BTW has other wires spliced into it and is neatly tucked away in a harness) I decided it would be much easier to run a 2nd 8 gauge wire parallel to it. I discovered if you take the bottom of the fusebox off you can add the 2nd wire to the screw post and that way you don't have to splice into the original wire. I did the same thing at the alt screw post:

The ground wire upgrade I have used several 8 gauge wires for redundancy.
Here's where all that comes to a head, the new battery area:

Two of those cables are for the winch, one is Roger Brown's headlight harness upgrade, one is the original harness. Hard to keep it all looking neat but at least everything is protected with flextubing. Believe it or not the overflow bottle still fits between the battery and all that wire. Anyone know if those headlights get hot enough to melt flextubing?
In the first case from the battery to the fusebox, this must be done since the battery is now moved 4 feet farther away. The factory wire looks to be about 8 gauge, I went with 4 gauge welding cable here (note: I am keeping a fuseable link at the battery end of this wire like the Toyota engineers do).
The factory wire from the alt to the fusebox looks to be 8 gauge too, and rather than ripping out a perfectly good 8 gauge wire (which BTW has other wires spliced into it and is neatly tucked away in a harness) I decided it would be much easier to run a 2nd 8 gauge wire parallel to it. I discovered if you take the bottom of the fusebox off you can add the 2nd wire to the screw post and that way you don't have to splice into the original wire. I did the same thing at the alt screw post:
The ground wire upgrade I have used several 8 gauge wires for redundancy.
Here's where all that comes to a head, the new battery area:
Two of those cables are for the winch, one is Roger Brown's headlight harness upgrade, one is the original harness. Hard to keep it all looking neat but at least everything is protected with flextubing. Believe it or not the overflow bottle still fits between the battery and all that wire. Anyone know if those headlights get hot enough to melt flextubing?
Last edited by mt_goat; Feb 2, 2008 at 08:52 AM.
Jun 30, 2006 | 04:18 AM
#64
Thread Starter
Contributing Member
Joined: Nov 2002
Posts: 10,666
Likes: 5
From: Oklahoma State
I cleared a few hurdles the last few weeks.
The donor engine coming out:

The 3.4 engine for some reason doesn't come with a passenger side lift hook, so I took the one off the 3.0 and drilled a new hole and used it:

This had me worried for a long time so I'm really glad to be done with it, drilling a new dip stick hole through 2 inches of solid cast iron:

BTW it took about 3 hours of drilling and a half day of running around buying tools. I used a right angle drill, although maybe a regular drill would work if you remove the exhaust manifold. This doesn't have to be done on the 99 and earlier 3.4 engines.
The dip stick tube adapter in place:

This was included in the ORS conversion kit as well as a tap and plug to plug the old dip stick hole.
The oil pan has to be changed on this swap and that means the oil strainer also gets changed. Here's the new one from ORS in place now:

I got the valve body out of the tranny before I removed it from the donor truck, here what that looks like before I shipped it off to IPT for the upgrade:

To keep the tranny cool here's the ATF coolers in place now and plumbed up: EDIT: I have now removed these from that location, there was too much extra stress on the cooling system from the reduced air flow to the radiator and the extra heat placed in front of the radiator. The tranny just has one cooler now and it runs nice and cool. Removing these two ATF coolers lowered the radiator temps about 10 degrees.

The donor engine coming out:
The 3.4 engine for some reason doesn't come with a passenger side lift hook, so I took the one off the 3.0 and drilled a new hole and used it:
This had me worried for a long time so I'm really glad to be done with it, drilling a new dip stick hole through 2 inches of solid cast iron:
BTW it took about 3 hours of drilling and a half day of running around buying tools. I used a right angle drill, although maybe a regular drill would work if you remove the exhaust manifold. This doesn't have to be done on the 99 and earlier 3.4 engines.
The dip stick tube adapter in place:
This was included in the ORS conversion kit as well as a tap and plug to plug the old dip stick hole.
The oil pan has to be changed on this swap and that means the oil strainer also gets changed. Here's the new one from ORS in place now:
I got the valve body out of the tranny before I removed it from the donor truck, here what that looks like before I shipped it off to IPT for the upgrade:
To keep the tranny cool here's the ATF coolers in place now and plumbed up: EDIT: I have now removed these from that location, there was too much extra stress on the cooling system from the reduced air flow to the radiator and the extra heat placed in front of the radiator. The tranny just has one cooler now and it runs nice and cool. Removing these two ATF coolers lowered the radiator temps about 10 degrees.
Last edited by mt_goat; Feb 2, 2008 at 08:59 AM.
Jun 30, 2006 | 06:00 AM
#66
Thread Starter
Contributing Member
Joined: Nov 2002
Posts: 10,666
Likes: 5
From: Oklahoma State
Originally Posted by Tragic Drive
:bounce2:
Unbelievable attention to detail. You will absolutley love this this truck when you are driving it.
Attention Mods: Here is my nomination for truck of the month hands down.
,Thomas
Unbelievable attention to detail. You will absolutley love this this truck when you are driving it.
Attention Mods: Here is my nomination for truck of the month hands down.
,Thomas

PS: I think the truck of the month has to have an engine in it doesn't it LOL.
Last edited by mt_goat; Jun 30, 2006 at 06:12 AM.
Jun 30, 2006 | 07:24 AM
#67
Registered User
Joined: Dec 2002
Posts: 4,655
Likes: 0
From: Idaho
Originally Posted by mt_goat
Wow, thanks! I hope so
PS: I think the truck of the month has to have an engine in it doesn't it LOL.
PS: I think the truck of the month has to have an engine in it doesn't it LOL.
I dont think he said WHAT month :pat: :pat:
Looking good, kinda making me wish I hadnt sold the motor I bought a few years back, but...
Jun 30, 2006 | 09:56 AM
#68
Thread Starter
Contributing Member
Joined: Nov 2002
Posts: 10,666
Likes: 5
From: Oklahoma State
Originally Posted by AH64ID
I dont think he said WHAT month :pat: :pat:
Looking good, kinda making me wish I hadnt sold the motor I bought a few years back, but...
Looking good, kinda making me wish I hadnt sold the motor I bought a few years back, but...


 Jun 30, 2006 | 11:31 AM
#73
Contributing Member
Joined: Jun 2006
Posts: 4,047
Likes: 0
Originally Posted by mt_goat
The auto tranny will be getting a valve body upgrade and two extra Tru-cool LPD coolers (http://www.importperformancetrans.com/coolers.shtml ) to help handle the extra power.
Jun 30, 2006 | 12:02 PM
#74
Thread Starter
Contributing Member
Joined: Nov 2002
Posts: 10,666
Likes: 5
From: Oklahoma State
Originally Posted by 04 Rocko Taco
Hows that trans cooler look, do you have them in yet? Keep me posted on updates on these tranny coolers, I have had tranny coolers on race cars before, and have thought about one for the truck. Keep me posted!!
About half of the coolers are actually below the AC condensor.
EDIT: I have now removed these from that location, there was too much extra stress on the cooling system from the reduced air flow to the radiator and the extra heat placed in front of the radiator. The tranny just has one cooler now and it runs nice and cool. Removing these two ATF coolers lowered the radiator temps about 10 degrees.
Last edited by mt_goat; Feb 2, 2008 at 09:01 AM.
Jul 18, 2006 | 06:34 AM
#75
Thread Starter
Contributing Member
Joined: Nov 2002
Posts: 10,666
Likes: 5
From: Oklahoma State
Originally Posted by Tragic Drive
Lookin good MT goat.
Ive done the 3.4 supercharger swap and have only had one small problem. The boost port fitting on the back of the charger is a straight MPT fitting. I would recomend using a 90 degree fitting before you put your charger on ( lot easier to access).
Here is why in the 2nd gen Runner our heater controls really get in the way of the 3.4 swap (2" body lift on mine). The boost port fitting rubs on the hot water lines, at least in mine I had this problem. Actualy ripped some air lines easy fix though.
I cant wait to see your truck and some engine pics.
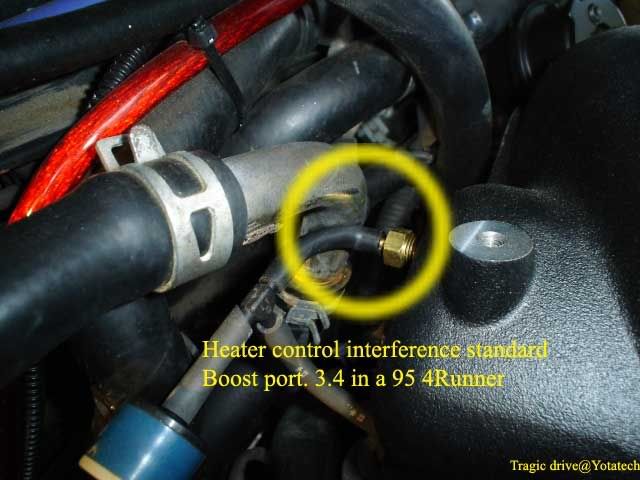
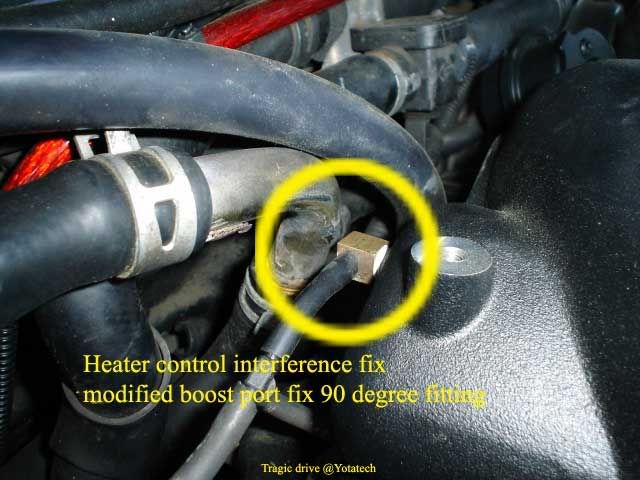
Jul 18, 2006 | 12:43 PM
#76
Contributing Member
Joined: Jun 2003
Posts: 432
Likes: 1
From: Maryland
Dale ,
This wont be much help but to answer your question the fitting screwed into the port without any modifications. The fitting I used is a 90 degree MPT that is used in a lot of pneumatic HVAC controls.
Do you have the 2nd gen Charger ?
,Thomas
This wont be much help but to answer your question the fitting screwed into the port without any modifications. The fitting I used is a 90 degree MPT that is used in a lot of pneumatic HVAC controls.
Do you have the 2nd gen Charger ?
,Thomas
Jul 18, 2006 | 01:46 PM
#77
Thread Starter
Contributing Member
Joined: Nov 2002
Posts: 10,666
Likes: 5
From: Oklahoma State
Originally Posted by Tragic Drive
Dale ,
This wont be much help but to answer your question the fitting screwed into the port without any modifications. The fitting I used is a 90 degree MPT that is used in a lot of pneumatic HVAC controls.
Do you have the 2nd gen Charger ?
,Thomas
This wont be much help but to answer your question the fitting screwed into the port without any modifications. The fitting I used is a 90 degree MPT that is used in a lot of pneumatic HVAC controls.
Do you have the 2nd gen Charger ?
,Thomas
Jul 18, 2006 | 05:38 PM
#78
Contributing Member
Joined: Jun 2003
Posts: 432
Likes: 1
From: Maryland
I'm glad you were able to get the fitting you needed .Did your original fitting rub on the heater hose like mine?
The boost port is hooked up to my fuel pressure regulator. I followed the 96 4Runner vaccum diagrams in the TRD charger install guide. I also thought it was the fmu mod but I'm not sure on that.
If you are still using your 4x4 vsv's let me know what port you are using currently I have those also hooked up to the boost port as well and I think I want to use a vaccum port only. I havn't tried my 4 wheel out yet since the charger has been installed. :pat:
,Thomas
Jul 18, 2006 | 05:56 PM
#79
Thread Starter
Contributing Member
Joined: Nov 2002
Posts: 10,666
Likes: 5
From: Oklahoma State
Originally Posted by Tragic Drive
Did your original fitting rub on the heater hose like mine?
:pat:
,Thomas
:pat:
,Thomas
Originally Posted by Tragic Drive
I also thought it was the fmu mod but I'm not sure on that.
,Thomas
,Thomas
Originally Posted by Tragic Drive
If you are still using your 4x4 vsv's let me know what port you are using currently I have those also hooked up to the boost port as well and I think I want to use a vaccum port only. I havn't tried my 4 wheel out yet since the charger has been installed. :pat:
,Thomas
,Thomas
Last edited by mt_goat; Jul 18, 2006 at 05:58 PM.
Jul 19, 2006 | 05:51 PM
#80
Thread Starter
Contributing Member
Joined: Nov 2002
Posts: 10,666
Likes: 5
From: Oklahoma State
Well I got the supercharger on, along with some URD goodies:

And got some detailing done on the engine:

URD injectors in place:

This hurt but I had to cut the stock injector plugs off:

To do a good job of soldering on the new injector plugs I removed the engine harness and cut it open:

But a little electrical tape puts it back together again:

And got some detailing done on the engine:
URD injectors in place:
This hurt but I had to cut the stock injector plugs off:
To do a good job of soldering on the new injector plugs I removed the engine harness and cut it open:
But a little electrical tape puts it back together again:
Last edited by mt_goat; Feb 2, 2008 at 09:05 AM.


