
Cabin filter in the "t"?
 Jun 22, 2010 | 07:55 AM
#21
Registered User
Joined: Jan 2009
Posts: 713
Likes: 0
From: Katy/Lubbock Texas
I just took all of that crumbled old dry stuff off and left it like it is. I haven't really noticed a difference without it. I remember someone saying you could find some stuff at home depot or lowes that you could cut down and use for a foam replacement.
Jun 22, 2010 | 12:41 PM
#22

Registered User
Joined: Feb 2007
Posts: 454
Likes: 0
Here's a possible foam replacement solution from Wicks Aircraft Supply. I was gonna use the 1/2" stuff fer a hoodliner or some soundproofing on the rear section of the truck. It might be overkill but it should work pretty good. 
DESCRIPTION PART NUMBER FOOT
1/4" INSULATION SP-250 $9.58
DESCRIPTION PART NUMBER FOOT
1/4" INSULATION SP-250 $9.58
Jun 22, 2010 | 08:24 PM
#23
Thread Starter
Registered User

Joined: Dec 2007
Posts: 108
Likes: 0
From: Central, VA
BZP, I'm wondering how much that vinyl/nitrile would smell...yeah yeah, I know, a LOT better than mouseburger for sure...but I like the idea of installing it as a hood liner and sound supressor, our trucks are LOUD!!! I've got some 3M strip caulking that would probably be good enough to fasten that stuff down and form a good seal.
I troll on the GovDeals auction site from time to time and have actually bought some items on it. I just spotted this T100 that sold pretty cheap IMO. I didn't know about it since I had not been on it for awhile.
1997 Toyota T100 Abandoned & Forfeited Vehicle: Sold Amount: $4,555.00
Bargain! (even if it is just for parts).
Jun 23, 2010 | 05:57 AM
#24
Registered User
Joined: Feb 2007
Posts: 454
Likes: 0
According to this installer he uses 3M #80 spray adhesive to mount the padding. Soundproofing.org is recommending 1" thick stuff. Go figure.
Did you ever fix yer firewall steering shaft seal? My thread on a cheap/quick fix.
I usually shop craigslist fer low priced T-100s and accessories. There's some good bargains out there waiting to be found.
Did you ever fix yer firewall steering shaft seal? My thread on a cheap/quick fix.
I usually shop craigslist fer low priced T-100s and accessories. There's some good bargains out there waiting to be found.
Jun 23, 2010 | 06:39 AM
#25
Registered User
Joined: Jan 2009
Posts: 6,086
Likes: 17
From: Just North of Pittsburgh
That's an interesting find there man...I had a nest in my blower but the critter was gone and the P/O ruined the blower fan. So I found a nice metal blower instead of the lil plastic one that was in there before.
Jun 26, 2010 | 07:19 PM
#26
Thread Starter
Registered User
Joined: Dec 2007
Posts: 108
Likes: 0
From: Central, VA
Well, I got a bunch of material today @Lowes. Took me awhile to find everything I think I need to fabricate a genuine cabin filter like the sedans have, or at least as close as I can make it. Total cost was just < $20.00 for everything. I'll post some pics of the work.
Last edited by 8lugnuts; Jun 29, 2010 at 08:52 PM.
Jun 28, 2010 | 06:31 PM
#27
Thread Starter
Registered User
Joined: Dec 2007
Posts: 108
Likes: 0
From: Central, VA
Here are the materials I got and what I did with them. Got all of it @Lowes.
The big package is what you typically use for air exchanger systems like the one I have in my house. In fact I will actually be able to use the rest of this piece since it is oversized for my unit and plenty left for my *T* project.
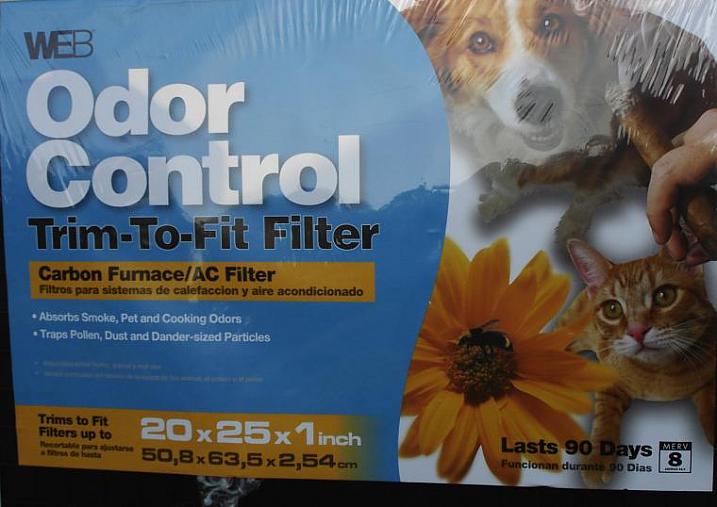
notice is states that it is good for "90 days". That's all well and good if it is being used in a house system, it should last a lot longer than that in my T since I don't drive it every day and besides, this is just a trial run for ultimate goal(re-fabbing a genuine cabin filter like the ones used in the sedans for use in my T).

The mesh looking material is a gutter strainer, found this in the section where all the gutter guard stuff is (hat tip to BZP for that advice, this stuff is *better* than that chicken wire stuff, way more flexible and easy to work with, and hopefully critter proof! The other item is a filter kit for a bagless Eureka vacuum, I am going to use that for the interior blower door flap

The big package is what you typically use for air exchanger systems like the one I have in my house. In fact I will actually be able to use the rest of this piece since it is oversized for my unit and plenty left for my *T* project.
notice is states that it is good for "90 days". That's all well and good if it is being used in a house system, it should last a lot longer than that in my T since I don't drive it every day and besides, this is just a trial run for ultimate goal(re-fabbing a genuine cabin filter like the ones used in the sedans for use in my T).
The mesh looking material is a gutter strainer, found this in the section where all the gutter guard stuff is (hat tip to BZP for that advice, this stuff is *better* than that chicken wire stuff, way more flexible and easy to work with, and hopefully critter proof! The other item is a filter kit for a bagless Eureka vacuum, I am going to use that for the interior blower door flap
Last edited by 8lugnuts; Jun 29, 2010 at 08:56 PM.
Jun 28, 2010 | 07:02 PM
#28
Thread Starter
Registered User
Joined: Dec 2007
Posts: 108
Likes: 0
From: Central, VA
Cutting the material to size was easy: I used the opening on my blower housing as the template, then used scissors to cut the filter material. The filter material has a plastic frame backing which made it ideal for what I wanted to do. The metal gutter mesh material was easy to cut to shape with tin snips.

I used four tie-straps to the reinforce the filter material sandwich between the plastic frame and the wire mesh. I guess I could just as easily used the wire mesh on both sides since I purchased two of them but I wanted to use the plastic frame because it is rigid and will not conform to a new shape when it is bent(like the mesh will). Also, the wire mesh side is UP, which is where I believe the critters came from, although I have no idea how.

And VOILA! here it is in place. I did not fasten it in with anything yet and I don't think I will. It's in there pretty tight and cannot go anywhere since the top part of this opening is tapered, and the bottom part has a lip, so there does not seem to be any possibility of it working loose and falling down.
If necessary I will go back in later and drill some holes in the opening and tie-strap it in. I need to head back to Lowes or Home Dep. to get some thin single sided sticky insulation liner for that opening since I had to peel the old stuff off, it was falling apart just like the stuff on the flap.

I have not fixed up the inside/outside flap yet but I scraped all of the cruddy dried up old foam off of it with a wire brush. Once I get the vacuum filter in place and tie-strap that in with the factory chicken wire frame I should once again be experiencing critter-free air flowing goodness!
I used four tie-straps to the reinforce the filter material sandwich between the plastic frame and the wire mesh. I guess I could just as easily used the wire mesh on both sides since I purchased two of them but I wanted to use the plastic frame because it is rigid and will not conform to a new shape when it is bent(like the mesh will). Also, the wire mesh side is UP, which is where I believe the critters came from, although I have no idea how.
And VOILA! here it is in place. I did not fasten it in with anything yet and I don't think I will. It's in there pretty tight and cannot go anywhere since the top part of this opening is tapered, and the bottom part has a lip, so there does not seem to be any possibility of it working loose and falling down.
If necessary I will go back in later and drill some holes in the opening and tie-strap it in. I need to head back to Lowes or Home Dep. to get some thin single sided sticky insulation liner for that opening since I had to peel the old stuff off, it was falling apart just like the stuff on the flap.
I have not fixed up the inside/outside flap yet but I scraped all of the cruddy dried up old foam off of it with a wire brush. Once I get the vacuum filter in place and tie-strap that in with the factory chicken wire frame I should once again be experiencing critter-free air flowing goodness!
Last edited by 8lugnuts; Jun 29, 2010 at 09:00 PM.
Jun 28, 2010 | 09:58 PM
#30
Registered User
Joined: Apr 2010
Posts: 43
Likes: 0
From: okc oklahoma
 mighty fine ni!@#r riggin!!!! if it only last 90 days in a house running the return air 24/7 then it ought to last a year or more in the truck. Did the critter smell finally get out after alot of scrubbin? With as big a sheet you got you could make 5 more if that one wears out. sure is alot cheaper than oem..
Jun 29, 2010 | 09:07 PM
mighty fine ni!@#r riggin!!!! if it only last 90 days in a house running the return air 24/7 then it ought to last a year or more in the truck. Did the critter smell finally get out after alot of scrubbin? With as big a sheet you got you could make 5 more if that one wears out. sure is alot cheaper than oem..
Jun 29, 2010 | 09:07 PM
#31
Thread Starter
Registered User
Joined: Dec 2007
Posts: 108
Likes: 0
From: Central, VA
Not sure if the cracklin' critter odor is *completely* gone yet since I have a small Christmas tree farm in there, so all I smell are those. I sure *hope* it's all gone after I get it all back together. I'm really missing my A/C!.
Since the air flow through the filter material is nearly unrestricted I doubled the material in the *sandwich*, sort of like getting *double meat* @Subway. This little filter will at least buy me some time while I search for a *real* cabin filter. There are so many dozens of them, most of them square shaped, so I can take my time trying to find one that is as close to the shape I need, one that will require only a minimum amount of re-fabbing.
I'll post some notes after I get everything back together and the air is flowing again, hopefully before the holiday weekend.
Since the air flow through the filter material is nearly unrestricted I doubled the material in the *sandwich*, sort of like getting *double meat* @Subway
. This little filter will at least buy me some time while I search for a *real* cabin filter. There are so many dozens of them, most of them square shaped, so I can take my time trying to find one that is as close to the shape I need, one that will require only a minimum amount of re-fabbing. I'll post some notes after I get everything back together and the air is flowing again, hopefully before the holiday weekend.
Last edited by 8lugnuts; Jun 29, 2010 at 09:35 PM. Reason: fixit
Jul 5, 2010 | 08:49 PM
#32
Registered User
Joined: Feb 2007
Posts: 454
Likes: 0
Something to consider...stainless steel wool.
Rodent control...
I was shopping fer some stainless steel wool to put in my oil catch jar vs the stainless steel scrubbers I have in there now and came across that little tidbit.
Rodent control...
I was shopping fer some stainless steel wool to put in my oil catch jar vs the stainless steel scrubbers I have in there now and came across that little tidbit.
Jul 7, 2010 | 08:46 PM
#33
Thread Starter
Registered User
Joined: Dec 2007
Posts: 108
Likes: 0
From: Central, VA
Doesn't SS steel rust over time when exposed to moisture(particularly steel wool)? It also doesn't smell too good when it gets moist but I'm sure it's good critter-proofing material
 Aug 23, 2010 | 08:57 AM
#36

Banned
Joined: Sep 2008
Posts: 12
Likes: 0
Cutting the material to size was easy: I used the opening on my blower housing as the template, then used scissors to cut the acc cabin filter material. The filter material has a plastic frame backing which made it ideal for what I wanted to do. The metal gutter mesh material was easy to cut to shape with tin snips.
I used four tie-straps to the reinforce the filter material sandwich between the plastic frame and the wire mesh. I guess I could just as easily used the wire mesh on both sides since I purchased two of them but I wanted to use the plastic frame because it is rigid and will not conform to a new shape when it is bent(like the mesh will). Also, the wire mesh side is UP, which is where I believe the critters came from, although I have no idea how.
And VOILA! here it is in place. I did not fasten it in with anything yet and I don't think I will. It's in there pretty tight and cannot go anywhere since the top part of this opening is tapered, and the bottom part has a lip, so there does not seem to be any possibility of it working loose and falling down.
If necessary I will go back in later and drill some holes in the opening and tie-strap it in. I need to head back to Lowes or Home Dep. to get some thin single sided sticky insulation liner for that opening since I had to peel the old stuff off, it was falling apart just like the stuff on the flap.
I have not fixed up the inside/outside flap yet but I scraped all of the cruddy dried up old foam off of it with a wire brush. Once I get the vacuum filter in place and tie-strap that in with the factory chicken wire frame I should once again be experiencing critter-free air flowing goodness!
Last edited by kurtdaniel; Aug 23, 2010 at 03:04 PM.

Thread
Thread Starter
Forum
Replies
Last Post


