When you click on links to various merchants on this site and make a purchase, this can result in this site earning a commission. Affiliate programs and affiliations include, but are not limited to, the eBay Partner Network.
Im planning on cutting them back 3 inches on each side and twist, solder, shrink them up as suggested. Im moving and all my tools are in storage, but my buddy with a '12 4runner is gonna help me patch these wires up.
Is it possible these wires are also responsible for my driver door light not coming on? The light that's build into the arm rest/handle. As well as my dome light? They have never worked in 6 months owning the truck.
Is it possible these wires are also responsible for my driver door light not coming on? The light that's build into the arm rest/handle. As well as my dome light? They have never worked in 6 months owning the truck.
this could easily be the cause for the courtesy light on the door, but the bulb is also a prime candidate. The dome light may be another bulb or there may be something else entirely going on. Start with a good bulb and check for power and ground at the lights. There should be power at the dome light all the time and you can either turn it on by grounding the other side of the bulb either manually, or through the door jamb switches.
Alright, I already know I will get a little hate for this but this is all I had access to! My friend had no more solder and we made do with what we had. If any of the wires fail I can pull it back out and redo it "correctly." I'm in the process of moving and all my tools are in storage
I plan on wrapping it with electrical tape before reinstall. Not bad I think..
For those that said they don't like crimp repairs, mind expanding on why? The connectors above are a less than ideal crimp being a U style, but nearly all factory internal splices are crimped with B style crimps and is what I use when building harnesses...
Here's a B crimp example and a cross cut example of a good crimp.
[img]http://cycleterminal.com/splice-crimp-3x16.JPG{/img]
Here's a cross section of a similar crimp to the U crimp. left side is a poor crimp, right side is what they count as good (big difference from the B crimp huh?).
Anyway, looks like the right size of terminal (the splices) were used, and from what I can tell they were crimped with a proper tool, not just needle nose pliers etc. Those terminals come with dual walled (adhesive) heat shrink that actually seals the crimps, never use "normal" heat shrink unless it's an inside use only device, it should always goo out the ends to show it's sealed well. I see no reason the repair will fail unless the wires are brittle, or the crimps are not very tight, or the repair was done right were the wire bends in the door jam instead of inside the door/body. The splices can't handle constant bending since there isn't very good strain relief on the wires and it will break right next to the crimps over time. For the short replacement wires, higher strand count is better, makes it more flexible.
Small tip on doing several splices, manufactures use the trick of off setting the splices so the harness looks more uniform, and possible place of failure doesn't all line up.
If you don't have any wire, jump on ebay and look up GXL wire, 18 gauge and 14 gauge. Example below for 14awg. 18 gauge is pretty much the standard wire size in most harnesses and the larger wires are pretty commonly 16 or 14 gauge, never hurts to error on the larger size (14).
[QUOTE=atcfixer;52394618]For those that said they don't like crimp repairs, mind expanding on why? The connectors above are a less than ideal crimp being a U style, but nearly all factory internal splices are crimped with B style crimps and is what I use when building harnesses...
Here's a B crimp example and a cross cut example of a good crimp.
If you knew how many repairs I have made to wiring harnesses with home hacker tracks and crimped connectors you would know why I think they are evil. The ones used by the OP in his repair are far better quality than most having the heat shrink already in place and with the goo that seals the repair, so I would trust them far better than most. unfortunately in this particular repair having all of them bunched together in the same spot and still in the door jamb will cause the wires to flex in one spot and will break far sooner than if a section of wire were replaced and the connections mad farther away from the area that gets flexed every time the door is opened.
The typical crimped repair I see ends up looking something like this: This was someone's idea of a stereo installation. they even used an installation harness, so this was all easily unplugged from the vehicle and there was no reason they needed an extra 3 inches of wire, so WHY put 2 crimps on each one?These cheaper connectors work OK if they are always dry and not subjected to vibrations or flexing, but I live in Alaska, the roads are crap and fixing Joe Blow's trailer wires done with these gets really old. I believe in soldering it once and never fixing it again.
Alright, I already know I will get a little hate for this but this is all I had access to! My friend had no more solder and we made do with what we had. If any of the wires fail I can pull it back out and redo it "correctly." I'm in the process of moving and all my tools are in storage
I plan on wrapping it with electrical tape before reinstall. Not bad I think..
I can tell from your pictures this is in the exact location where the wires broke, in order to make these connections you have shortened each wire slightly thereby putting more tension on the wires. You have also bunched the connectors all together which will transfer the flexing to one or two points instead of allowing that whole 5 inch section in the door jamb boot to flex. If you are keeping this truck you are just insuring that you have to go back in again at some point to make another repair. If you are getting rid of this truck you are an ass. I have seen the same wires cracking the insulation and shorting together burning the wiring harness in the door. So if I were you I would have done it right the first time or just left it apart until I could do it right.
Is it possible these wires are also responsible for my driver door light not coming on? The light that's build into the arm rest/handle. As well as my dome light? They have never worked in 6 months owning the truck.
Gonna sound stupid but did you check the bulbs?
how about the door push switch on the door jam?
Alright, I already know I will get a little hate for this but this is all I had access to! My friend had no more solder and we made do with what we had. If any of the wires fail I can pull it back out and redo it "correctly." I'm in the process of moving and all my tools are in storage
I plan on wrapping it with electrical tape before reinstall. Not bad I think..
Headed out the door for work so no time to debate the rest of this thread. But!
That black and yellow right in the front there should probably be redone. You can see the wire under the crimp cover.
I see what you mean, it's not so much the crimp at fault from what I see in the photos, but the person attempting to crimp with the incorrect tool. If those have built in heat shrink, it doesn't even look like they tried to seal them, so the flex point was right next to the crimp, so quick to fail. They do look cheap though, for that style of terminal, I always use name brand.
Soldering can be good and bad too, the solder wicks up the wire and makes it stiff, also introduces excess heat to the insulation in the area, so it could cause the insulation to get brittle sooner, and you still need to seal it up with heat shrink which also acts a bit as strain relief. If someone doesn't know what they are doing, I'm sure the solder method can be just as bad as crimp, but generally speaking, if the person doing the repair has a solder iron, they probably have atleast a little bit more of a clue than a random person walking in the store looking for something to band-aid their harness up with and likely doesn't have the correct tool for the crimp or a solder iron and are too cheap or ignorant to buy them. Ignorant in my usage is meaning lack of knowledge or understanding, not saying they can't learn, just they haven't been educated.
I probably should mention, the B crimp isn't fool proof either, a lot of terminals use that style of crimp and a huge % of the china junk I've seen is crimped so poorly I can pull the wires out of the crimp. The "pull test" is something like 20lbs of pull for 18 gauge wire. That's not even mentioning their complete crap wire that looks like 18 gauge but really is 22-26 gauge. It's sad when it's like 4-5 strands with super thick low temp insulation.
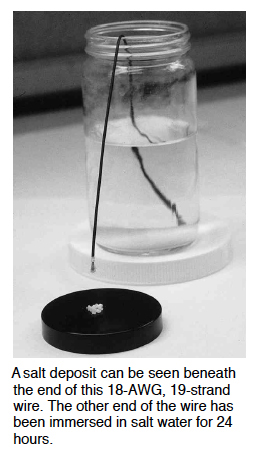
Alaska has some pretty extreme weather and salt, so I'm sure you see a lot more wiring problems up there than we do in Michigan, even though we are one of the worst states for salt on the road... or I should say calcium chloride which is some nastiest stuff, but it works to clean the roads. Anyway, my point of mentioning this is salt is very good at wicking, so sealing connections is ever more important in your area compared to say mid to the southern states.. Here's a fun pic & videos on the subject.
For those that said they don't like crimp repairs, mind expanding on why?
I believe you touched in the reasons why in your explination. The reason I do not like crimp repairs, espically cheap butt connectors, is that the vastmajority of these types of repairs I have seen were done incorrectly with the wrong tools, parts, and methods of installation.
I usually see crimp butt connector repairs put together with the wrong size connector put together with the wrong tool without any shrink tube or adhesive leading to lose and corroded connections.
I have absolutely no issues with factory crimps and do not think that crimps themselves are the problem but rather the lack of knowledge of proper crimp installation and use.
Good stuff, I just wanted to make sure what I've been doing for years isn't the less than ideal way lol.
Also just thought of something on the crimps, it's also acceptable to solder after a crimp to be sure of a good connection and helps the mechanical holding of it. I wouldn't solder it unless the wire has high temp insulation though like GXL wire. A poor crimp will wick up a bit of solder, a good crimp will hardly wick any up.
The door jamb switch makes a connection to ground. If you were to take off the cover to your dome light you should be able to test for voltage with a meter (black probe to ground red probe to the light bulb terminals) check it with the switch on the dome light in all 3 positions, there is off, on and door. If you see 12 volts it means there is no ground, opening the door (releasing the door jamb switch) grounds one side and allows the light to turn on when the control switch is in the "door" position. When it is in the on position it grounds the circuit through the dome light mounting screws.
If you don't find 12 volts at the dome light then you need to check your fuses or grab a wiring diagram and figure out where the wire is cut.

 Mar 27, 2018 | 02:58 PM