
Upgrading Battery + Wire to Fuse Box 80A
 Mar 7, 2015 | 05:06 PM
#1
Thread Starter
Registered User
Joined: Apr 2014
Posts: 30
Likes: 0
From: Dallas, TX
Upgrading Battery + Wire to Fuse Box 80A
I've read and re-read Philbert's post and Rad's responses, etc. about upgrading the gauge wire leading from the battery positive cable to the copper plate on the bottom of the 80 Amp fuse in the fuse box. I think the seminal answer is found around post #191.
Here's Philbert's thread: https://www.yotatech.com/forums/f116...2/index10.html
But, there was so much back-and-forth that I'm a little confused about the final connections and would welcome advice.
At this point, I would like to only try upgrading the gauge of the wire from Battery + to Fuse with 8 gauge. Is this the proper way to do (1) and (2) below:
1) Connect 8 gauge stranded copper wire with eye ring on to the + terminal. String this 8 gauge for, say, 5 inches before parallel clasping it to a 12 gauge fusible link wire.
2) This 12 gauge fusible link wire will connect to the brass/copper plate that at the bottom of the 80A fuse. (Not really sure how you connect this FL wire, but I can tackle that question once I understand if (1) and (2) are correct.
Mar 7, 2015 | 09:49 PM
#2
Registered User


Joined: Mar 2012
Posts: 7,139
Likes: 687
We learned a lot from discussion on Philbert's post. May he rest in peace. I was hoping to meet him in Silicon Valley, but he lost his life trying to save someone (who did not want to live.)
DO NOT change the gage of the stock fusible link. That's there to protect stock circuit from overload/shorts. This way, if something goes wrong:
1) You prevent a fire that could consume the truck, and
2) You only have to look at that fusible link and not have to dig deep into the stock wiring.
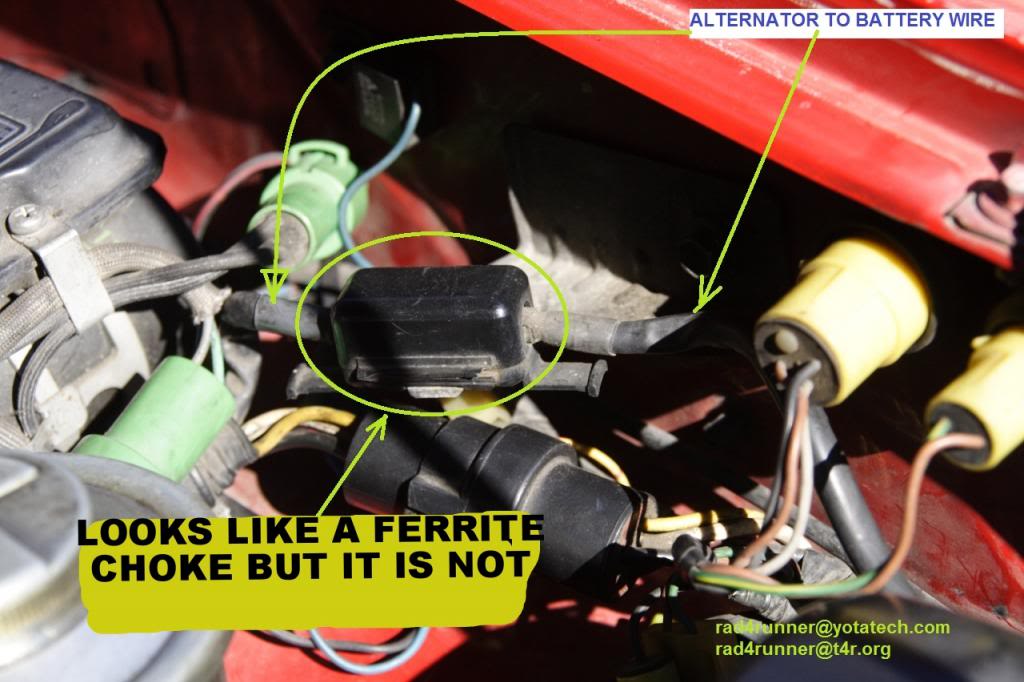
IF you really want to upgrade because you think the stock wire is fatigued/corroded/brittle, etc, simply replace it with thicker wire, clean contacts but do not change FL gauge. Also delete the disconnect pictured below, by replacing with one-piece alt to batt wire ("B" wire). OK to use thicker "B" wire.
IF you really want to upgrade because you expect higher loads and you upgraded your alternator, checkout my charging system wiring upgrade. Chefyota and Redeth wired theirs same way - just different gauges to match load and alt outputs. With this wiring, original FL and fuse network are left stock.
IF anything goes wrong with auxiliary circuits it will not affect stock fusible link and fuse network. Only the ADDED fusible link will blow.
Disconnect which does not really do anything and is a potential point of failure from corrosion/loose contact:
DO NOT change the gage of the stock fusible link. That's there to protect stock circuit from overload/shorts. This way, if something goes wrong:
1) You prevent a fire that could consume the truck, and
2) You only have to look at that fusible link and not have to dig deep into the stock wiring.
IF you really want to upgrade because you think the stock wire is fatigued/corroded/brittle, etc, simply replace it with thicker wire, clean contacts but do not change FL gauge. Also delete the disconnect pictured below, by replacing with one-piece alt to batt wire ("B" wire). OK to use thicker "B" wire.
IF you really want to upgrade because you expect higher loads and you upgraded your alternator, checkout my charging system wiring upgrade. Chefyota and Redeth wired theirs same way - just different gauges to match load and alt outputs. With this wiring, original FL and fuse network are left stock.
IF anything goes wrong with auxiliary circuits it will not affect stock fusible link and fuse network. Only the ADDED fusible link will blow.
Disconnect which does not really do anything and is a potential point of failure from corrosion/loose contact:
Last edited by RAD4Runner; Mar 7, 2015 at 10:03 PM.

 Mar 8, 2015 | 11:18 AM
#4
Registered User
Joined: Jun 2014
Posts: 228
Likes: 1
From: North Alabama
What does the fusible link wire protect that the 80/40/30 amp ones don't? Based on my 87 FSM, it looks like just the headlights (each one is protected by an individual 10A fuse) and the "HAZ-HORN" 15A fuse. I can see why these would skip the other fusible links, all 3 are considered safety equipment. You don't want to have a short take out your headlights when you are driving!
Of course, it can also protect against high current draws that are split through the other 3 FLs, but the only conductor that would carry such a hazardous current would be itself. In this way I feel it's redundant. More safety isn't a bad thing, of course.
Do we know what the current rating of the wire is? What sort of failure is it supposed to protect from? Can it be replaced with an actual fusible link? The sum of the 3 fuses and 3 FLs is 185 A but I would imagine the FL wire would fail before that. My AWG chart list 41 A as the max current for a 12 gauge wire, but I'm sure it can handle more in the real world.

 Mar 8, 2015 | 04:46 PM
#6
Thread Starter
Registered User
Joined: Apr 2014
Posts: 30
Likes: 0
From: Dallas, TX
Rad:
Thanks for the link to your thread. I am now on post #209, and I think you are about to state what you did to improve the wiring to the headlights to produce more wattage to your new Autopal light setup.
But, I'm afraid unless you/others in your thread have something more specific and 'dumbed-down' for someone like me, I just won't 'get it.' I look at your schematics and will probably print them out and try to find someone locally to decipher those hieroglyphics. But, as they are presented, I don't understand.
Anyway, I will keep reading (dang, you've got some other great mods on the thread I'd like to try, though). Thanks again for your help and any further assistance.
Mar 8, 2015 | 08:33 PM
#7
Registered User
Joined: Mar 2012
Posts: 7,139
Likes: 687

However, that disconnect may help make it easy for people to troubleshoot. For example, IF alt screw terminal is not easily or safely accessible (depending on on alt belt/bracket adjustment), one can simply interrupt "B" wire right there. I never saw a need for it, and I detest non-functional details and add to complexity of things so I removed it.
Of course, it can also protect against high current draws that are split
I would imagine the FL wire would fail before that.

Thread
Thread Starter
Forum
Replies
Last Post
rushw
General Electrical & Lighting Related Topics
4
Jul 18, 2015 01:46 PM
Sandman
86-95 Trucks & 4Runners
8
Jul 14, 2015 12:36 PM
skoti89
Offroad Tech
3
Jul 8, 2015 12:05 AM


