
Help changing CV axles on 92 4runner
 Aug 21, 2006 | 09:14 PM
#1

Thread Starter
Registered User
Joined: Aug 2006
Posts: 46
Likes: 0
Help changing CV axles on 92 4runner
I need help, I have pulled the calipers and so far I am down to just having removed the snap ring holding the axle in the hub. The axle will push back an inch or so but of course won't come out yet. What else do I have to remove to get it out? I tried removing the bolts on the other end that go into the differental but I couldn't keep the axle for spinning, HELP!!!
Last edited by nineball; Aug 21, 2006 at 09:43 PM.
Aug 22, 2006 | 03:25 AM
#2
Registered User
Joined: Mar 2005
Posts: 1,756
Likes: 7
From: New Brunswick, Canada
Before starting this, you should thoroughly soak the nuts in PB Blaster or WD-40. The easiest way to remove the nuts from the bolts on the differential end is to put your tire back on, lower your truck so that your tire is back on the ground (or better yet, stack a couple of short pieces of 2"x6" under your tire before lowering it to keep your truck higher up in the air with the weight on the tire). Keep some of the weight of the truck on the jack to gain a few extra inches of height to make working under there easier (the goal is to have enough weight on the tire to keep the axle from turning when you're trying to loosen the bolts at the diff.)
Now, take a combination wrench (17mm if I remember correctly, isn't it), and put the closed end on one of the nuts (make sure you are on the nut and not on the end of the bolt... those bolts are pressed in, so turning them is pretty tuff). Take a second combination wrench (19mm or 21mm) and lock its closed end into the open end of the 17mm to give you more leverage (there's only one way to put it in there so that it works... hopefully you've done this before and know what I mean.) You should be able to get at three of the nuts, then jack the truck up a bit, rotate the wheel so that you can access the last three, lower the truck, and get the rest of them loose.
Now... you'll never compress the axle tulip joint in enough to remove the axle like this. Some people pound out two of the studs to allow enough clearance to remove the axle, but I prefer to remove the 4 lower balljoint bolts, and loosen the top nut on the shock (to allow the lower suspension arm to droop more.) With the lower balljoint disconnected, take a pry bar and pry the lower suspension arm down as much as you can, and jam some scrap pieces of wood between it and the bumpstop to keep it down as low as you can. Jack the spindle up a bit if you need extra clearance. You should have no problem getting the axle out from here.
Good luck.
Aug 22, 2006 | 06:15 AM
#3
Registered User
Joined: Mar 2006
Posts: 212
Likes: 0
From: Austin, TX
Yep, do what GSGallant said.
I just did mine for the first time and it was a living nightmare. The nuts were so tight, I had to get a blowtorch to loosen them.
It took me a total of about 4 days to finish mine. About 4 hours a day average....just awful.
I just did mine for the first time and it was a living nightmare. The nuts were so tight, I had to get a blowtorch to loosen them.
It took me a total of about 4 days to finish mine. About 4 hours a day average....just awful.
Oct 1, 2010 | 01:40 PM
#4
Registered User
Joined: Feb 2010
Posts: 56
Likes: 0
From: Fayetteville, AR
Yeah I'm in the same position...except it's day 2 for me, I hate those nuts. Here's hoping getting the old cv out and the new one in will be easier.
Oct 1, 2010 | 04:11 PM
#5
Registered User
Joined: Dec 2007
Posts: 710
Likes: 2
From: Santa Rosa, CA
I feel guilty,
I swapped out my CV's on my '89 on Sunday in 3 hours total. Impact is nice, those nuts just pop right off. Also, I went ahead and removed all the studs from the diff flange before pulling the CV out, that helped also.
You can get them out without popping a ball joint. You have to jack the A-arm up to near horizontal so that you can then drop the inboard CV joint down and then pull the axle out of the hub assembly.
One nice mod is to take the studs out of the differential flanges and grind the splines off of them so that they are now bolts. It is way easier to work on if do that, the CV's do not hang up on the studs the entire time.
Good luck guys.
Mike
Oct 1, 2010 | 06:41 PM
#6

Registered User

Joined: Sep 2007
Posts: 8,384
Likes: 875
From: San Francisco East Bay
Where many people run into trouble is trying to remove the half-shafts with the wheels dangling. The angle of the half-shaft is wrong, and it is NOT going to come out. Just lift that wheel back up to where it wants to be, and you're golden. (I leave the truck on jack stands, and use a jack under the rotor to lift it until the weight just comes off the jack stands.)
If you still want to take a sledgehammer to your truck, well that's your business. But you can be pretty sure that's not how the truck's designers planned on your doing this (relatively) common maintenance task.
Oct 1, 2010 | 07:02 PM
#7
Registered User
Joined: Apr 2009
Posts: 74
Likes: 0
From: On the road of the Western United States
When I removed my differential bolts I had the truck on the ground. I loosened the bolt with a breaker bar and big socket. Then I got in the truck and let it roll until I was lined up for the next one. Seemed pretty simple. It was the other parts of the operation that kicked my ass!!
Trending Topics
Oct 1, 2010 | 09:55 PM
#8
Registered User
Joined: Sep 2008
Posts: 135
Likes: 0
From: Northern British Columbia, Canada
when i did mine i put a large screwdriver... into the brake rotor? maybe can't remember but i put in in a way where it would hit and stop turning and held the axle then i torqued on the nuts and it came pretty good then just took the screwdriver out and turned the axle to the next one and repeated. for getting the cv axle out... lots of jacking up and lowering the a arm just to get that perfect angle. 2 nights for me. probly 3 hours each. now i think it would go quicker.
Oct 3, 2010 | 06:59 AM
#9
Registered User
Joined: Sep 2010
Posts: 7
Likes: 0
From: BC Coast Canada
Done mine
I just finished doing my driver's side cv axle and had a great time. I used an electric impact for half of the diff side nuts and a long extention on my half inch ratchet with an extention on the handle for the other 3. I only jacked up the rotor after undoing the lower ball joint bolts (4). tough to break that one free. Once free I just pulled the rotor outward and slipped the shaft out. Real slick! Total 3 1/2 hrs from jacking up to truck to back on the ground and tools cleaned up and put away with a coffee break in there too. I really enjoy quality time spent with my Toyota, especially when there is no skinned knuckles and no swearing.
Nov 22, 2010 | 11:12 AM
#10

Registered User
Joined: Nov 2010
Posts: 1
Likes: 0
...If you used GSGALLANT's stack-of-2x6 method, you're already there because the truck is sitting on the tire (with the bonus of more room to work). The differential end of the half-shaft (the tulip) will clear the studs with a minimal amount of fiddling.
Where many people run into trouble is trying to remove the half-shafts with the wheels dangling. The angle of the half-shaft is wrong, and it is NOT going to come out. Just lift that wheel back up to where it wants to be, and you're golden. (I leave the truck on jack stands, and use a jack under the rotor to lift it until the weight just comes off the jack stands.)...
I don't know about the configuration of your vehicle (and I'm certified, just not as a mechanic
 ).
). Yesterday I replaced the CV half-shafts on my son's 1990 4Runner. I followed the procedure below and it was fairly simple, but not necessarily easy:
(No hammering required!)
1) Set parking brake, put chocks in front of and behind rear wheels for safety, jack up the vehicle and put securely on jack stands such that the suspension arms are /not/ being supported.
*** I left the hydraulic jack under the center frame between the jack stands for extra safety.
2) Remove the wheels, then remove the hub cover and remove the c-ring from the splined axle end so that it can be pulled out.
3) Remove the six nuts that secure the CV axle to the differential flange. DO NOT remove the studs from the differential flange. (wedge a medium-sized screw driver in the section of the rotor that you can see in the brake caliper to make it stop rotating while loosening the nuts)
4) Remove the front shocks (they needed replacing anyway).
5) Remove the torsion bar [you'll likely need to replace the bushings on the bolts that secure the torsion bar to the lower suspension arm - I bought the kits (under 10.00 ea) at the same time that I bought the CV axles (49.00 ea)]
6) Remove the 4 bolts on the ball joint assembly that secure the lower suspension arm to the steering knuckle assembly.
7) Place a bottle jack (like the factory jack that came with my F-150 pickup) between the suspension arms and use it to separate the lower suspension arm from the steering knuckle. I jacked it about 6 inches to create enough separation to allow pulling out the CV axle.
8) Use one hand (or get a helper) to swivel the rotor/steering knuckle UP a few inches; this will allow you to separate inner end of the CV axle from the studs on the differential flange, then pull it out of the hub.
9) Reassemble with new parts using the above instructions in reverse...
(Caveats:
During reassembly, DO NOT wrench-tighten down either side of the torsion bar assembly until you have both sides assembled with new bushings/hardware and hand-tightened)
You may also need to use a pry bar or screwdriver to move the knuckle arm assembly while aligning it with the lower suspension arm, in able to get the 4 ball-joint bolts started.
Supplies/Tools needed:
Spray all nuts well with WD-40 and let soak overnight before starting.
The hub cover requires a 12 mm wrench or regular socket.
14 mm wrench or socket for the torsion bar bolt (top side).
The lower nut (inset on the bottom of the lower suspension arm) of the torsion bar requires a 14 mm deep socket and break-over handle.
1/2 inch drive 17 mm socket and/or 17 mm wrench for the differential flange bolts.
1/2 inch drive 22 mm regular socket and
22 mm wrench for the lower shock bolts.
1/2 inch drive break-over handle
1/2 inch drive ratchet
A 1/2 inch drive long extension and universal joint came in handy while removing the differential flange nuts and the lower shock bolt.
Pry bar.
Regards,
Steve
Nov 29, 2011 | 02:06 PM
#11

Registered User
Joined: Jul 2011
Posts: 3
Likes: 0
I think the only tool not in the list above is a 1 dollar bic lighter. That's what I used to get those ball joint bolts lose. Do not use a sledge. My buddy did that and he ended up having to cut them out with a grinder.
Nov 30, 2011 | 08:56 AM
#12
Registered User
Joined: Sep 2007
Posts: 8,384
Likes: 875
From: San Francisco East Bay
Torsion bar?!
You know that steps 4, 5, 6, 7, and 8 are all unnecessary, as long as you lift the lower control arm (to where it would be if the truck were sitting on the tires) before you easily remove the half-shaft.
You know that steps 4, 5, 6, 7, and 8 are all unnecessary, as long as you lift the lower control arm (to where it would be if the truck were sitting on the tires) before you easily remove the half-shaft.
 Dec 5, 2011 | 02:22 PM
#14
Registered User

Joined: May 2003
Posts: 438
Likes: 4
From: Toronto
I've done this enough times that just last month, I took the whole damn thing out, repacked the bearings, changed all the seals and upper ball joints (the bottoms were okay) right on the bench. It was a relief to work that way and keep everything clean rather than on the filthy floor. This gave me a chance to also clean and re-grease the brass bushings and needle bearings in the knuckles.
[IMG]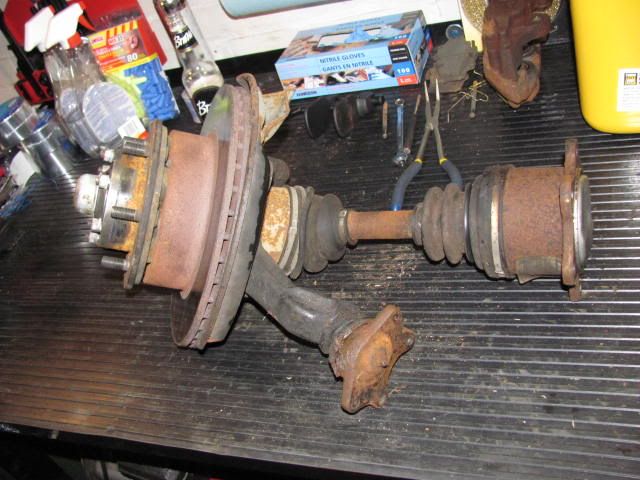 [/IMG]
[IMG]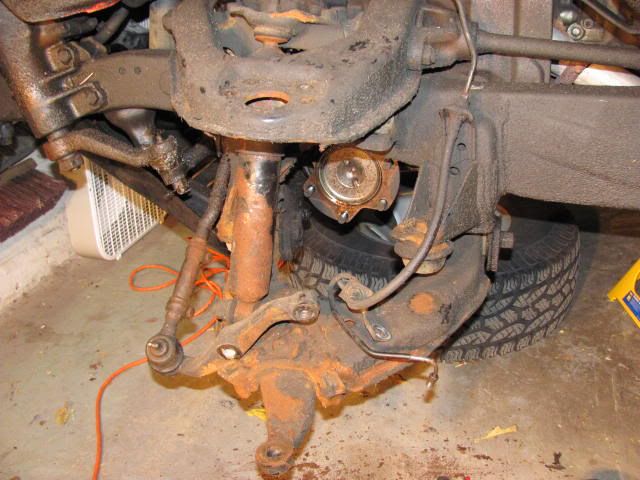 [/IMG]
....and, these Beck/Arnley inner hub seals? Eight bucks each from Rock Auto. Made in Japan. The Toyota dealer wanted $80 EACH! Shipping was negliable because Rock Auto shipped me rotors and drums in the order. Thank you, Rock Auto.
[IMG]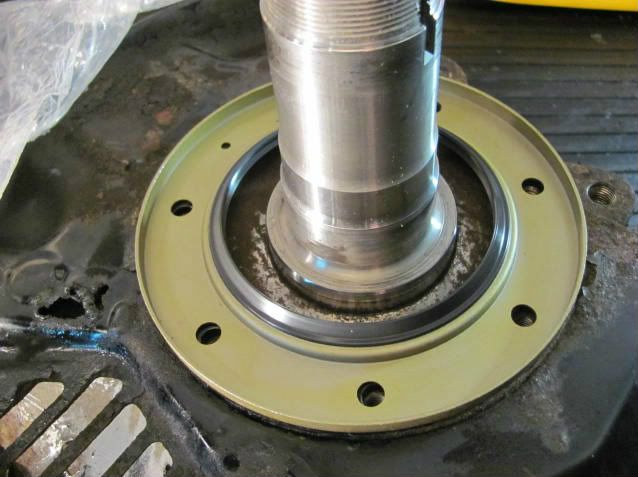 [/IMG]
[IMG]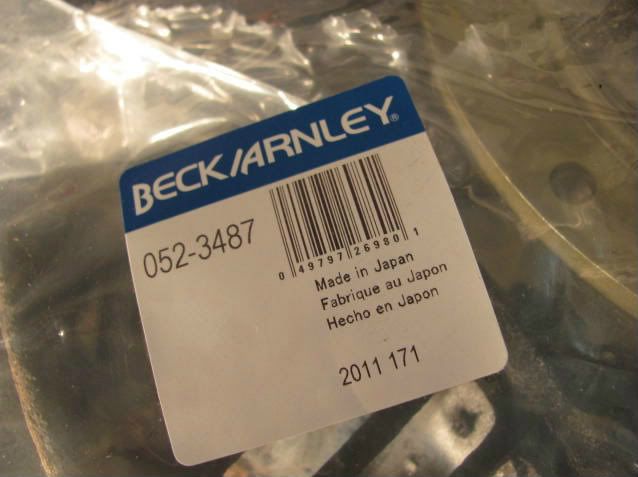 [/IMG]
[IMG]
[/IMG][IMG]
[/IMG]....and, these Beck/Arnley inner hub seals? Eight bucks each from Rock Auto. Made in Japan. The Toyota dealer wanted $80 EACH! Shipping was negliable because Rock Auto shipped me rotors and drums in the order. Thank you, Rock Auto.
[IMG]
[/IMG][IMG]
[/IMG]
Dec 5, 2011 | 02:56 PM
#15

Registered User
Joined: Jul 2011
Posts: 170
Likes: 0
From: colorado springs, Co
I did mine in about 2 hours total. the first one took 1.5 hours the second took 30 min. guess I am lucky. I just followed the manual easy as pi. do what I did and use a wrench on the side with the bolt that doesn't move. I put that up against the frame (I think) and put another wrench on the other side and pulled as hard as possible. I pushed with my legs agains the frame. they all came without very much effort. and spin the wheel to get to the next bolt. I didn't spray anything until about 5 min before I started. good luck.
Last edited by nathanmyers; Dec 5, 2011 at 02:58 PM.
May 9, 2012 | 08:40 PM
#16

Registered User
Joined: May 2012
Posts: 1
Likes: 0
Just replaced driver side. Took me about 3 hours, bolts came loose with a good size breaker bar. Had a lot of trouble getting axel out/in. After a lot of cursing I finally tried loosening ball joint bolts. Way Easier!!!!! Will go this route when I do the other side. Think it would save hours.
May 31, 2012 | 07:31 PM
#18
Registered User
Joined: Nov 2011
Posts: 21
Likes: 0
From: Maine
hey im trying to do the same thing on my truck ... but when I went to pull the drivers side cv axle out the cap popped off the back of the axle tulip joint and a bunch of grease ran out. can i refill this with grease and pop the cap back on and reuse it. if so what grease do i use? these are rediculously painful to do im on day 6
May 31, 2012 | 09:09 PM
#19

Registered User
Joined: Oct 2002
Posts: 500
Likes: 2
From: CA
Um, I have changed the front CV's on my truck 10 times so far (the cheap kragen brand keeps breaking)
Its pretty easy to change those in about 30 minutes total. No jack required, no crazy tools. The trick is to change the drivers side, you turn the wheel all the way to the right, to change the passenger, all the way to the left. This pulls the CV joint out of the tulip partway, making it super easy to take off the whole assembly. Then, unbolt them and drop the axle straight down through the hole in the A-arm and pull it out. Its not even that hard to do by hand with no prying tools. I typically just lock the hubs and use a 1/2" ratchet to loosen the 17mm's.
Its pretty easy to change those in about 30 minutes total. No jack required, no crazy tools. The trick is to change the drivers side, you turn the wheel all the way to the right, to change the passenger, all the way to the left. This pulls the CV joint out of the tulip partway, making it super easy to take off the whole assembly. Then, unbolt them and drop the axle straight down through the hole in the A-arm and pull it out. Its not even that hard to do by hand with no prying tools. I typically just lock the hubs and use a 1/2" ratchet to loosen the 17mm's.


