
Famous "high idle/surge" culprits!
 Jun 7, 2008 | 07:55 PM
#361
Registered User
Joined: Mar 2008
Posts: 12,723
Likes: 6
From: Temecula Valley, CA
and all of this would've been moot if you'd have just figured out how to drop that oil pan?
this will take thought on my part too, even though I've got quite a bit of time on my hands right now.
this will take thought on my part too, even though I've got quite a bit of time on my hands right now.
Jun 7, 2008 | 08:01 PM
#362
Thread Starter
Registered User
Joined: Feb 2008
Posts: 2,805
Likes: 1
From: Salem, OR
Alright, take your time!
Jun 7, 2008 | 08:02 PM
#363
Thread Starter
Registered User
Joined: Feb 2008
Posts: 2,805
Likes: 1
From: Salem, OR
Oh yeah, I knew how to do it, I was just afraid I would be getting myself into a bigger mess than I already was in...lol. But it seemed hard taking off the cross-member thing. It seems so easy now...lol.
Jun 7, 2008 | 08:44 PM
#364
Registered User
Joined: Mar 2008
Posts: 12,723
Likes: 6
From: Temecula Valley, CA
the funny thing is that working on the engine hasn't gotten any harder since you started this thread. you know more now than you did before. and you know that the yotatech community will be here to help you.
Jun 8, 2008 | 01:52 AM
#365
Thread Starter
Registered User
Joined: Feb 2008
Posts: 2,805
Likes: 1
From: Salem, OR
 Jun 8, 2008 | 05:02 PM
#367
Registered User
Joined: Mar 2008
Posts: 12,723
Likes: 6
From: Temecula Valley, CA
how'd you separate the cylinder from the rest of the engine? that means #4 is laying on the ground too?
or did you mean piston?
anyways, I'm gonna guess the cylinder walls are scored, the piston skirt is as well, the rings are coked up and the piston top looks like someone covered it with black bedliner.
am I right?
or did you mean piston?
anyways, I'm gonna guess the cylinder walls are scored, the piston skirt is as well, the rings are coked up and the piston top looks like someone covered it with black bedliner.
am I right?
Jun 8, 2008 | 05:54 PM
#368
Thread Starter
Registered User
Joined: Feb 2008
Posts: 2,805
Likes: 1
From: Salem, OR
how'd you separate the cylinder from the rest of the engine? that means #4 is laying on the ground too?
or did you mean piston?
anyways, I'm gonna guess the cylinder walls are scored, the piston skirt is as well, the rings are coked up and the piston top looks like someone covered it with black bedliner.
am I right?
or did you mean piston?
anyways, I'm gonna guess the cylinder walls are scored, the piston skirt is as well, the rings are coked up and the piston top looks like someone covered it with black bedliner.
am I right?
The CYLINDER WALL if fine...no scratches at all...and I'll let the pictures tell the rest...lets just say I'm surprised it had THAT MUCH compression...lol.
It will be fixed soon

Also, I bagged and labeled ALL nuts and bolts so it will be a breeze when putting it back together


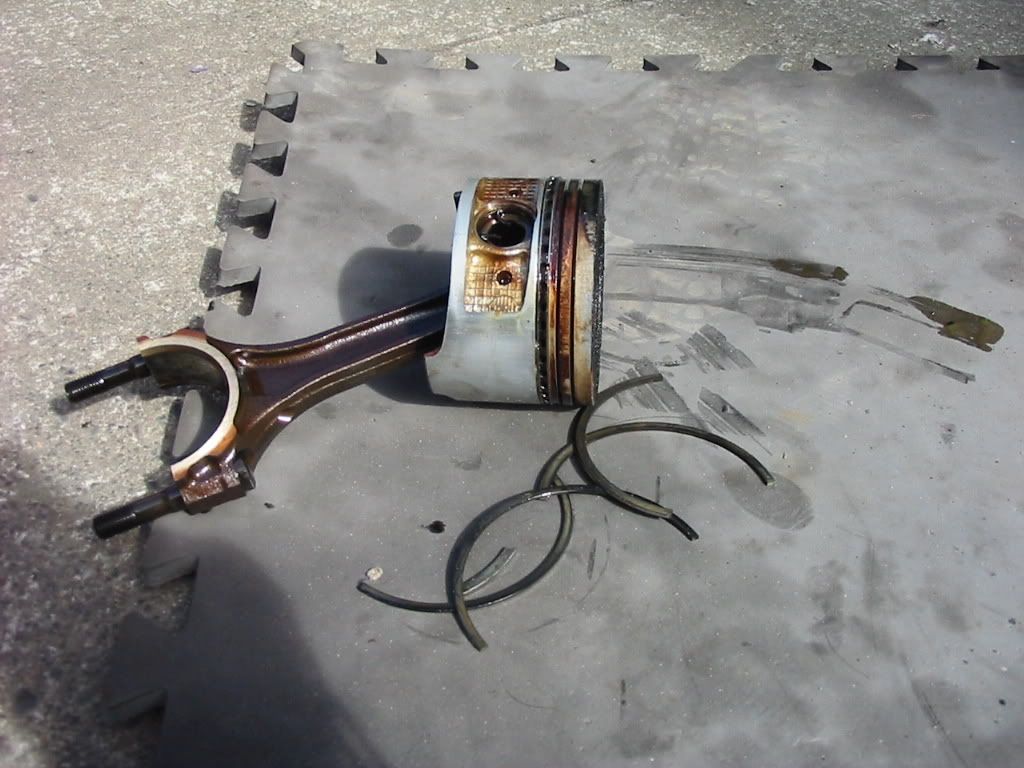


OKAY, you've seen it all. The cylinder wall is smooth...it has a little groove in the middle but nothing serious. The piston rings were all broken...lol. How can you break them??? Anyway, the top of the piston looks like it had a coat of herculiner on it...lol. Other than that, I say its in pretty good condition...and I think I will just re-ring the pistons...I was thinking of JUST doing #3 but I am not sure of that as of now...lol.
So what do you think now? Can't say I pussed out this time
 Jun 8, 2008 | 06:02 PM
#370
Thread Starter
Registered User
Joined: Feb 2008
Posts: 2,805
Likes: 1
From: Salem, OR
LOL...yeah.
I will definitely check that out!
Thanks for the confidence though! Its actually REALLY easy the second time...I'll remember to wait for warmer weather if there is a next time...lol.
I don't know what I would do if you guys weren't here
I will definitely check that out!
Thanks for the confidence though!
Its actually REALLY easy the second time...I'll remember to wait for warmer weather if there is a next time...lol.I don't know what I would do if you guys weren't here
Jun 8, 2008 | 06:14 PM
#372
Thread Starter
Registered User
Joined: Feb 2008
Posts: 2,805
Likes: 1
From: Salem, OR
I will definitely remember that...as it won't EVER hit the rev limiter again
Do I follow the manufacturers break in procedure for a new engine?
Thanks!
Jun 8, 2008 | 06:22 PM
#373
Registered User
Joined: Mar 2008
Posts: 12,723
Likes: 6
From: Temecula Valley, CA
yes, plastigauge it. remember to not rotate the crank when the plastigauge is in there. cross reference the plastigauge results with the fsm for bearing clearances to see if you need new bearings or to turn the crank journals (hope not). if you end up needing to turn the crank, may as well check the main bearing clearances too so you can get new bearings for the mains
chances are that if the rods need new bearings then the mains are likely wearing out as well.
if the ring set doesn't come with break-in guidelines search the forum here and find the recent engine break-in thread.
chances are that if the rods need new bearings then the mains are likely wearing out as well.
if the ring set doesn't come with break-in guidelines search the forum here and find the recent engine break-in thread.
Jun 8, 2008 | 06:27 PM
#374
Thread Starter
Registered User
Joined: Feb 2008
Posts: 2,805
Likes: 1
From: Salem, OR
yes, plastigauge it. remember to not rotate the crank when the plastigauge is in there. cross reference the plastigauge results with the fsm for bearing clearances to see if you need new bearings or to turn the crank journals (hope not). if you end up needing to turn the crank, may as well check the main bearing clearances too so you can get new bearings for the mains
chances are that if the rods need new bearings then the mains are likely wearing out as well.
if the ring set doesn't come with break-in guidelines search the forum here and find the recent engine break-in thread.
chances are that if the rods need new bearings then the mains are likely wearing out as well.
if the ring set doesn't come with break-in guidelines search the forum here and find the recent engine break-in thread.
This is definitely a learning experience for me. I don't know many 17 year olds that do there own engine work
So, what exactly has to be done to the head to get more power? Is it even worth my time? lol
Jun 9, 2008 | 02:51 PM
#375
Registered User
Joined: Sep 2005
Posts: 8,656
Likes: 16
From: NW Ark on wooded ten acres...Ozarks at large!
Well, I can see catching up wasn't real necessary....lol!
To be honest, though I know the potential damage than CAN be done with the situation you were in, I'm not real surprised to see the good condition of your motor. Plastigage will tell the truth, but the crank journal looks real good. I'm sure the bearings were just as good, too. AND! The piston looks no worse than mine did when I had mine apart in Jan......well, except I didn't have any broken rings. See? What'd I tell you? 22re's are good motors. Worth the rebuild.
When you get the new rings, check the ring gap in the middle and upper portion of the cylinder bores. That way you can see how much taper the bore has, if any. And, that way you'll know if the cylinders need reboring or just honing.....since there is no unacceptable scoring.
Be sure when you get the ring set to note instructions on or in the box for the proper ring order. You don't want to mix up the scraper and compression rings, nor do you want to install the scraper upside down....if it has a beveled edge. Sometimes they don't, but my Hasting's set did.
On the plastigage.....when you're checking the bearings and journals for wear, note if the plastigage has an even impression across the surface of the journals.....regardless if the impression width is within spec. If not, it'll need to be turned and you'll need oversized bearings. It appears from the reflection of the light, they are evenly worn, though.
Oh, and also if the oil clearances vary widly from the #3 journal and the rest, you should probably have it turned. The only alternative I know of is to order bearings from Toyota that would fit each main and rod journal specifically. But, THAT is expensive. I've checked! It'd be far cheaper to have the crank turned.
Check the end play on the crankshaft, too. The instructions are in the FSM, but if you find no end play has developed then you won't necessarily need new thrustwashers.
Can you take a pic of the bearings? I'd like to see what they look like, if you don't mind. I'm betting they're in good shape and that you could probably reuse them, if you wanted/needed to cut expenses, but you have it all apart and bearings are not really all that expensive to replace. If/when you order new bearings, I'd recommend getting tri-metal ones. They conform better if you don't have the crank turned. From the research I've done, aluminum bearings are a harder material. So, the slight, slight imperfections on the journals get worn off instead of the bearing material, and you'd rather have the bearings conform than the crank. AFAIK, Clevite77's are the only tri-metal bearings available in the U.S anymore.
Anyway, just throwing out more thoughts and options...hehe. Do whatever you're most comfortable with.
Jun 9, 2008 | 02:55 PM
#376
Registered User
Joined: Sep 2005
Posts: 8,656
Likes: 16
From: NW Ark on wooded ten acres...Ozarks at large!
Oh, one more thing....
About rings...
Some may suggest getting iron piston rings. Well, they do break in quicker, but the disadvantage is they don't last as long. And, they aren't as durable for heavy, heavy compression loading. Moly rings seem to be the best option all around.
About rings...
Some may suggest getting iron piston rings. Well, they do break in quicker, but the disadvantage is they don't last as long. And, they aren't as durable for heavy, heavy compression loading. Moly rings seem to be the best option all around.
Jun 9, 2008 | 03:00 PM
#377
Registered User
Joined: Mar 2008
Posts: 12,723
Likes: 6
From: Temecula Valley, CA
matthew-
what's your opinion on ring timing? like how to orient the ring gaps around the piston.
On the VW type 4 I did, I put the oil ring end-gaps 180 apart (they are a 3 piece ring- upper toward the front of the engine, middle towards the rear then the lower towards the front) then put then next ring 180 from the top oil ring, and the compression ring 180 from that. some people I've heard do 120 degree rotations so... but the VW went about 40,000 before I got rid of it and wasn't using a drop of oil over 3000 mile intervals, and it only burnt about 1 quart during break-in.... and would pull 75 up a 6% grade with the a/c on. (yes it had factory a/c)
Last edited by abecedarian; Jun 9, 2008 at 03:01 PM.
Jun 9, 2008 | 03:20 PM
#378
Registered User
Joined: Sep 2005
Posts: 8,656
Likes: 16
From: NW Ark on wooded ten acres...Ozarks at large!
I'd wondered about that when I did my rebuild. I even did some reading on the internet. But, I talked about it with a couple of different people I know that have been building street and racing engines for a long time. From what I understand, of course you don't want to have them aligned together, but rings move around a bit anyway.....more so during break in. So, clock them however so that the gaps are far enough apart (I followed the FSM recommendations), but it's nothing to be overly concerned about. Most important is the ring fitment....that you have a nice, tight end gap towards the deck surface (aside from cylinder roundness). You don't want to lose any compression at the top stroke of the pistons due to a sloppy gap. Note that if you have a tight gap at the top, you'll have it also in midway of the cylinder bore, for obvious reasons.
But, that's just what I gathered from the discussions. Does that answer the question?
But, that's just what I gathered from the discussions. Does that answer the question?
Jun 9, 2008 | 03:30 PM
#379
Registered User
Joined: Mar 2008
Posts: 12,723
Likes: 6
From: Temecula Valley, CA
lol... not really. but I get what you're saying: the rings will be compressed the most at the top and bottom of the piston stroke and the least near the middle of the stroke.
I was just wondering if you'd heard anything differing from what I've heard.
I was told that if the rings were 180 apart, there wouldn't be enough time for the any oil that got past the scraper to flow between the end gaps and migrate upwards and could cause the compression ring to, for lack of a better analogy, hydroplane and break the seal with the cylinder wall so it wouldn't break-in properly. some said that 120 was good because it let the oil seep around the gaps a bit and helped break em in quicker. oh well. but everyone I spoke and worked with agreed you want the gaps no less than 90 apart.
it's funny some of the tips and tricks you get from diesel mechanics compared to gas mechanics.
Last edited by abecedarian; Jun 9, 2008 at 03:32 PM.
Jun 9, 2008 | 03:55 PM
#380
Registered User
Joined: Sep 2005
Posts: 8,656
Likes: 16
From: NW Ark on wooded ten acres...Ozarks at large!
Wow! That's certainly more info than I got from anyone else. None of that was ever mentioned. I will have to look into it, I suppose. I clocked all 4 gaps at 90*. Figured it was fine.


