When you click on links to various merchants on this site and make a purchase, this can result in this site earning a commission. Affiliate programs and affiliations include, but are not limited to, the eBay Partner Network.
Hey all, I've read all sorts of posts now suggesting that blower motor resistor issues lead to the failing of low and medium blower speeds, but I have the opposite issue. The fan in my '87 4runner works on the three low speeds, but shuts off when I get to the high blower speed. Based on what I can gather from the other threads, this can't really be due to the resistor being bad, right? So am I likely looking at mechanical issues with the switch contacts? And if so, can that switch be pulled out without taking apart the entire dash panel? Can I get just that switch component somewhere? My local pick and pull wants me to buy the entire A/C:Fan:Heater: console and wants to charge me a pretty penny for it. Thanks all!
$0.01 for a heater switch? That sounds like a pretty good price to me! (If you tell us what a "pretty penny" is in US currency, we can get an idea of what you don't want to do.)
"Where do I get this part" seems to come up pretty often. Haven't you ever heard of "shopping"? First, go to a dealer site. (My favorite is https://parts.lakelandtoyota.com/sho...rimLevel=18293 , a for-real dealer in Florida.) Wander around until you find the right category and the right drawing, and pick out the part you want. (84730) That gets you the part number 84732-89109 and the price $9.23. Too rich for your blood? Put the part number in Google. I got to
at $4.73! (More often, the Amazon/eBay/etc. sellers are MORE expensive than this dealer. Go figure.)
But wait (you say). 84730 points to several different part numbers. The codes (RN 6#, 5# and so on) have to do with your body style. You can actually pull that out of your VIN. OR, you can cheat. Print the drawing, circle the part you think you want, and WRITE YOUR VIN ON THE PRINTOUT. Take that to your local dealer, ask if they can figure out the right part (yes, the VIN is important). Usually, they will tell you the part number and the price, and you can make your decision.
Hey, you're thinking. I'll print out the Amazon listing, and the dealer will match the price, won't they? Of course not. Don't be silly. But a big cost to dealers comes from Morons who waste the time of the counter man (woman), and in the end return the part because it wasn't right anyway. If you show up with the drawing, your best guess of the part number, and your VIN, you may be able to convince them you are not a Moron. And you can ask for a better price. I've always been able to get a better price (!), but never quite as low as an online price. After all, if I order it online, I still have to pay about $7-$10 in shipping. And wait for it.
I lost one speed on my motor, forget which one. Resistor didn't fix it. Ended up the switch itself was faulty and I just had to clean all the contacts & make a minor adjustment to the sliding contact blade on it. Also used some dielectric grease for a smoother feel. Getting to the switch isn't that hard, just be careful of the light bulb w/short wire & main plug that attaches to the back of it. Remove trim piece, pull knobs off, then black bezel & I think I took the clock out too. Be careful with the black bezel when exposing the upper & lower tabs on it, it does need a little twist taking it off and putting it back on. Plastic white plug socket attached to switch board will also be brittle, so be careful with that. There was no need to remove any of the cables. If you replace the switch, you will have to remove the cables and that will require more work.
I lost one speed on my motor, forget which one. Resistor didn't fix it. Ended up the switch itself was faulty and I just had to clean all the contacts & make a minor adjustment to the sliding contact blade on it. Also used some dielectric grease for a smoother feel. Getting to the switch isn't that hard, just be careful of the light bulb w/short wire & main plug that attaches to the back of it. Remove trim piece, pull knobs off, then black bezel & I think I took the clock out too. Be careful with the black bezel when exposing the upper & lower tabs on it, it does need a little twist taking it off and putting it back on. Plastic white plug socket attached to switch board will also be brittle, so be careful with that. There was no need to remove any of the cables. If you replace the switch, you will have to remove the cables and that will require more work.
I went in and got the switch out from behind the panel, thanks for your instructions. I didn't end up needing to take out the clock (just in case someone else is going for it in the future.) I pulled the switch housing away from the switch board and my contacts were pretty gummed up, so I cleaned everything off and reassembled, but now I only get one of the 4 states (lost 2 in the cleaning process....) Is this probably the sort of thing that a little dialectric grease will fix? Also, for anyone else going into this switch, there is a little spring behind the switch wiper that has to be in place, one of those easy to lose parts, so be careful when separating the switch housing from the switch board.
I went in and got the switch out from behind the panel, thanks for your instructions. I didn't end up needing to take out the clock (just in case someone else is going for it in the future.) I pulled the switch housing away from the switch board and my contacts were pretty gummed up, so I cleaned everything off and reassembled, but now I only get one of the 4 states (lost 2 in the cleaning process....) Is this probably the sort of thing that a little dialectric grease will fix? Also, for anyone else going into this switch, there is a little spring behind the switch wiper that has to be in place, one of those easy to lose parts, so be careful when separating the switch housing from the switch board.
Dielectric grease won't fix that. Seems the slider contact is not making proper contact with the two contacts that need to have continuity for that speed to work. You might have to tweak that slider a bit and make sure spring is working correctly. Also, make sure white plug socket on switch is still tight. Play with slider a bit with key on on bad speeds to see where pressure is needed to make continuity.
One of these times trying the easy stuff will pay off, but not this time. I dug deeper into the problem and found a couple of things. I wasn't having exactly the same presentation of blower motor resistor issues that everyone else was, so I didn't think that was my problem, But guess what...
Broken coils on Blower Motor Resistor Broken coils on Blower Motor Resistor
Two of the coils were shot. I know that semi recently three of four fan speeds were working, but maybe when I was fiddling with the switch trying to get the fourth working, I helped contribute to shorting out these two old, weak coils. Very fragile. So I decided to investigate more, because I didn;t think fiddling with the switch should really lead to shorting coils on the resistor, but what I found makes more sense.
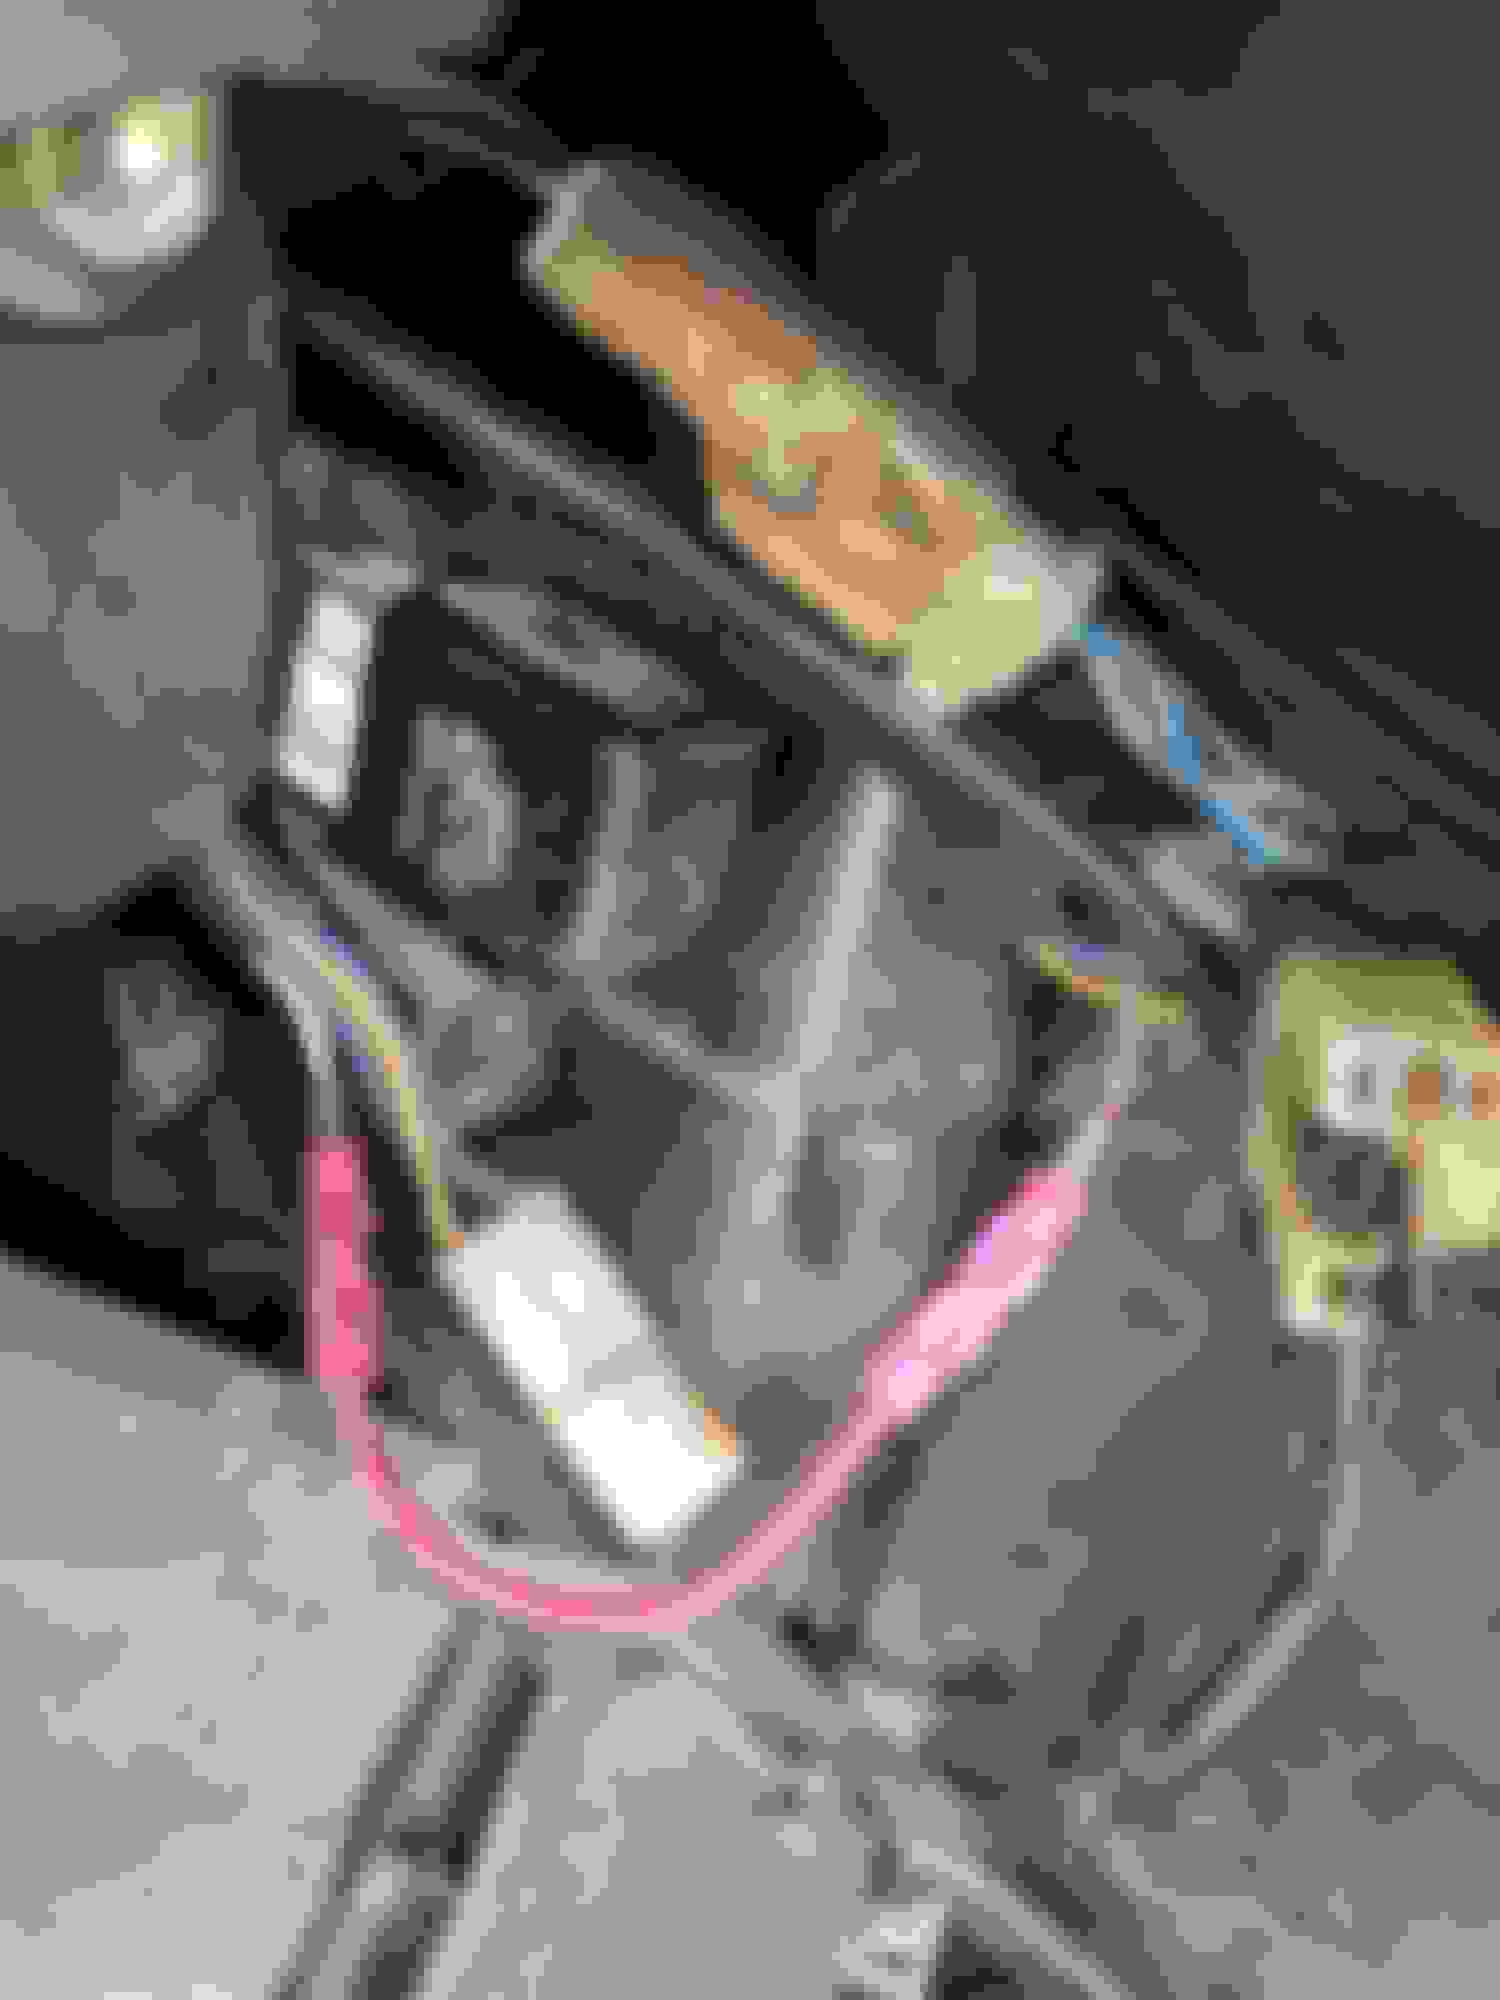
Burnt connector pins on blower motor connections
This is apparently not the first time this sort of problem has been visited. 2 very burnt connections on the connector for the blower motor switch (from behind the glove box). Looks like the previous owner had an issue with the connection, so they cut (or it burned through) and spliced the White/Black wire (Ground?) back together outside of the connector. PO Wire splice job due to burnt pin on connector
So, now I have another burnt terminal in the connector, looks like it's the right terminal to be the Hi Speed (based on the Blue Black wire and the schematic on https://www.yotatech.com/forums/f116...orking-262455/ ) So my guess is that this was where my lost High Speed fan was coming from, and that somewhere in the process I either burnt out 1 and 2 speeds, or I wrecked the resistor pulling it out. Either way, I'm pretty sure I know what the 2 problems are now.
My question before I run off and think I know everything is whether or not there is something else I should be looking for that is contributing to the burning up of these terminals. After I replace the resistor, can I get away with just splicing over the other burnt wire similarly to the way the previous owner did? Or should I try and find replacement connectors closer to OEM?
I've included just a couple of extra photos in case anyone else is thinking about digging around in their dash and wants to see some part numbers/ wire colors.
Splicing should be fine. Question is what caused the terminals to burn up like that? Probably a bad resistor, but that is just a guess. Those terminals got real hot somehow. If it was me, I would replace the resistor and splice all those wires at the connector. Also, test the switch with a meter to make sure it isn't shorting at all on any speed. Do the terminals on the switch connector plug look ok?
You might be able to repair the connectors "good as new." I am told that you can often find a 5-digit code on the plastic connector bodies; prefix that with 90980-, and take it to a dealer site to see if they have that part. The metal part of the connector is more standard across many connectors (you might have to scroll around a bit). You can remove the pins from the body with a small screwdriver, open the crimp on the insulation, and cut off only the uninsulated part crimp into the pin (I can't get those crimps open). The wire will shorten only by about 2mm with the new pins.
Could also just be the terminals in the plug not making good contact and the burn was caused by arcing by the high draw of the motor. My resistor looked pretty bad too like yours and ended up not being the problem.
Spliced in the new wire (put a fuse inline with it just because I happened to have a fuse holder handy and to help prevent burnout in the future) and replaced the blower resistor. All 4 speeds working great now. Thanks for all the help.
Now, I need to figure out why the heat output has decreased and why I lost the dash light for my environment controls. I must have jiggled enough stuff around to cause more problems. Back at it.

 Nov 1, 2018 | 09:33 AM