When you click on links to various merchants on this site and make a purchase, this can result in this site earning a commission. Affiliate programs and affiliations include, but are not limited to, the eBay Partner Network.
Well, that brings up some interesting speculation.
My post just a little while ago was asking about what was used to seal the cover to the engine block, not the head. And there are major water passages where those surfaces mate; inlet/outlet for waterpump.
Now the speculation. FIPG is pretty thick. It's designed to function as a gasket as much as a adhesive sealant. I've seen where those who leave the cylinder head on during a timing chain replacement will loosen the head bolts a little bit to be able to pull the timing cover out without totally trashing the headgasket. Now, if FIPG was but on the top surface of the timing cover it might be acting as a shim; compromising the headgasket seal. It could be ever so slightly lifting up the head and preventing a good seal at cylinder head to block.
Oh! Sorry for the misinterpretation - I used the paper gasket that came with the timing chain kit, with some Permatex high tack gasket sealant to put the timing cover on (the high tack sealant was only to get the gasket to stay in place while reassembling), with the FIPG being used at the head/timing cover area.
Should I put FIPG on the edges of the top of the timing cover when I install a new headgasket? I keep reading conflicting information about it, and of course the Haynes manual says to use it. Some people also say to install the head gasket dry, while others say to spray both sides with copper spray before installing.
The way you installed the timing cover to the block sounds fine.
Regarding the headgasket, I wouldn’t use Copper Coat. I’d use a OEM headgasket and install dry. Here’s a picture from the FSM showing fipg at the seam of the block/timing cover. As you can see, the FIPG is used in a small amount at two specific locations. It’s not to go entirely over the top surface edge of the timing cover.
The way you installed the timing cover to the block sounds fine.
Regarding the headgasket, I wouldn�t use Copper Coat. I�d use a OEM headgasket and install dry. Here�s a picture from the FSM showing fipg at the seam of the block/timing cover. As you can see, the FIPG is used in a small amount at two specific locations. It�s not to go entirely over the top surface edge of the timing cover.
Thank you so much for the help! The FSM is really helpful there. I definitely spread it across the entire timing chain cover, so that probably created a gap as you said and is causing the HG to leak?
I guess I just need to apply a tiny bit of FIPG to the timing chain cover/block junction? Do I spread it out with my fingers and then let the HG squish it down (or does that even matter?)?
It’s just a dab, hardly any at all. Just enough to seal that seam junction so oil doesn’t ooze out later on. The engine block surface is dead even with the timing cover top surface. Together they make a perfectly flat surface for the head. So you really don’t want any high spots.
I’m not a fan of Haynes. Watch eBay and every now and then you’ll find a FSM at a great price, just make sure it hasn’t been beaten to hell.
It�s just a dab, hardly any at all. Just enough to seal that seam junction so oil doesn�t ooze out later on. The engine block surface is dead even with the timing cover top surface. Together they make a perfectly flat surface for the head. So you really don�t want any high spots.
Thanks! I probably globbed too much on there, then. Live and learn, I guess.
I bought this truck to learn how to wrench on it, and I've certainly gotten many opportunities to do so, so I can't be too mad that I have to do the head gasket now. I was initially tempted to take the head off as well, but most DIY writeups said to leave the head on and just seal the top of the timing cover so I skipped that and am going to redo a bunch of work because of it.
I’d still recommend doing a chemical block test, compression test, and if possible, a leak down test before pulling the head. Those tests won’t show a restricted coolant passage, but if the headgasket was compromised those readings can help identify the cylinder(s) involved. Especially the leak down.
You picked a great engine to learn with, one of Toyota’s friendliest from a tech’s perspective.
I used same burping setup as you did, O.P.
I also repeatedly squeezed heater and radiator hoses as engine was running. At first there were marble-sized bubbles each time I squeezed and eventually they went away.
Originally Posted by Jimkola
...You picked a great engine to learn with, one of Toyota�s friendliest from a tech�s perspective.
I�d still recommend doing a chemical block test, compression test, and if possible, a leak down test before pulling the head. Those tests won�t show a restricted coolant passage, but if the headgasket was compromised those readings can help identify the cylinder(s) involved. Especially the leak down.
You picked a great engine to learn with, one of Toyota�s friendliest from a tech�s perspective.
I'll have to try and borrow an air compressor for the leakdown test, but I will try that first before taking the head apart. I haven't found a chemical block test anywhere that I can rent, though.
Originally Posted by RAD4Runner
I used same burping setup as you did, O.P.
I also repeatedly squeezed heater and radiator hoses as engine was running. At first there were marble-sized bubbles each time I squeezed and eventually they went away.
Second that.
I was able to get quite a bit of air out of the radiator by squeezing the upper radiator hose, but I was also getting a very fine "foam" out of the radiator as well, which just seemed like a lot of tiny bubbles mixed in with the coolant.
The leak down test would give more info than the chemical test. The chemical test is just a relatively quick and easy(and very reliable) method to see if combustion gas is getting into the coolant. But nothing more.
A compression test, followed by the leakdown test will give you a overall picture of each cylinder you test.
Sorry for the constant questions with no real progress, but I rented a compression tester from Autozone today, ran the truck till the coolant temp showed it was going to overheat again, then pulled the EFI fuse and spark plugs and hooked the battery up to a tender. I ran the compression test twice and got:
They're all quite high and pretty close to each other. I was expecting to see at least once cylinder below 150.
Now what do I do? I'm still stumped because again, the upper radiator and radiator hose stayed cold, until after I shut the engine off, after which it started to get hot (I'm guessing from heat soak?). Without a thermostat, the top hose and radiator do get warm, so I'm guessing my new water pump is pumping water and there aren't any blockages in the system. With the compression test, I'm not so sure it's the HG either now... Would a leak down test show any different? I just haven't done one yet because I don't have access to compressed air, and I can't really move the truck since it overheats so fast.
Either I have the world's worst air bubble somewhere deep in the truck or there's a blockage or something.
I am not sure what brand the pump is (didn't recall seeing what packaging it came in when I put it on).
I am thinking about just removing the radiator, fan and water pump and seeing if there are any blockages in the timing cover or if there are any issues with the water pump, but I can't imagine why a failed water pump or blocked timing cover would still work without a thermostat.
I’m at a loss. I’m assuming the pump LC included in the kit is Aisin, which is seldom a issue. I was thinking if it was a Autozone/O’Reillys brand that maybe the impeller suffered a weird failure.
The 22R# doesn’t have any weird coolant issues, and bleeding the coolant isn’t that esoteric. At least nothing like the 3VZE V6.
i guess they only thing left is to reverse your work. drain the coolant into a pail and see if anything weird in it. Pull the radiator flip it over and flush with a hose. Flush into a 5 gallon bucket and see if any odd material comes out. Then pull your waterpump and check passages in the timing cover and check the impeller on the pump. I guess you could at this point pull the thermostat housing and run a hose through it, making sure it comes out the timing cover inlet ok.
last resort is to pull the head.
maybe some can chime in with thoughts.
I've had three of these with 22RE, they were always easy to flush and never had overheat issues unless the head is not sealing. What I had on mine was the aluminum on the head was actually eaten away so just swapping a new head gasket would not fix it permanently, the 22RE also uses "one use" head bolts so they have to be replaced when a gasket is done. Since you bought it used someone could have changed that head gasket and now the same issue is back...
Yeah I think at this point I'm just going to start pulling things off the engine and see if there are any blockages and work my way to getting the head off. Thanks for the help everyone (especially Jimkola!) - I will keep the thread updated as I go on.
If/when the head comes off I will be getting it pressure tested and machined at a shop to make sure it's flat.
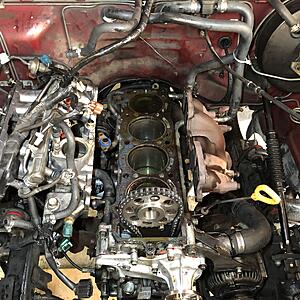
Pulled the head off, and is my head gasket supposed to look this clogged? There looks like a bunch of silicone gunk in all the passageways. I haven't removed the HG yet as I'm off to the machine shop with the head to get it pressure tested and decked, but I'm surprised the HG looks so blocked.
I also don't have the new HG in hand yet to see what it looks like it but this one looks pretty bad (you can also see where I used a ton of FIPG on the front at the timing cover...).
It’s hard to tell by the picture, but no, the passages shouldn’t be restricted at all. Someone may have added some sort of sealant at one time. Under the exhaust manifold towards the back of the block is the block drain. You might pull that whole drain out and see if it’s clogged up. You’re going to want to flush that out as much as you can. There’s a good chance if they added Barr’s leak or AlumaSeal it screwed up the radiator, too.
oh, btw, shove some rags or old cotton t shirts into the cylinders and soak up that coolant on top of the pistons. Get them dry, then spray the walls and pistons with a light coat of penetrating oil or silicone, then cover with a towel. When you’re working on the top surface of the block shove some rags in each cylinder to minimize debris getting in there.
It�s hard to tell by the picture, but no, the passages shouldn�t be restricted at all. Someone may have added some sort of sealant at one time. Under the exhaust manifold towards the back of the block is the block drain. You might pull that whole drain out and see if it�s clogged up. You�re going to want to flush that out as much as you can. There�s a good chance if they added Barr�s leak or AlumaSeal it screwed up the radiator, too.
oh, btw, shove some rags or old cotton t shirts into the cylinders and soak up that coolant on top of the pistons. Get them dry, then spray the walls and pistons with a light coat of penetrating oil or silicone, then cover with a towel. When you�re working on the top surface of the block shove some rags in each cylinder to minimize debris getting in there.
thanks for updating.
jimW
Thanks for the tips! I will definitely follow your advice. I still have to take the timing cover, water pump, oil pump and oil pan off and make sure I don't have any other blockages there either.
The head bolts I ordered from Amazon will take over a week to arrive so I have a lot of time to clean, I suppose.

 Apr 27, 2020 | 08:26 AM