When you click on links to various merchants on this site and make a purchase, this can result in this site earning a commission. Affiliate programs and affiliations include, but are not limited to, the eBay Partner Network.
That was a good read! I plan to refer back to it several times and I may end up doing this upgrade somewhere down the road.
Last night, I drove the 4Runner to work. I went about 12 miles and stopped at Subway for a bite to eat - the truck was parked for 10-15 minutes at the most. The engine was obviously still warm and when I cranked it up, the idle was extremely rough. The truck was jerking and bucking similar to what happens if you're sitting in gear and release your foot off the clutch.
I'll be looking at the IACV and testing it to the best of my ability. With the holidays right around the corner, I don't know how much attention I'll be able to give to the problem.
In the meantime, I'm wondering if I should I leave the 4Runner parked until I can get this straightened out?
The engine was obviously still warm and when I cranked it up, the idle was extremely rough. The truck was jerking and bucking similar to what happens if you're sitting in gear and release your foot off the clutch.
I did the late intake-throttle body swap which is great, now my truck idles up when the engine is cold all the time. But the problem you are describing is still happening when the engine is hot ever since i got the truck 9 years ago, park the truck for a few minutes comeback and restart it and it just idles really rough like crap. But i don't think it has anything to do with the auxiliary air valve at all, so i just learn to live with the problem and ignore it.
I agree there's almost no chance your iacv is making the idle that rough at warm start-up.
My iacv was non-functional the first 4 years I had my '85 with the old-style valve and the worst symptom was a very low dropping idle on the coldest days at first start-up. Once in awhile it got so low that it would stall out in the driveway while I tried to warm the truck up before a drive. Those were all days that were below 20�F.
Got a timing light? Where's your timing set at and is the timing dot fairly steady when you check it?
Happy Holidays! It's been a little while, but I finally had a bit of time to mess around with the truck. Here's where I'm at:
This week I inspected the spark plugs, adjusted the idle speed, adjusted the timing and performed an oil change.
IMO the spark plugs were generally in good condition. They were the right kind - Denso plugs with Sumitomo wires. No excessive wear - maybe a bit of carbon deposit. I was comparing my spark plugs to what I saw in the Haynes manual, but I'd love to hear your thoughts. See pictures below. I did not replace the spark plugs at this time.
I got an Innova 3568 timing light for Christmas and this allowed me to check the idle speed and timing. According the factory service manual, target idle speed for the 22R-E is 750 rpm. When I checked my engine, the idle speed was set at around 1000 rpm. I tried 750 rpm and it just seemed to be too rough, so I think I've settled in for now at about 850 rpm. I believe I read somewhere that 850 is the target for a 22R-E with auto trans. If anyone has any thoughts or concerns, feel free to share.
After adjusting the idle, I checked out the timing. This was my first time doing this procedure and I found this video (below) to be helpful. It does a nice job supplementing the information in the factory service manual. Upon initial inspection, I found that the timing was more or less in spec. I made a minor adjustment, but nothing crazy.
The oil change was pretty routine. The oil was old and dirty, but it didn't look bad. I replaced the parts store oil filter with the tall Toyota filter: 90915-YZZD3. I don't live particularly close to the dealership, so I ordered the filter off of Amazon. I get free 2 day shipping with Prime and got 5 filters for $26.90. Seemed OK to me. I replaced the drain plug with a Fumoto F-103 drain valve. It seems that some people hate these and others love them. I love them. I have one on my car and it makes oil changes a breeze. I did keep the old drain plug though - just in case.
In the near future, I plan to remove the valve cover and take a look at the timing chain. I'll also be performing a compression test and want to get the valves adjusted and perform a general tune up. I'll be investigating why the truck consumes oil and troubleshooting a (possible?) fuel leak. There are also a few odds and ends that need to be replaced. I appreciate your feedback and suggestions. YotaTech is an incredible resource and I'm glad to be a part of the community.
Last edited by NC87_Runner; Dec 28, 2017 at 05:56 PM.
I just realized that the Temp switch no.2 referred to on this^^^ tech bulletin is the one on top of the thermostat housing shown in attachment. It is a single-wire switch, meaning it also gets its ground through its mounting threads, meaning its mounting threads should also be cleaned to bare, shiny metal just like the CSI timer switch's. I still get my occasional rough idle after parking for a short while, so I'll double-check threads on mine soon, too.
I recently started following you on IG, funny that found you here within a few days. im keyappstate. following your resto closely, mostly because I fully intend on stealing part numbers and ideas haha. ill be putting my resto thread up soon enough.
I recently started following you on IG, funny that found you here within a few days. im keyappstate. following your resto closely, mostly because I fully intend on stealing part numbers and ideas haha. ill be putting my resto thread up soon enough.
Nice! If your username refers to Appalachian State, that's where I graduated from too. You've been putting a lot of work into your 4Runner. I've seen a lot of things that you've posted on Instagram that I'm also interested in doing eventually. I hope you'll go into greater detail on YotaTech. Look forward to following your thread!
Nice! If your username refers to Appalachian State, that's where I graduated from too. You've been putting a lot of work into your 4Runner. I've seen a lot of things that you've posted on Instagram that I'm also interested in doing eventually. I hope you'll go into greater detail on YotaTech. Look forward to following your thread!
Yes i went from 07-11. Parks and rec. i had a red 88 1st gen with a trail gear sas and 6 inch lift springs on 37�s. Had long tube headers and dual magnas on it, if you were around you probably saw (or heard) it. Was a pos but a fun truck.
Not much to report. The weather has been miserable and I've been sick as well... To keep myself busy, I like to experiment with ways to restore parts that are difficult or impossible to find. No detail is too small.
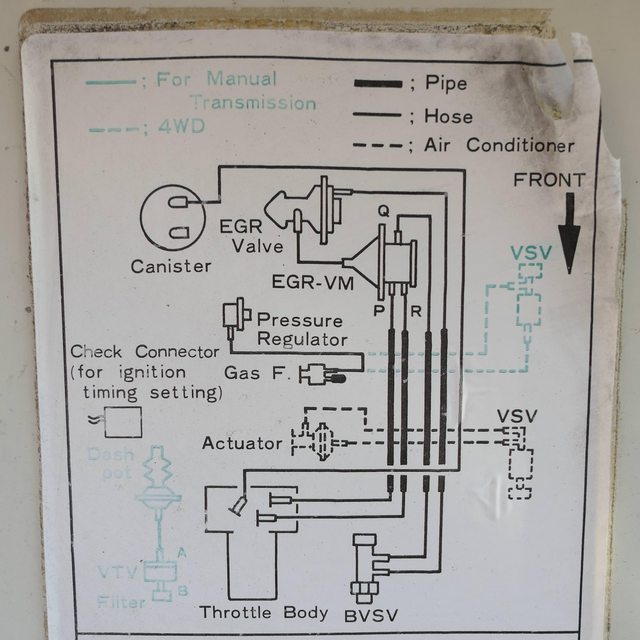
Whenever I pop the hood, my eyes tend to stray to the faded vacuum diagram and emissions labels - they drive me bananas! Unfortunately, neither sticker is available from Toyota (Vacuum Hose Diagram: 17792-35840 & Emission Control Label: 11298-3D010) so I decided to try to create a replica of the vacuum diagram in Photoshop. I'm definitely not a pro and it still needs some work, but I thought my initial attempt came out pretty good (below)!
I'd like to get this printed as a heavy duty sticker and replace the original whenever I paint the hood.I'm trying to make a list of other little things similar to this that I can work on - any suggestions?If anyone has the emissions sticker for the 22R-E that is not too faded or worn, I'd love to see a picture and try my hand at recreating it too. Here's mine (below).
I'll admit that I really love doing things like this - obsessing over the details and trying to duplicate the original as accurately as possible is a lot of fun!
Very nice work, NC87. User ksti printed a sticker on a sublimation press found at a trophy shop. He reported to me that it was very difficult to get it to work correctly (though the example he sent me was excellent.) You could print this with a laser printer onto "full sheet" label stock, but unless you protected the surface somehow (spray lacquer?) it might not fare well in the hot engine bay.
Not much to report. The weather has been miserable and I've been sick as well... To keep myself busy, I like to experiment with ways to restore parts that are difficult or impossible to find. No detail is too small.
Whenever I pop the hood, my eyes tend to stray to the faded vacuum diagram and emissions labels - they drive me bananas! Unfortunately, neither sticker is available from Toyota (Vacuum Hose Diagram: 17792-35840 & Emission Control Label: 11298-3D010) so I decided to try to create a replica of the vacuum diagram in Photoshop. I'm definitely not a pro and it still needs some work, but I thought my initial attempt came out pretty good (below)!
I'd like to get this printed as a heavy duty sticker and replace the original whenever I paint the hood.I'm trying to make a list of other little things similar to this that I can work on - any suggestions?If anyone has the emissions sticker for the 22R-E that is not too faded or worn, I'd love to see a picture and try my hand at recreating it too. Here's mine (below).
I'll admit that I really love doing things like this - obsessing over the details and trying to duplicate the original as accurately as possible is a lot of fun!
Nice job on the label!
You are like me in that even the smallest details are important. Nothing shows this more than making accurate reproduction labels!
At some point I need to find the label that goes on the top of the power steering reservoir. I accidentally wiped that label clean of lettering when wiping up spilled ATF for the Power Steering...

 Dec 15, 2017 | 09:11 AM


 It's been a little while, but I finally had a bit of time to mess around with the truck. Here's where I'm at:


 I replaced the drain plug with a Fumoto F-103 drain valve. It seems that some people hate these and others love them. I love them. I have one on my car and it makes oil changes a breeze. I did keep the old drain plug though - just in case.


 You've been putting a lot of work into your 4Runner. I've seen a lot of things that you've posted on Instagram that I'm also interested in doing eventually. I hope you'll go into greater detail on YotaTech. Look forward to following your thread!