
190 hp 3.0 V-6 from CHS Machine 210 Torq
 Jul 3, 2011 | 04:56 PM
#21

Thread Starter
Registered User
Joined: Jun 2011
Posts: 37
Likes: 0
http://s1204.photobucket.com/albums/...FWildblue09%2F
Here she is with 190 new Hp & 210 fp of torque... that smurf bar has to go on craigs list... will post a follow up when its compound buffed and at 10K miles in. Just going to do the break in oil change and scope check its running conditions for the warranty.
Here she is with 190 new Hp & 210 fp of torque... that smurf bar has to go on craigs list... will post a follow up when its compound buffed and at 10K miles in. Just going to do the break in oil change and scope check its running conditions for the warranty.
Last edited by Wildblue; Jul 3, 2011 at 05:04 PM.
Jul 3, 2011 | 06:19 PM
#24
Registered User
Joined: Jan 2007
Posts: 6,106
Likes: 27
He meant $300 core for the high performance 22RE, I presume.
NOT seeing the pic still. To do so easily, copy the [IMG] code of the pic on the photobucket page. It's at the bottom of the list of them just below the pic. Paste it in the post. Easy peasy.
NOT seeing the pic still. To do so easily, copy the [IMG] code of the pic on the photobucket page. It's at the bottom of the list of them just below the pic. Paste it in the post. Easy peasy.
Last edited by MudHippy; Jul 3, 2011 at 06:24 PM.
Jul 3, 2011 | 06:22 PM
#25
Thread Starter
Registered User
Joined: Jun 2011
Posts: 37
Likes: 0
Jul 3, 2011 | 06:32 PM
#26
Registered User
Joined: Jan 2007
Posts: 6,106
Likes: 27
[IMG]insert direct link to image here[/IMG]
The direct link code at the TOP of the list goes between the [IMG]direct link to image on photobucket[/IMG], if you feel like doing it a different way(takes longer than just copying and pasting).
The direct link code at the TOP of the list goes between the [IMG]direct link to image on photobucket[/IMG], if you feel like doing it a different way(takes longer than just copying and pasting).
Last edited by MudHippy; Jul 3, 2011 at 06:40 PM.
Jul 4, 2011 | 08:01 AM
#27
Thread Starter
Registered User
Joined: Jun 2011
Posts: 37
Likes: 0


 Jul 4, 2011 | 10:49 AM
#29
Registered User
Joined: Jan 2007
Posts: 6,106
Likes: 27
Oooooh, I just thought of some things that might be a problem for some people buying these. Unless they make sure they give you the heads you need for your timing and ignition components to work.
http://www.enginebuildermag.com/Arti...ta_30l_v6.aspx
What that means is if you have an earlier distributor with an 8mm shaft, you will need a head that also has an 8mm pilot hole. Or it will need sleeved to fit the 10mm hole, or replaced with the later model distributor(wiring connector swap involved to work with old harness). The shaft is also longer on the earlier ones so it won't fit the later hole that way either.
Cylinder heads
The cylinder heads are unique from left to right due to a spot for the distributor, although you can convert the heads by changing the caps and line boring the cylinder head. The early cylinder heads (’88 through ’90) had a smaller pilot hole for the distributor than the later ones which were 10mm.
To make a universal application, some shops have successfully machined the pilot holes to 10mm to fit later applications. This can be done without any problems if used on an earlier application with the smaller piloted distributor. The left and right camshafts did not change throughout the life span of the motor.
Timing components
The belt tensioner used from ’88-’92 was a spring loaded tensioner (Toyota p/n 13505-65020). In 1993 the tensioner went to a hydraulic style (Toyota p/n 13505-65040) (see photo on page 38). To accommodate this change, the front of the right-hand cylinder head has a machined recess and a drilled and tapped hole. Earlier heads may be machined to be adapted if necessary.
The timing belt was also changed to accommodate the difference in the tensioner at the same time. If you are supplying water pumps, be aware of a couple of things to watch out for (see photo on page 39). Different applications had a bypass nipple while some did not.
The best bet is to have the customer identify which pump they have. From ’88-’92 the water pump must have a locator pin at one end for the spring on the timing tensioner. The 1993 and later water pumps did not have the pin. The pin can be knocked out on new and remanufactured water pumps that have the pin if it is not needed for the later applications.
What that means is if you have an earlier distributor with an 8mm shaft, you will need a head that also has an 8mm pilot hole. Or it will need sleeved to fit the 10mm hole, or replaced with the later model distributor(wiring connector swap involved to work with old harness). The shaft is also longer on the earlier ones so it won't fit the later hole that way either.
Last edited by MudHippy; Jul 7, 2011 at 01:41 PM.
Jul 7, 2011 | 11:54 AM
#30
Registered User
Joined: Aug 2010
Posts: 2,027
Likes: 1
From: Oregon, USA
I'm actually leaning more towards this than a 3.4 swap...did you install headers? I'm curious if the idle lopes at all and how throaty it sounds...would love to see a video of this thing running/idling if it's not too much to ask.
Jul 7, 2011 | 12:25 PM
#31
Registered User
Joined: Jan 2007
Posts: 6,106
Likes: 27
Jul 7, 2011 | 01:11 PM
#33
Registered User
Joined: Aug 2010
Posts: 2,027
Likes: 1
From: Oregon, USA
 Just wondering if he installed headers or not. I'd still like to see a video of this thing too.
Jul 7, 2011 | 01:39 PM
Just wondering if he installed headers or not. I'd still like to see a video of this thing too.
Jul 7, 2011 | 01:39 PM
#34
Registered User
Joined: Jan 2007
Posts: 6,106
Likes: 27
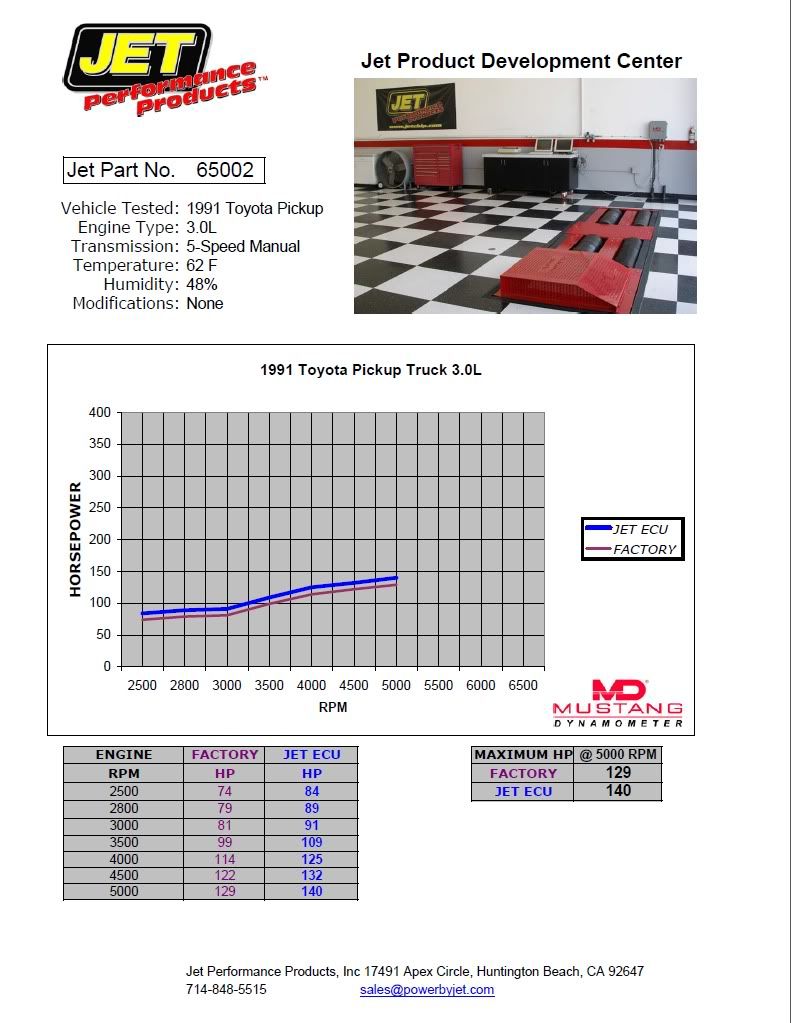
http://www.jetchip.com/dyno.asp?folder=Toyota

Last edited by MudHippy; Jul 7, 2011 at 07:18 PM.
Jul 7, 2011 | 04:11 PM
#35

Registered User
Joined: Jun 2011
Posts: 70
Likes: 0
thanks for the info ill keep it in mind,i plan to pick up a spare motor and do some of my own work to it.i have built a few motors (gm) so the toyota motor is new and interesting.i figure with some good pistons,ill do a bowl blend and send the heads to my machinist for a good valve job and decking and see what i can get out of it.
Jul 7, 2011 | 05:00 PM
#36
Thread Starter
Registered User
Joined: Jun 2011
Posts: 37
Likes: 0
No I did not install headers.... did not anticipate having to do the engine swap at this time and for the money I thought the potential gains were at the best minimal.
You will never get that cross over pipe out without removing the engine or cab . The bellhousing bolt top drivers side was fun enough. I'm make road run video after changing my break-in oil out.
You will never get that cross over pipe out without removing the engine or cab
. The bellhousing bolt top drivers side was fun enough. I'm make road run video after changing my break-in oil out.
 Jul 8, 2011 | 06:12 AM
#39
Thread Starter
Registered User
Joined: Jun 2011
Posts: 37
Likes: 0
The K&N filter was badly mounted with only one bolt to the fender. Over time vibration pulled the underside nut up through the fender liner and so it was basically flopping on the fender liner causing the knock sense to kick in Code. Stymied for cause for the Code 52 I decided to take a break on solving that problem and put it aside until I could do more research. So I fabricated a mounting bracket to better secure the filter and after clearing the ECU code, took it for another run down the road. The code light still came on just as I was coming back into the drive way but the code was settling down and was much less frequent. The ECU seems to be shopping around for a new normal operational range.... would like to examine the computer code line by line to understand the ECU design logic. All in all its been a great expereince of getting to know your Yoda on a deeply intimate basis. Swap an engine in one of these and you will get to know your Yoda. The original intent was to purchase a rust free body and frame cheaply anticipating an engine swap later down the road. The Chasis turned out better than anticpated and the engine weaker so the decision was made to immediately do the CHS Proline 190 hp rebuild. One day for a very rusty hobby mechanic (me) to pull the old engine (some great insightful time saving tips were provided by Duane). The 92 4x4 engine compartment is a pretty tight space to work. Most manuals want you to pull engine and trany together and to take out all the steering rods, but after struggling with undoing the tappered shafts I went with just pulling the motor. Once I figured out the starter hangup problem the engine lifted right out. We would have been only one day for the reinstall but had to run back to the machine shop in Portland (3 hrs return) twice to pick up studs, cam dowel and side block plug. The mistake made on this swap was in taking the core into the machine shop before install. Only somebody very familiar with this long block should attempt to do the swap that way. Toyota has done a pretty good job on this truck and the one thing that I found nice working on it was that you can do all this with pretty much three wrenches. Bolt standardization saves a hobbiest a lot of time scrambling for another tool. I've done a Ford 289 v-8 when I was 15 years old under my Dad's supervision. Raced a 383 dodge stock car claimer for one season (engine was in and out weekly) hot rodded a 390 ford into the 12 second bracket and later rebuilt a four cylinder diesel all of this over 30 years ago. As for the design the main shortcoming is that rear problematic mounted cross over pipe. I'm pretty sure that the original designers would now agree that going straight down to a wye pipe or straight dual exhaust would have been a much better design. I'm sure that this item alone would have done away with a lot of heat sink stress failure issues (head gaskets, valves, coolant presure failures, etc) to say nothing of the pain it is to work on it. It can be removed with the engine in place only by removing both heads at once with the cross over pipe still attached to both heads. That is clearly a design flaw. Otherwise very happy with the new engine and a great little truck. Now I noticed that I have some CV boots that are split and need service before i can go get this thing muddy.... new repair territory for me again.... any advice on working in this area? Thank you kindly,
Wildblue
Wildblue
Last edited by Wildblue; Jul 8, 2011 at 06:27 AM.
Jul 8, 2011 | 08:16 AM
#40

Registered User
Joined: Dec 2010
Posts: 72
Likes: 0
Keep us posted on how this works. I wish i would have known about this a few months ago. I just replaced my 3.0 at "The Engine Store" in tualatin. 1800 bucks for a rebuilt motor installed in my truck. I would have loved to spend a little extra and get that much extra power.


