
30 spline Longfield install with pics.
 Jul 21, 2006 | 07:41 PM
#21
Originally Posted by 1985 4Runner
NOW you tell me... 
Grasshopper learns from Wabbit...
I have the drilled rotors, just not the V-6 calipers...if only the '89 had been a 3.0...(not)
Grasshopper learns from Wabbit...
I have the drilled rotors, just not the V-6 calipers...if only the '89 had been a 3.0...(not)

You can upgrade the brakes when you do the high crossover steering as you gotta take the rims off again anyway. I'm going to do mine soon...as I actually thought I already had. :pat:
Looks good so far. :bigclap: I'll catch you tomorrow...lots of work to do.
 Jul 21, 2006 | 07:50 PM
#22
Thread Starter
Contributing Member
Joined: Feb 2006
Posts: 1,876
Likes: 1
From: Gulfport, Mississippi
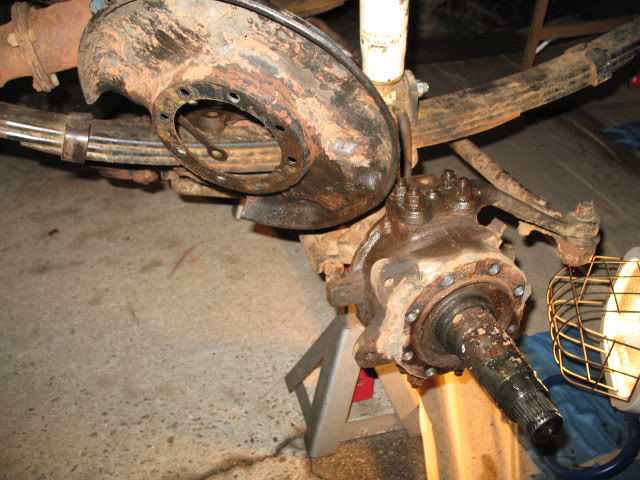
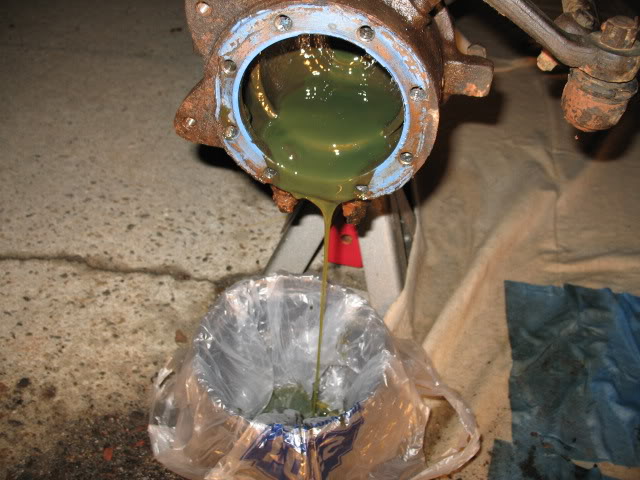
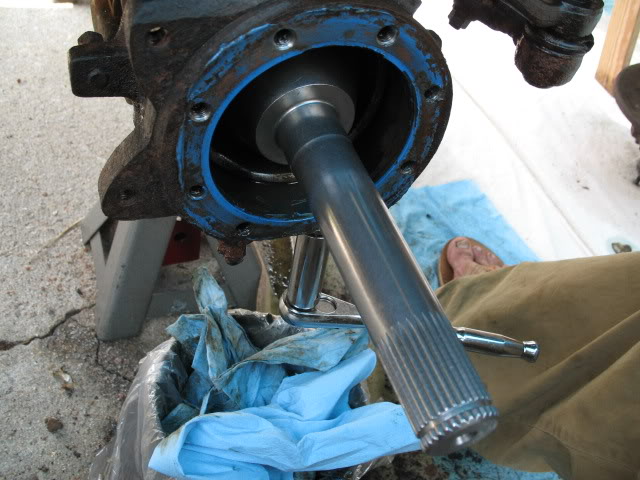
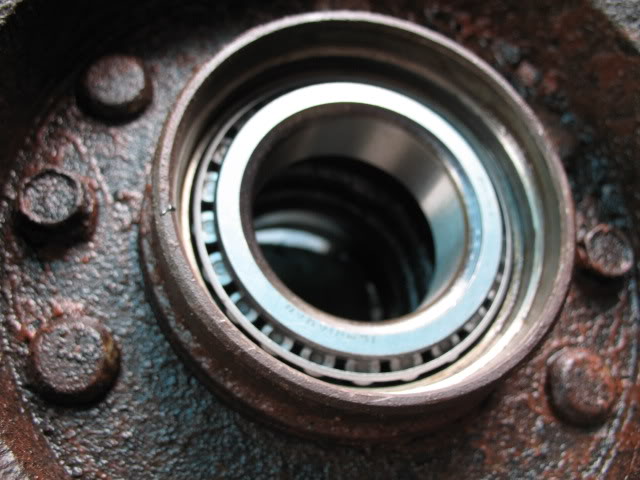
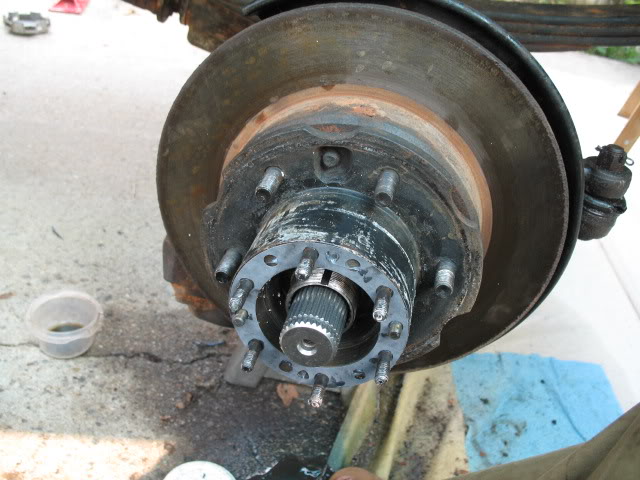
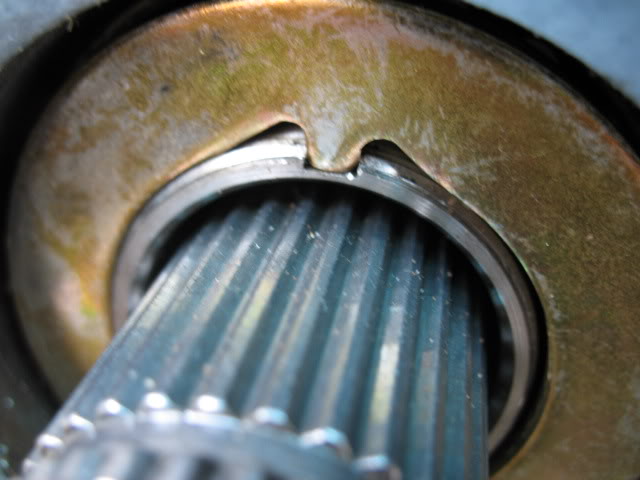
So once the wheel hub assembly is off I could remove the seal & inner wheel bearing:

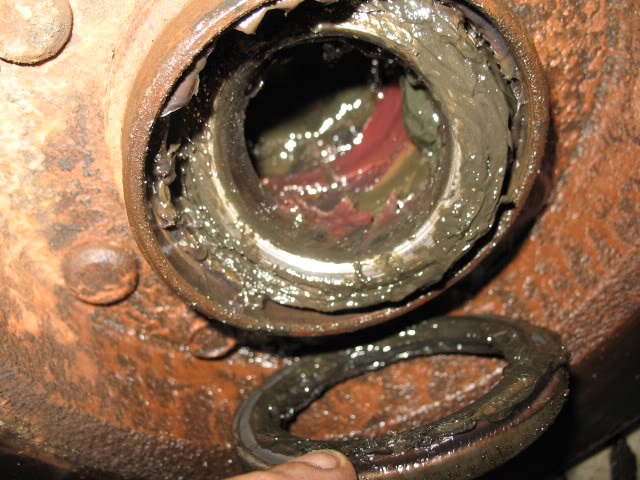

Now I remove the knuckle spindle dust shield:


Which allows the whole dust shield to come off: I set it on the leaf spring.
Now I remove the knuckle spindle dust shield:
Which allows the whole dust shield to come off: I set it on the leaf spring.
Jul 21, 2006 | 07:54 PM
#23
Thread Starter
Contributing Member
Joined: Feb 2006
Posts: 1,876
Likes: 1
From: Gulfport, Mississippi
Originally Posted by waskillywabbit
I done showed you once.
You can upgrade the brakes when you do the high crossover steering as you gotta take the rims off again anyway. I'm going to do mine soon...as I actually thought I already had. :pat:
Looks good so far. :bigclap: I'll catch you tomorrow...lots of work to do.
You can upgrade the brakes when you do the high crossover steering as you gotta take the rims off again anyway. I'm going to do mine soon...as I actually thought I already had. :pat:
Looks good so far. :bigclap: I'll catch you tomorrow...lots of work to do.
I hear ya...get some sleep, us whipper snappers go all night...

Work? You must be fabbing an exo for me right? :bigclap:
I bet the other side is fine, I may only run half a longfield...

Later!
Jul 21, 2006 | 08:04 PM
#26
Thread Starter
Contributing Member
Joined: Feb 2006
Posts: 1,876
Likes: 1
From: Gulfport, Mississippi
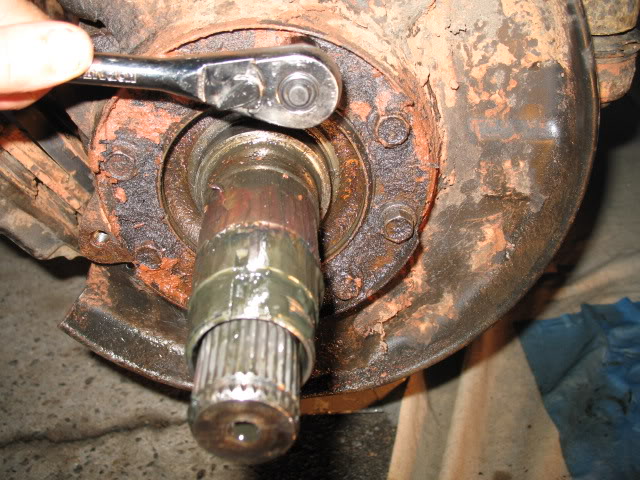
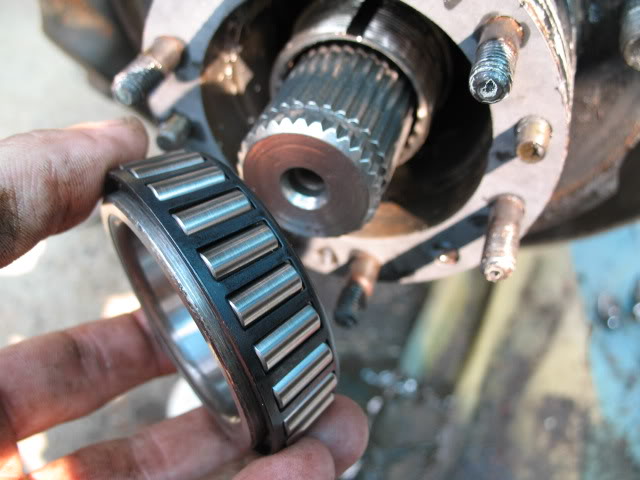
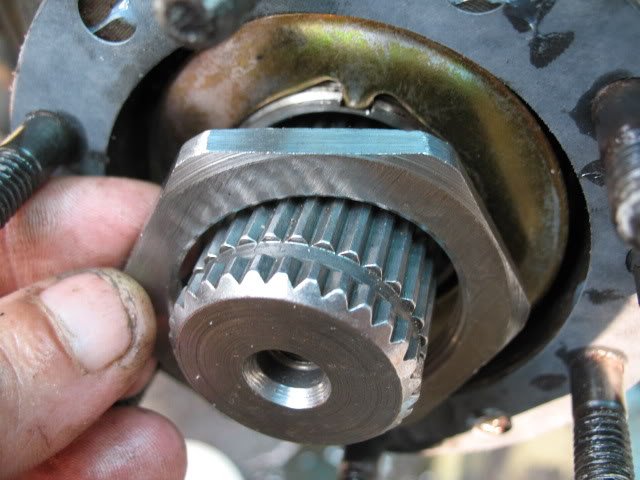
Once the dust cover is off, the knuckle spindle can be removed:
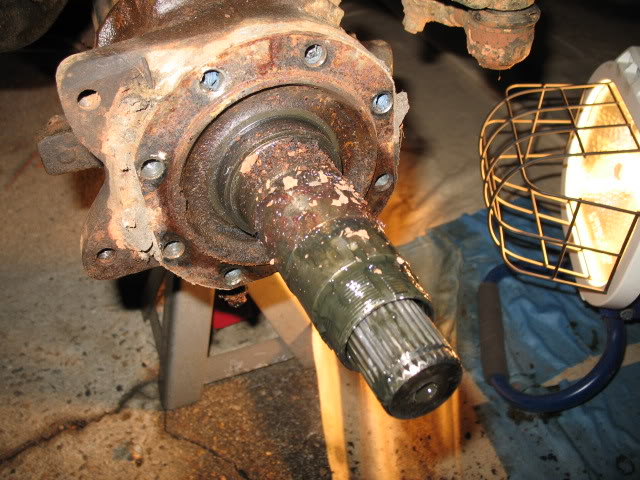
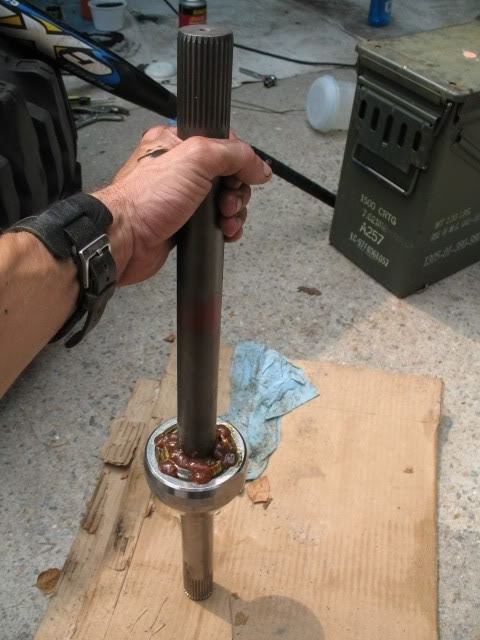
Which exposes the objective, the axle shaft...
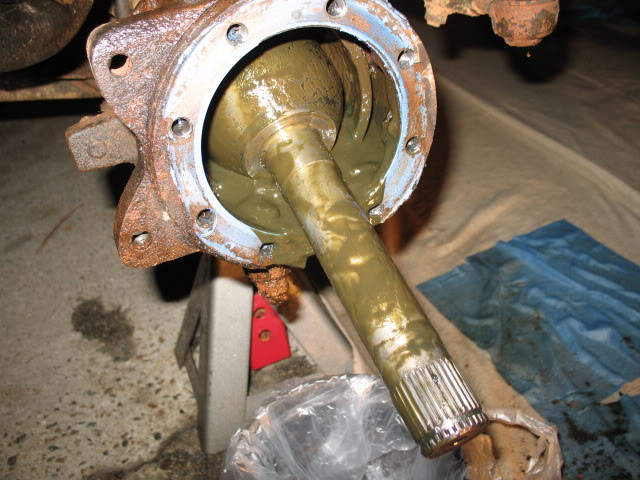
I felt like I was delivering a baby....
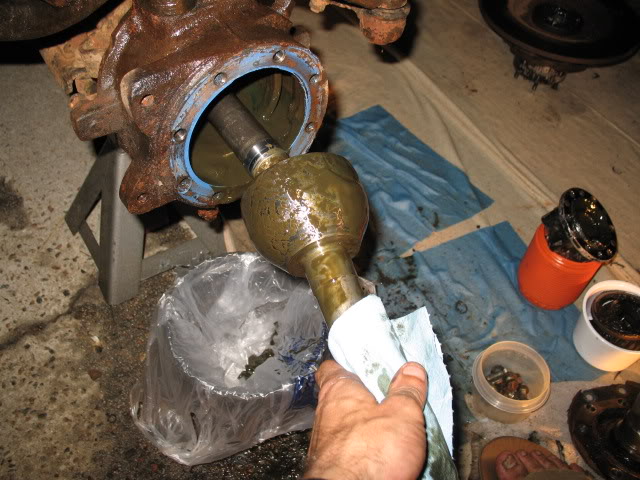
Here she is:
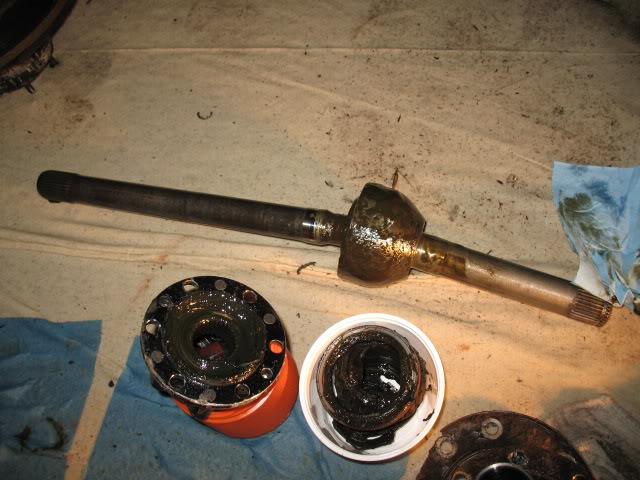
After delivery...
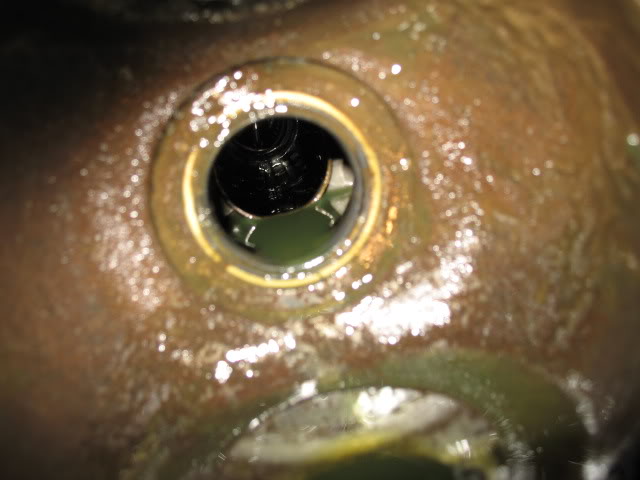
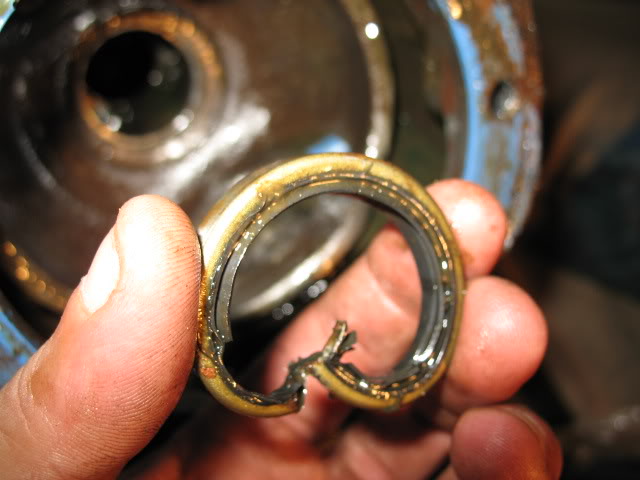
Inner axle seal: (this little thing gave me quite a headache, I didn't have a seal puller)
Which exposes the objective, the axle shaft...
I felt like I was delivering a baby....
Here she is:
After delivery...
Inner axle seal: (this little thing gave me quite a headache, I didn't have a seal puller)
Jul 21, 2006 | 08:20 PM
#27
Thread Starter
Contributing Member
Joined: Feb 2006
Posts: 1,876
Likes: 1
From: Gulfport, Mississippi
Originally Posted by neliconcept
sounds good man.. educate me on what the hell a spline is lol. Im gonna try and wheel my truck but im afraid im gonna eff something up until i start upgrading the armrour (aka tjm15 and budbuilt skids and what not)
I'll do something though
I'll do something though
Splines turn the axles, they are attached to the gears. (Somebody correct me if I'm wrong)
Wheel what you can, don't worry. I went to Tellico & rode the easier trails, I had just bought my truck & knew it wasn't built for the harder trails (yet). No worries, we'll have a good time. I still have to take it easy because of my stock steering.
Last edited by 1985 4Runner; Jul 21, 2006 at 08:48 PM.
Jul 21, 2006 | 08:52 PM
#28
Thread Starter
Contributing Member
Joined: Feb 2006
Posts: 1,876
Likes: 1
From: Gulfport, Mississippi
Ok, sorry this is taking longer than I thought, but I have to stop every few minutes & clean the grease off to take a pic, then upload a few while the info is still fresh in my mind. My "helper" is out of town this week so be patient & I'll be done soon.
Jul 21, 2006 | 11:59 PM
#29
Thread Starter
Contributing Member
Joined: Feb 2006
Posts: 1,876
Likes: 1
From: Gulfport, Mississippi
After a hour of hammering on the knuckles, I decided not to remove & rebuild them. Too much of a PITA... I have to do all that stuff when I do the steering mod anyway.
So the plan is re-install the new 30 splines with the new hub gears & ride tomorrow.
So the plan is re-install the new 30 splines with the new hub gears & ride tomorrow.
Jul 22, 2006 | 08:29 AM
#30
Thread Starter
Contributing Member
Joined: Feb 2006
Posts: 1,876
Likes: 1
From: Gulfport, Mississippi
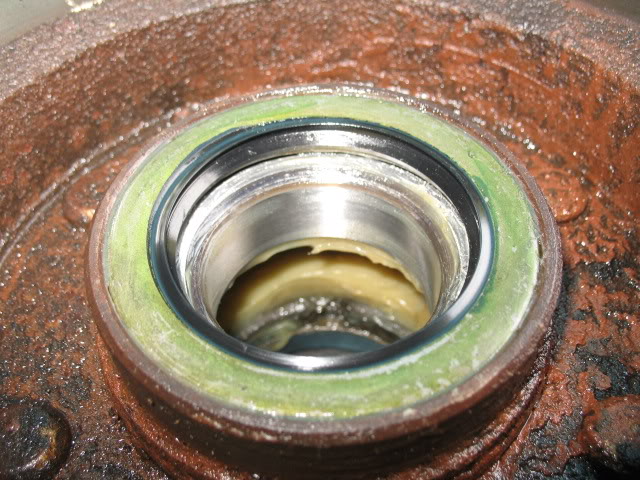
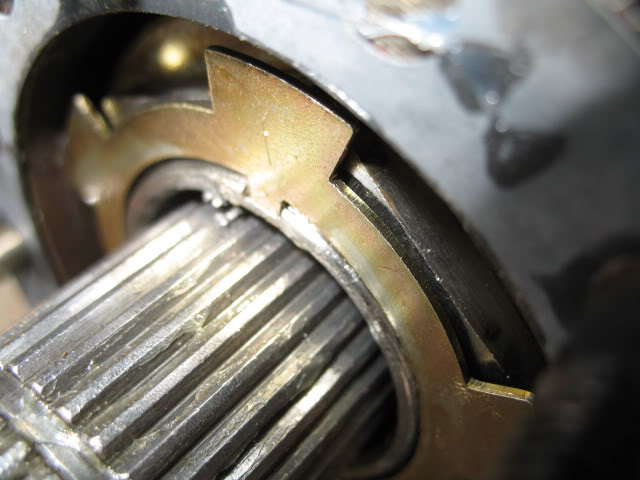
OK, so I put the new seal in. I tapped it in with a piece of wood so as not to damage it.


all seated in...

Time to put these in:

put them together & tapped it in
insertion...
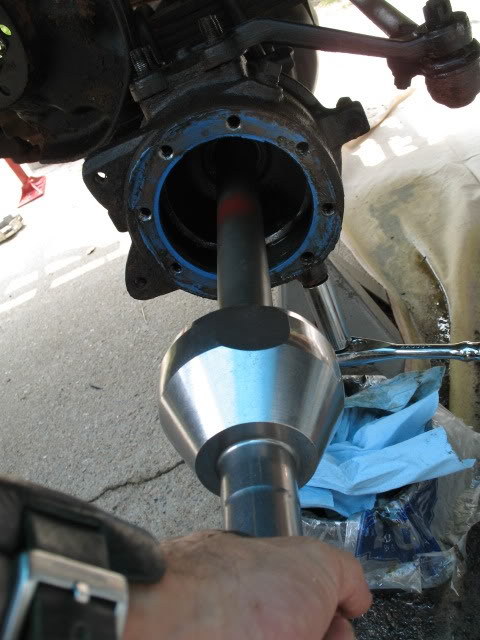
all seated in...
Time to put these in:
put them together & tapped it in
insertion...
Jul 22, 2006 | 08:33 AM
#31
Thread Starter
Contributing Member
Joined: Feb 2006
Posts: 1,876
Likes: 1
From: Gulfport, Mississippi
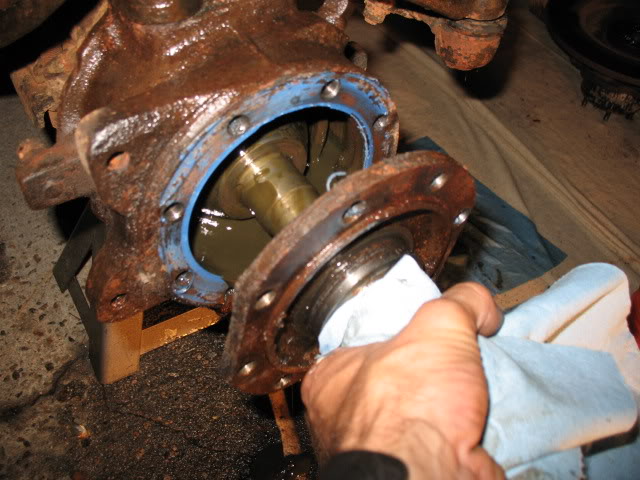
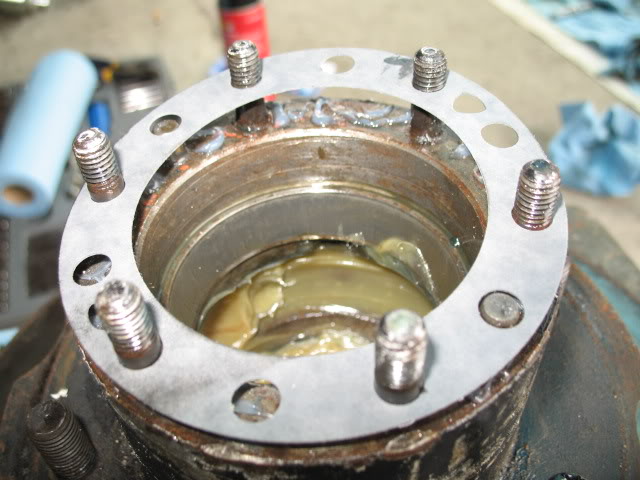
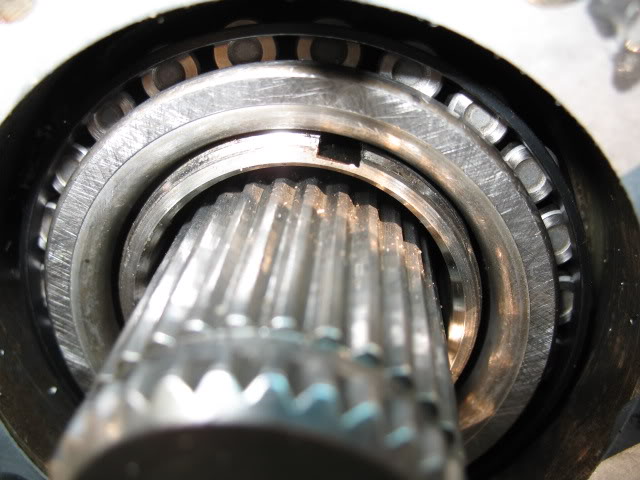
Got it almost all the way in & hit the diff: :complain:
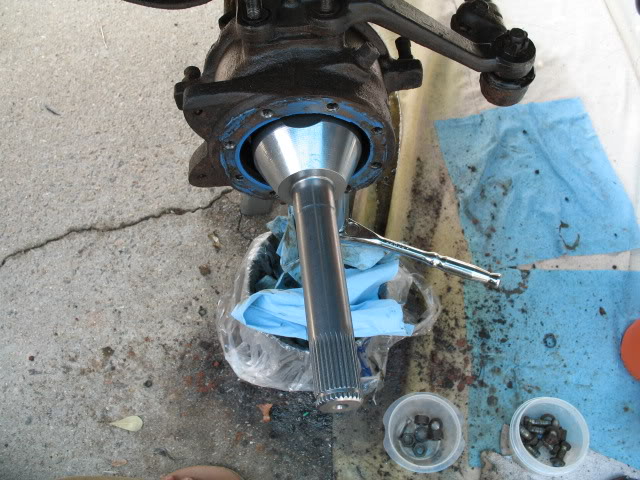

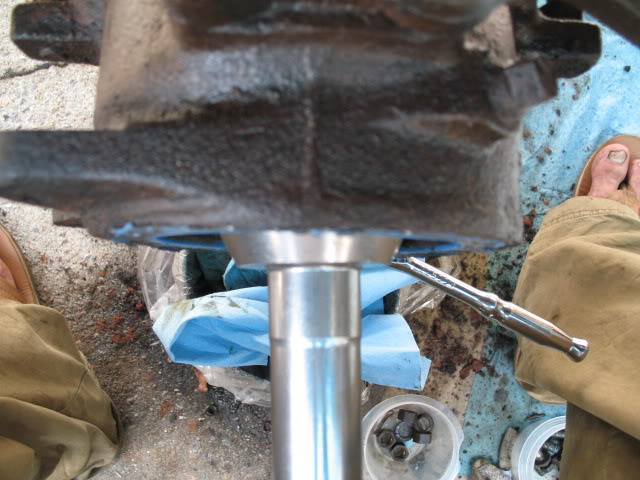
so I reached around & turned the driveshaft & then it slid it all the way. I think this is fully seated:
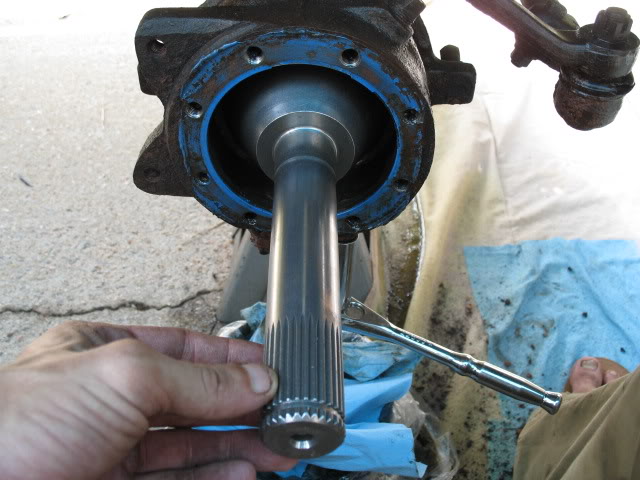
So I have to repack the knuckle with grease & button her back up using some new parts from the rebuild kit & change out the hub gears & then do the other side.
so I reached around & turned the driveshaft & then it slid it all the way. I think this is fully seated:
So I have to repack the knuckle with grease & button her back up using some new parts from the rebuild kit & change out the hub gears & then do the other side.
Jul 22, 2006 | 01:41 PM
#33
Thread Starter
Contributing Member
Joined: Feb 2006
Posts: 1,876
Likes: 1
From: Gulfport, Mississippi
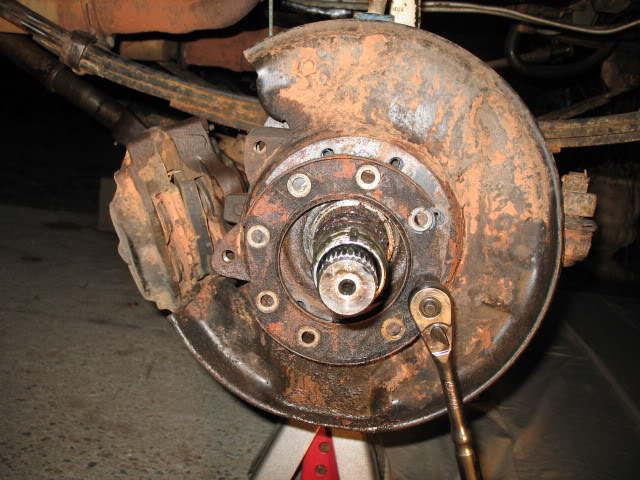
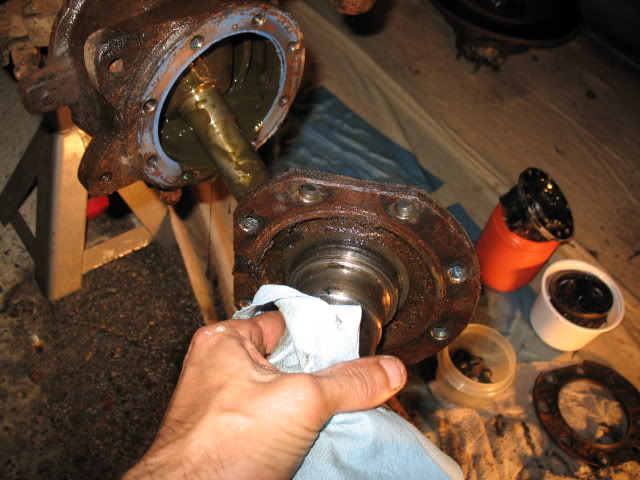
So I pack the knuckle around the birf with gease:

then apply sealant to attach the spindle:
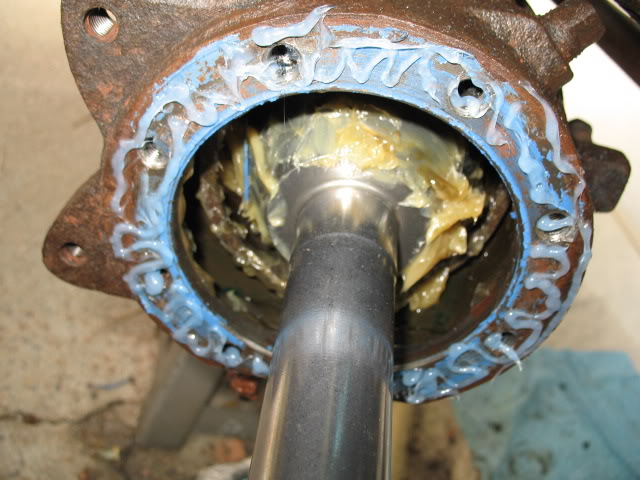
I bolt the spindle on so the sealant cant take hold:
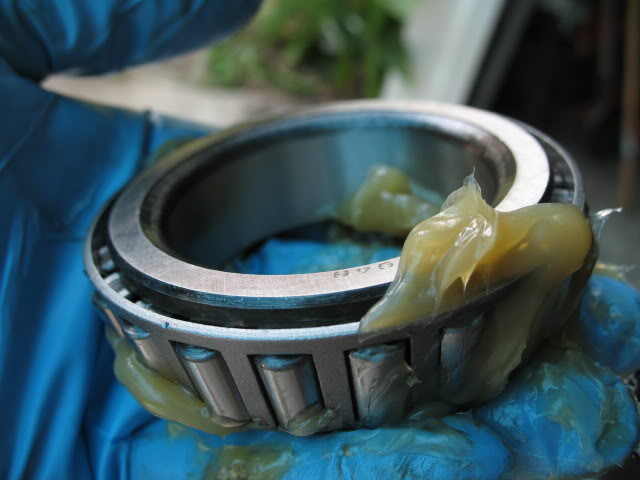
While all that stuff is drying I clean out the wheel hub for the new bearings:
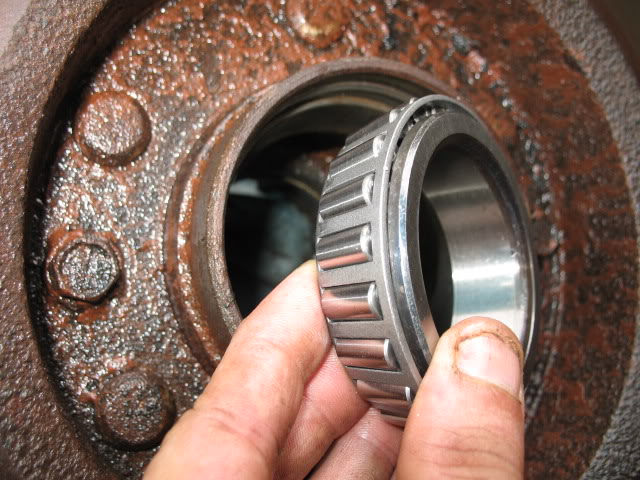
Grease it up & put it in:

Then the seal:

Same wood handle from a paint roller...

then apply sealant to attach the spindle:
I bolt the spindle on so the sealant cant take hold:
While all that stuff is drying I clean out the wheel hub for the new bearings:
Grease it up & put it in:
Then the seal:
Same wood handle from a paint roller...
Jul 22, 2006 | 01:42 PM
#34
Thread Starter
Contributing Member
Joined: Feb 2006
Posts: 1,876
Likes: 1
From: Gulfport, Mississippi
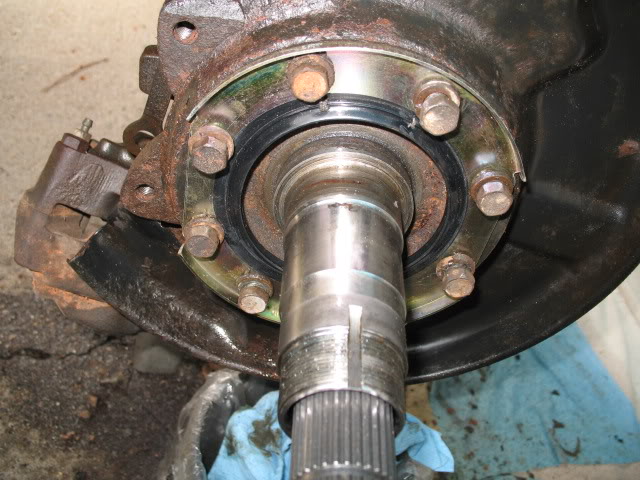
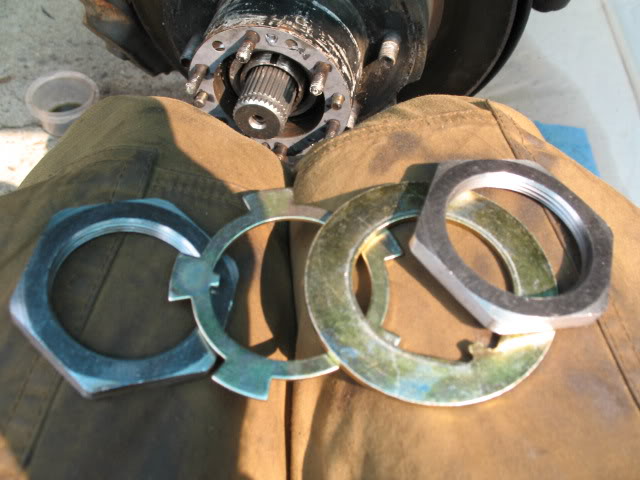
Flip it over & pull the old crap off:

Sealant:

New crap:
Then back on: (this is where I first noticed what was a problem, the whell hub would not slide all the way back to where it sat originally & bolted to the caliper...
Bearing: (yes I added grease no pic)
Now to put this junk back on:
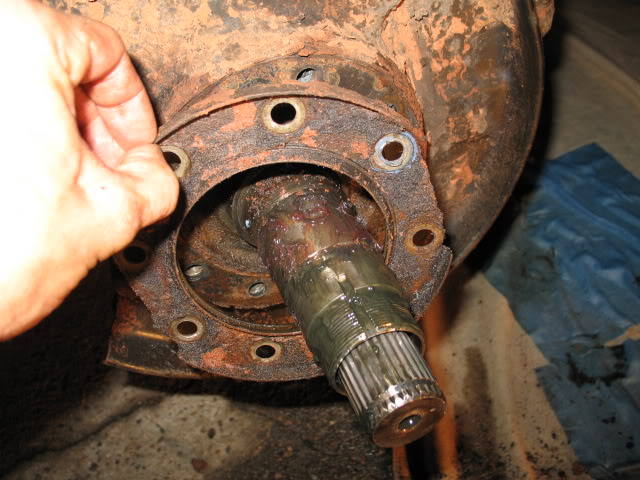
Here is where I run out of room:
Have I not seated the axle all the way?
That is the only thing I can think of why it wont go on. I have tightened it down so much now I can't even spin the wheel hub.
Any ideas or see anything I did wrong?
Sealant:
New crap:
Then back on: (this is where I first noticed what was a problem, the whell hub would not slide all the way back to where it sat originally & bolted to the caliper...
Bearing: (yes I added grease no pic)
Now to put this junk back on:
Here is where I run out of room:
Have I not seated the axle all the way?
That is the only thing I can think of why it wont go on. I have tightened it down so much now I can't even spin the wheel hub.
Any ideas or see anything I did wrong?
Jul 22, 2006 | 01:47 PM
#35
Around the birf once it is seated...fill that area FULL of grease...as better to have too much than too little. Good thing is on the other side you can still pump in some through the grease fitting cause IMO that wasn't enough.
Looking good. Now if you could only sell my tires. :pat:
Looking good. Now if you could only sell my tires. :pat:
Jul 22, 2006 | 02:25 PM
#37
Thread Starter
Contributing Member
Joined: Feb 2006
Posts: 1,876
Likes: 1
From: Gulfport, Mississippi
Originally Posted by waskillywabbit
Around the birf once it is seated...fill that area FULL of grease...as better to have too much than too little. Good thing is on the other side you can still pump in some through the grease fitting cause IMO that wasn't enough.
Looking good. Now if you could only sell my tires. :pat:
Looking good. Now if you could only sell my tires. :pat:
Is there a certain way to put the wheel hub back on that I may have overlooked?
When you sell your tires you're getting a set I reckon...
Jul 22, 2006 | 02:50 PM
#38
That is the only reason I know of that everything won't fit...the birf isn't seated. Remember how much fun I had seating the other one...you are swapping that one out anyway, take the other side off and see how far it is in (seated) and compare.
Yes, the shaft should spin. There is a spot where it feels in, but it isn't, then there is that last little fit in where it is in the diff spindles. We had to turn the d-shaft and the axle to get things lined up just right, remember. Make sure you got the smaller dust shield turned the correct way, and everything else.
Yes, the shaft should spin. There is a spot where it feels in, but it isn't, then there is that last little fit in where it is in the diff spindles. We had to turn the d-shaft and the axle to get things lined up just right, remember. Make sure you got the smaller dust shield turned the correct way, and everything else.
Jul 22, 2006 | 03:07 PM
#39
Thread Starter
Contributing Member
Joined: Feb 2006
Posts: 1,876
Likes: 1
From: Gulfport, Mississippi
sounds good, I'll pull that other side & compare. It's pouring buckets outside now so It'll have to wait AGAIN... I won't chance that lightning, I swore too much today after it didn't fit... 
Did the smaller cover look wrong to you?
I put the spindle on as tight as I could, I'm looking back at the pictures & it has to be the birf not seated. Damn, I wanted to wheel tomorrow.
Did the smaller cover look wrong to you?
I put the spindle on as tight as I could, I'm looking back at the pictures & it has to be the birf not seated. Damn, I wanted to wheel tomorrow.
Jul 22, 2006 | 03:43 PM
#40
That stuff goes on one way pretty much, so it has to be the birf.
I spent all day cramming a 1st gen roll bar into a 3rd gen 4Runner...not quite finished but it fit like a glove after I got it modified...should finish it up after it and some sliders get powder coated and then installed. I'm sure pics will be up eventually.
I spent all day cramming a 1st gen roll bar into a 3rd gen 4Runner...not quite finished but it fit like a glove after I got it modified...should finish it up after it and some sliders get powder coated and then installed. I'm sure pics will be up eventually.


