
22re Amateur head gasket job, stuck at intake manifold
 May 9, 2013 | 09:14 PM
#41
Registered User
Joined: Nov 2012
Posts: 534
Likes: 1
From: Hayward, California
take the cap off, mark the position of rotor on the distributor with white out, if set at #1 compression TDC, the rotor will be about 10 o'clock area. when you pull the distributor out the gear on the end is going to move the rotor you want to know where the #1 spot is for when you're reassembling
May 11, 2013 | 11:15 AM
#42
Thread Starter
Registered User
Joined: Dec 2010
Posts: 26
Likes: 0
From: Farmington, Minnesota
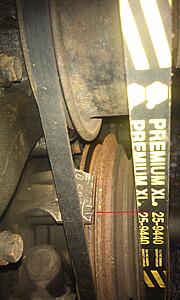
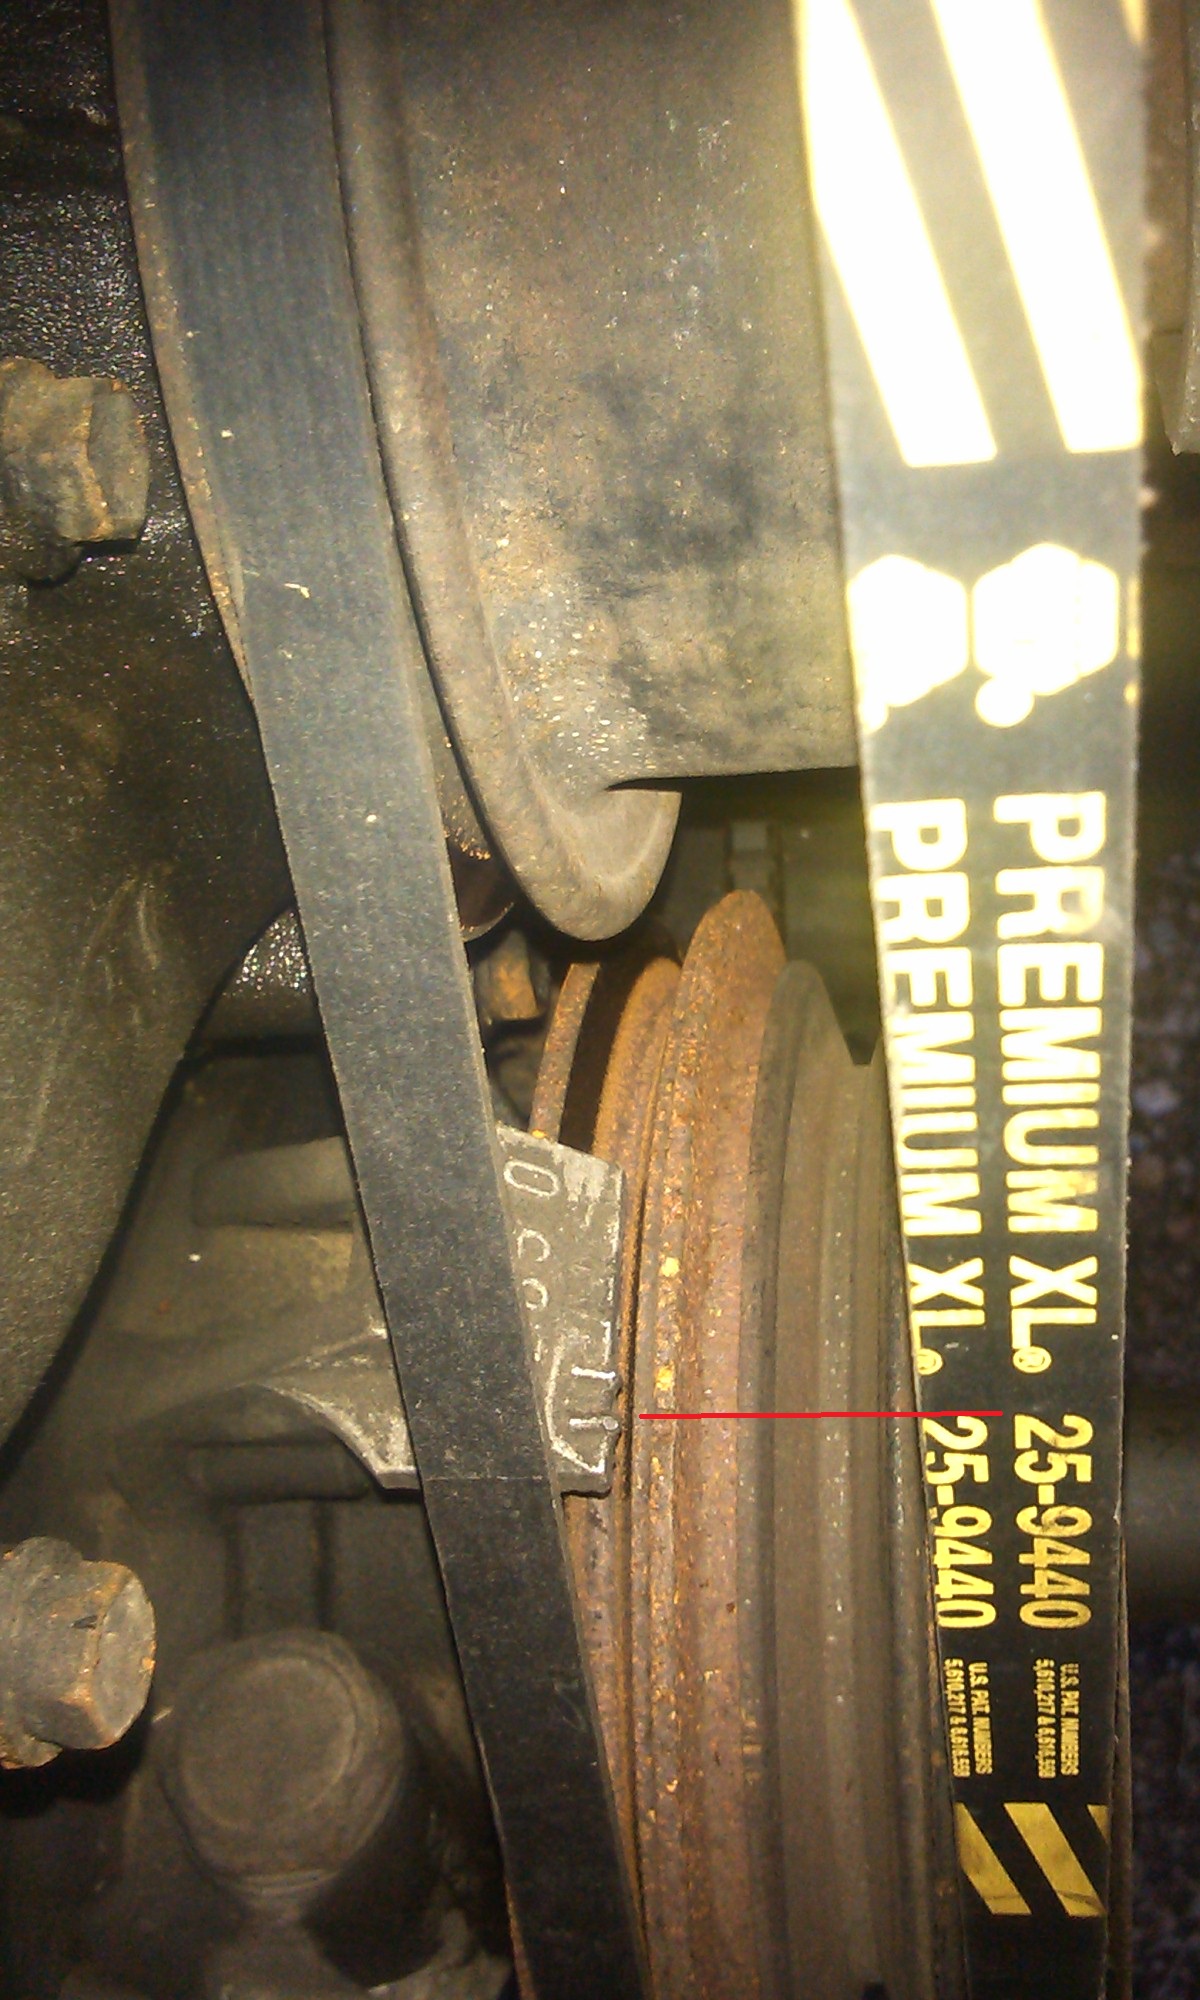
Just wondering about the timing chain now...when I set it at #1 TDC, the mark on the sprocket points straight up, and the distributor is pointed at #1 spark plug, but the notch here is not lined up to 0. It's completely on the other side. Is this wrong? My dad replaced the timing chain a few years back and now I'm wondering if everything got put back together right. The red mark is where the notch is when the engine is at TDC
 May 11, 2013 | 11:32 AM
#43
Registered User
Joined: May 2013
Posts: 73
Likes: 0
From: Anchorage Alaska
Well mine doesn't point directly 12 o'clock, I think I messed up and it's point 12 slightly to the right and I think it should be 12 slightly left, 1 tooth make that much of a problem, it's running all blubbery with no power
May 11, 2013 | 06:53 PM
#47
Thread Starter
Registered User
Joined: Dec 2010
Posts: 26
Likes: 0
From: Farmington, Minnesota
Well I got the head off today! Never thought I would even make it this far. I've already learned a lot more about the truck than I thought I would.
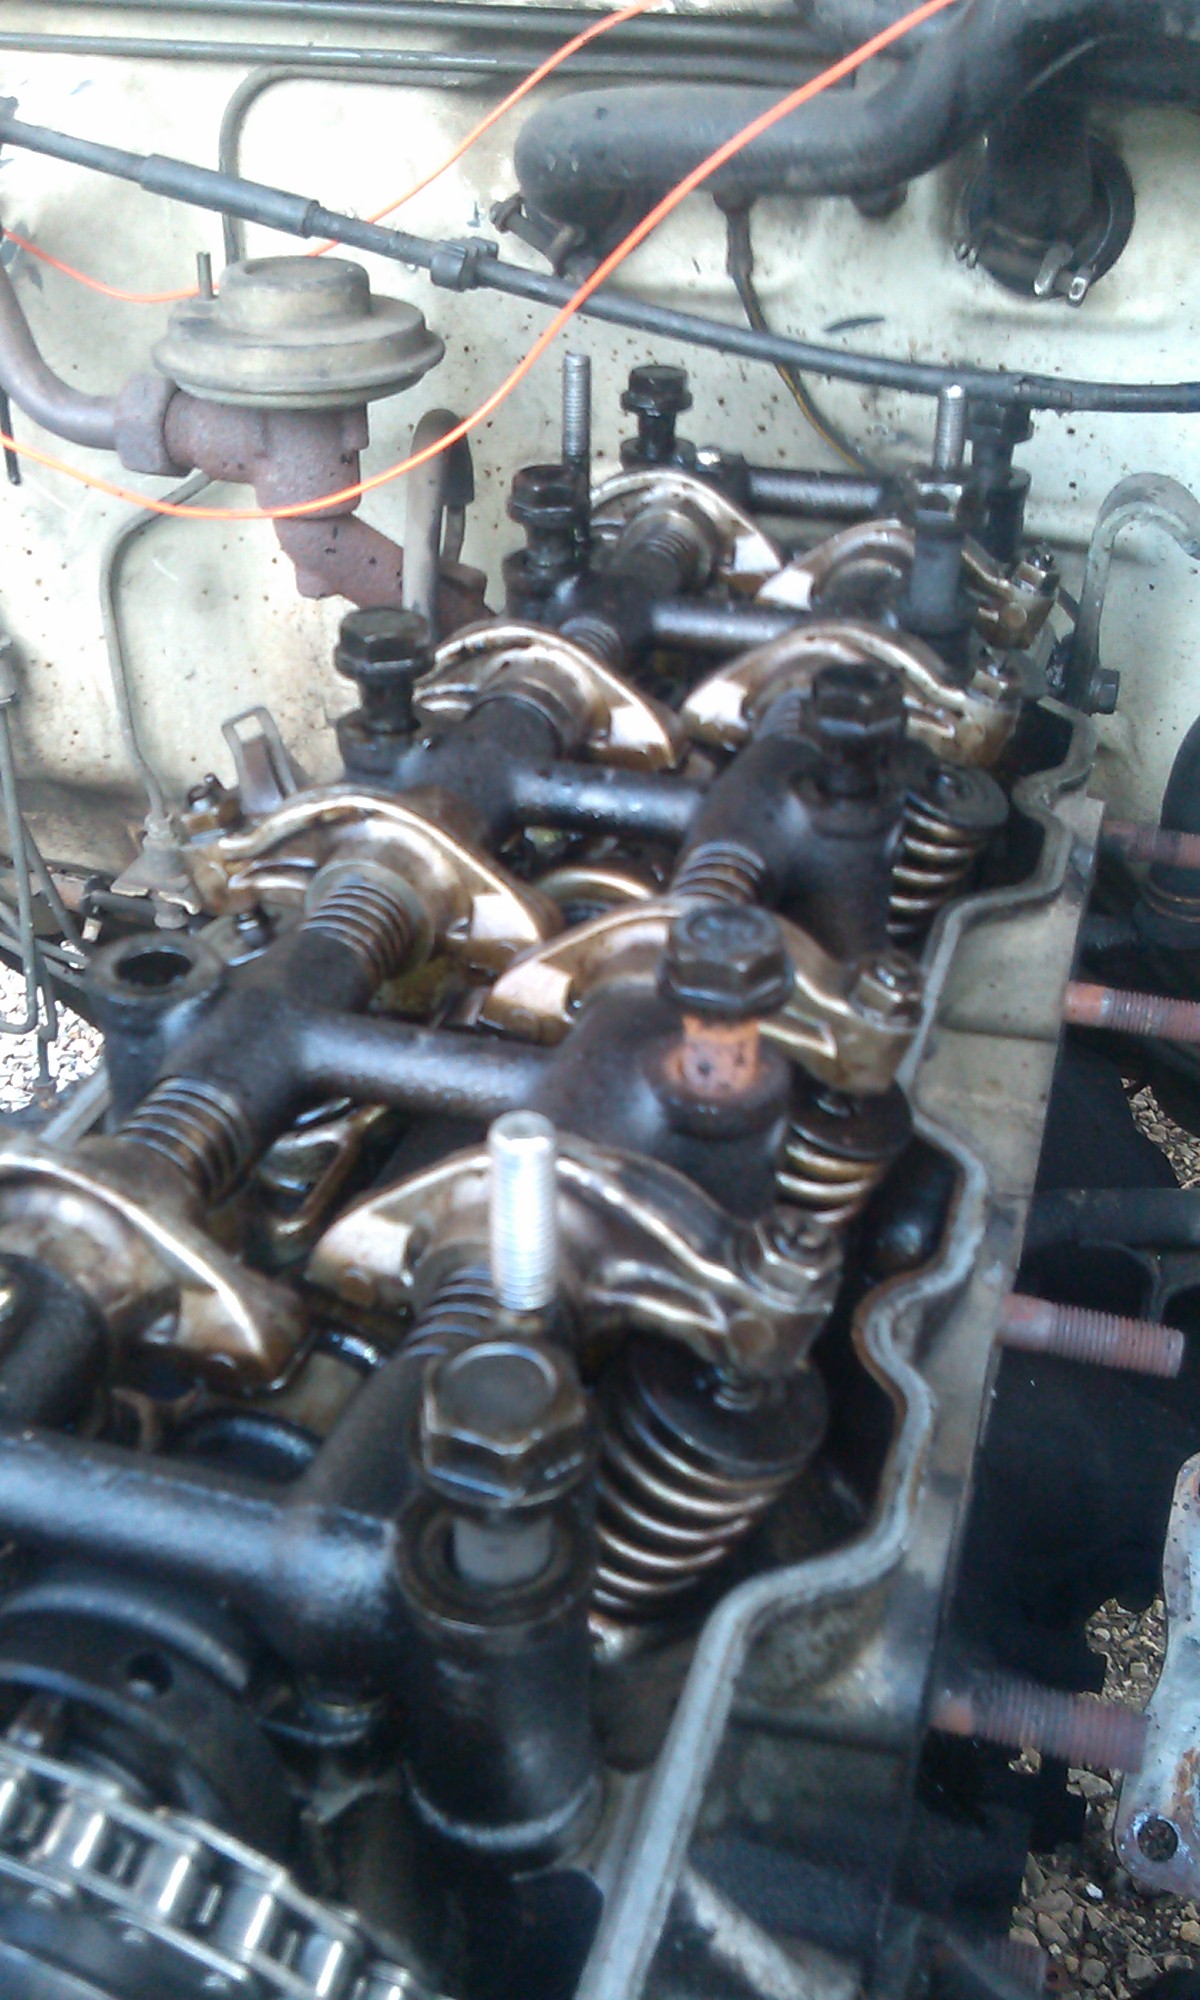
One of the head bolts really put up a fight, I thought for sure it would break. Had to slip a fencepost over the end of my bar to get it loose. It looked almost like the threads on the bolt were...swollen and deformed when I pulled it out. Hopefully nothing happened to where it threads in. Also all of them were coated in oil except for the second one from the right side...it's completely rusted and dry. Not sure if that means anything.
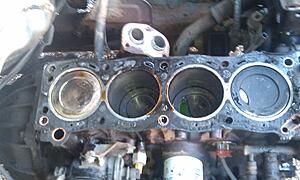
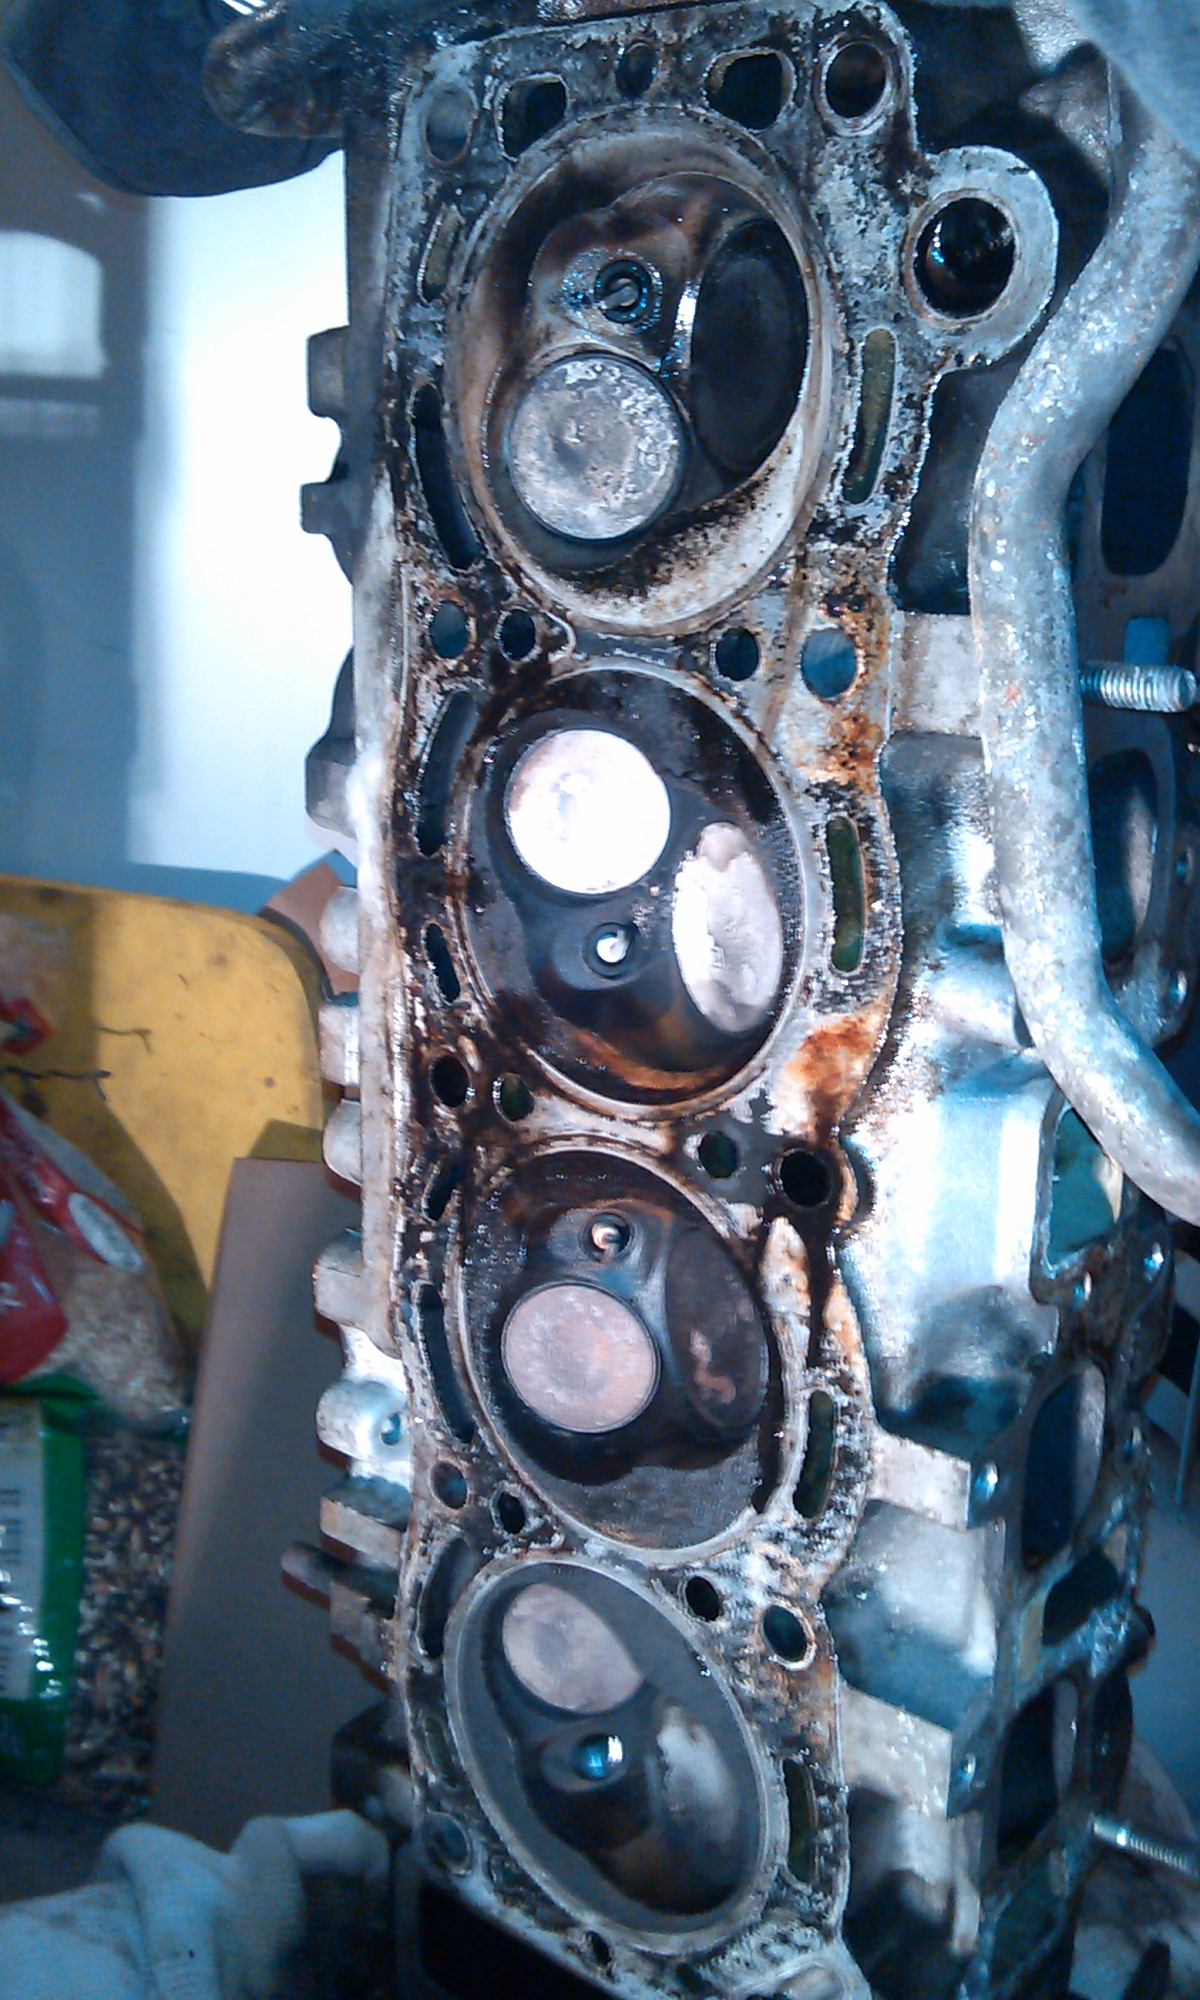
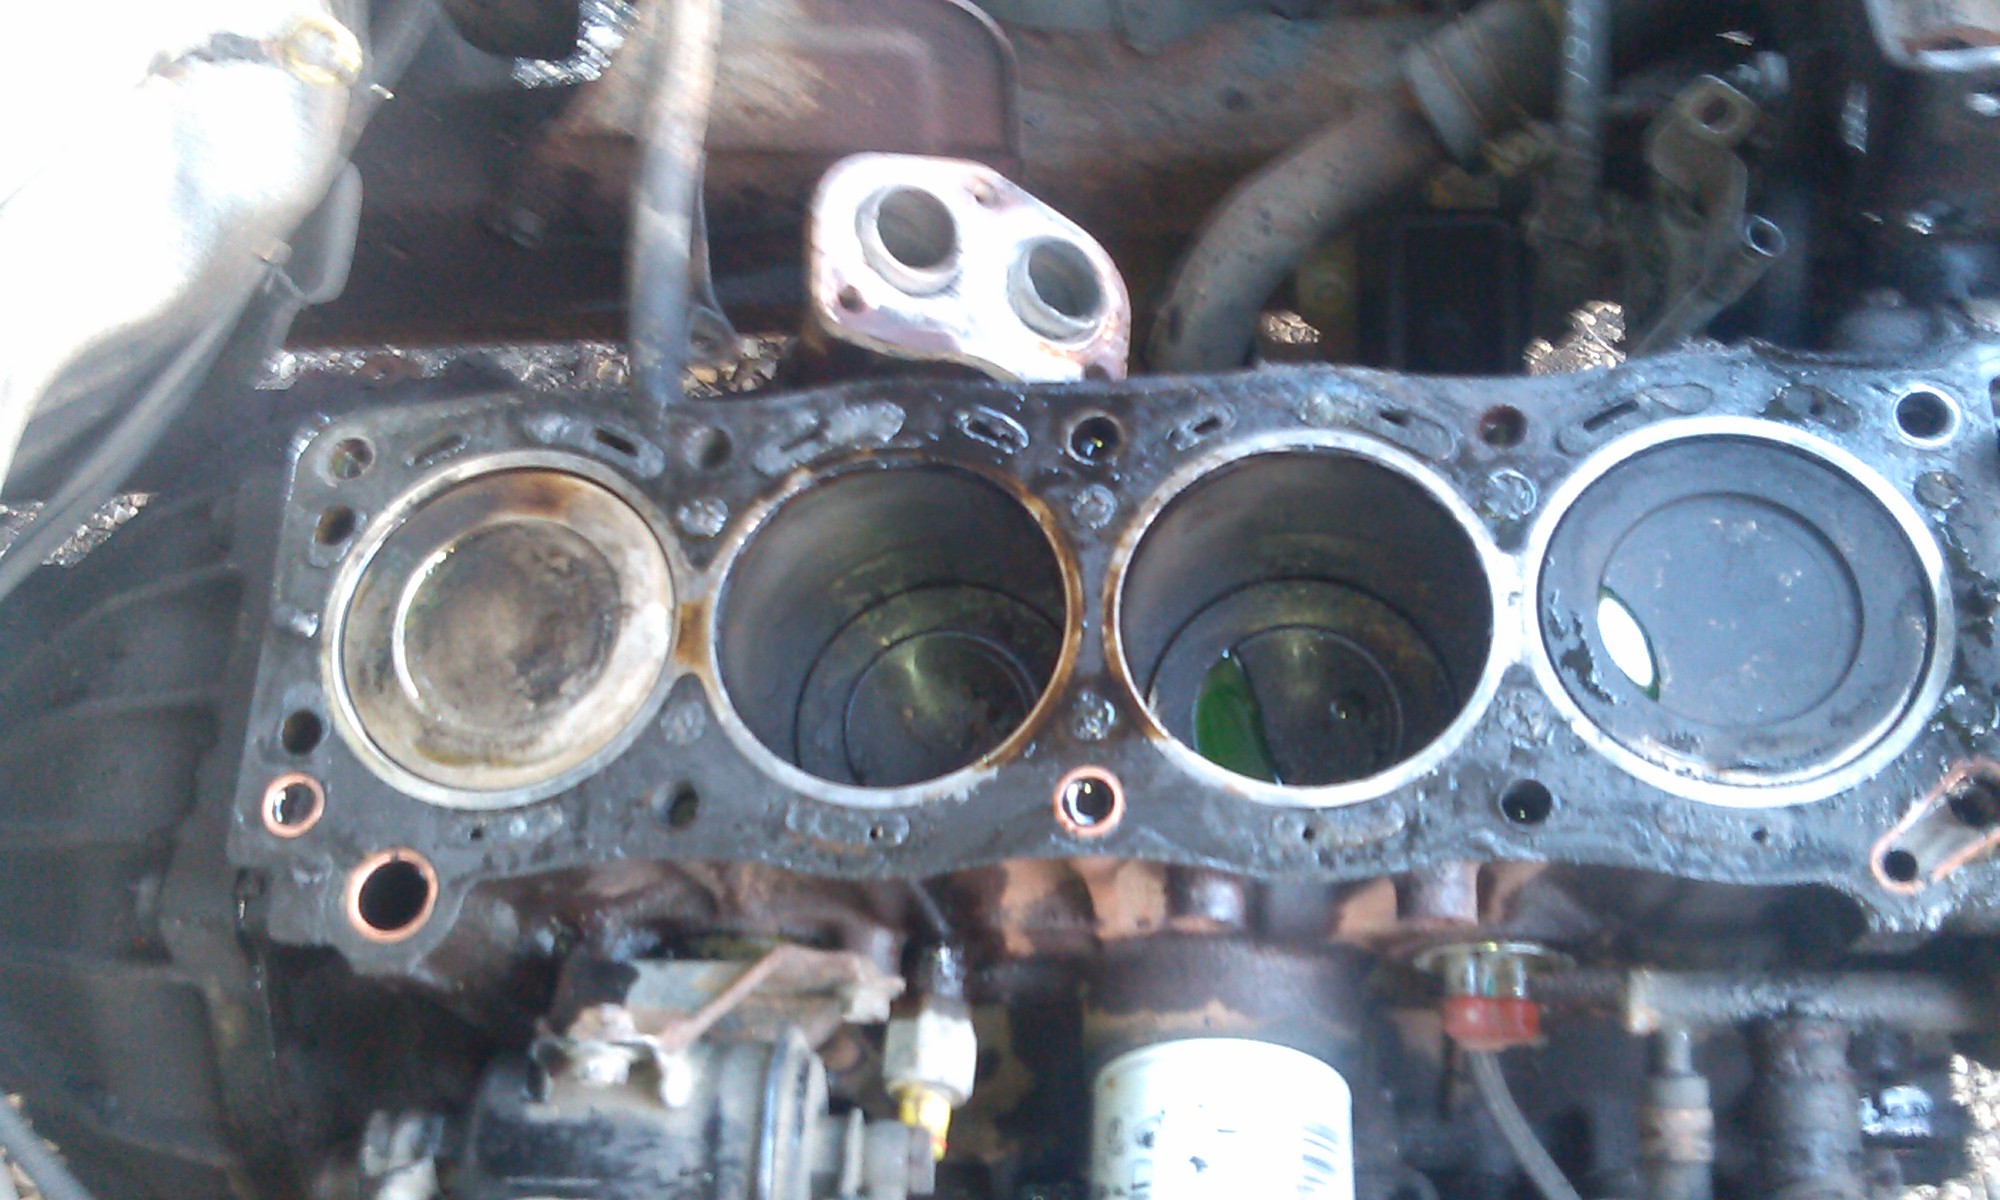
Can't really tell on the head gasket where it went bad, but one of the cylinders is a whole lot cleaner than the other ones. Is this indicative of a bad HG? On the head, the valves for that cylinder are also very much cleaner than the rest.
Anyhow, some pictures below! Last one is just to show the rusted head bolt...really don't need a pic but what the hell, I'll throw it out there


One of the head bolts really put up a fight, I thought for sure it would break. Had to slip a fencepost over the end of my bar to get it loose. It looked almost like the threads on the bolt were...swollen and deformed when I pulled it out. Hopefully nothing happened to where it threads in. Also all of them were coated in oil except for the second one from the right side...it's completely rusted and dry. Not sure if that means anything.
Can't really tell on the head gasket where it went bad, but one of the cylinders is a whole lot cleaner than the other ones. Is this indicative of a bad HG? On the head, the valves for that cylinder are also very much cleaner than the rest.
Anyhow, some pictures below! Last one is just to show the rusted head bolt...really don't need a pic but what the hell, I'll throw it out there
 May 11, 2013 | 09:12 PM
#48
Registered User
Joined: Mar 2004
Posts: 1,421
Likes: 2
From: Oceanside, CA.
You HAVE to tap the holes in the block for the new head bolts.
You will NEVER get a proper torque reading without cleaning them up.
Just as hard as that bolt was to get out a new one will be as hard to get in.
This will cause the wrench to click when bolt is still not clamping head down.
Also get the oil and water out of them too.
Couple of areas on the left side of the head in your first pic look suspect.
Follow the "ring" as it passss by the coolant passeges. 2 on the left side look like they might allow water thru. If so head will have to be welded there and then re decked.
Last edited by SoCal4Running; May 11, 2013 at 09:15 PM.
May 11, 2013 | 11:32 PM
#49
Contributing Member
Joined: Jul 2010
Posts: 709
Likes: 1
From: San Jose, CA
That is called a washed cylinder and that tells you where the gasket went bad. I bet that the rusted bolt was near the washed cylinder. How did that pool of anti freeze get into number 2 cylinder? You should consider having a machine shop rebuild that head while you have it off.
Last edited by Buck87; May 11, 2013 at 11:36 PM.
May 12, 2013 | 12:11 AM
#50
Thread Starter
Registered User
Joined: Dec 2010
Posts: 26
Likes: 0
From: Farmington, Minnesota
Antifreeze is probably drained from somewhere else when I pulled the head. I sat inside the engine bay and lifted it up myself and had to tip it to get it out. As for the rusted head bolt, it was #2 from the front on the right side, so no, nowhere near the washed cylinder. The "washed" cylinder is the farthest towards the back of the engine bay. The bolt that was rusted was between the 1st two cylinders furthest front. Is that something to be concerned about? How do the head bolts get the oil on them? They must be exposed somewhere
May 12, 2013 | 12:48 AM
#51
Thread Starter
Registered User
Joined: Dec 2010
Posts: 26
Likes: 0
From: Farmington, Minnesota
Also thanks socal, I plan on tapping the holes in the block and spraying them out with a compressor. Wondering what you mean about welding the head? Are you suggesting the passages have possibly widened beyond what the gasket would cover? Keep in mind I know nothing about this kind of thing. I'm not questioning your statement at all, just wondering what you mean and why you've come to that conclusion. I can try and provide better pics if needed.
May 12, 2013 | 01:00 AM
#52
Registered User
Joined: Feb 2013
Posts: 178
Likes: 0
From: Portland Oregon
i see what he is talkin about, your head may have a crack in it,....on the steam cleaned combustion chamber, in the 1st pic, the long hole to the left in the picture, ...see how it looks kinda chipped in, it is cheap or even free to have a machine shop clean that head really well and check it out, if it is bad you would either weld it (not my cup o tea) or buy a used head that is in better shape, if it isnt bad, at least have it decked and check your block out carefully, feeler gauge a good straight edge and get that sucker scraped cleeeaann you are going to have to any way to put a new hg on
May 12, 2013 | 01:03 AM
#53
Registered User
Joined: Feb 2013
Posts: 178
Likes: 0
From: Portland Oregon
and dry that bore out and smack some oil on there, cast iron will rust before your very eyes, if it does cross, your fingers, cuss alot and get to scrubbin with a dark red scotch brite and some wd40
May 12, 2013 | 07:17 AM
#54
Registered User
Joined: Mar 2004
Posts: 1,421
Likes: 2
From: Oceanside, CA.
The water in the cylinder is from when you first broke the head free after removing the bolts. When you drain the cooling system and even if you pull the block plug there are still places where water is trapped.
Yes clean all the cylinders out and wipe down with oil.
The areas I mentioned are exactally what KT is mentioning. I have had 2 heads fail like this. The area between the coolant passage and the ring of the head gasket is very small and it the head can "chip, erode or break away" there and allow water around the ring other gasket. In both cases after looking at prices of new heads it was cheaper to have the machine shop who was doing all my work also weld the head in these places and then deck plane it and pressure check it. They also replaces valve seats and guides for less than a rebuild would cost.
Pressure checking you should consider anyways. Their might be cracks you can not see in areas like between the valves or elsewhere.
Was this engine ever overheated as far as since you owned it?


 May 12, 2013 | 05:48 PM
#58

Registered User
Joined: Sep 2011
Posts: 608
Likes: 1
Looking good! Be sure you use a reputable machine shop. Ask around at some local repair shops and find out who they use. There are some shoddy ones out there.
Also want to add for anyone else attempting a head gasket job that, in my opinion, its easier to remove the head with the intake manifold attached. Pull the wire harness from computer and pull the harness with the head/intake. Then disassemble everything on the bench. Good luck!
Also want to add for anyone else attempting a head gasket job that, in my opinion, its easier to remove the head with the intake manifold attached. Pull the wire harness from computer and pull the harness with the head/intake. Then disassemble everything on the bench. Good luck!
May 12, 2013 | 05:57 PM
#59
Registered User
Joined: Feb 2013
Posts: 178
Likes: 0
From: Portland Oregon
ill drop my .02, Socal nailed it, listen to every word he tells you.
the coolant has an anti corrosive property in relationship to cast aluminum, i die cast aluminum for a living, if i were to drop a hot cast part into plain water and leave it wet it would start to corrode quickly, when we have to cool parts fast guess what we put in the water....yep industrial antifreeze/coolant. even then, it resists corrosion but doesnt counter act it completely, you dont want stagnant moisture anywhere in there. after you get that head machined, carefully deburr those passage openings so there are no nooks and crannys just a nice smooth hole, i could go more in to the nature of cast aluminum but just take my word for it and you will reduce the chance of doin this again
the coolant has an anti corrosive property in relationship to cast aluminum, i die cast aluminum for a living, if i were to drop a hot cast part into plain water and leave it wet it would start to corrode quickly, when we have to cool parts fast guess what we put in the water....yep industrial antifreeze/coolant. even then, it resists corrosion but doesnt counter act it completely, you dont want stagnant moisture anywhere in there. after you get that head machined, carefully deburr those passage openings so there are no nooks and crannys just a nice smooth hole, i could go more in to the nature of cast aluminum but just take my word for it and you will reduce the chance of doin this again
May 12, 2013 | 07:37 PM
#60
Registered User
Joined: Nov 2012
Posts: 534
Likes: 1
From: Hayward, California
as for the bolts being oily and the single dry/rusty bolt, the oily ones pass through oil passages. the dry one is the only one that doesn't, they normally just char, but the rust was prob from poor lubrication when installed. not surprising tho. looking good tho so far on the progress. deff take care of any corrosion, if it is cracked (or a lot to repair) there's this sight I got my head from, brand new, shiny soooo purdy, that is all OEM, and really reasonable.


