When you click on links to various merchants on this site and make a purchase, this can result in this site earning a commission. Affiliate programs and affiliations include, but are not limited to, the eBay Partner Network.
WHAT'S NEXT:
I already have Dynatron 550 seam sealer whose recommended application is either bare metal or primed metal, so I think my next steps would be:
1) Thoroughly steel brush everything I can reach on the gutter,
2) Apply the Dynatron 550 by hand, squeezing it well into the crack, let dry,
3) Prime
4) Paint
Your thoughts please, guys?
I wonder why it's not dripping from the door frame pinch-weld which is directly below the gutter.
Do you think the Dupli-Color / store bought spray can primer and paint would be good enough?
I haven't been to happy with my primer. I've used the Rust-Oleum self etching and non etching automotive primer, and I think some other random stuff Napa or the hardware store had also. I am planning to try the two part epoxy cans. That is sort of like primer and primer sealer all in one, where the other stuff is very sponge like the two part forms a proper water barrier.
I think that gutter rail is the meat of the sandwich, and it slants upwards towards the roof peak, so it runs mostly down hill.
I would try to leave the factory coatings intact if it's not showing signs of rust. Just flake the old crusty goop out and scuff the paint, degreaser, then the dynaflex followed up with duplicolor for UV protection.
You have left over por15, iirc. You could go hardcore on it and just brush that into the seam first after its cleaned up.
... Do you mean dab it in with your finger? The little tip on the tube is a lot smaller than your finger and would be better at squeezing the sealer into corners and cracks.
Yes, using the tube tip or fingers to push the material into the gap as applicable.
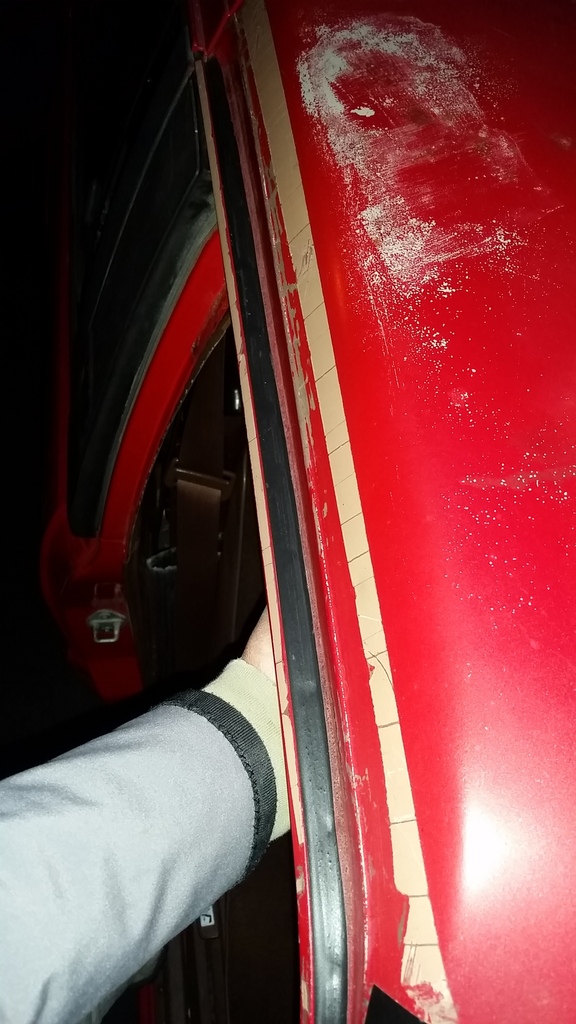
... Rain gutter on the A-pillar... Leaks in that area lead to the fairly common A-pillar rust in the door jamb area
.
Yes, also working on that part at the same time. The sealant has gone brittle and has started to come off and some rust stain already dripping on door frame.
Do your best to minimize paint removal where it shows. Then be careful to only apply it where necessary so you can't see the mis-match.
Originally Posted by Co_94_PU
I would try to leave the factory coatings intact if it's not showing signs of rust.
Agree. Most of my factory paint is good. When touching up where I see rust spots or where potential for rust is great (like the tailgate window sill, and my windshield pinchweld), I will sand to bare metal only the affected area and use POR-15, apply primer while tacky (per POR instructions), then paint to blend.
Originally Posted by Co_94_PU
... planning to try the two part epoxy cans. That is sort of like primer and primer sealer all in one, where the other stuff is very sponge like the two part forms a proper water barrier...
You have left over por15, iirc. You could go hardcore on it and just brush that into the seam first after its cleaned up.
Yes, got POR-15. I like the rust-proofing properties of POR-15 so Im debating...
POR-15 is best applied directly on bare metal and I could not produce bare metal within the tight interface/gap between roof and gutter and A-pillar and gutter. There may already be some minimal rust in those interfaces so options to keep air and moisture from getting into that interface are:
1) Even if not ideal, I can try to make POR-15 flow into the interface/gap. Then sand down to bare metal the accessible area of the seam and apply Dynatron 500 to that. Prime and paint, OR
2) Do you think just doing my best to squeeze Dynatron into that thin gap would be enough... being in So Cal, after all?
2) Do you think just doing my best to squeeze Dynatron into that thin gap would be enough... being in So Cal, after all?
Cheers!
Dynatron is brushable, no problem there. I went looking for a video I barely remember seeing but couldn't find it. What I did wander across was 3m collision video
https://youtu.be/ubZN_rBBty8
Interesting he contradicts the product info regarding bare metal application..
Dynatron is brushable, no problem there. I went looking for a video I barely remember seeing but couldn't find it.
Cool!
.
The guy in video^^^ says unless sealant is made for bare-metal application, so I'll double-check directions for Dynatron.
I realized that electrical tape fits the gutter and covers the seam well... LOL!
I'll run with this until we get our sunny days back...
Roadtrip looked fun!
Glad to see the windshield is good, and that this area is a trouble spot. Mine has a bit of rust starting there, I'll take care of it while I already have the truck in the shop.
What primer do you use over the POR-15? I don't think the self etching cans I have are the right way to go...
What primer do you use over the POR-15? I don't think the self etching cans I have are the right way to go...
Haven't figured it out, yet. However, POR-15 instructions say IF wanting to paint, apply primer when POR-15 is tacky.
Also, many people, including glass tech say it's actually good to apply primer for windshield urethane adhesive directly to sanded POR-15, then urethane adhesive on that. I like that idea because I believe that there are less layers interfaces to fail.
On my windshield gap, I would have to sand down the POR-15 and prime before I paint it for UV protection.
Last edited by RAD4Runner; Apr 20, 2017 at 09:59 PM.
Haven't figured it out, yet. However, POR-15 instructions say IF wanting to paint, apply primer when POR-15 is tacky.
Also, many people, including glass tech say it's actually good to apply primer for windshield urethane adhesive directly to sanded POR-15, then urethane adhesive on that. I like that idea because I believe that there are less layers interfaces to fail.
On my windshield gap, I would have to sand down the POR-15 and prime before I paint it for UV protection.
Originally Posted by Co_94_PU
correct, self etching is for application to bare metal and still needs another primer and sealer coat before painted.
Need to clarify however.:
When I say primer above,that's for preparing the POR-15 that is not covered by the urethane to accept paint.
The 3M primer in the link is used to prepare the pinchweld - whether painted or POR'd - for application of the urethane adhesive. Needed if you plan to install the windshield yourself. Description of the 3 primer says it is used for priming metal exposed by scratches made to pinch weld paint. This makes sense. Safelite Tech said OK to apply urethane adhesive directly to primed bare metal... too late because I already applied POR.
Makes sense that the windshield tech would come with the urethane primer, Doh.
How much POR did it take to paint your channel? My gut says a pint isn't gonna cut it?
It looks like I have the same brittle cracking sealant in the rain drip above the door as you, as well as a couple rusted through pinholes in a weird place (see my thread)
How much POR did it take to paint your channel? My gut says a pint isn't gonna cut it?
It looks like I have the same brittle cracking sealant in the rain drip above the door as you
I got the starter kit that comes with degreaser and metal prep solution. The windshield surround only requiredaybe 1/4 of the POR can. Maybe even less.
Yes, gone brittle. I hope the Dynatron would be better.
How to Check or test a Fuse WHILE IT IS INSTALLED AND THERE IS POWER
How to Check or test a Fuse WHILE IT IS INSTALLED AND THERE IS POWER.
This will check IF power is getting to the fuse, and IF power is getting through the fuse to supply downstream circuit.
This procedure should work for most, if not all of our ATO fuses, but I will illustrate using the Engine Fuse because that's what I'm helping someone with right now.
We will check:
1) IF there is voltage coming to the fuse,
2) IF there is voltage going through that fuse, and
3) IF none, verify that the fuse is blown (no continuity).
Set multimeter to voltage DC range immediately higher than 12VDC; That's usually 20VDC.
Negative (black) probe to "COM"
Positive (red) probe to "V"
The Engine Fuse (15A) is on the driver-side kick panel fuse block. Note the grounding screw into the body. This will be the ground reference point for most voltage checks. Touch the negative (black) probe to this for most voltage checks.
NOTE:
Some fuses like Hazard-Horn may not require IGN to be on because they are connected to battery through fuses with no switch in between.
I will also check which side of the engine fuse is the supply side, and will update picture ASAP.
EVEN FUSES THAT READ CORRECT VOLTAGE (AT NO LOAD) AND RESISTANCE ACROSS THEM MAY BE DEFECTIVE/GOING BAD.
TO BE SURE:
1) Turn on circuit that fuse supplies (give it load).
2) Measure voltage between "A" and"B". This should be Zero.
3) To be extra sure, ALSO measure "A" and "B" at the terminals themselves. Access from behind the fuse block.
Last edited by RAD4Runner; May 8, 2017 at 12:25 PM.
How to add Marker Lights that Double as Turn Signals
In these days of distracted drivers (and harsh California winters -LOL!), I want the truck and my intentions as visible as possible. This project adds a marker light that will also blink when turn signal blinks. Added marker light will be more visible from the side of the vehicle, or to the driver in my blind spot.
Concept is as follows:
Added marker light requires much less current than the turn signal bulb to turn on. I bought the rear side-marker lights from an earlier Camry like this from the pick a part. An LED marker light would would work as well, but needs to be tested as I did here.
Connect positive terminal of added marker light to positive side of existing tail light circuit ("A" in illustration).
Connect negative terminal of added marker light to the positive side of the turn signal circuit for that side ("B" in illustration).
When turn signal contact is open, the turn signal bulb is OFF, AND tail lights are on there will be 12V at "A" and "B" is connected to ground through the filament of the turn signal bulb. Added marker light will be ON.
When turn signal contact closes, and tail lights are on, there will be 12Volts at "A" and also 12V at "B". There is no difference in potential between the two sides of the added marker lights so it will be off.
SCHEMATIC FOR REAR-RIGHT:
(Duplicate for left side observing color of turn signal positive wire)
Physical Setup:
Video of circuit test is below. I just need to properly complete connections and mount the added marker lights... Considering on side of bumper corner so I would not need to drill holes into the body.
Good idea. I would definitely say on the bumper and spare the body, unless you're certain you'll like the look.
Did you mod the front markers to blink?
Yes, on the bumpers. I'll have to re-shape the sides (carefully with a hear gun) so the lights will face out, not down.
Yes, will re-wire my front fender-mounted markers to do same.
Replaced Hood Vibration Dampeners...
Vibration dampening dumplings are toast...
When one problem becomes the solution for another... Crazy Dog likes to attack footwear - LOL!
Cut to size and scalloped to help secure it to the bracing.
I siliconed it ONLY on side that faces the brace so when sheet and/or brace flex, the pad will stay stuck to the brace and not peel off.
When it rains hard water comes into the rear quarter panel and pools there. I already know that it pools when the drain hole is clogged so I clean that occasionally.
Searched for clues, definitely not from cap/bed interface nor from the tail light fixture...
Finally saw sign of seepage in front corner near the wheel wheel. I suspect water getting in and wicking in that pinch-weld into the body compartment.
Will apply Dynapro sealant when it gets consistently-sunny in So Cal...
Last edited by RAD4Runner; Jun 4, 2020 at 01:01 AM.

 Jan 12, 2017 | 05:52 AM