
3.0 teardown for head gasket swap ques...
 Nov 2, 2010 | 07:40 AM
#1
Thread Starter
Registered User
Joined: Oct 2009
Posts: 134
Likes: 0
From: NW Phoenix
3.0 teardown for head gasket swap ques...
How in the heck am I supposed to remove the 6 exhaust crossover nuts? Got 2 each side out, worked on the last 2 for a little bit, then called it a day. Anyone with first hand experience got any suggestions?? My first 3.0 gasket swap. Any help greatly appreciated!!
 Nov 2, 2010 | 08:39 AM
#3
Contributing Member
Joined: Apr 2006
Posts: 4,787
Likes: 36
From: TENN Native Languishing in Virginia
You pulled the hood off, right?
They are a PITA but you can get them. It takes a while, especially if you have large hands like I do.
It's possible to pull both heads with the crossover intact, but I don't recommend it. I lifted mine by myself then almost couldn't get down out of the engine compartment holding them & had nowhere to put them~
Nov 2, 2010 | 08:49 AM
#4
Registered User
Joined: Nov 2008
Posts: 1,903
Likes: 2
From: Hillsboro, OR
I had a buddy help me take my heads off, i just unbolted the exhaust at the y pipe that goes to the cat. Worked just fine.
Then going back on I bolted up the passenger side head with crossover and then did the driver side.
Then going back on I bolted up the passenger side head with crossover and then did the driver side.
Nov 2, 2010 | 09:22 AM
#5
Registered User
Joined: Jan 2007
Posts: 6,106
Likes: 27
I've removed the crossover several times on mine, and it never gets any easier. It's the most difficult task I've performed on my truck, even with a 3" body lift(I can't hardly believe it's at all possible without one). Everything else I've done is childs play in comparison(in the middle of a frame-off resto currently, so that's saying much). So many advil required it's ridiculous. The only possible exception to that would be trying to install the transmission/transfer case combo without a trans jack(which I've done several times now too). NOT FUN!
The passenger's side is particularly challenging. I always end up rounding off atleast 2 of the nuts on that side. And then end up having to chisel them off and/or use a nut-splitter to remove them from the studs(ruining them in the process). The driver's side has gotten a bit easier since I discovered that I could reach those nuts laying underneath the truck and using socket extensions to get at them from behind. Not doable on the passenger's side, you'll see why if you try.
Just giving you fair warning, getting it back on is no picnic either.
Enjoy!
Hint: Don't use 12 point sockets for this job. 6 point ONLY, and preferably impact sockets if available. Rounded off nuts MUST be avoided at all costs. You can thank me later.
Nov 2, 2010 | 09:33 AM
#6
Thread Starter
Registered User
Joined: Oct 2009
Posts: 134
Likes: 0
From: NW Phoenix
Wow! Thanks for (superfast) responses! I am 1 shy of the driverside. So, If I get that off, I can pull that head. Then, the other head I can pull with the crossover attached to it. If that is the case, I should be good to go. That sounds do-able.
Nov 2, 2010 | 09:38 AM
#7

Registered User

Joined: Sep 2007
Posts: 8,381
Likes: 873
From: San Francisco East Bay
There are two things going on here. MudHippy sounds like he had the problem common to many exhaust nuts, where you have to get a lot of precisely placed force to overcome the rust. I didn't really have that problem.
TNRabbit had the more usual problem. It's not hard to get your fingers onto the nuts, but there is no place to swing the (ordinary) wrench. Removing the hood (a non-trivial job that calls for at least one helper) gets one obstruction out of the way, but the firewall itself isn't going to move.
I didn't have to remove my hood. So unless you have another reason to remove the hood, I'd first invest in the wrench just to try it. But if the nuts are really stuck you may have to move on, because the whole point of using the angle-head wrench is to use it at a sharp angle, which isn't optimal for high force.
Trending Topics
Nov 2, 2010 | 09:46 AM
#8
I doused the nuts in PB Blaster repeatedly over a period of 2+ days while I tore down everything else (my first time too!). Definitely take the Driver's side off and keep the Xover on the passenger head - install the same way! I could get the 1/2" drive socket with many extensions onto that third nut but I didn't have enough space to turn it even one click, and still I couldn't get much leverage but eventually it let go. Once the torque broke I switched to the 1/4" drive socket and had room to turn it way up by the firewall, about 1 or 2 clicks at a time. It takes forever!!! Putting it back is the same way, start the nut with many extensions, run it down with the 1/4", torque it down with the 1/2". Be sure to use new gaskets, you don't want to re-torque later!!
Nov 2, 2010 | 10:09 AM
#11
Registered User
Joined: Oct 2009
Posts: 263
Likes: 0
From: Pgh, PA
I used a swivel head ratchet wrench, mostly through the fenderwell. Worked well for me on both sides AND the cat pipe. I got lucky though as they broke free fairly easy considering what were talking about and the fact the wrench was a mile long
Nov 2, 2010 | 10:21 AM
#12
Contributing Member
Joined: Apr 2006
Posts: 4,787
Likes: 36
From: TENN Native Languishing in Virginia
I will NEVER work on anything in the back of my engine bay ever again without removing the hood; it's a PIECE OF CAKE compared to just about anything else, including an oil change! 4 bolts & it's out. I do it by myself all the time.
Nov 2, 2010 | 11:42 AM
#13
Registered User
Joined: Oct 2009
Posts: 318
Likes: 2
From: Knoxville, TN
After soaking in PB Blaster, the top two nuts on each side came off with a box end wrench and an extension for leverage... not bad at all. The lower two on each side were more difficult to reach, but spun off using a rechargeable impact wrench and various 3/8" swivels, extensions and sockets. One nut on the driver's side seized right at the end of the stud, I ended up using a dremel and cut-off wheel to cut the nut off the stud.
Staceman1, do yourself a favor and don't put the crossover back on. Headers are best but pricey. You can also cut off and use the passenger side crossover flange to route your exhaust down instead of behind the engine. It is a triangle that you can just rotate to point downward, and an exhaust shop can build you a custom down pipe and Y pipe to rejoin your existing pipes just before the O2 sensor pretty cheap. You would also need to make a block plate for the driver's side manifold where the crossover used to join. Just a thought.
Good luck with it.
Nov 2, 2010 | 12:13 PM
#14
Registered User
Joined: Dec 2009
Posts: 754
Likes: 0
From: Pearland, Tx
I just got the three drivers side nuts off and then i took the passenger head off with the crossover attached. The same with going back on. its tough to get it in there without sliding it or anything but thats just what worked for me.
Nov 10, 2010 | 11:18 AM
#16
Contributing Member
Joined: Apr 2004
Posts: 5,464
Likes: 6
From: Arvada, Colorado
For future reference, if anyone else comes across this thread, removing the cross over is a PAIN, and can be avoided.
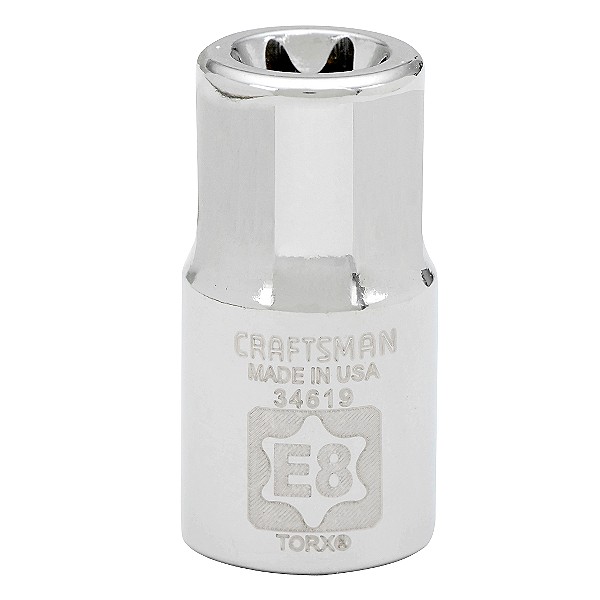
Simply remove the 12 exhaust manifold nuts, then, purchase an E8 female torx socket.
Remove the 12 studs. Then remove the heads. It is unbelievably easier than getting the x-over off. The x-over pipe causes the manifolds to spread out just a bit, giving you plenty of room to move the heads around when putting them back on.
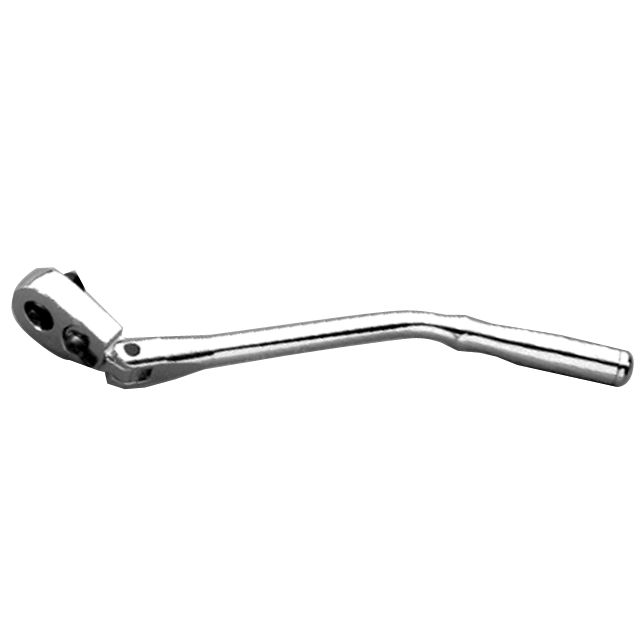
Here is the craftsman one I have.
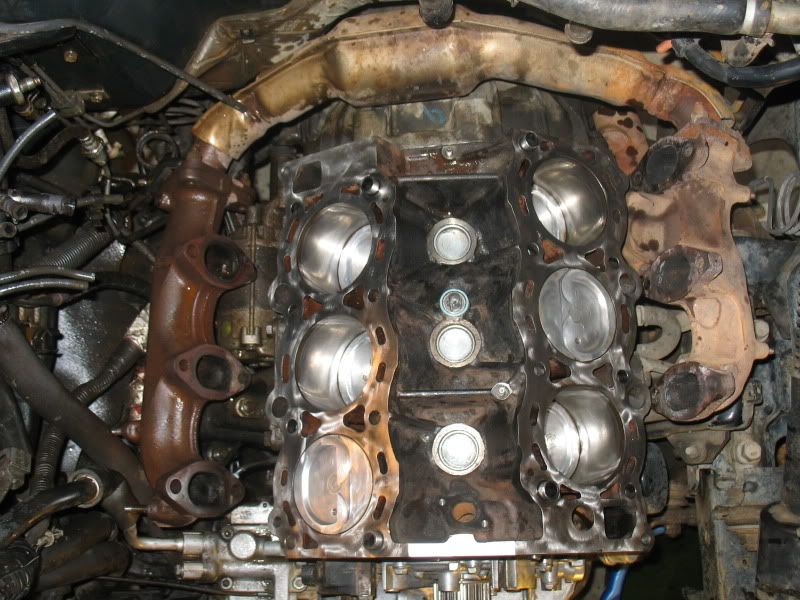
This is a shot of my brothers 95 that I'm working on:
Simply remove the 12 exhaust manifold nuts, then, purchase an E8 female torx socket.
Remove the 12 studs. Then remove the heads. It is unbelievably easier than getting the x-over off. The x-over pipe causes the manifolds to spread out just a bit, giving you plenty of room to move the heads around when putting them back on.
Here is the craftsman one I have.
This is a shot of my brothers 95 that I'm working on:
Last edited by AxleIke; Nov 10, 2010 at 11:21 AM.
Nov 10, 2010 | 11:35 AM
#17
Registered User
Joined: May 2010
Posts: 19
Likes: 0
From: Bellingham WA
just got the heads off mine, really hate this engine
after rebuilding my brother's 22re the stupid 3.0l seems too obnoxious, have a spare 22re sitting around and seems like it might be easier to just swap that in than deal with the cramped quarters and issues with the v6
i guess we'll see how the bottom looks first, ugh
after rebuilding my brother's 22re the stupid 3.0l seems too obnoxious, have a spare 22re sitting around and seems like it might be easier to just swap that in than deal with the cramped quarters and issues with the v6
i guess we'll see how the bottom looks first, ugh

Thread
Thread Starter
Forum
Replies
Last Post


