
fuel pressure pulsation damper 94 4runner v6

 Jul 15, 2009 | 08:25 AM
#2

Registered User
Joined: Jan 2007
Posts: 137
Likes: 0
From: Bothell, WA
You won't be happy....the top of the intake manifold has to come off. Bare minimum all you need to replace is the intake plenum gasket. but, it would be a good time to service the injectors and set the valves.
Jul 15, 2009 | 11:38 AM
#3
Registered User
Joined: Feb 2006
Posts: 114
Likes: 0
From: NJ
What do you mean by servicing the injectors and setting valves? whats involved?
Jul 15, 2009 | 01:37 PM
#4
Contributing Member
Joined: Apr 2006
Posts: 4,787
Likes: 36
From: TENN Native Languishing in Virginia
Setting valves is a GIANT PITA; if they are close, I wouldn't change anything.
Servicing the injectors would be pulling them and sending to someone like http://www.witchhunter.com/index.php4 for ultrasonic cleaning & replacement of all the grommets/o-rings. It's WELL WORTH IT.
Servicing the injectors would be pulling them and sending to someone like http://www.witchhunter.com/index.php4 for ultrasonic cleaning & replacement of all the grommets/o-rings. It's WELL WORTH IT.
Nov 27, 2010 | 06:12 PM
#5
Registered User
Joined: Dec 2009
Posts: 94
Likes: 0
From: Minnesota, USA
dude's fuel leak in the garage. thinkin it's the damper. gonna be fun investing time in something so gay. Anyone here know of a write-up on this so i can get an idea on the kind of time i'll need?
Nov 27, 2010 | 07:22 PM
#6
Registered User
Joined: Jan 2007
Posts: 6,106
Likes: 27
1. The EGR valve and the intake plenum chamber stay/bracket will need disconnected/removed. Disconnect the 2 coolant hoses running to and from the bottom of the throttle body and the 2 heater hoses at the front and rear of the intake plenum chamber. Unplug the TPS and the rear engine ground strap from the intake plenum chamber. A couple vacuum hoses(1 on top of the throttle body mark "P", 1 on top of fuel pressure regulator)and atleast one fuel line(fuel pressure regulator)will need disconnected. Disconnect the accelerator cable from the throttle body and remove it from the intake plenum chamber clips. Disconnect the hoses for the intake silencer and air filter box resonator from the intake plenum chamber. Disconnect the air intake hose from the throttle body. Then unbolt the intake plenum chamber. Lift the intake plenum chamber off the intake manifold and set it aside leaving the throttle body and as many hoses and wires still connected to it(passenger's side)as possible, while leaving enough space to access the fuel pressure pulsation damper.
2. Unscrew the fuel pressure pulsation damper from the end of passenger's side fuel rail. Replace with a new one using new copper gaskets. If the unit itself isn't the cause of the leak, then you may be able to just replace the copper gaskets.
3. Place a new intake plenum chamber gasket on top of the intake manifold. Set the intake plenum chamber on top of that and bolt it securely to the intake manifold. Reconnect the EGR valve, intake plenum chamber stay/bracket, and all hoses and wires.
4. Run the engine with the heater on and the radiator cap off untill the upper radiator hose is warm, to circulate coolant through the system and remove any trapped air(necessary because you'll have disconnected/reconnected atleast 4 coolant lines for the throttle body and heater core in the process). Check the coolant level and refill if needed. Put the radiator cap back on.
5. Your done.
More info/details can be found in the link below.
http://personal.utulsa.edu/~nathan-b...68cylinder.pdf
There's your write-up. Shouldn't take more than 4-5 hours even if you take your time. It would take me less than 2, because I'm very familiar with how to remove/replace the intake plenum chamber efficiently.
Last edited by MudHippy; Nov 28, 2010 at 05:42 PM.
Trending Topics
Nov 28, 2010 | 02:01 PM
#8
Registered User
Joined: Jan 2007
Posts: 6,106
Likes: 27
Here's the stuff I forgot, diagrams and part #'s.
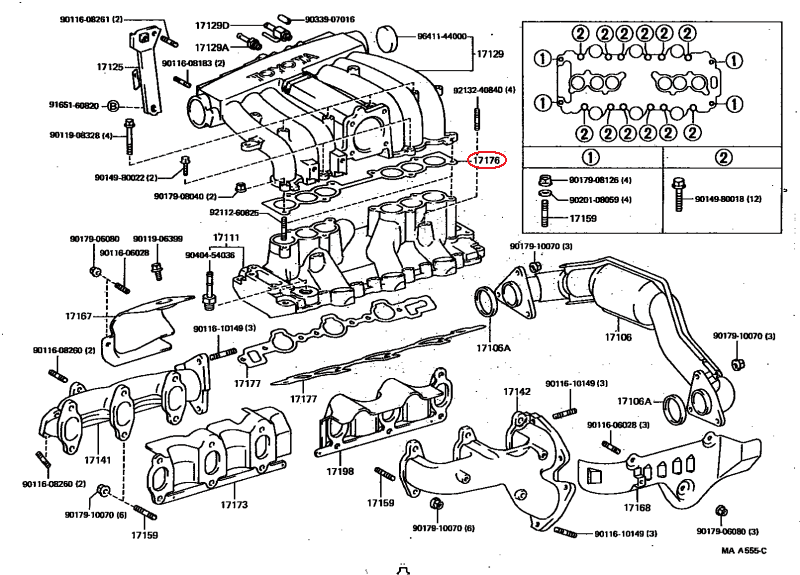
17176 GASKET, AIR SURGE TANK TO INTAKE MANIFOLD
17176-65020 3VZE
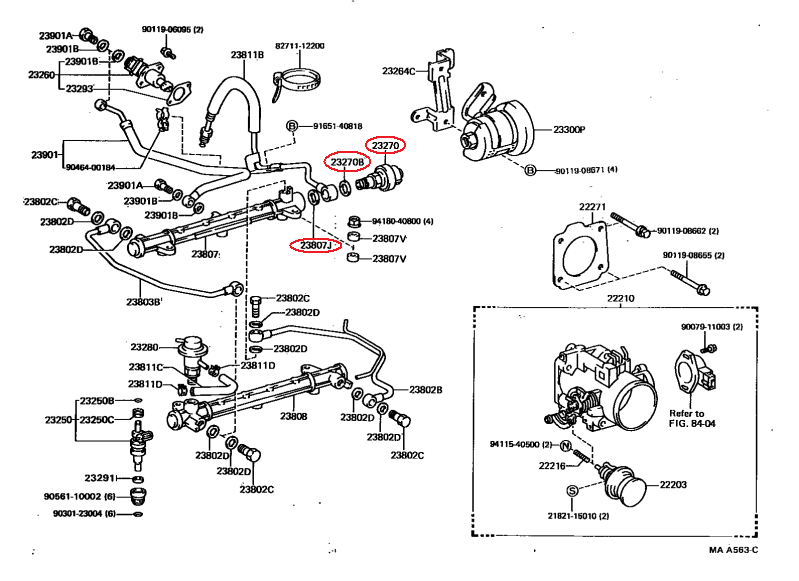
23270 DAMPER ASSY, FUEL PRESSURE PULSATION
23207-65010 3VZE
23270B GASKET (FOR PULSATION DAMPER HOSE)
90430-18028 3VZE
23807J GASKET, PIPE FUEL DELIVARY INLET
90430-18028 3VZE
17176 GASKET, AIR SURGE TANK TO INTAKE MANIFOLD
17176-65020 3VZE
23270 DAMPER ASSY, FUEL PRESSURE PULSATION
23207-65010 3VZE
23270B GASKET (FOR PULSATION DAMPER HOSE)
90430-18028 3VZE
23807J GASKET, PIPE FUEL DELIVARY INLET
90430-18028 3VZE
Nov 28, 2010 | 05:19 PM
#9

Registered User
Joined: Nov 2009
Posts: 9
Likes: 0
From: Charlotte, NC
i just got done replacing mine last weekend. its not horrible to do but its some work, I ordered a new one from the dealer $146 i believe. I also took the opportunity to replace my leaky valve cover gaskets while i was in there and also the pcv valve and some vaccume lines. good luck
Jul 3, 2013 | 11:43 PM
#10

Registered User
Joined: Jun 2013
Posts: 4
Likes: 1
From: California
Remove the hood. Remove coolant hoses and sensor closest to the damper. Also clearing all wiring and vacuum hoses nearby helps. I broke the vacuum hose nipple going to the charcoal canister. First remove the driver side fuel line going to the back of the engine(23802B)The banjo under the plenum is just forward and above the damper.(Screws in straight down).Caution not to slip or bend fuel line. A stuby ratchet wrench works well. Then loosen the other end adove left valve cover. Remove bolt that secures the passenger side fuel line(23811B) just behind the valve cover. A 23mm crows footusing shortest extension possible helps break loose the damper if you plan on re-using the existing damper. A wrench will work, but damage the damper. I was able to use the banjo gaskets several times cleaning the surfaces with fine sand paper. Less torque is required if using new gaskets if a wrench is used to secure. Be sure to line up the hold down bracket before you torque down. I will upload some pictures if needed.
Last edited by rikd72; Jul 27, 2013 at 04:14 PM.
Jan 4, 2015 | 10:20 AM
#12

Registered User

Joined: Sep 2007
Posts: 8,380
Likes: 871
From: San Francisco East Bay
No. You can't reach it.
I don't know how MudHippy manages to remove the FPD without removing the cross-over fuel pipe as well, but he may have a clever wrench that can fit in there.
It ain't that hard; just suck it up and be systematic as you work your way in there.
I don't know how MudHippy manages to remove the FPD without removing the cross-over fuel pipe as well, but he may have a clever wrench that can fit in there.
It ain't that hard; just suck it up and be systematic as you work your way in there.
Jan 5, 2015 | 08:14 AM
#13
Registered User
Joined: Aug 2012
Posts: 40
Likes: 1
From: Twin Cities, MN
Depending on how many miles are on your engine, you may want to adjust the cam-shim gaps at the same time. Apparently this is an area of potential failure on these engines as they tend to wear outside their limits over time. Not that much more to do since you've already got the manifold off, but there are tricks. Lots of info on this in the forums and in the FSM.
Jan 5, 2015 | 08:37 AM
#14

Registered User
Joined: Jan 2015
Posts: 12
Likes: 0
hawaii
Well I install the new fuel damper. After market peace.... Straight metal but use da same crush washer on da damper. . Put everything back together and shoots gas now... u think it could be da crush washer
Last edited by dleehawaii808; Jan 5, 2015 at 09:15 AM.
Jan 5, 2015 | 08:57 AM
#15
Registered User
Joined: Sep 2007
Posts: 8,380
Likes: 871
From: San Francisco East Bay
dlee-
Try proof-reading your postings before you send them; it will make it much easier for others to understand. "After marker peace"? "da damper"?
Also, asking the same question repeatedly in different threads doesn't help much either. If you don't like the answer you got, explain why and someone else might be able to fill it out.
And yes, since you reused the crush washers, that's almost a guarantee of failure.
Jan 5, 2015 | 09:02 AM
#16
Registered User
Joined: Jan 2015
Posts: 12
Likes: 0
dlee-
Try proof-reading your postings before you send them; it will make it much easier for others to understand. "After marker peace"? "da damper"?
Also, asking the same question repeatedly in different threads doesn't help much either. If you don't like the answer you got, explain why and someone else might be able to fill it out.
And yes, since you reused the crush washers, that's almost a guarantee of failure.
Try proof-reading your postings before you send them; it will make it much easier for others to understand. "After marker peace"? "da damper"?
Also, asking the same question repeatedly in different threads doesn't help much either. If you don't like the answer you got, explain why and someone else might be able to fill it out.
And yes, since you reused the crush washers, that's almost a guarantee of failure.

Thread
Thread Starter
Forum
Replies
Last Post
steve miller
General Electrical & Lighting Related Topics
2
Oct 10, 2015 01:40 AM


