
Painting your 5-spokes--My Write-Up--Pics
 Jun 28, 2007 | 11:21 AM
#1
Thread Starter
Registered User
Joined: Dec 2005
Posts: 844
Likes: 0
From: Bloomington,Indiana
Painting your 5-spokes--My Write-Up--Pics
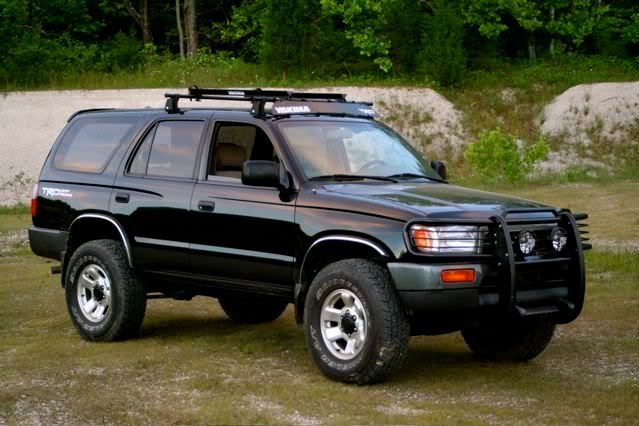
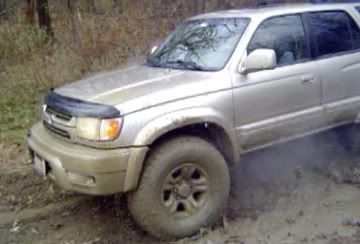
Per RoorRunner's request, I decided to put something together that explains how I went from this....
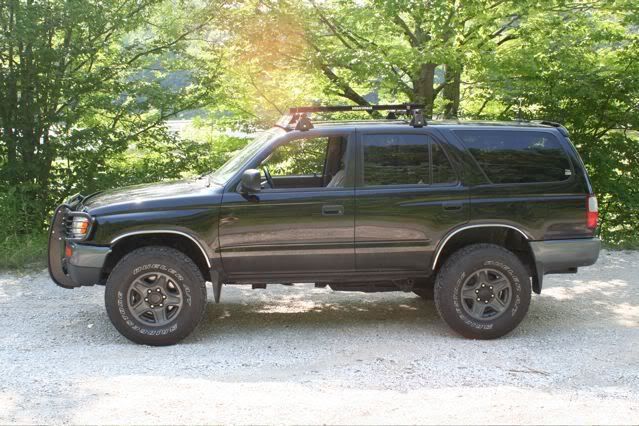
To this...
Remember, I'm providing this for reference only and perform at your own risk. When painting, be sure to use a respirator or work in a well vented area (outside!)...
On to the write-up...and sorry at the time I didn't think to take pictures of the process.
Materials:
--Limited 5-spoke wheels
--Acetone
--Sand paper (I used a general purpose "150 grit-fine")
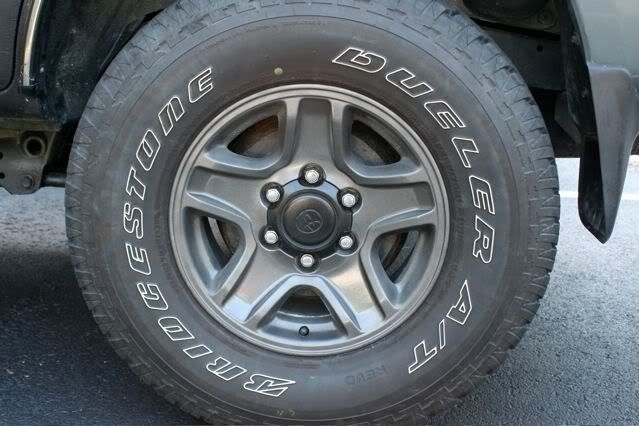
--3 Cans of "Dupli-Color High Performance Wheel Coating"
(Color: WP102 Graphite)--(Cost me about $7 bucks a can at Pep Boys)
--2 Cans of Rust-Oleum Automobile Primer or similar product
--2 Cans of Clear Coat (I used some off brand I found at my local hardware store for roughly $3-4 bucks--it was meant for use on metal surfaces)
--Cup brush and Drill
--Paper Towels or Rags
--Paint Thinner
--"Krylon Satin Black spray paint for Plastic"
Process
Step 1--Wheel prep is the most important part of the whole project, this will determine just how well your final product will look so take your time with this and don't get too anxious. I first started with the cup brush and worked off all the clear coat/paint from the easy to get to areas, then followed up with the sand paper. The wheels I had were a little beat up with nicks and some heavy scratches so I really worked these areas over and got'em nice and smooth. Check and re-check all the nooks and crannies of the wheels making sure to get around the outer edge and in between spokes when sanding (See below pictures).


Notice the blemish on the one spoke, watch for falling leaves when you let them dry. By the time I found it, the wheel was basically dry so I decided to live with it rather than trying to repaint and risk screwing it up more.
At the point when its ready for priming, there shouldn't be any "shiny" areas any where on the wheel. When you begin sanding, you'll see what one area looks like after sanding...in the end the whole wheel should look like this. Sorry if this is vague, its hard to describe without pictures. Don't be afraid to use the sand paper, the better you sand it down, the better it will turn out
Step 2--Wipe down all the wheels with acetone or similiar cleaner to get rid of all the dust/dirt, again making sure to get in all the small nooks and crannies of the wheel, it should dry almost instantly.
Step 3--Priming the wheel is again, another important stage. I used two different colors of primer (gray and black) to ensure all the areas were gone over thoroughly. Because my final wheel outcome would be a sort of gunmetal color, I applied the first coat of primer with the gray and followed up with the black so it blended better (at the time it made since to do it this way, it now seems sort of weird for my logic now but whatever they turned out!..Haha) I applied two good coats of primer waiting about 10-15 minutes in between each.
Step 4-- Apply the wheel coating, I did a quite few thin coats of this so this process took me a while. By doing it in several thin coats, I was hoping to avoid having the paint run or become too heavy in any one area. The whole coating process was done over the course of probably about an hour.
Step 5--I allowed roughly 30 minutes for this to dry once the final coat was applied, I didn't want to touch it in fear that it would be sticky and then I'd have a finger print in the wheel so I just played it safe. I then went on to a apply 2 coats of clear coat again making sure I got in all the nooks and crannies. I allowed them to dry and setup up over night and went and got-em put on!
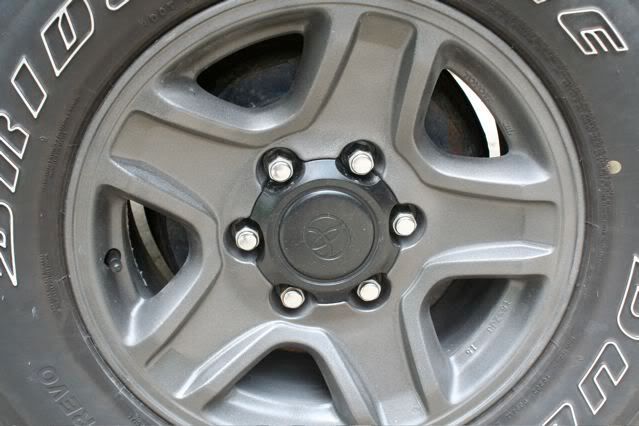
Step 6--Lastly, the center caps. I had to use a heavy duty paint stripper to take the silver/gray paint on the center caps off. This was relatively easy, the stripper was very easy to use with very little scrubbing/sanding. Once the paint was off, I again wiped it down with acetone and let dry for a minute.
Step 7--I applied my black plastic paint and let dry. Very straight forward process. Obviously it'd be easy to color in the toyota symbol on these center caps with a kind of touch up paint if you'd desire but didn't I didn't want to at this point in time.
Again, the finished product....besides being a little dirty.

On a side note: notice I got rid of those crappy chrome fender trim pieces, I used basically the same method to paint those.
Hope this helps you RoorRunner and anyone else looking to do a mod similiar to this. Again, a big thanks to 96_Runner (Christian), he has a great write up and video that helped make this a reality for me (try searching here on YT and on Youtube).
Let me know if you anyone has any questions.
Kyle
To this...
Remember, I'm providing this for reference only and perform at your own risk. When painting, be sure to use a respirator or work in a well vented area (outside!)...
On to the write-up...and sorry at the time I didn't think to take pictures of the process.
Materials:
--Limited 5-spoke wheels
--Acetone
--Sand paper (I used a general purpose "150 grit-fine")
--3 Cans of "Dupli-Color High Performance Wheel Coating"
(Color: WP102 Graphite)--(Cost me about $7 bucks a can at Pep Boys)
--2 Cans of Rust-Oleum Automobile Primer or similar product
--2 Cans of Clear Coat (I used some off brand I found at my local hardware store for roughly $3-4 bucks--it was meant for use on metal surfaces)
--Cup brush and Drill
--Paper Towels or Rags
--Paint Thinner
--"Krylon Satin Black spray paint for Plastic"
Process
Step 1--Wheel prep is the most important part of the whole project, this will determine just how well your final product will look so take your time with this and don't get too anxious. I first started with the cup brush and worked off all the clear coat/paint from the easy to get to areas, then followed up with the sand paper. The wheels I had were a little beat up with nicks and some heavy scratches so I really worked these areas over and got'em nice and smooth. Check and re-check all the nooks and crannies of the wheels making sure to get around the outer edge and in between spokes when sanding (See below pictures).
Notice the blemish on the one spoke, watch for falling leaves when you let them dry. By the time I found it, the wheel was basically dry so I decided to live with it rather than trying to repaint and risk screwing it up more.
At the point when its ready for priming, there shouldn't be any "shiny" areas any where on the wheel. When you begin sanding, you'll see what one area looks like after sanding...in the end the whole wheel should look like this. Sorry if this is vague, its hard to describe without pictures. Don't be afraid to use the sand paper, the better you sand it down, the better it will turn out
Step 2--Wipe down all the wheels with acetone or similiar cleaner to get rid of all the dust/dirt, again making sure to get in all the small nooks and crannies of the wheel, it should dry almost instantly.
Step 3--Priming the wheel is again, another important stage. I used two different colors of primer (gray and black) to ensure all the areas were gone over thoroughly. Because my final wheel outcome would be a sort of gunmetal color, I applied the first coat of primer with the gray and followed up with the black so it blended better (at the time it made since to do it this way, it now seems sort of weird for my logic now but whatever they turned out!..Haha) I applied two good coats of primer waiting about 10-15 minutes in between each.
Step 4-- Apply the wheel coating, I did a quite few thin coats of this so this process took me a while. By doing it in several thin coats, I was hoping to avoid having the paint run or become too heavy in any one area. The whole coating process was done over the course of probably about an hour.
Step 5--I allowed roughly 30 minutes for this to dry once the final coat was applied, I didn't want to touch it in fear that it would be sticky and then I'd have a finger print in the wheel so I just played it safe. I then went on to a apply 2 coats of clear coat again making sure I got in all the nooks and crannies. I allowed them to dry and setup up over night and went and got-em put on!
Step 6--Lastly, the center caps. I had to use a heavy duty paint stripper to take the silver/gray paint on the center caps off. This was relatively easy, the stripper was very easy to use with very little scrubbing/sanding. Once the paint was off, I again wiped it down with acetone and let dry for a minute.
Step 7--I applied my black plastic paint and let dry. Very straight forward process. Obviously it'd be easy to color in the toyota symbol on these center caps with a kind of touch up paint if you'd desire but didn't I didn't want to at this point in time.
Again, the finished product....besides being a little dirty.
On a side note: notice I got rid of those crappy chrome fender trim pieces, I used basically the same method to paint those.
Hope this helps you RoorRunner and anyone else looking to do a mod similiar to this. Again, a big thanks to 96_Runner (Christian), he has a great write up and video that helped make this a reality for me (try searching here on YT and on Youtube).
Let me know if you anyone has any questions.
Kyle
Last edited by Skrillah; Jun 28, 2007 at 11:23 AM.
Jun 28, 2007 | 12:56 PM
#4
Contributing Member
Joined: Nov 2006
Posts: 1,434
Likes: 0
From: GSU/ATL/SD
haven't read it through yet but thank you thank you thank you
edit
alright i read it, very good i think i'll go through this in a breeze. i'm wondering.....what if i were to spray the herculiner with the same color, just the rear bumper and the rocker panels. i think that'd look pretty sexy
edit
alright i read it, very good i think i'll go through this in a breeze. i'm wondering.....what if i were to spray the herculiner with the same color, just the rear bumper and the rocker panels. i think that'd look pretty sexy
Last edited by MillerPKA; Jun 28, 2007 at 01:28 PM.
Jun 28, 2007 | 01:45 PM
#5
Thread Starter
Registered User
Joined: Dec 2005
Posts: 844
Likes: 0
From: Bloomington,Indiana
haven't read it through yet but thank you thank you thank you
edit
alright i read it, very good i think i'll go through this in a breeze. i'm wondering.....what if i were to spray the herculiner with the same color, just the rear bumper and the rocker panels. i think that'd look pretty sexy
edit
alright i read it, very good i think i'll go through this in a breeze. i'm wondering.....what if i were to spray the herculiner with the same color, just the rear bumper and the rocker panels. i think that'd look pretty sexy
I didn't have to mask off the tires, I ordered the rims and the tires were dismounted which made it very easy. Wouldn't be bad to mask off the tires though.
Jun 30, 2007 | 12:53 PM
#7
Thread Starter
Registered User
Joined: Dec 2005
Posts: 844
Likes: 0
From: Bloomington,Indiana
Well...I appreciate the remark but I don't have a lift. I plan on doing a very mild lift this summer sometime, maybe some PP coils or OME 906 and 881's but nothing more as my 2.7 is sluggish enough.
What tires are you running right now? I'm sittin on 265/75/16 with not much problem.
What tires are you running right now? I'm sittin on 265/75/16 with not much problem.
Trending Topics
Jun 30, 2007 | 05:22 PM
#8
Registered User
Joined: Dec 2006
Posts: 250
Likes: 0
From: kentucky
Looks good. I like that color. I've thought about the exact same color combo for mine but haven't decided for sure yet. I do like the factory color but think it would be hard to duplicate because it's almost as shiny as chrome. I'm starting to think I'd do the center caps the same color but maybe the toyota emblem diff.
Jul 3, 2007 | 04:09 PM
#10
Registered User
Joined: Oct 2006
Posts: 198
Likes: 0
From: Tejas
I always wondered, would the painting of the inside (where the tire would be) of the wheel affect the mounting surface at all? Did you just avoid that with little to no overspray or just paint over it?
Nice work BTW.
Nice work BTW.
Dec 8, 2008 | 02:54 PM
#12
Registered User
Joined: Jul 2008
Posts: 298
Likes: 0
From: Chicago Area
ive been eye-ballin' this mod for a while. How is that paint holding up? Has anyone done this with the tires on? i was going to sand mine with a cup brush but maybe just do the part near rubber by hand and just tape it off. i recently had my wheels coated in mud this color and it looked awesome!
Well not the same color but it got me thinkin! u think this color will work with my body paint? personally i think it works with anything
Well not the same color but it got me thinkin! u think this color will work with my body paint? personally i think it works with anything
Dec 8, 2008 | 04:12 PM
#13
Registered User
Joined: Nov 2005
Posts: 1,205
Likes: 1
From: SouthWest Littleton, Colorado
Somewhere I had seen a "How-To" on wheel painting. They did paint their wheels with the tires on. They deflated the tires, while pressing down on the sidewalls slide index cards between the tire and rim, tape/paper off the rest of the tire. If this doesn't give you enough space, I'm sure you could pop the outside bead and mask off then.
Dec 8, 2008 | 04:52 PM
#14

Registered User
Joined: Jan 2007
Posts: 732
Likes: 6
Nice job.....I'm another one who's been eyeballing that mod for a while.
How did the re-mount go as far as the tire machine tool scraping the rim?
What about the wheel weights going on and then the dreaded lug nuts going on.
Any scrapes and bumps to touch up?
Some guys even leave the caps on when removing wheels.
Scraping and scratching galore!
Kenny S>
How did the re-mount go as far as the tire machine tool scraping the rim?
What about the wheel weights going on and then the dreaded lug nuts going on.
Any scrapes and bumps to touch up?
Some guys even leave the caps on when removing wheels.
Scraping and scratching galore!
Kenny S>
 Dec 8, 2008 | 08:36 PM
#16
Registered User
Joined: Jul 2008
Posts: 298
Likes: 0
From: Chicago Area
Somewhere I had seen a "How-To" on wheel painting. They did paint their wheels with the tires on. They deflated the tires, while pressing down on the sidewalls slide index cards between the tire and rim, tape/paper off the rest of the tire. If this doesn't give you enough space, I'm sure you could pop the outside bead and mask off then.


Thread
Thread Starter
Forum
Replies
Last Post
ashamsuddin
General Vehicle Related Topics (Non Year Related)
17
Jul 22, 2024 03:59 AM
kawazx636
The Classifieds GraveYard
34
Oct 6, 2021 03:03 PM
Toys4parts
86-95 Trucks & 4Runners (Build-Up Section)
2
Sep 26, 2015 01:56 PM


