The Fab Shop Tube buggies, armor protection and anything else that requires cutting, welding, or custom fab work

"taking the top off" my 2nd gen 4runner

Thread Tools
 
Search this Thread
 
Old 08-25-2008, 08:02 PM
  #61  
Registered User
 
RiCh_90-yota's Avatar
 
Join Date: Jul 2008
Location: Reno NV/Oxnard CA (805)
Posts: 197
Likes: 0
Received 0 Likes on 0 Posts
Great Work, Love that look!!!! I Think I may just Do that too. Any Tips
Old 08-25-2008, 08:30 PM
  #62  
Registered User
 
rocklover's Avatar
 
Join Date: Jul 2008
Location: Parker, CO
Posts: 81
Likes: 0
Received 0 Likes on 0 Posts
thats one of the most badass things ive ever seen. Nice job man!!!!
Old 08-25-2008, 08:38 PM
  #63  
Registered User
Thread Starter
 
4rnnr33's Avatar
 
Join Date: Jan 2008
Location: castle rock, wa
Posts: 327
Likes: 0
Received 0 Likes on 0 Posts
thanks guys. lets see.... the only advice that i really have is dont cut off too much like i did. if you leave part of the window frame then it would be a lot easier to fill in. kinda like how fills is. but even though i cut a little bit too much it still wasnt that bad
Old 08-25-2008, 09:35 PM
  #64  
Registered User
Thread Starter
 
4rnnr33's Avatar
 
Join Date: Jan 2008
Location: castle rock, wa
Posts: 327
Likes: 0
Received 0 Likes on 0 Posts
heres some pics of the inside
Name:  SSPX0045.jpg
Views: 1143
Size:  30.0 KB
decent amount of space behind the seats
Name:  SSPX0047.jpg
Views: 1161
Size:  31.3 KB
also put lapbelts in the rear since the mounts for the shoulder belts were cut out
Name:  SSPX0046.jpg
Views: 1142
Size:  29.5 KB
Old 08-25-2008, 09:57 PM
  #65  
Registered User
 
shancerlelby's Avatar
 
Join Date: Oct 2007
Location: quesnel b.c Canada
Posts: 319
Likes: 0
Received 0 Likes on 0 Posts
what do think you got for weight savings? looks like it might have lifted more in the rear.
Old 08-25-2008, 10:21 PM
  #66  
Registered User
Thread Starter
 
4rnnr33's Avatar
 
Join Date: Jan 2008
Location: castle rock, wa
Posts: 327
Likes: 0
Received 0 Likes on 0 Posts
ya the back did go up a little bit i almost need to move the shackle hangers forward a little bit but im not really sure how much weight i took off overall. i would have to say around 150 maybe 200 pounds but its hard to say for sure.
Old 08-26-2008, 06:11 AM
  #67  
Contributing Member
 
Belize Off Road Team's Avatar
 
Join Date: Apr 2007
Location: Edmonton, Alberta
Posts: 2,850
Likes: 0
Received 1 Like on 1 Post
It's different i'll give you that! when i do my chop, i'm going to keep the original rear window frame and make it all functional. Yours is coming along nicely. Can't wait to see it finished
Old 08-26-2008, 06:08 PM
  #68  
Registered User
 
pepsibluefloat's Avatar
 
Join Date: Dec 2006
Location: Albuquerque, New Mexico
Posts: 386
Likes: 0
Received 0 Likes on 0 Posts
whats with the sheetmetal around the fenders?
Old 08-26-2008, 07:57 PM
  #69  
Registered User
 
RobD's Avatar
 
Join Date: Jun 2006
Location: Calgary, AB
Posts: 2,243
Likes: 0
Received 4 Likes on 4 Posts
Dude, very, very well done.

I've seen one or two chopped 4Runners around here and your's is by far the best one I've seen, especially with the rear slider on the back. Good work.
Old 08-26-2008, 09:08 PM
  #70  
Registered User
Thread Starter
 
4rnnr33's Avatar
 
Join Date: Jan 2008
Location: castle rock, wa
Posts: 327
Likes: 0
Received 0 Likes on 0 Posts
sheetmetal around the fenders?? you must be talking about my sweet fender flares. those are only on there because this is my dd and i kept geting pulled over because my tires stuck out too far thats also why the bumpers have extensions on them incase anyone was wondering.
Old 08-26-2008, 10:06 PM
  #71  
Registered User
 
fillsrunner4's Avatar
 
Join Date: Jun 2004
Location: Woodinville, wa
Posts: 2,906
Likes: 0
Received 2 Likes on 1 Post
thats crazy lookin


Nice job with the chop!
Old 08-27-2008, 02:08 PM
  #72  
Registered User
Thread Starter
 
4rnnr33's Avatar
 
Join Date: Jan 2008
Location: castle rock, wa
Posts: 327
Likes: 0
Received 0 Likes on 0 Posts
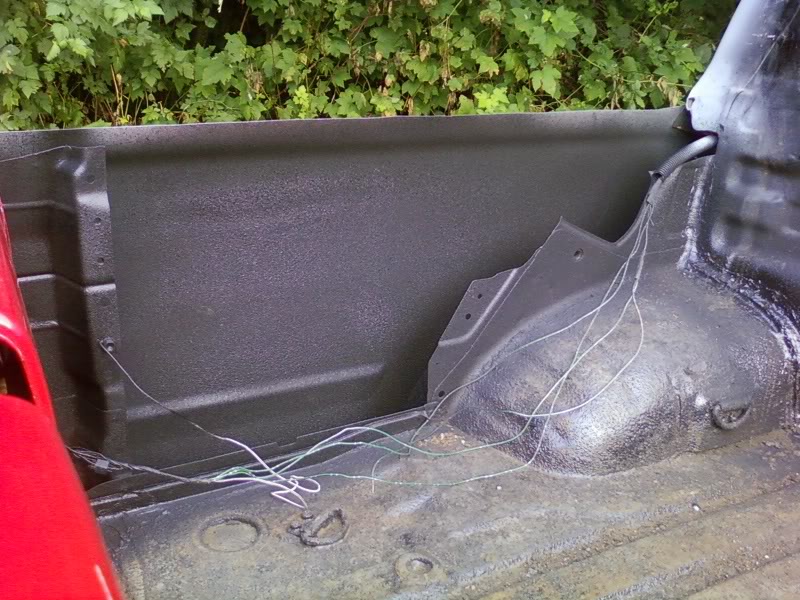
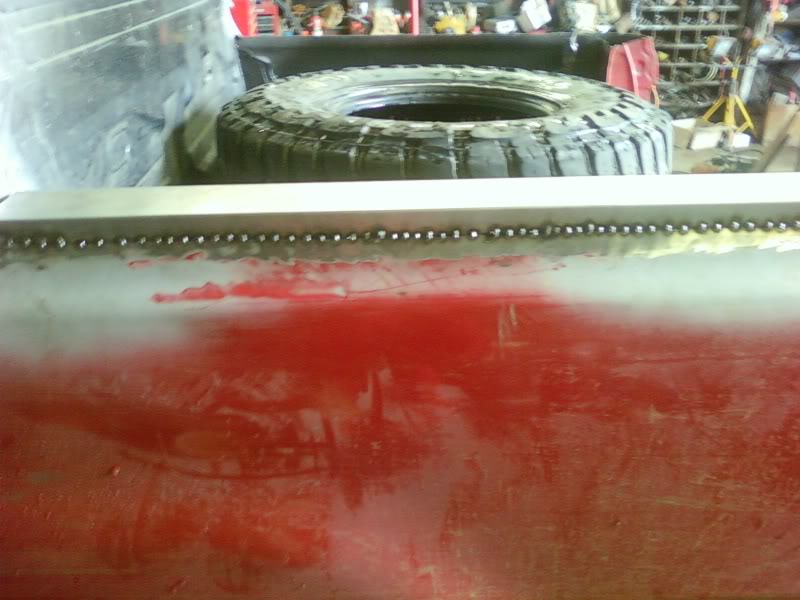
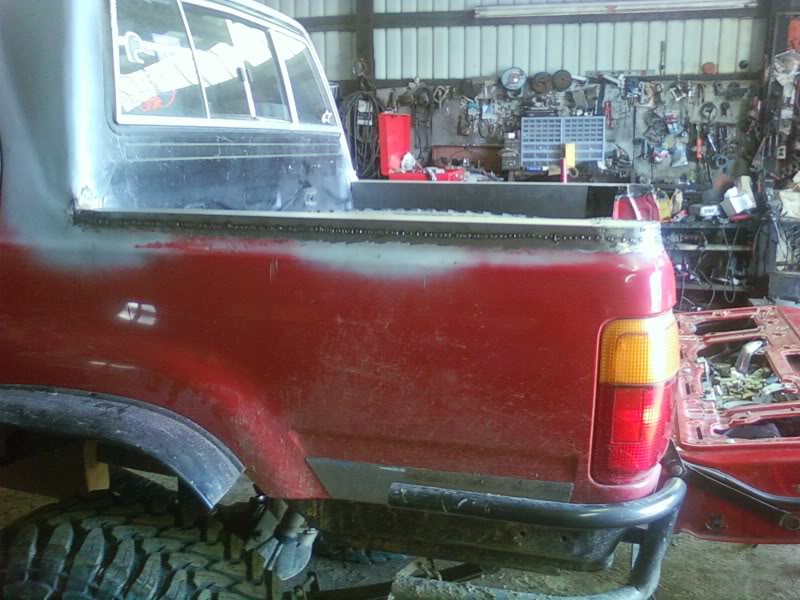
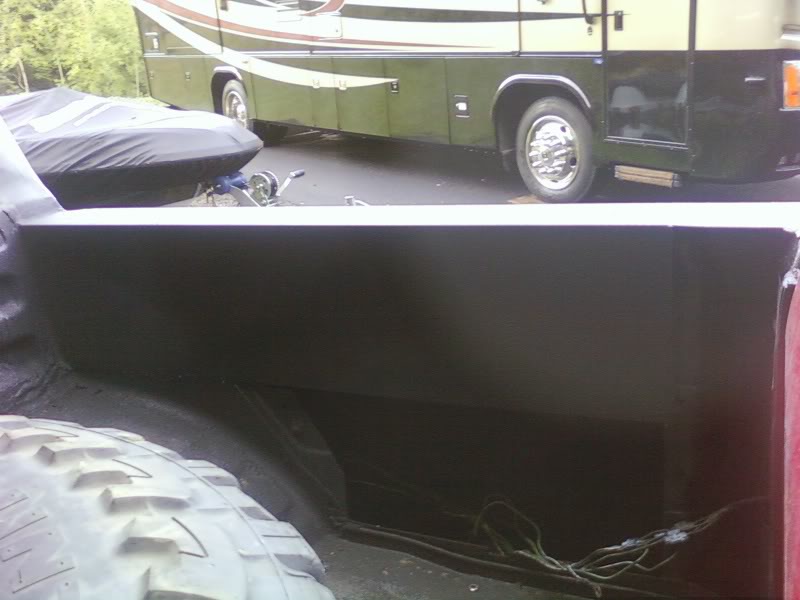
well today i went to the sheetmetal place and they are making me some pieces for the bed rails and those will be done tomorrow. and i also bedlined the insides of the fenders so i dont have to worry about anything rusting. i used some duplicolor truck bed liner and i love it i think it looks way better than the herculiner that i have in the interior and the best part is it only4 costs $40.00 a gallon instead of 100 for herculiner. heres a pic
Name:  SSPX0048.jpg
Views: 1174
Size:  125.4 KB
Old 08-29-2008, 03:32 PM
  #73  
Registered User
Thread Starter
 
4rnnr33's Avatar
 
Join Date: Jan 2008
Location: castle rock, wa
Posts: 327
Likes: 0
Received 0 Likes on 0 Posts
well today i picked up the pieces for the bed rails and ill probably work on getting thewm on sunday. heres what they look like
Name:  SSPX0050.jpg
Views: 1173
Size:  110.7 KB
Old 08-31-2008, 06:12 PM
  #74  
Registered User
Thread Starter
 
4rnnr33's Avatar
 
Join Date: Jan 2008
Location: castle rock, wa
Posts: 327
Likes: 0
Received 0 Likes on 0 Posts
well i just about got the bed all finished up.
bedrails welded on
Name:  SSPX0059.jpg
Views: 1147
Size:  61.8 KB
Name:  SSPX0061.jpg
Views: 1158
Size:  87.2 KB
then finished off with some bedliner
Name:  SSPX0062.jpg
Views: 1166
Size:  99.7 KB
Name:  SSPX0063.jpg
Views: 1144
Size:  51.5 KB
Old 08-31-2008, 06:57 PM
  #75  
Registered User
 
94Runner4x4's Avatar
 
Join Date: May 2006
Location: Lawrenceville/Statesboro, GA
Posts: 625
Likes: 0
Received 0 Likes on 0 Posts
lookin better and better everyday! i love it! and the bed rails look great!
Old 08-31-2008, 07:13 PM
  #76  
Registered User
Thread Starter
 
4rnnr33's Avatar
 
Join Date: Jan 2008
Location: castle rock, wa
Posts: 327
Likes: 0
Received 0 Likes on 0 Posts
thanks man
Old 09-01-2008, 09:09 PM
  #77  
Registered User
 
yotaman's Avatar
 
Join Date: Mar 2005
Location: Cumming, GA
Posts: 1,165
Likes: 0
Received 6 Likes on 5 Posts
Very nice!!!

I'm doing the same myself. I plan to just completely cut the rear off and make a flat bed big enough to hold a tool box and a spare tire.
Old 09-01-2008, 09:24 PM
  #78  
Registered User
Thread Starter
 
4rnnr33's Avatar
 
Join Date: Jan 2008
Location: castle rock, wa
Posts: 327
Likes: 0
Received 0 Likes on 0 Posts
ya that would be cool and that was actually my original plan to make a flatbed
Old 09-19-2008, 10:01 AM
  #79  
Registered User
Thread Starter
 
4rnnr33's Avatar
 
Join Date: Jan 2008
Location: castle rock, wa
Posts: 327
Likes: 0
Received 0 Likes on 0 Posts
well finally got an update.
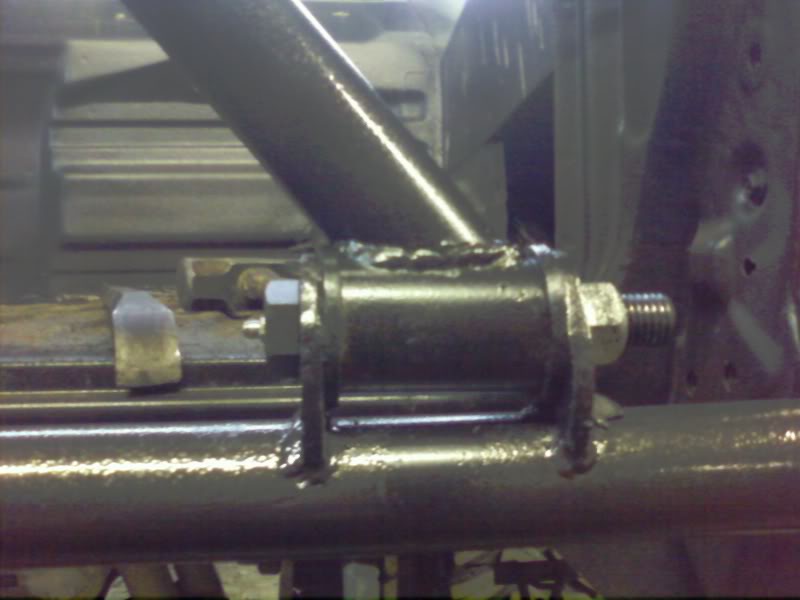
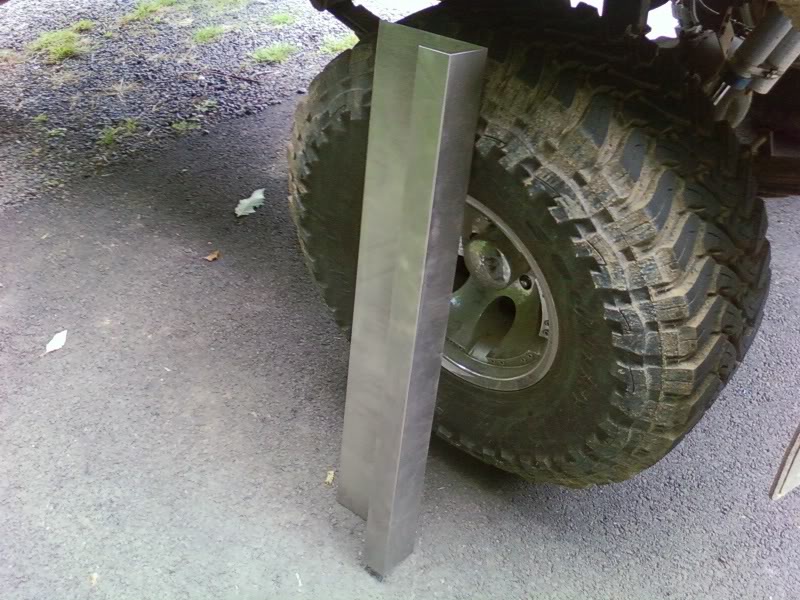
built a spare tire carrier heres some pics
it sits down in the bed or i can fold it up if i need to put anything in the back
Name:  SSPX0073.jpg
Views: 1155
Size:  54.4 KB
Name:  SSPX0071.jpg
Views: 1177
Size:  48.3 KB
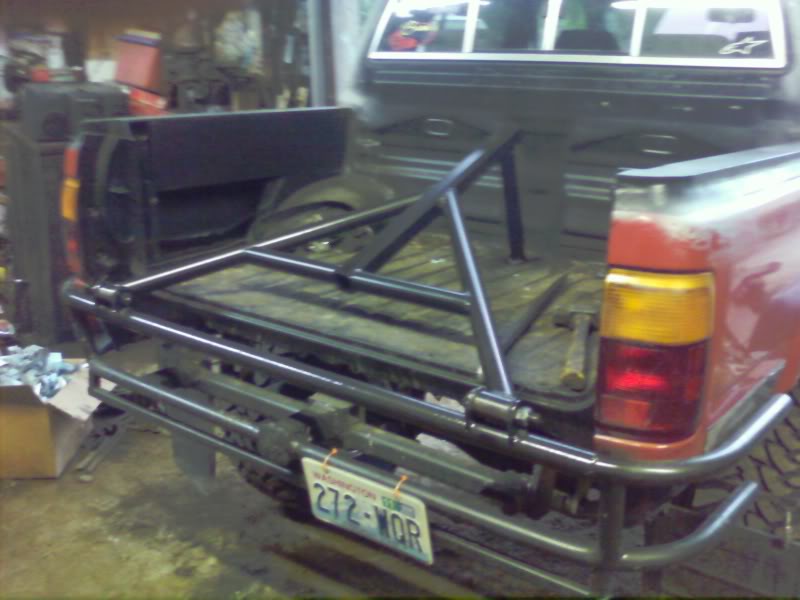
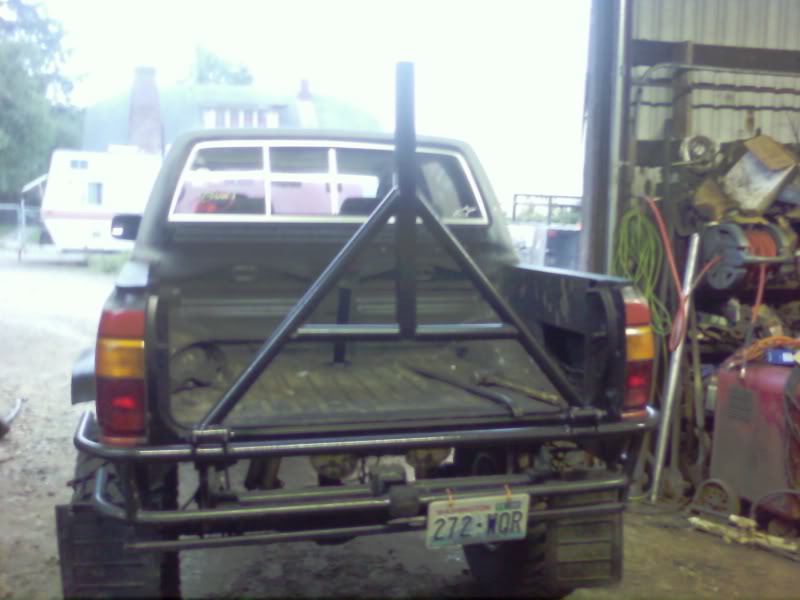
the hinges are 1/4 in plate with holes drilled through it and leaf spring bushings pressed inside a tube with a spring bolt holding it in place
Name:  SSPX0071.jpg
Views: 1177
Size:  48.3 KB
i still need to add a shovel, axe, and highlift mount.
Attached Images
File Type: jpg
SSPX0071.jpg (48.3 KB, 96 views)
Old 09-19-2008, 10:02 AM
  #80  
Registered User
Thread Starter
 
4rnnr33's Avatar
 
Join Date: Jan 2008
Location: castle rock, wa
Posts: 327
Likes: 0
Received 0 Likes on 0 Posts
woops that last pic was supposed to be this
Name:  SSPX0072.jpg
Views: 1183
Size:  40.1 KB


Quick Reply: "taking the top off" my 2nd gen 4runner


All times are GMT -8. The time now is 10:07 AM.