
Rear bumper brackets on aftermarket swingout
 Feb 19, 2011 | 06:19 PM
#103
Thread Starter


Joined: Dec 2006
Posts: 15,192
Likes: 190
From: Sedro-Woolley, WA
lolz thanks guys. 
A buddy of mine has a jig to hold a corded drill and I'll use that to notch the tubing when I make the hoops. It's gonna be three pieces, should work great.
A buddy of mine has a jig to hold a corded drill and I'll use that to notch the tubing when I make the hoops. It's gonna be three pieces, should work great.

 Mar 19, 2011 | 08:58 PM
#105

Banned
Joined: Mar 2011
Posts: 60
Likes: 0
Just a comment about the original post. You are absolutely right. Those brackets should never be designed to go OUTSIDE of the framerail on the 4runner. And you pretty much have to have a modular design to keep from having to remove the tailgate. I build the brackets for PadgettFabrication.com out of 3/8" steel and they insert into the Framerail without removing the Tailgate, using Factory holes, and they then bolt to the mating bracket stubs welded to the bumper. Your bumper, and its mods look great. Good Job
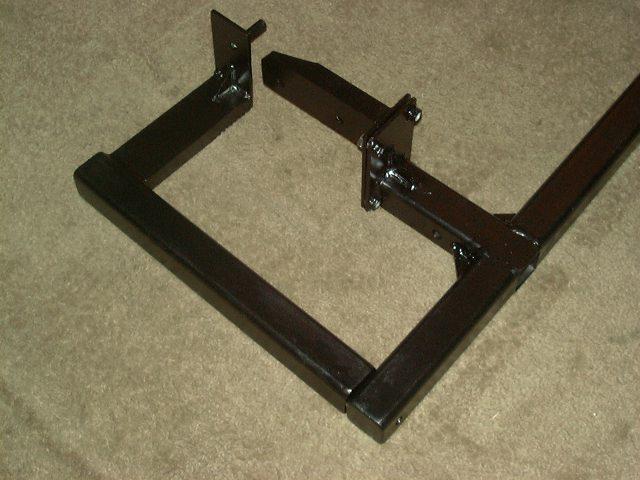
Ok, here's the deal: there's a pretty good chance ya'll have seen my rear swingout bumper around:
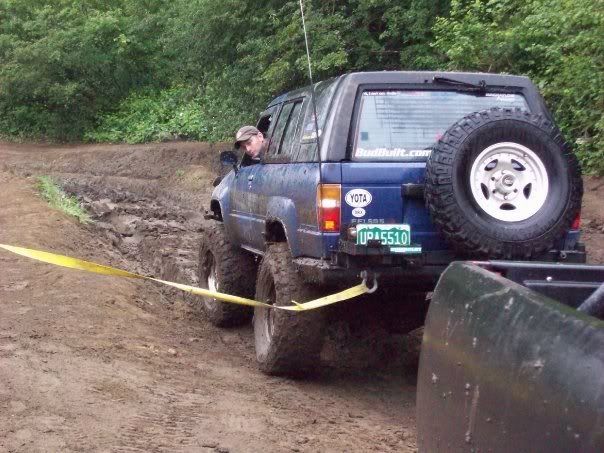
This bumper, functional yes, has been a pain in my tailgate since the day I tried to install it. Please DO NOT ask me who makes this bumper 'cause I'm not gonna tell you!!!! I'm not gonna advertise for these clowns any further.
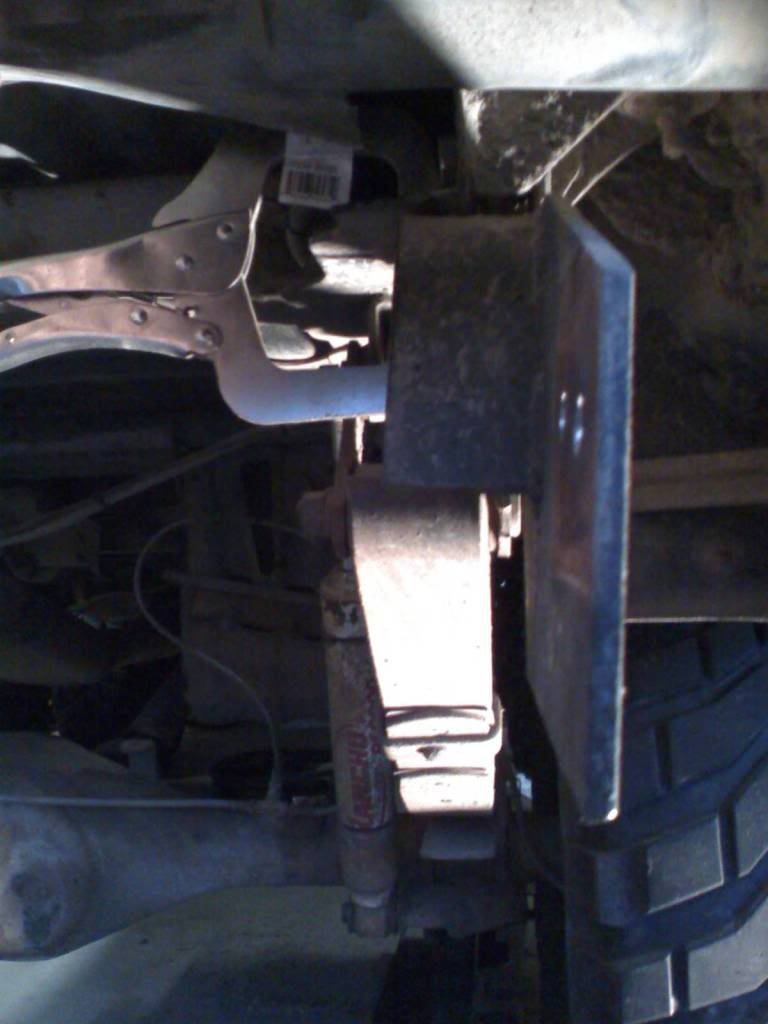
ANYWAYS, the mounts for this bumper were completely NOT thought thru and I tried to fix this issue when I first put the bumper on but to no avail. Now, it's really a problem. These brackets mount on the outside of the framerail and use the factory bumper holes. Because of this, the rear shackles directly contact the bracket and limit spring movement. Not to mention the obnoxious CLANG I get everytime I hit a pothole or flex out on the trails.
Here's the passenger mount from the outside:
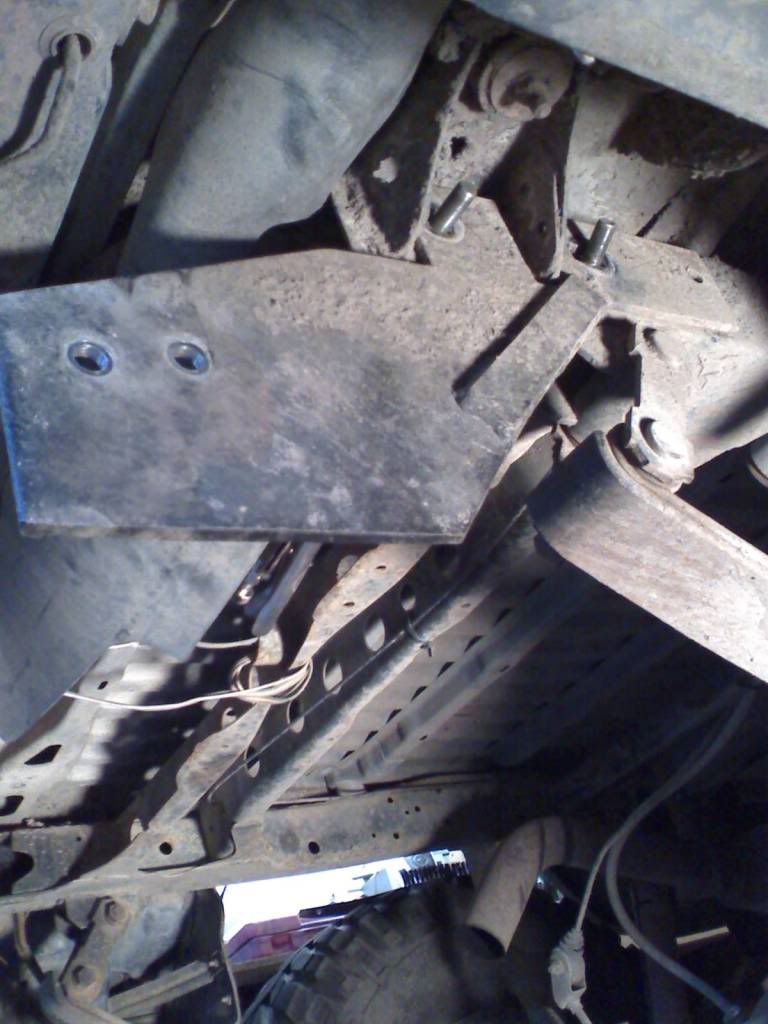
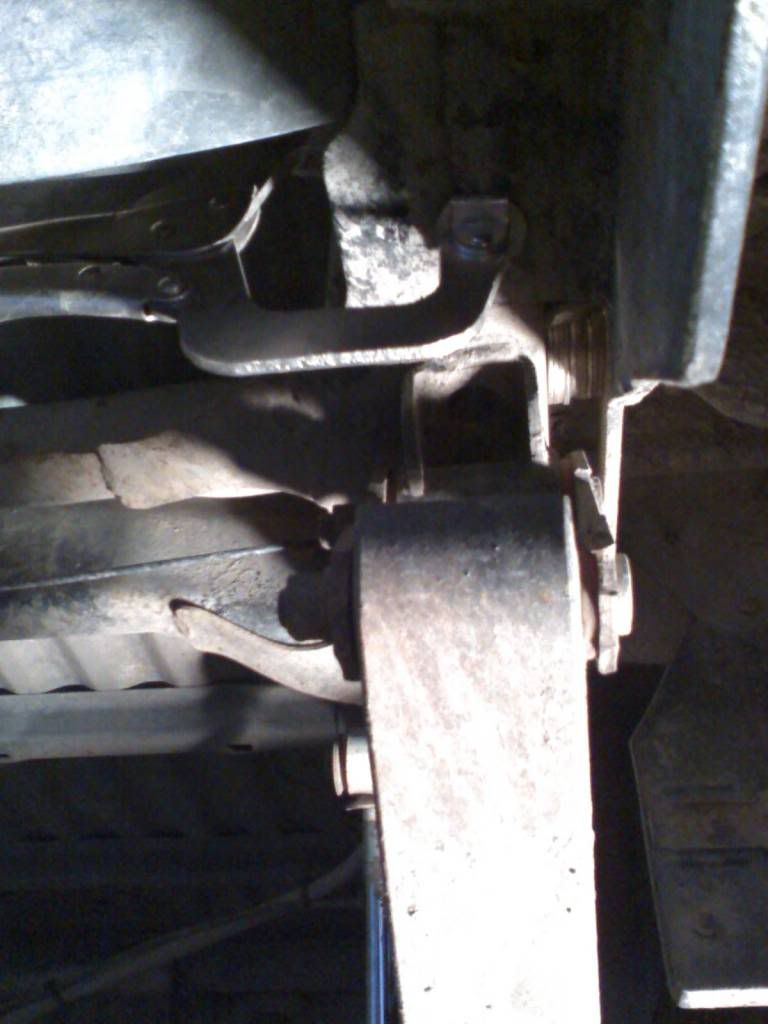
Here's the passenger mount from directly behind it looking forward:
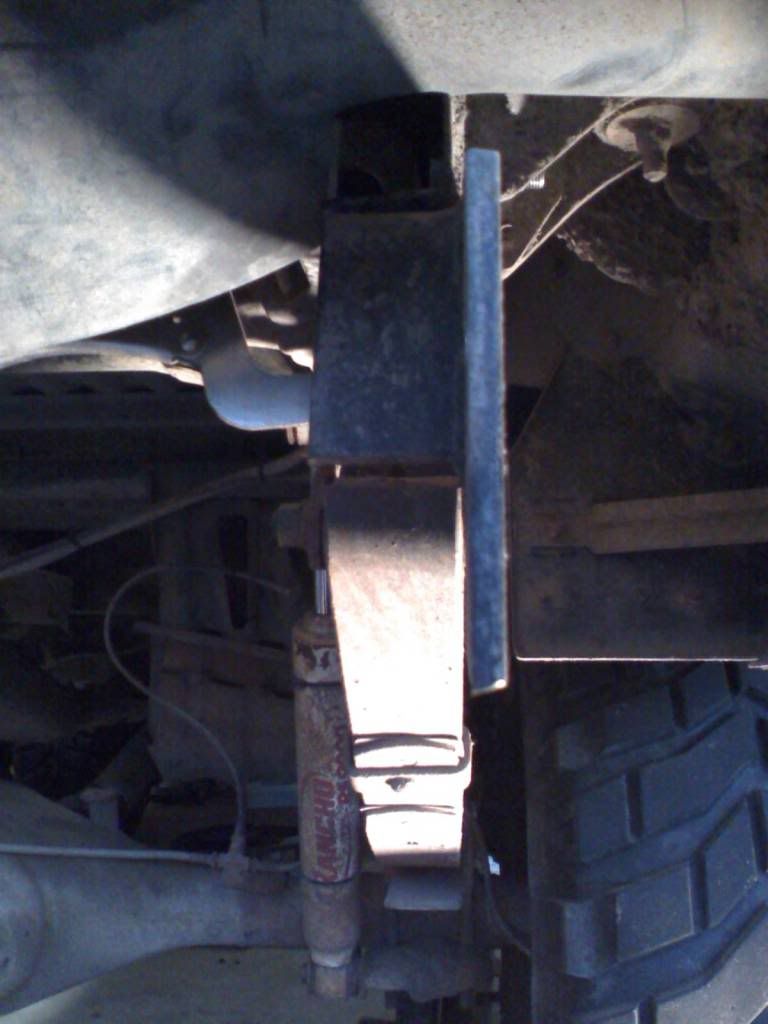
Here's the drivers side mount as a whole:
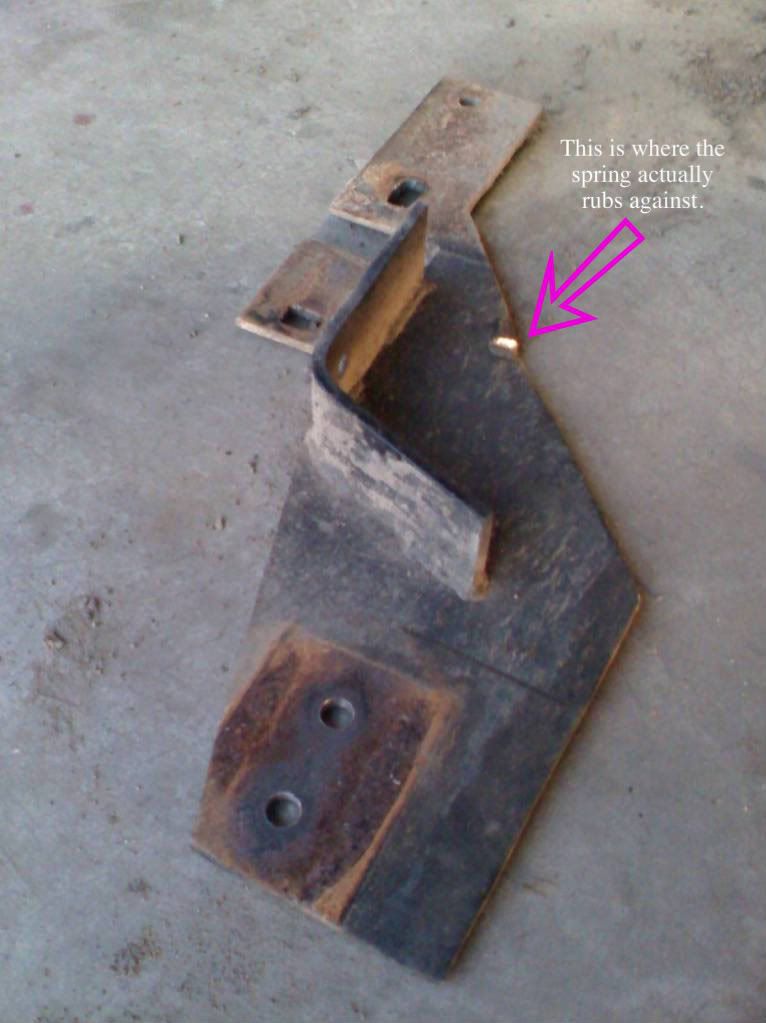
Now, I have two ideas to fix this problem. Number ONE was to have fab'd a one (1) inch spacer for between the bracket and the frame rail and bumper and bracket like these(disregard the little swirl thingy by the sharpie marker...stupid photobucket...):
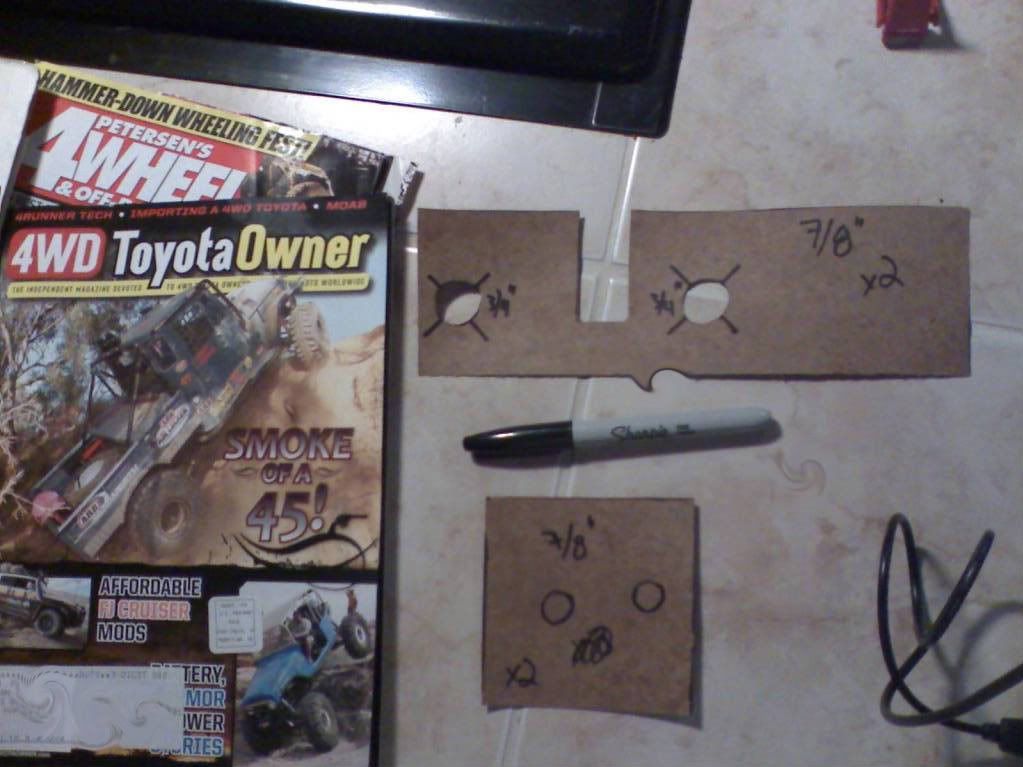
Here I just used washers to simulate:
From the bottom with washers:
Now, I'm thinking this should work, but I am worried about there not being enough support along the bottom of the frame rail since the bracket is shifted so far over. I could have that lower piece extended an inch to compensate though. Also, will this cause MORE stress to the frame rail since the "lever arm" is longer(ie-it's not up flat on the side of the frame rail but farther out)?? I did oversize the spacers as much as I thought nessasary.
Number TWO. Years ago while engrossing myself in Yota knowlege on 4crawlers(thanks again Roger!!! ) site, I found where he made a kit form for a rear swingout bumper(http://www.4crawler.com/4x4/ForSale/RearBumper.shtml). Now, I already had the bumper, just needed the mounts, which he sells on their own. I'm revisiting this option. These mounts are like the factory in the way they mount INSIDE the frame rails and are in NO WAY interfering with the shackels.
Basically, I need some help deciding which way I should go. Get the spacers made(yes I could do them myself but since the only "me" time I get is after 8pm using a grinder is a little frowned upon...) or dump more money into 4crawler stock? LOL!!
This bumper, functional yes, has been a pain in my tailgate since the day I tried to install it. Please DO NOT ask me who makes this bumper 'cause I'm not gonna tell you!!!!
I'm not gonna advertise for these clowns any further. ANYWAYS, the mounts for this bumper were completely NOT thought thru and I tried to fix this issue when I first put the bumper on but to no avail. Now, it's really a problem. These brackets mount on the outside of the framerail and use the factory bumper holes. Because of this, the rear shackles directly contact the bracket and limit spring movement. Not to mention the obnoxious CLANG I get everytime I hit a pothole or flex out on the trails.
Here's the passenger mount from the outside:
Here's the passenger mount from directly behind it looking forward:
Here's the drivers side mount as a whole:
Now, I have two ideas to fix this problem. Number ONE was to have fab'd a one (1) inch spacer for between the bracket and the frame rail and bumper and bracket like these(disregard the little swirl thingy by the sharpie marker...stupid photobucket...):
Here I just used washers to simulate:
From the bottom with washers:
Now, I'm thinking this should work, but I am worried about there not being enough support along the bottom of the frame rail since the bracket is shifted so far over. I could have that lower piece extended an inch to compensate though. Also, will this cause MORE stress to the frame rail since the "lever arm" is longer(ie-it's not up flat on the side of the frame rail but farther out)?? I did oversize the spacers as much as I thought nessasary.
Number TWO. Years ago while engrossing myself in Yota knowlege on 4crawlers(thanks again Roger!!!
) site, I found where he made a kit form for a rear swingout bumper(http://www.4crawler.com/4x4/ForSale/RearBumper.shtml). Now, I already had the bumper, just needed the mounts, which he sells on their own. I'm revisiting this option. These mounts are like the factory in the way they mount INSIDE the frame rails and are in NO WAY interfering with the shackels. Basically, I need some help deciding which way I should go. Get the spacers made(yes I could do them myself but since the only "me" time I get is after 8pm using a grinder is a little frowned upon...
) or dump more money into 4crawler stock? LOL!!
Apr 2, 2011 | 10:13 AM
#107
Thread Starter
Joined: Dec 2006
Posts: 15,192
Likes: 190
From: Sedro-Woolley, WA
Update, 01APR11
Finally got a chance to work the drivers side wing armour. Going much faster this time, having templates helps. Also found my cb coax cable broken. After 10 years of coaxing it fatigued and broke. So that would be the cause of the squealing. Picked up a new connector at radio shack.


Last edited by BigBluePile; Apr 2, 2011 at 06:26 PM.
Jul 21, 2011 | 11:16 AM
#110
Registered User
iTrader: (2)
Joined: Dec 2009
Posts: 2,159
Likes: 7
From: Pleasanton, CA - SF Bay Area
Graet write up and photos Logan!
It seems you welded everything yourself, but then toward the end, took it to someone to get....welded more? Can you elaborate for me, the noob, who aspires to do this one day?
thanks!
It seems you welded everything yourself, but then toward the end, took it to someone to get....welded more? Can you elaborate for me, the noob, who aspires to do this one day?
thanks!
Jul 21, 2011 | 11:41 AM
#111
Thread Starter
Joined: Dec 2006
Posts: 15,192
Likes: 190
From: Sedro-Woolley, WA
Yes. Yes I did. I only had, at the time, a 110V fluxcore welder. So, I tacked it all together(the bumper to the 2.5" square tube to the mounting plate) and then dropped it off at my local offroad shop to burn in. I did this because that's the major stress points. ALL the other welding I did by myself with my little welder. Went slow and took my time.
Sep 12, 2011 | 04:20 PM
#113
Registered User
Joined: Jan 2010
Posts: 125
Likes: 0
From: Dirty Jersey
is she ever when your truck is involved? my tail pipe rusted through at the outlet end of the muffler. you should have seen my girls face when i said 550 for the exhaust i was looking at. in MY defense i'm leaning towards the trd catback. i ghetto rigged it for now so she's at least been eased into what it's going to cost.
Last edited by revenantdead; Sep 12, 2011 at 04:21 PM.

 Sep 14, 2011 | 02:36 PM
#117
Registered User
Joined: Jan 2010
Posts: 125
Likes: 0
From: Dirty Jersey
i suppose she cant argue with that. i took my stock rear off after i got done with customer vehicles today. i kinda forced my own hand if you will. i feel like if i didn't i'd never get the project started.


