
Corey's 2007 FJ Cruiser Build-Up Thread
 Apr 2, 2007 | 10:03 AM
#121
Thread Starter
Co-Founder/Administrator
iTrader: (1)
Joined: May 2002
Posts: 32,242
Likes: 21
From: Auburn, Washington
The antenna is up inside with the front right speaker.
One of the vendors over on FJ Cruiser Forums.com said that is how they do all of the FJs with nav, and it works out good.
http://www.fjcruiserforums.com/forums/363010-post1.html
So far mine has not dropped off at all, I get a good strong signal.
I was messing around in the menu, and I think it tracks 8 sats at once, and it had a lock on 7 of them in my driveway.
Apr 4, 2007 | 09:20 PM
#122

Registered User
Joined: Apr 2007
Posts: 3
Likes: 0
Hey Corey, I like what you've done to your FJ. You left me a response earlier about the speed sensor wire...thanks again. Do you have and XM antenna? If so, where did you mount it.
You mentioned above that you are getting around 18.5 mpg (I am too). But it looks like you are running larger tires. Are they 33's and did you re-gear?
You mentioned above that you are getting around 18.5 mpg (I am too). But it looks like you are running larger tires. Are they 33's and did you re-gear?
Apr 5, 2007 | 01:02 AM
#123
Thread Starter
Co-Founder/Administrator
iTrader: (1)
Joined: May 2002
Posts: 32,242
Likes: 21
From: Auburn, Washington
Nope, no XM.
I have thought about adding in satellite radio at a later date, but Cartoys says most of their employee's prefer Sirius over XM.
I do not enjoy all the commercials on FM, that is why I prefer to listen to the iPod in the rig.
But after sitting in the lobby at Cartoys and being pumped full of Sirius tunes from the overhead speakers, I like how they do things, so I will more than likely add it in later.
I was getting 21 mpg, then dropped down to 18.5 with the addition of the mud tires, and have now dropped down to 15.5 to 18 with the addition of the ARB bumper and 3" lift.
The tires are the stock size.
Will be switching to the 285x70x17 (33") at a later date.
No need to regear with the bigger size, many are running the 33s with no problems.
You do have to shave the body mounts down when running aftermarket wheels, or the 33s will rub.
But if running the stock alloy rim, many have reported that there is no rubbing.
I many buy another set of the stock rims for the bigger tires.
I really like these stock rims, and I usually do not like factory rims.
Here is a good explanation of trimming the body mounts over on ih8muds forum.
http://forum.ih8mud.com/showthread.php?t=137655
I may have mine done later if I can find a local shop to take this on.
I may go with an aftermarket wheel which would more than likely require it, but I am kind of hooked on these factory rims.
Good luck on your stereo install, you are going to like the Pioneer AVIC D3.
Apr 8, 2007 | 01:49 PM
#124
Thread Starter
Co-Founder/Administrator
iTrader: (1)
Joined: May 2002
Posts: 32,242
Likes: 21
From: Auburn, Washington
Added a ton more information with more links at bottom of page two of my mods section.
http://www.pnw4runners.com/fjc/mods/modindex2.htm
Pioneer now has the unit listed on their site too, the link is provided.
http://www.pnw4runners.com/fjc/mods/modindex2.htm
Pioneer now has the unit listed on their site too, the link is provided.
Apr 21, 2007 | 03:07 PM
#125
Thread Starter
Co-Founder/Administrator
iTrader: (1)
Joined: May 2002
Posts: 32,242
Likes: 21
From: Auburn, Washington
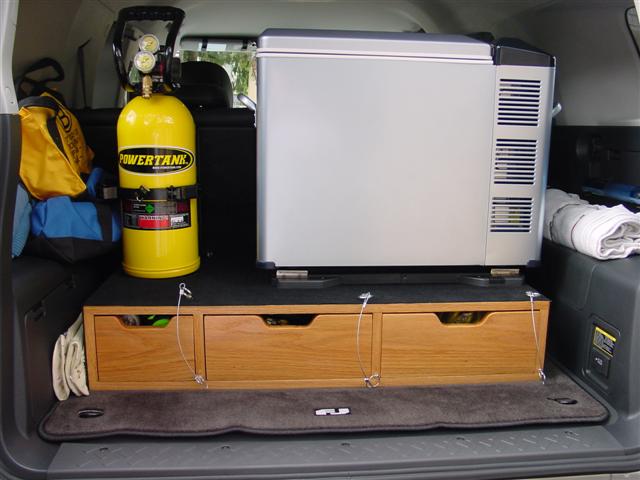
ARB fridge installed 4-21-2007
I have been wanting a fridge for quite some time.
I hate taking coolers camping and having the ice melt.
I have a nice 3 way fridge (12v, 110v, and propane) that I have sued when camping, but it would suck the battery dry in a few hours.
The ARB fridge (Norcold and Engel brands are the exact same thing) use a swing arm motor design and are very energy efficient.
More info on the ARB can be seen on their website.
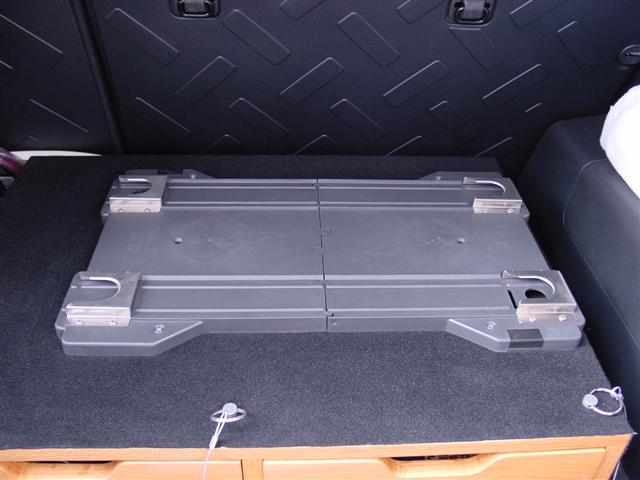
I ordered an Engel Slide Loc which screws to a surface with 4 to 6 screws, depending on how many you want to use.
I went for 4 this time, but may add the other 2 for extra insurance.
Here is the Engel Slide Loc.
It called for drilling 1/8" holes, piece of cake in the wood top of my cargobox.
Once the first hole was drilled, I put a screw in to keep the Slide Loc was shifting on me.
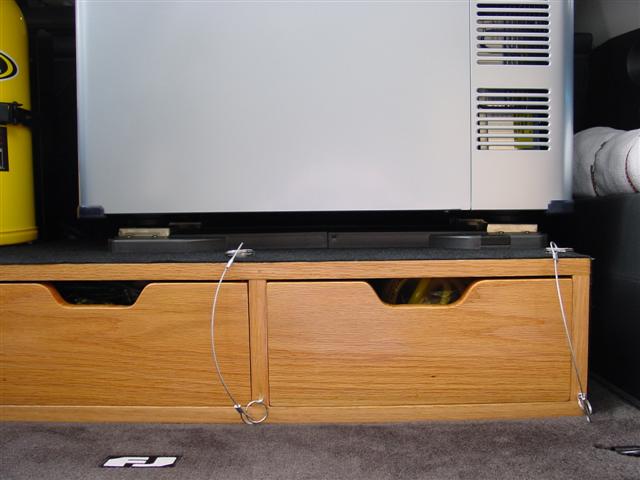
The Slide Loc is all the way to the right side of the cargobox, which leaves me plenty of room to slide the fridge in around the Powertank, no problems at all.
There is only 1 lock button on the Slide Loc to worry about when you want to disengage the 4 feet on the fridge.
The package comes with 4 new feet.
You simply unbolt the 4 stock feet and put on the 4 new ones that are made to slide into the Slide Loc unit.
I can not lift up the lid all the way, this is a big fridge, 43 qt, but I did not want anything smaller.
I plan on using this for a long time, and want it to be able to hold a weeks worth of food for camping.
This is also a freezer, so when we go on runs this summer, the crowd is going to get treated to some ice cream bars
Here are some pics of the installation.
The first 2 show the Engel Slide Loc, the last 2 show the fridge mounted to the Slide Loc.
The release button is at the back left side, very easy to reach with the fridge mounted.

I still need full time 12vpower to run the fridge.
This will come with my next mod, a Blue Sea aux fusebox, and two 12v outlets that will be mounted above the 110v outlet like KD7NAC_07FJ did in his rig.
Hopefully next weekend that project can get underway.
Member KD7NAC_07FJ will be lending me his expertise on that project, he is a wizard at wiring projects, and his rig shows it.
Forgot to mention, I bought this through www.trdparts4u.com and since I work about 2 blocks from ARB, I just stopped by after work a few weeks back and will called it there.
I hate taking coolers camping and having the ice melt.
I have a nice 3 way fridge (12v, 110v, and propane) that I have sued when camping, but it would suck the battery dry in a few hours.
The ARB fridge (Norcold and Engel brands are the exact same thing) use a swing arm motor design and are very energy efficient.
More info on the ARB can be seen on their website.
I ordered an Engel Slide Loc which screws to a surface with 4 to 6 screws, depending on how many you want to use.
I went for 4 this time, but may add the other 2 for extra insurance.
Here is the Engel Slide Loc.
It called for drilling 1/8" holes, piece of cake in the wood top of my cargobox.
Once the first hole was drilled, I put a screw in to keep the Slide Loc was shifting on me.
The Slide Loc is all the way to the right side of the cargobox, which leaves me plenty of room to slide the fridge in around the Powertank, no problems at all.
There is only 1 lock button on the Slide Loc to worry about when you want to disengage the 4 feet on the fridge.
The package comes with 4 new feet.
You simply unbolt the 4 stock feet and put on the 4 new ones that are made to slide into the Slide Loc unit.
I can not lift up the lid all the way, this is a big fridge, 43 qt, but I did not want anything smaller.
I plan on using this for a long time, and want it to be able to hold a weeks worth of food for camping.
This is also a freezer, so when we go on runs this summer, the crowd is going to get treated to some ice cream bars
Here are some pics of the installation.
The first 2 show the Engel Slide Loc, the last 2 show the fridge mounted to the Slide Loc.
The release button is at the back left side, very easy to reach with the fridge mounted.
I still need full time 12vpower to run the fridge.
This will come with my next mod, a Blue Sea aux fusebox, and two 12v outlets that will be mounted above the 110v outlet like KD7NAC_07FJ did in his rig.
Hopefully next weekend that project can get underway.
Member KD7NAC_07FJ will be lending me his expertise on that project, he is a wizard at wiring projects, and his rig shows it.
Forgot to mention, I bought this through www.trdparts4u.com and since I work about 2 blocks from ARB, I just stopped by after work a few weeks back and will called it there.
Apr 21, 2007 | 05:06 PM
#126
Registered User
Joined: Dec 2006
Posts: 285
Likes: 0
From: Everett
With that lock down plate it looks like it will be good and secure. Does it have much play front to back?
Let me know when you get the fuse block in and we'll get set up to do some wiring next weekend.
Let me know when you get the fuse block in and we'll get set up to do some wiring next weekend.
Apr 21, 2007 | 05:17 PM
#127
Thread Starter
Co-Founder/Administrator
iTrader: (1)
Joined: May 2002
Posts: 32,242
Likes: 21
From: Auburn, Washington
Hi Wayne, there seems to be zero play with that Engel plate.
The feet set it there good.
Sounds good on the wiring.
It will be nice to check out all the stuff in person on your rig too.
The feet set it there good.
Sounds good on the wiring.
It will be nice to check out all the stuff in person on your rig too.
Apr 25, 2007 | 12:01 PM
#128
Thread Starter
Co-Founder/Administrator
iTrader: (1)
Joined: May 2002
Posts: 32,242
Likes: 21
From: Auburn, Washington
Coming up this weekend Wayne and I will be working on adding the Blue Sea fusebox and 2x12v outlets in the back.
Also after much thinking, I am going to have a carpenter here at work who is on my crew build me a new cargobox.
I really dig mine, but I want to turn the fridge 90 degrees, and the present Engel tray will not work with the cargobox as it is not deep enough, that is why it is mounted sideways.
He runs a cabinet shop on the side, so it will be killer.
It will not be any taller, just deeper and a little wider to take advantage of the FJs layout since it was built for my '91 4Runner.
I will then mount the other type of Engel tray, the one that lets you slide the fridge out.
This way I will be able to open up the lid all the way.
http://www.engel4u.com/tray_for_the_mt45.html
Apr 25, 2007 | 12:07 PM
#129
Contributing Member
Joined: May 2006
Posts: 1,066
Likes: 0
From: Morgan Hill, Ca
Haven't followed this thread...and I ain't gonna read it... but anyone noticed that the clowns at Consumer Report project the FJ Cruiser as most reliable of the most reliable. Period.
Not bad for an under 30K vehicle. Corey.. you got lucky. (can't be smarts)
Not bad for an under 30K vehicle. Corey.. you got lucky. (can't be smarts)
Apr 25, 2007 | 12:13 PM
#130
Thread Starter
Co-Founder/Administrator
iTrader: (1)
Joined: May 2002
Posts: 32,242
Likes: 21
From: Auburn, Washington
He he, I did my research before buying this rig.
I poured over all the posts at fjcruiserforums and read reviews and read what new owners thought of them.
It has most excellent crash test results, tons of power, more than I would ever need, and a downright utilitarian feel to it.
And excellent offroad capabilities.
I poured over all the posts at fjcruiserforums and read reviews and read what new owners thought of them.
It has most excellent crash test results, tons of power, more than I would ever need, and a downright utilitarian feel to it.
And excellent offroad capabilities.
Apr 28, 2007 | 03:25 PM
#131
Thread Starter
Co-Founder/Administrator
iTrader: (1)
Joined: May 2002
Posts: 32,242
Likes: 21
From: Auburn, Washington
Blue Sea aux. fusebox & twin 12v outlets installed 4-28-2007
Thanks to member KD7NAC_07FJ (Wayne) for coming down to my home today to help on this project.
Take one Blue Sea 6 gang fusebox
http://www.northeastmarineelectronic...OD&ProdID=2750

Tie it in with 6 gauge wire from the battery to it, and run 18-Gauge Red & Black 2-Conductor back to twin 12v outlets
http://www.radioshack.com/product/in...tId=2062272&cp

and you have a recipe for adding several circuits easily from inside the right front kick panel.
I will utilize one of the 12v outlets in the back to power my new ARB fridge.
All connections are soldered and have shrink tubing added to them.
Wayne used a small butane torch to solder the connections with.
A lot of perfection went into this.
I would have crimped the ends and called it a day, but Wayne is very experienced at this and went all the way with the solder and shrink tubing, very professional.
The first 2 pictures show a few things torn apart.
You have to remove the floors threshold by grasping it and pulling straight up.
Once removed you can easily take off the passenger side kick panel with a plastic thumbscrew which is all the way forward.


Wayne ended up taking the battery out to gain better access to the wires presently on the battery.
We moved the CB power wire off of the battery and it is wired inside the cabin now with the new fusebox.
You can see in picture 4 a slit inside the read circle which was already there from running the CB wire to the battery.


Pictures 5 and 6 show the panel you remove by inserting a small flat tipped screw driver and prying it outwards.
Picture 5 still has the yellow sticker on it with info on the 10v converter outlet.
You remove the yellow tape and use a hole saw sized at 1 3/32" and drill 2 holes.
You can also use a knife and make a small incision since the 12v plug has a "key" on it to hold it tight so it will not spin on you.
Picture 6 shows the twin 12v outlets in place.


Picture 7 shows the new Blue Sea box mounted in place with white zipties (no need to screw this unit down) and the 18-Gauge Red & Black 2-Conductor wire attached to it.
This fusebox also utilizes a ground, so you can attach the black ground wire to one of the three screws on top, and attach the red power wire to one of the three screws below.
This box is much nicer than the cheap one I used on the 4Runner long ago.
It did not have a grounding circuit.
Picture 8 shows the 6 gauge wire inside of the black wire loom going down to the slit in the firewall.
It is all tired in with zipties to the factory harnesses running along the firewall.


And finally picture 9 shows the twin 12v outlets in place.

After the battery was put back in place and all the wires were reattached, I carried out the ARB fridge and set it on the ground and plugged it into one of the 12v outlets.
I reached down and rotated the switch and the green light came on the fridge and the sweet sound of a fridge coming to life was like music to my ears
From what I have read, the fridge only draws a maximum of 2.7 amps when set to the highest setting to freeze.
When set to just keep food at the safe temperature to prevent spoilage, it draws much less and can go for 3 days without wearing your battery down.
This project turned out great.
I am pretty decent at wiring projects, and Wayne is much more experienced at what we tackled today.
It turned out really good.
I think I will have to hit him up again when it comes time to do the dual battery setup.
He has that setup and it looks fantastic.
Frozen ice cream bars will be on the menu for this summers runs!
I look forward to getting lots of use from the new ARB fridge and the newly added fusebox and twin 12v outlets back there.
Take one Blue Sea 6 gang fusebox
http://www.northeastmarineelectronic...OD&ProdID=2750
Tie it in with 6 gauge wire from the battery to it, and run 18-Gauge Red & Black 2-Conductor back to twin 12v outlets
http://www.radioshack.com/product/in...tId=2062272&cp
and you have a recipe for adding several circuits easily from inside the right front kick panel.
I will utilize one of the 12v outlets in the back to power my new ARB fridge.
All connections are soldered and have shrink tubing added to them.
Wayne used a small butane torch to solder the connections with.
A lot of perfection went into this.
I would have crimped the ends and called it a day, but Wayne is very experienced at this and went all the way with the solder and shrink tubing, very professional.
The first 2 pictures show a few things torn apart.
You have to remove the floors threshold by grasping it and pulling straight up.
Once removed you can easily take off the passenger side kick panel with a plastic thumbscrew which is all the way forward.
Wayne ended up taking the battery out to gain better access to the wires presently on the battery.
We moved the CB power wire off of the battery and it is wired inside the cabin now with the new fusebox.
You can see in picture 4 a slit inside the read circle which was already there from running the CB wire to the battery.
Pictures 5 and 6 show the panel you remove by inserting a small flat tipped screw driver and prying it outwards.
Picture 5 still has the yellow sticker on it with info on the 10v converter outlet.
You remove the yellow tape and use a hole saw sized at 1 3/32" and drill 2 holes.
You can also use a knife and make a small incision since the 12v plug has a "key" on it to hold it tight so it will not spin on you.
Picture 6 shows the twin 12v outlets in place.
Picture 7 shows the new Blue Sea box mounted in place with white zipties (no need to screw this unit down) and the 18-Gauge Red & Black 2-Conductor wire attached to it.
This fusebox also utilizes a ground, so you can attach the black ground wire to one of the three screws on top, and attach the red power wire to one of the three screws below.
This box is much nicer than the cheap one I used on the 4Runner long ago.
It did not have a grounding circuit.
Picture 8 shows the 6 gauge wire inside of the black wire loom going down to the slit in the firewall.
It is all tired in with zipties to the factory harnesses running along the firewall.
And finally picture 9 shows the twin 12v outlets in place.
After the battery was put back in place and all the wires were reattached, I carried out the ARB fridge and set it on the ground and plugged it into one of the 12v outlets.
I reached down and rotated the switch and the green light came on the fridge and the sweet sound of a fridge coming to life was like music to my ears
From what I have read, the fridge only draws a maximum of 2.7 amps when set to the highest setting to freeze.
When set to just keep food at the safe temperature to prevent spoilage, it draws much less and can go for 3 days without wearing your battery down.
This project turned out great.
I am pretty decent at wiring projects, and Wayne is much more experienced at what we tackled today.
It turned out really good.
I think I will have to hit him up again when it comes time to do the dual battery setup.
He has that setup and it looks fantastic.
Frozen ice cream bars will be on the menu for this summers runs!
I look forward to getting lots of use from the new ARB fridge and the newly added fusebox and twin 12v outlets back there.
 Apr 28, 2007 | 03:46 PM
#133
Thread Starter
Co-Founder/Administrator
iTrader: (1)
Joined: May 2002
Posts: 32,242
Likes: 21
From: Auburn, Washington
Thanks Brian, yes it looks all factory, very neat and tidy
That is great news you have your fridge and blanket on the way.
My blanky is still it the plastic packaging, have not taken it out yet.
Looks pretty easy to install, and has a pocket in the front of it too I think.
Now I gotta install my PA horn still for the CB.
I can then pipe some ice cream truck music through it and sell ice cream bars while off road.
May 4, 2007 | 03:17 AM
#134
Thread Starter
Co-Founder/Administrator
iTrader: (1)
Joined: May 2002
Posts: 32,242
Likes: 21
From: Auburn, Washington
Also after much thinking, I am going to have a carpenter here at work who is on my crew build me a new cargobox.
I really dig mine, but I want to turn the fridge 90 degrees, and the present Engel tray will not work with the cargobox as it is not deep enough, that is why it is mounted sideways.
I really dig mine, but I want to turn the fridge 90 degrees, and the present Engel tray will not work with the cargobox as it is not deep enough, that is why it is mounted sideways.
The carpenter at work looked at my rig and the cargobox yestermorning, and he had a great idea.
So great I wish I had thought of it.
If he built a new cargobox, it would not be that much bigger.
You can not really go much wider than 1" or so, because I would not have access to the electrical plugs or the access door to the factory jack.
He said to pull the cargobox more towards the back door, there is about 3" or more I can come back before I hit the D rings on the floor.
Then he can build a simple extension to go behind the cargobox which will let me turn either the present Engel fridge slide or I can mount the nicer one that extends the fridge outside.
I think this idea makes more sense since I am pretty happy with the current cargobox.

 May 4, 2007 | 08:50 AM
#137
Contributing Member
Joined: May 2002
Posts: 1,002
Likes: 0
From: Graham, Wa.
WOW
That was going to be an expensive box. Don't blame ya on keeping the old box.
I'm going to join a van pool next week i think. Its only $80 a month. Right now i'm spending $100 a week filling up
Hopefully i will have some extra $$$ now. I really need to pay off my booky
That was going to be an expensive box. Don't blame ya on keeping the old box.
I'm going to join a van pool next week i think. Its only $80 a month. Right now i'm spending $100 a week filling up
Hopefully i will have some extra $$$ now. I really need to pay off my booky
May 4, 2007 | 09:31 AM
#138
Thread Starter
Co-Founder/Administrator
iTrader: (1)
Joined: May 2002
Posts: 32,242
Likes: 21
From: Auburn, Washington
Yeah, I just left the carpenter shop, I had to drop off all of our winter deicing stuff to store there until next winter.
I talked with him some more on mine, and told him I paid $300 for it back in the spring of 2001.
He said the materials alone today to build that type of quality box I want would cost that much alone, and factor in the labor.
He has another idea besides the extension to put in the back of the box to make it deeper.
He says we can use my current Engel $60 fridge tray, and mount it to heavy duty sliders that extend out.
Engel alone wants $239 for their sliding fridge tray, and he can do it for a lot less and utilize my current rigid tray and make it slide.
I may have to send the box home with him.
He runs a cabinet shop on the side, this guy is good.
He makes a lot of the high end stuff down where I work, and caters to the CEO here, so you know he is good.
$100 a week on gas, ouch.
I fill up once a week regardless if I need it or not.
Been using I think about 11 gallons per week.
May 4, 2007 | 01:32 PM
#139
Contributing Member
Joined: May 2006
Posts: 1,066
Likes: 0
From: Morgan Hill, Ca


