
habanero's 1996 4Runner Build-Up Thread
 Apr 15, 2023 | 04:03 PM
#4462

Registered User


Joined: Feb 2010
Posts: 748
Likes: 135
From: St. Louis MO
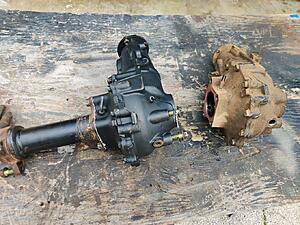
Did a little work on the new front diff. Stripepd down the old diff (the original 4.10 ratio) and got it ready to box up and send back to ECGS for the core charge. And boxed up my old slightly whiny 4.10 e-locker diff for a core return as well.
And put the non-ADD passenger leg onto the new 4.88 locker front diff.
And put the non-ADD passenger leg onto the new 4.88 locker front diff.

Last edited by Jomoka; Apr 15, 2023 at 05:29 PM.
Apr 23, 2023 | 04:35 PM
#4463
Thread Starter
Contributing Member


Joined: Sep 2005
Posts: 8,247
Likes: 497
From: mo
There was a little e-locker trouble once Mr. Moka got the rear buttoned up- it wouldn't do anything. Nada. He even tried the spare e-locker, still nothing. I couldn't get them to work on my e-locker harness either, but the unit in the 96 would lock/unlock.
Next he tried directly using the battery, both of the e-lockers worked. When we pulled the spare we also took the e-locker harness with it, so he tried swapping this harness for the 99's. Success!
I've been suspecting something is up with the '96s e-locker harness since our CO/UT trip, when I had intermittent troubles getting it to work but couldn't find anything wrong with the motor itself.
Having known working e-lockers not work when plugged into my harness, but then work when plugged into mine (different wire position) kinda points to a problem with my harness.
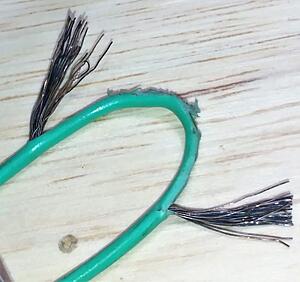
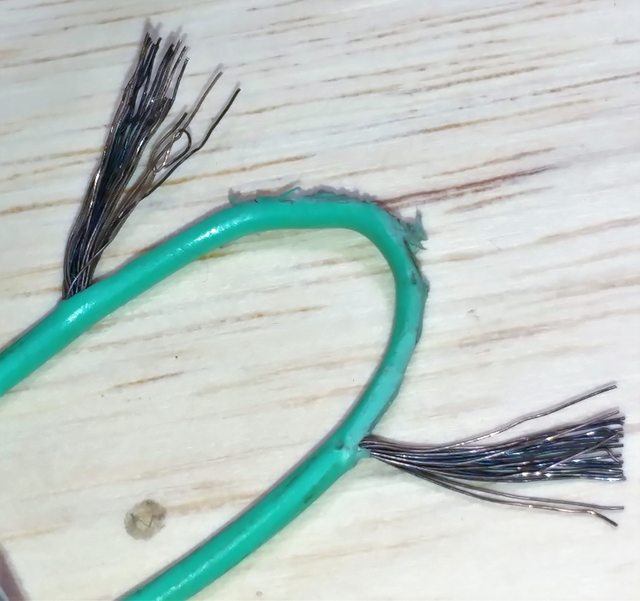
Today I peeled the coating off the 99's harness after finding no continuity end to end for one of the power wires. After I got the coating off I probed along the wire until I lost continuity and peeled the insulation there to see what I could see.
AHA! Nearly half-way between connectors, under the stiff sheathing, the wires were discolored and broken. I'm betting I'll find something similar on the 96's harness too...but still together enough to work in certain positions.
Next he tried directly using the battery, both of the e-lockers worked. When we pulled the spare we also took the e-locker harness with it, so he tried swapping this harness for the 99's. Success!
I've been suspecting something is up with the '96s e-locker harness since our CO/UT trip, when I had intermittent troubles getting it to work but couldn't find anything wrong with the motor itself.
Having known working e-lockers not work when plugged into my harness, but then work when plugged into mine (different wire position) kinda points to a problem with my harness.
Today I peeled the coating off the 99's harness after finding no continuity end to end for one of the power wires. After I got the coating off I probed along the wire until I lost continuity and peeled the insulation there to see what I could see.
AHA! Nearly half-way between connectors, under the stiff sheathing, the wires were discolored and broken. I'm betting I'll find something similar on the 96's harness too...but still together enough to work in certain positions.
 Apr 24, 2023 | 05:29 AM
#4464
Registered User
Joined: Feb 2010
Posts: 748
Likes: 135
From: St. Louis MO
Yeah, that was some frustrating timing on the harness failure. The locker has been working flawlessly forever. It worked normally immediately before I pulled the 4.30 diff, because I locked it before removal (makes it easier to pull the 3rd member out of the axle housing).
I never *yanked* on the harness, but I did gently dangle the actuator from it after removing it, before undoing the connectors. And then did the same on reassembly, connected it before putting the actuator on, then lifting the actuator up. Before discovering the actuator was 100% dead.
Obviously, it flexes every time the axle moves, and 24 years is a good run, no complaints. And it was probably considerably weakened and all it too to completely fail was being straightened out.
Glad we happened to have a junkyard spare harness. But it's around 20 years old as well. We might need to get a couple of new ones. Toyota still makes them...
Apr 29, 2023 | 05:56 AM
#4465
Registered User
Joined: Feb 2010
Posts: 748
Likes: 135
From: St. Louis MO
Started on the front end disassembly. Front diff is out. Which wasn't as bad as it can be. Having a new(er) motor mount on the driver side helps I think. I still wonder why Toyota made that rear diff mount with a stud that pokes down into the frame. Removal would be SO much easier if the mount had a threaded hole and it used a bolt to attach it to the crossmember.
Steering rack comes out next. After taking a closer look, it has been leaking from the steering shaft area, so it's getting replaced with a new one. And the oil cooler o-rings and coolant hoses, and the oil pan removed and replaced. A lot of synergy for all of those jobs with the rack and diff removed, way better access.
Steering rack comes out next. After taking a closer look, it has been leaking from the steering shaft area, so it's getting replaced with a new one. And the oil cooler o-rings and coolant hoses, and the oil pan removed and replaced. A lot of synergy for all of those jobs with the rack and diff removed, way better access.
May 2, 2023 | 05:35 AM
#4466
Registered User
Joined: Feb 2010
Posts: 748
Likes: 135
From: St. Louis MO
Took the steering rack out yesterday. It was about 15 minutes unding everything... until I got to that splined joint between the steering rack input shaft and the steering column. That would NOT budge. I PBLasted. I pried at the slot. I pried the splined part up. I thumped at it with a drift and hammer. I even got out the pickle fork and whaled away on that. Nothing.
Finally, I changed tactics and undid the middle splined joint - above the rubber rag joint on the column. That came out with a reasonable/normal amount of effort.
And then kept on working on getting that lower most splined joint off the steering rack, only with more access (although the rack could wiggle around now). It was INCREDIBLY stubborn. I guess it's steel on steel, been in place for 24 years now, it really resisted all efforts.
Dunno, finally managed to budge it with a pickle fork and an open end wrench slid over the shaft. Just corroded, stuck. I decided to just order a new part - the rubber is 24 years old and didn't look too bad, but still, don't want that to break. And it got a little beat up while taking it off. Toyota part number 45230-25090 - it's the bottom splined steel connector and the rubber rag joint together.
If only I'd decided to buy a new part earlier, I could have saved myself a lot of grief getting the old part off the old rack.
May 4, 2023 | 04:20 PM
#4467
Registered User
Joined: Feb 2010
Posts: 748
Likes: 135
From: St. Louis MO
Finicky job for yesterday - replacing the oil cooler hoses and o-ring/seal. The hoses are finicky and hard to get to, I too the upper bolt of the thermostat housing to get a wiring bracket out of the way to access the hardest fitting. Getting the big bajo nut off is pretty easy from the wheel well. Had to pry it off the block, and then 15 minutes or so getting the old o-ring off the groove on the block side of the cooler. It was hard as a rock and *stuck* in there. I dug it out 1/16th of an inch at a time. A few times an inch or so would come out.
Then scraped the block clean, cleaned everything up, and put it back in. Most of the hoses other than the front one are fairly easy, I could just manage to fit my hand underneath the alternator and over the oil filter to get that one one - after pre-lubing the hoses with some drained coolant.
Next task - taking the oil pan off, cleaning it and the block, and reinstalling with fresh FIPG.
May 8, 2023 | 09:42 AM
#4468
Registered User
Joined: Feb 2010
Posts: 748
Likes: 135
From: St. Louis MO
Oil pan resealed. Took it off, nothing to note on the oil pump pickup, literally 2 or 3 tiny bits of oil crud, no RTV/sealer. All looked decent enough under there (of course, all you see is a windage tray and the pickup so...). Brakleened the two to get most of the oiliness off. Then carefully dried the sealing surfaces with a bunch of paper towels and rubbing alcohol. With everything bone dry, applied FIPG and bolted it back in. Pretty easy with the diff out of the way.
Then I stuck the new steering rack in. Actual new, not rebuilt, Habanero had a bad experience with a rebuilt one back when, and since brand new ones are available and not ridiculously more than rebuilt, might as well, The rebuilt one lasted a year, the new OEM one lasted 20+ years. *fingers crossed*. And I was not expecting a fight, but I sure got one. Massive struggle getting that center bushing into the frame. It just plain didn't fit. And there's no good way to force it. And even if you did, the center part of the bushing would just end up cockeyed in the frame bracket. Lots of struggle. Afterward, I noticed why it was so hard - apparently when I put the poly bushings on my old rack some number of years ago, somehow I forgot the center pipe/spacer part of the center bushing. It was just the two poly halves. So when I installed that (lol, no fight at all) and tightened the bolt down, it kept on going because that spacer wasn't there for the bolt to tighten down on. So it just deformed the clamp on the frame. Oy. Thanks for that, yester-me.
Then I installed the new high pressure power steering line. Easy, peasy. Got to the low pressure return line which had been leaking. I'd assumed the leaking was coming from the hose fittings where I'd added a Magnefine filter many years ago. But when I took it out and got a closer look, the top hose connection was bone dry, but the filter itself was wet starting somewhere near the top and on down (and all over everything under there, lol). Clearly the filter itself was leaking, not the hoses. I guess a tiny crack in the housing. Ordered another one.
And while doing that, I took the air cleaner box out for access to the PS hoses on the pump, and while wiggling the intake piping around, saw some major open cracks on the hose that bolts to the throttle body. Yeah, probably why it popped a lean O2 CEl a few weeks ago. Decided to live life dangerously and got a cheap Amazon knockoff. Just because it could get here quickly.
And last but not least, decided to slip the front diff in. I didn't expect a fight on the steering rack, got one. And I expected one on the diff, but nope, it went in easily. It's now a non-ADD e-locker (Eaton/Harrop). So I removed the vacuum lines and solenoids coming down from the engine bay and ziptied the new e-locker harness to the breather line down to the diff. I guess they make one harness for front or rear lockers, SIGH, because the harness is about 9 feet long. Certainly NOT needed on a front diff. I think I'll end up snipping it and shortening it vs trying to find a place to hide that much wiring under the hood.
Last edited by Jomoka; May 8, 2023 at 09:54 AM.
May 10, 2023 | 05:52 PM
#4469
Registered User
Joined: Feb 2010
Posts: 748
Likes: 135
From: St. Louis MO
Small amount of work today on the '99. But all PITA little tasks.
Replaced the passenger side motor mount. I replaced the driver side mount a few years ago when it broke, we got both mounts then but I only replaced the actually broken one. It's just an annoying task with a small amount of access through the passenger footwell.
Then installed the lower steering column rubber rag joint. A small bit of a puzzle to get it together with the 1" spacer (for the body lift) in with the new rack already in place. Then fitting the upper splined joint in at the only point it will go (there's a missing spline section), and putting the lower splined section on the rack. Well... then I noticed that the steering wheel wasn't pointing straight ahead. So... I got to do it again.
Then I replaced the driver side lower ball joint. It wasn't all that old, but the boot had a small split in it. Might as well replace it while it's half off anyhow.
And last but not least, put the CV stub shafts into the new e-locker front diff. Where I noticed something slightly alarming, hope it's not an issue. The diff is locked as it sits. It's an Eaton/Harrop e-locker. 12V to the wiring allows it to lock (once the wheels rotate relative to each other), no voltage and it will unlock (again, takes some rotation). I'm hoping that ECGS just was testing it and it was locked, and me twisting it around a little wasn't enough to unlock it.
May 11, 2023 | 03:12 AM
#4470
Thread Starter
Contributing Member
Joined: Sep 2005
Posts: 8,247
Likes: 497
From: mo
96 4Runner 325,650 miles
PO171 occasionally popping up. Checked all the vac lines and pcv valve, then tested the maf. It was testing out of spec so I double-checked against the 99's maf (mine is the same style since replacing the old-style one some years ago), confirmed it was out of spec. Then...it was behaving itself. Heh. Stuck it back in the truck and there you go. No more cel....yet.
What I have came out of a wrecked 4Runner, the plan is to get another when I see something good on one of our junkyard runs.
for air temp...use ohmmeter
unplugged, neg lead to E2, positive to THA
k ohm
2.2 - 2.7 @ 20 degrees celcius
.5 - .7 @ 60 degrees celcius

For air flow....use voltmeter
plugged in, ign on (not running)
neg lead to VG, pos lead to E2G
looking for voltage fluctuations when air flow is introduced (blow in it, already). Again, worked as it should.
Be prepared to clear a code this testing may produce.
PO171 occasionally popping up. Checked all the vac lines and pcv valve, then tested the maf. It was testing out of spec so I double-checked against the 99's maf (mine is the same style since replacing the old-style one some years ago), confirmed it was out of spec. Then...it was behaving itself. Heh. Stuck it back in the truck and there you go. No more cel....yet.
What I have came out of a wrecked 4Runner, the plan is to get another when I see something good on one of our junkyard runs.
for air temp...use ohmmeter
unplugged, neg lead to E2, positive to THA
k ohm
2.2 - 2.7 @ 20 degrees celcius
.5 - .7 @ 60 degrees celcius
For air flow....use voltmeter
plugged in, ign on (not running)
neg lead to VG, pos lead to E2G
looking for voltage fluctuations when air flow is introduced (blow in it, already). Again, worked as it should.
Be prepared to clear a code this testing may produce.
May 11, 2023 | 04:39 PM
#4471
Registered User
Joined: Feb 2010
Posts: 748
Likes: 135
From: St. Louis MO
And good news, with the wheels on, the new front diff is just stiff, not actually locked. Too stiff to reasonably get the left and right side to turn vs. each other by turning the CV shafts by hand, but with the wheels on you can get them to turn opposite of each other (with 4WD engaged).
Not sure if it will loosen up with use, or if they're just a bit on the stiff side by design.
But yay, not actually locked.
Not sure if it will loosen up with use, or if they're just a bit on the stiff side by design.
But yay, not actually locked.
May 13, 2023 | 12:12 PM
#4472
Registered User
Joined: Feb 2010
Posts: 748
Likes: 135
From: St. Louis MO
Spent the morning doing wiring. I bought a single DIN 6-switch plate ( https://www.paranoidfabrications.com...6-switch-holes ) a while back and finally had a good reason to install it. I thought the switch Eaton supplied with the kit would work with it, but it didn't. Contura style, but a bit longer than the switches I had. No problem, though, I just used one of the 6 Contura switches I had. And moved a few other things I had wired up to random switches on the dash to the new switches - air compressor, rack light bar, the antenna shutoff, and the front locker.
Fluids were in it, so time for the first test drive. *fingers crossed*. And it very obviously worked. I tried it on a gravel parking lot nearby, front hubs engaged, and driving along hit the switch and yeah, the steering gets really weird with the front diff locked. Really binds up as you turn the wheel, even on gravel. The Eaton seemed to quickly lock and unlock as I drove along, never needed to drive in an 'S' or backwards, it just locked and unlocked like it should.
Oh, and drove it to do a little shopping and noticed a little oil dripping, looks like I didn't seat the passenger CV shaft in the diff quite all the way, there's a tiny little gap and that's where it's leaking. Need to get under there and give it a couple more little taps. Not now, though, it started pouring rain outside.
Other than that, drive it and the new rear diff 500 miles, change the oil in them, done. 4.88 gears and double locked now.
Last edited by Jomoka; May 13, 2023 at 12:23 PM.
May 15, 2023 | 04:36 AM
#4473
Registered User
Joined: Feb 2010
Posts: 748
Likes: 135
From: St. Louis MO
Messed about with the leaking passenger side CV and it didn't really feel unseated. And it did wiggle up and down ver slightly. And at some point I realized that while almost everything else on the front driveline is now new, I just took a junkyard high mileage non-ADD passenger leg and stuck it on without ever really looking at the bearing or the seal.
Since tapping the CV shaft home wasn't happening, I decided to order a new seal and a new bearing (the wiggle sure doesn't seem right) and give that a bit of disassembly and inspection and reassembly with a couple of new parts.
And then we drove it (manual hubs unlocked so the front drivetrain isn't doing anything) around 50 miles yesterday to do a bike ride. And on the way back, out of the blue, battery warning light on the dash. WTH? Totally unrelated to all the work done, as far as I know. 252K miles was just enough for the original alternator. Pulled over to see if anything obvious was wrong (loose wire, missing belt), but all looked normal. I flipped the switch to connect the house (Yellowtop Optima) to the start (a tiny B14115 Braille/Deka) battery and drove it home, arriving with about 10.8 V. I guess I need a new alternator now.
May 19, 2023 | 06:07 AM
#4474
Registered User
Joined: Feb 2010
Posts: 748
Likes: 135
From: St. Louis MO
Was planningo n removing the alternator yesterday. Since it was completely dead, truck's not driveable anyhow.
So I started to do some basic diagnostics before removing it. Checked for grounded case, good. Checked for 12V at the big positive terminal, 12.1 volts, good. Tried to pull the plug off the back, it was stuck. Before ZI got too involved in that task I thought I'd start it up and check some running voltages. Started it, checked voltage at the output, 12.1 volts.a Checked at the battery cable, 14.3 volts. Wait, what? Checked back at the output terminal, 14.4 volts. It's a miracle!
OK, not really, but it did start working again. I hadn't even applied any percussive maintenance yet, which was next on my list. Either I wiggles that 3 wire plug a little (I didn't think I did enough to effect anything), or the brushes got jiggled enough to make contact again. Either way, it's working, turned the turck off and restarted it several times, still working.
Didn't pull the alternator off since it's now working, at least for the moment. Ordered a rebuild kit for it (bearings, brushes, rectifier/diode pack) and I'll take it out when that gets here. Or, there's an 02 in the local PnP junkyard that just showed up, I might go snag the alt off it and rebuild that one, and just quickly swap the two out after I'm done.
May 23, 2023 | 09:47 AM
#4475
Registered User
Joined: Feb 2010
Posts: 748
Likes: 135
From: St. Louis MO
New bearing and new seal on the non-ADD passenger side diff leg. I took the whole leg out which was far easier than working with it under the car.
The old bearing felt pretty good when removed, the seal was still pliable but had very little tension. Froze/heated things back and forth to ease the installation of the new bearing and that went smoothly and easily. Tapped the new seal in and installed the CV shaft onto the leg with both removed, just because it's easier. I stacked the CV on top of the leg, put a board on the ground, and tapped the whole thing down on the board, not even very hard. And the CV shaft seated itself nicely.
After reinstalling, the CV shaft felt far less wiggly, so I guess the bearing was part of the issue. Drove it to work and back yesterday, the alternator kept going on and off, about 50/50. Not really driveable, but I made it back home from work. Still waiting on that rebuild kit......
On the plus side, didn't see any oil coming out of the passenger side.
Jun 1, 2023 | 11:37 AM
#4476
Registered User
Joined: Feb 2010
Posts: 748
Likes: 135
From: St. Louis MO
My full alternator rebuild kit was stuck in a long 'shipper awaiting package' hold, so I got antsy and bought a brush set from Autozone which shipped right away.
Took the alternator out, took the back end off, and easily removed the brush and regulator. But then the screw that holds those two was good and frozen. And neither part is really strong enough to handle any real force. I'd have drilled it out somehow, but by then the week+ long wait for the full kit finally ended and that was showing up the next day, so I just waited for that. And put in a new brush set and regulator. the bearings felt 100% fine, so those just went on a shelf for possible future use.
Put the alternator on the car and voila, it's working perfectly again.
Jun 19, 2023 | 09:16 AM
#4477
Thread Starter
Contributing Member
Joined: Sep 2005
Posts: 8,247
Likes: 497
From: mo
96 4Runner 3265,811 miles
Off for the summer since there are no kids to feed, catching up on all the home things.
Today-
Right upper ball joint removal. Last replaced in 2015 it had 53,096 miles on it...oe Toyota from a dealership, being replaced with another Toyota ball joint.
B'lasted it yesterday and this morning. Removed the cotter pin and castle nut, reapplied castle nut upside down and near the top of the threads, then used a pickle fork to break it loose from the a-arm. Next I removed the c-clip and the castle nut, bungeed the spindle so it wouldn't run off, then removed the spindle from the upper a-arm. A ball joint tool kit helped it come out without too much trouble.
Lots of up and down, side to side, twirly circle movement. I wasn't expecting it to be that bad. Too sunny to work on now, will replace with the new one when the shade reaches it.
EDIT: Or order a pair and do them then, looks like the 99 got the set I was going to use, I'd forgotten about that.
Last edited by habanero; Jun 19, 2023 at 11:32 AM.
Jun 23, 2023 | 07:15 AM
#4478
Thread Starter
Contributing Member
Joined: Sep 2005
Posts: 8,247
Likes: 497
From: mo
96 4Runner 325,811 miles
Right upper and lower ball joints in, found the right rack boot is torn, the new one (Beck Arnley103-2864 Amazon $12.70) is due today. Once I get that I'll be able to button it up and be done. The upper ball joint was bad, the lower was actually in good shape. I went ahead and replaced it because it was apart, the other will go in my spares pile. The husband bought ARP bolts (663-1004 35mm) based on this thread bearing the mighty fine exploration of lower ball joint bolts by Spiker Engineering. I used the accompanying washers, loc-tite, and torqued them to 62 ft lb.
With Toyota lower ball joint bolts for the earlier 3rd gen (with flange, NOT washers) normal torque is 59 ft lbs and the ball joint itself is 105 ft lbs.
If you have the later ones with washers the lower ball joint bolts are a much lower value...37 ft lbs iirc.
The upper ball joint is 80 ft lbs.
Left side is next, but only the upper ball joint, based on the condition of the right side and that this side has fewer miles on it.
Last edited by habanero; Jun 23, 2023 at 07:17 AM.
Jun 27, 2023 | 06:30 PM
#4479
Thread Starter
Contributing Member
Joined: Sep 2005
Posts: 8,247
Likes: 497
From: mo
96 4Runner 325,811 miles
Left upper ball joint replaced. This side was in a lot better shape than the right one. 80ft lbs on the ball joint, 87 ft lbs on the upper a-arm bolt. Tighten the a-arm bolt after the tire is installed and the wheel is on the ground.
After I unbolted the brackets on the spindle for the abs and brake line I unscrewed the upper ball joint nut and used a pickle fork to release the ball joint stud from the a-arm. The nut caught it when it released, which I then removed, loosened the a-arm bolt, lifted the a-arm off the ball joint stud, and used a bungee to hold the spindle up. After removing the c-clip from the ball joint I spent a lot of time coaxing the ball joint from the spindle using the AutoZone tool kit, which doesn't work super-well in this application. Some creative configuring was required.
Pictured is the new one before I installed the boot and attached it to the a-arm.

Also pulled the e-locker harness today. Sprayed a bolt in b'laster, will address that tomorrow. The Toyota harness 82127-35100 comes with the wires, hard breather line, and brackets. It's also pricey and will hopefully last as long as the original ones did. Replacing it is just a matter of unplugging/ unbolting brackets/ pulling the hard line for the breather out. I originally made a bracket for the harness because mine didn't have one, have removed it and will replace with the oem supplied one. I extended the breather up into the body of the truck so I'll keep that configuration and install the breather line back into it. No more intermittent/ sluggish e-locker will be nice. The old harness I'll probably rewire and have as a spare, need to find the pins that fit the plugs so I can use all new wiring since the old wiring is so degraded. If anyone knows where I can source those please share.

Those wiper blades are new too...Denso 160-1117
Left upper ball joint replaced. This side was in a lot better shape than the right one. 80ft lbs on the ball joint, 87 ft lbs on the upper a-arm bolt. Tighten the a-arm bolt after the tire is installed and the wheel is on the ground.
After I unbolted the brackets on the spindle for the abs and brake line I unscrewed the upper ball joint nut and used a pickle fork to release the ball joint stud from the a-arm. The nut caught it when it released, which I then removed, loosened the a-arm bolt, lifted the a-arm off the ball joint stud, and used a bungee to hold the spindle up. After removing the c-clip from the ball joint I spent a lot of time coaxing the ball joint from the spindle using the AutoZone tool kit, which doesn't work super-well in this application. Some creative configuring was required.
Pictured is the new one before I installed the boot and attached it to the a-arm.
Also pulled the e-locker harness today. Sprayed a bolt in b'laster, will address that tomorrow. The Toyota harness 82127-35100 comes with the wires, hard breather line, and brackets. It's also pricey and will hopefully last as long as the original ones did. Replacing it is just a matter of unplugging/ unbolting brackets/ pulling the hard line for the breather out. I originally made a bracket for the harness because mine didn't have one, have removed it and will replace with the oem supplied one. I extended the breather up into the body of the truck so I'll keep that configuration and install the breather line back into it. No more intermittent/ sluggish e-locker will be nice. The old harness I'll probably rewire and have as a spare, need to find the pins that fit the plugs so I can use all new wiring since the old wiring is so degraded. If anyone knows where I can source those please share.
Those wiper blades are new too...Denso 160-1117
Last edited by habanero; Jun 28, 2023 at 02:55 AM.


