
habanero's 1996 4Runner Build-Up Thread
 Jun 15, 2019 | 06:25 AM
#3861
Thread Starter
Contributing Member


Joined: Sep 2005
Posts: 8,247
Likes: 497
From: mo
Starting at the beginning and working my way to the other end...
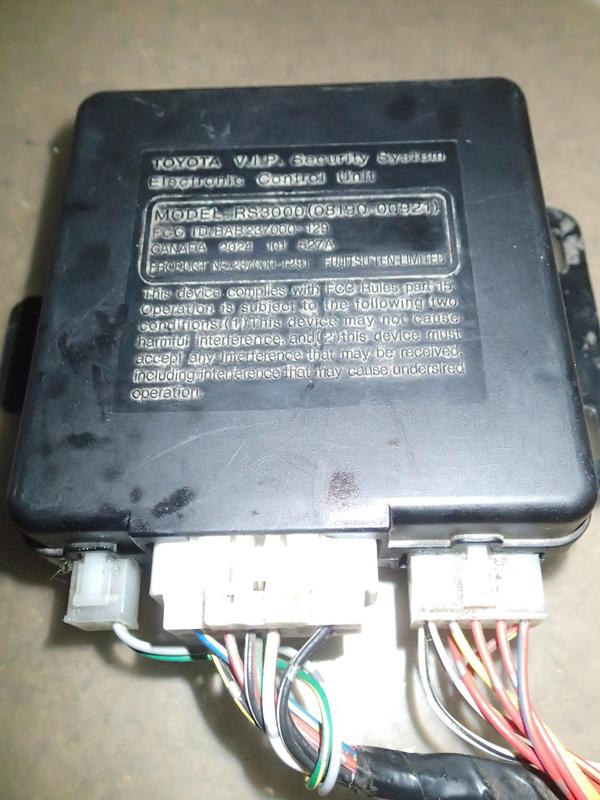
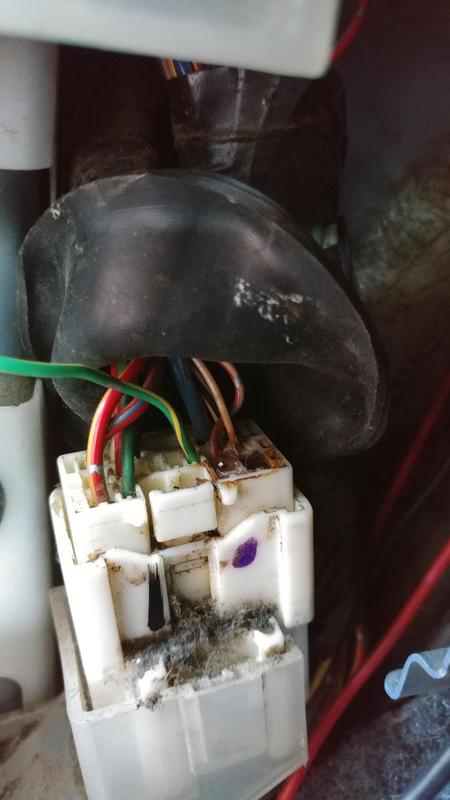
RS3000 ecu and the three connectors. Can be found under the driver's front seat.
1st two wires...the red/white with silver dots vampires to the corresponding wire of same color to the wiring that runs to the back of the truck along the driver's door sill.
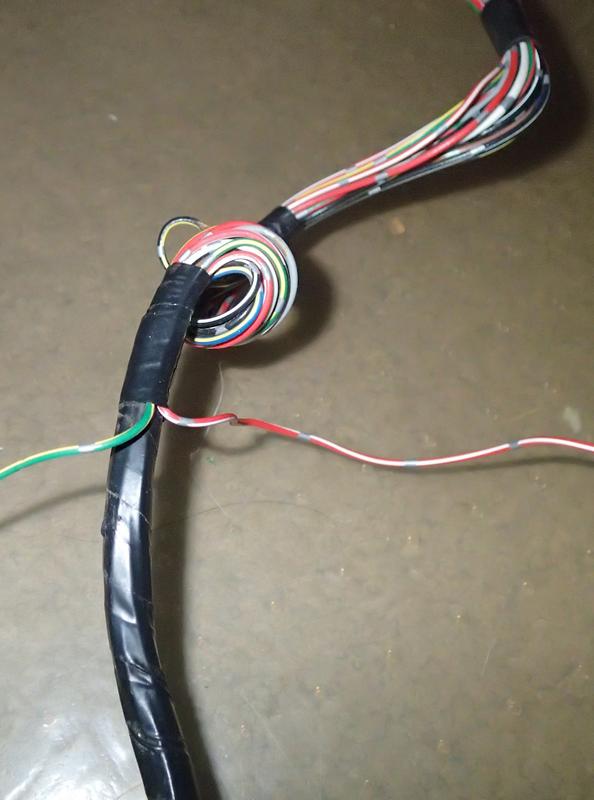
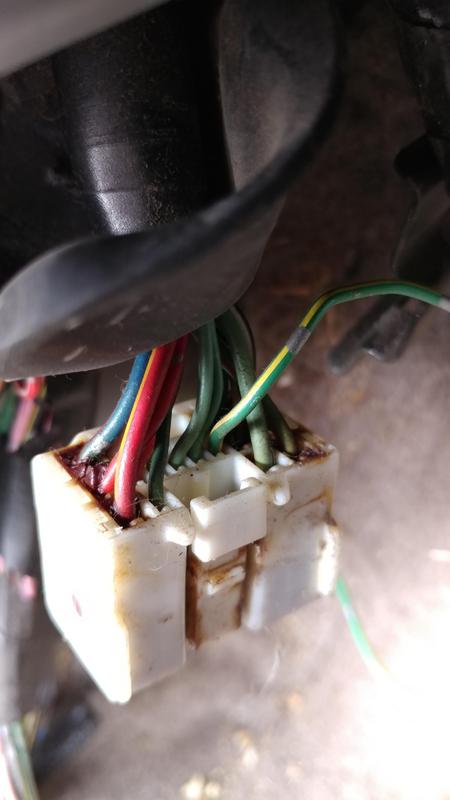
And the above pictured green/yellow wire with silver dots that you kept the pin intact (remove by pulling the pin keeper on the body of the connector out a few millimeters, then releasing the plastic catch from the plug-in side of the connector so the pin can be backed out) ...
fits like so in the existing connector that's behind the kick panel, about halfway back and near the floor.
still the green/yellow wire...
there should already be a pin in the body side of the connector-
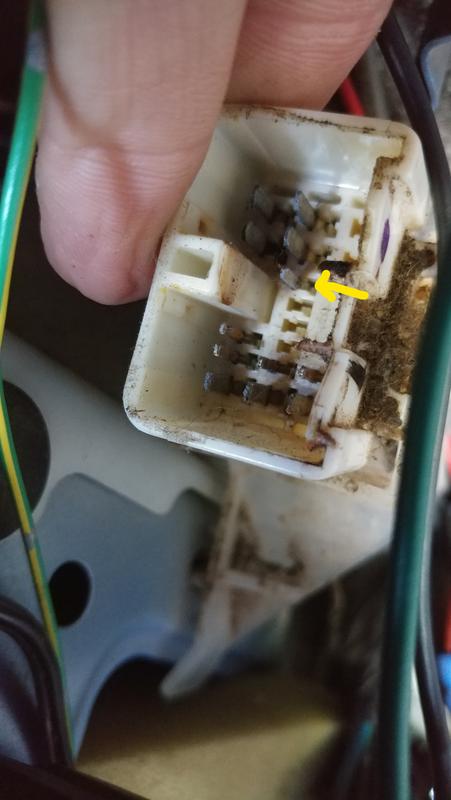
still the green/yellow wire...
Which then plugs together and the rubber boot gets pulled back down over it. The light blue thing at the bottom right of the picture is the catch for the kick panel, to give an idea of location
RS3000 ecu and the three connectors. Can be found under the driver's front seat.
1st two wires...the red/white with silver dots vampires to the corresponding wire of same color to the wiring that runs to the back of the truck along the driver's door sill.
And the above pictured green/yellow wire with silver dots that you kept the pin intact (remove by pulling the pin keeper on the body of the connector out a few millimeters, then releasing the plastic catch from the plug-in side of the connector so the pin can be backed out) ...
fits like so in the existing connector that's behind the kick panel, about halfway back and near the floor.
still the green/yellow wire...
there should already be a pin in the body side of the connector-
still the green/yellow wire...
Which then plugs together and the rubber boot gets pulled back down over it. The light blue thing at the bottom right of the picture is the catch for the kick panel, to give an idea of location
Jun 15, 2019 | 06:37 AM
#3862
Thread Starter
Contributing Member
Joined: Sep 2005
Posts: 8,247
Likes: 497
From: mo
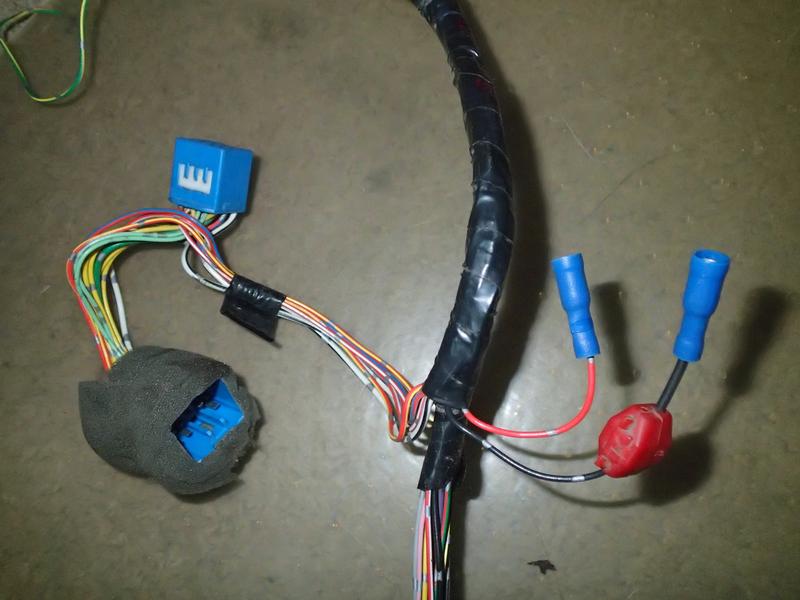
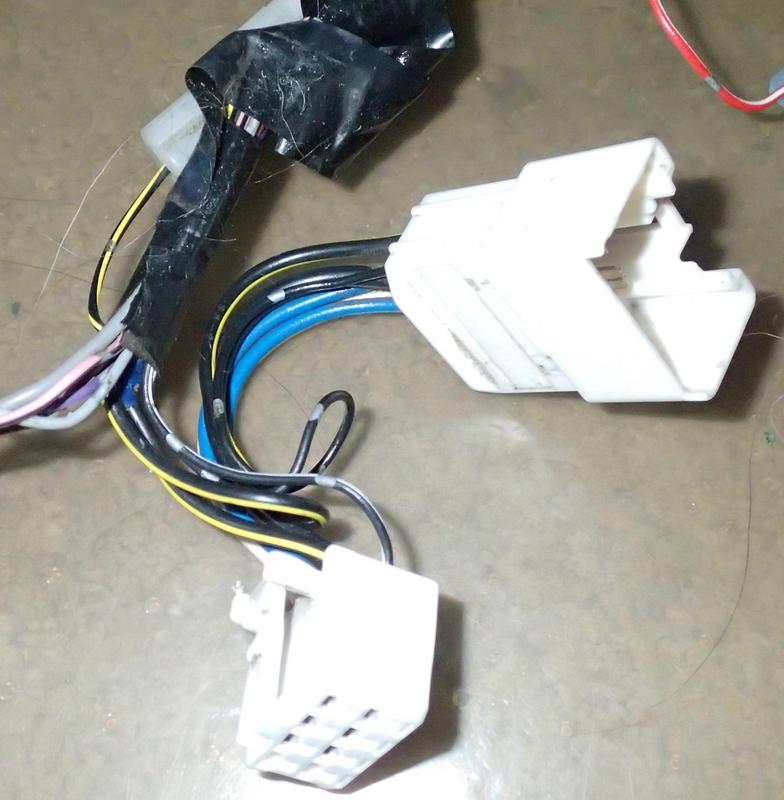
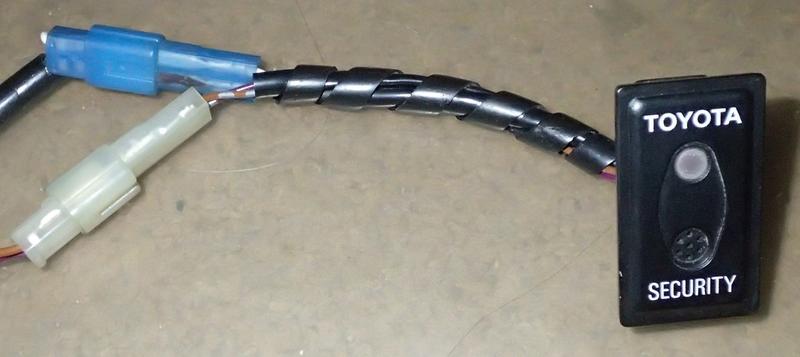
And going along it's time for the blue connector. It's behind the kick panel, just above and a little closer to you than the connector above, and the only big blue one. Unplug the existing oe connector, plug it into the corresponding connector on the harness, and the other harness connector into the oe's original spot. Stuff the oe connector mess into the body cavity next to the plug.
^
The red and back wire pictured above are for the chirper. I used bullet connectors here (didn't even bother removing the one vampire tap ), and ran the chirper wires through the firewall grommet. My first chirper didn't work so I checked it was getting power and put in a different junkyard chirper. Now it works.
Moving right along...
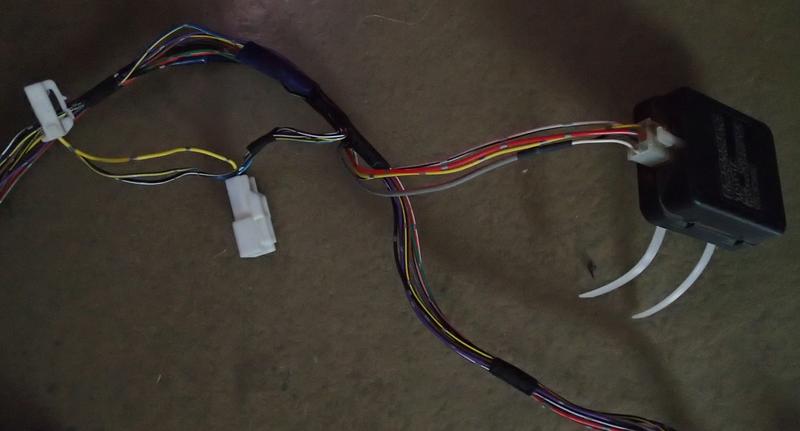
The white connectors pictured work much like the blue one does, unplug the small white connector on the back upper right-hand corner of the fuse block (looking at it from the front) and plug it into the corresponding harness connector, plug the other harness connector into the oe's original spot.
^
The little black box pictured above is the glass breakage sensor. It was zip-tied to the steering column wiring harness, so that's where I put it. There is an adjustment screw on it, I left that as it, but aimed it so that I have easy access if I need to change the sensitivity.
^
The red and back wire pictured above are for the chirper. I used bullet connectors here (didn't even bother removing the one vampire tap
), and ran the chirper wires through the firewall grommet. My first chirper didn't work so I checked it was getting power and put in a different junkyard chirper. Now it works.Moving right along...
The white connectors pictured work much like the blue one does, unplug the small white connector on the back upper right-hand corner of the fuse block (looking at it from the front) and plug it into the corresponding harness connector, plug the other harness connector into the oe's original spot.
^
The little black box pictured above is the glass breakage sensor. It was zip-tied to the steering column wiring harness, so that's where I put it. There is an adjustment screw on it, I left that as it, but aimed it so that I have easy access if I need to change the sensitivity.
Jun 15, 2019 | 06:42 AM
#3863
Thread Starter
Contributing Member
Joined: Sep 2005
Posts: 8,247
Likes: 497
From: mo
Time for the steering column wiring, two vampire taps...both connected to wires of the same color coming from the steering column. The green/red one is for the horn (if you don't want the horn to sound don't connect this one) and I haven't figured out the function of the red/white one yet.
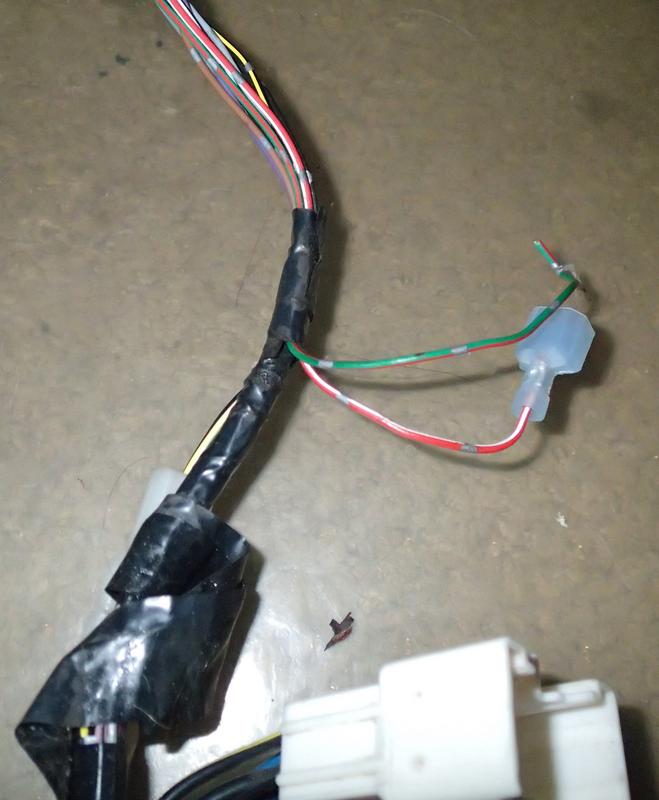
Same as above, but installed...
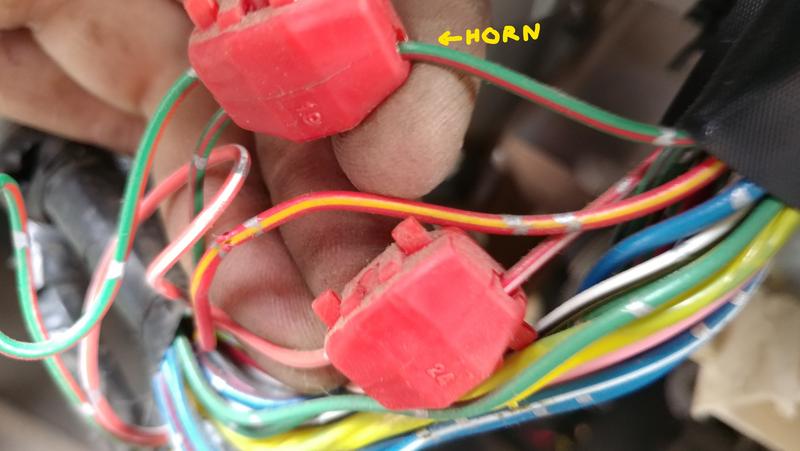
Same as above, but installed...
Last edited by habanero; Jun 15, 2019 at 07:04 AM.
Jun 15, 2019 | 07:01 AM
#3864
Thread Starter
Contributing Member
Joined: Sep 2005
Posts: 8,247
Likes: 497
From: mo
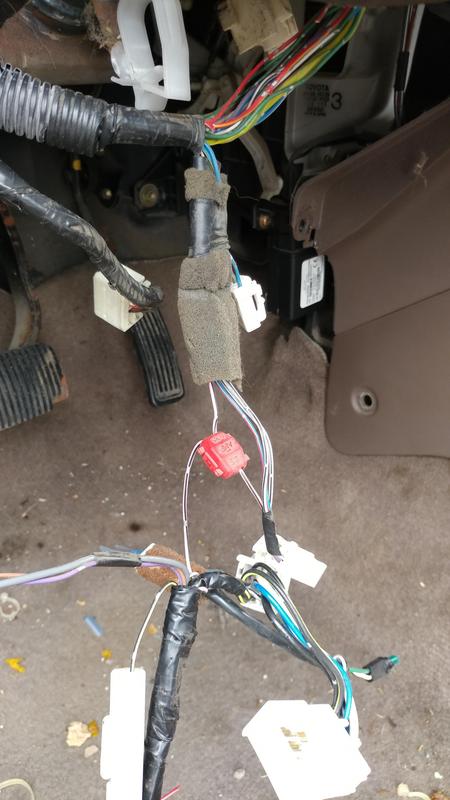
And now for the big white connector that replaces the one below the ignition. Same as the blue and the little white, disconnect the oe connector, plug oe connector into corresponding wire harness connector, plug other wiring harness connector into the oe's original spot.
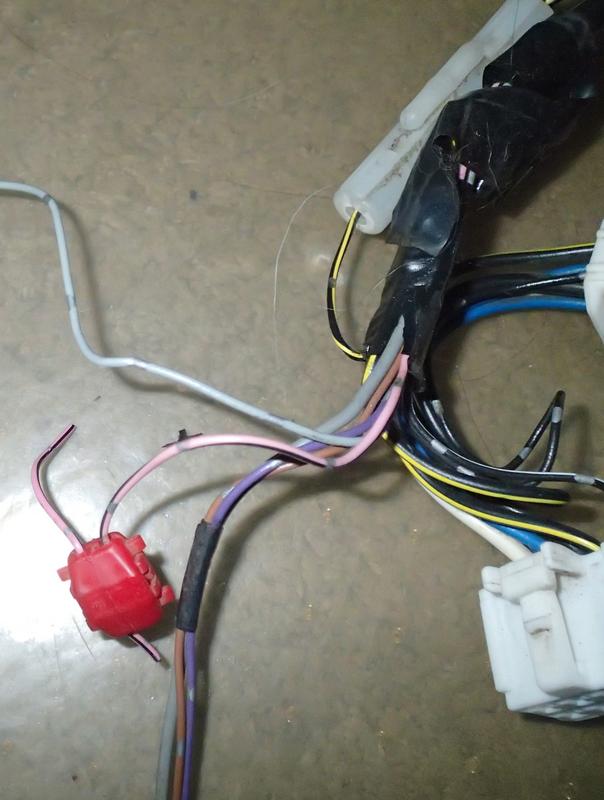
Time for the pink and black wire. I had a little trouble finding this one because it wasn't in the same spot on my 96 as it was on the 97 I pulled it from...
^
the pink/black wire was with the smaller white oe connector in step before this one on the 97
^
but on the '96 it was on a small blue connector very close to the same area at the ignition--- the key sense wiring (also triggers the door binger and key-in auto-unlock on the '96, I had it disconnected for years)
^
The grey wire above the pink wire in the pic is the antenna wire. In the truck I pulled it from it was wrapped up the wiring for the light in the key surround. I just took the little key surround light harness and bulb and left the grey wire as it was.
And the blinky alarm light is at the very end. I had to extend the wiring to put it in my center console, it wasn't quite long enough.
Did I already mention I ran the red and back wire for the chirper in through the firewall and used bullet connectors to connect? It's stuffed back by the charcoal canister.
If for some reason I don't have the fob or something happens to it while it's armed there is still a way to start the truck, that was important to me.
Last edited by habanero; Jun 15, 2019 at 07:10 AM.
Jun 26, 2019 | 05:15 AM
#3865
Registered User

Joined: Jan 2011
Posts: 695
Likes: 103
From: exo-reality -wave if you see me; Front Range, CO
Wow. I'm impressed - pretty amazing detective work there figurin' that all out.
"Always use your powers for good. Never evil." haha.
Bummer on the broken spring. I wonder if it was stress or rust or just an unfortunate combination?
"Always use your powers for good. Never evil." haha.
Bummer on the broken spring. I wonder if it was stress or rust or just an unfortunate combination?
Jun 26, 2019 | 12:26 PM
#3866
Thread Starter
Contributing Member
Joined: Sep 2005
Posts: 8,247
Likes: 497
From: mo
Hi coopster! It didn't seem to be rust...it's got surface rust but that's it. There was no rust on the broken part, no evidence of a crack that finally finished itself off.
Also bwahahhahahaha (only good).
Sorry about the motor mount thing....did it all work out for you?
Also bwahahhahahaha (only good).
Sorry about the motor mount thing....did it all work out for you?
Jun 27, 2019 | 07:57 AM
#3867
Registered User
Joined: Jan 2011
Posts: 695
Likes: 103
From: exo-reality -wave if you see me; Front Range, CO
Actually, just got off my two weeks Tuesday. Will worry about the motor (and mounts) later, but did get the transmission pulled out.
And since the donor is a left drop, running into issue with the xfer cases to be a right for the 95. So at the point yesterday was contemplating pulling the trans output shaft bearing off the 99's and putting the larger one from the 95 on it so that intermediate piece fit with the xfer shifter. I -thought- they were both the same R150(?) except obviously the input shaft difference as build threads have pointed out. But going to spend afternoon with grandkids, so there's that. Want to try to catch Dodgers game manana, and then it'll be Tuesday again....
Probably should start a build thread I reckon. Apologies for verbal diarrhea. Thinking out loud.
Jun 27, 2019 | 12:35 PM
#3868
Thread Starter
Contributing Member
Joined: Sep 2005
Posts: 8,247
Likes: 497
From: mo
Actually, just got off my two weeks Tuesday. Will worry about the motor (and mounts) later, but did get the transmission pulled out.
And since the donor is a left drop, running into issue with the xfer cases to be a right for the 95. So at the point yesterday was contemplating pulling the trans output shaft bearing off the 99's and putting the larger one from the 95 on it so that intermediate piece fit with the xfer shifter. I -thought- they were both the same R150(?) except obviously the input shaft difference as build threads have pointed out. But going to spend afternoon with grandkids, so there's that. Want to try to catch Dodgers game manana, and then it'll be Tuesday again....
Probably should start a build thread I reckon. Apologies for verbal diarrhea. Thinking out loud.
And since the donor is a left drop, running into issue with the xfer cases to be a right for the 95. So at the point yesterday was contemplating pulling the trans output shaft bearing off the 99's and putting the larger one from the 95 on it so that intermediate piece fit with the xfer shifter. I -thought- they were both the same R150(?) except obviously the input shaft difference as build threads have pointed out. But going to spend afternoon with grandkids, so there's that. Want to try to catch Dodgers game manana, and then it'll be Tuesday again....
Probably should start a build thread I reckon. Apologies for verbal diarrhea. Thinking out loud.

The sticker on my 96 says R150f...and all I know is something about different oil pans and that's about it.
Your build thread would be interesting, lemme know if you make one so I don't miss it.
The past couple of days I noticed my temps are not what they should be, running a little teeny bit hotter than it usually does when it's hot out. The temp seems to come down a little while moving and come up in slower traffic/ at stops. Not overheating, it hit a high of only around 215 degrees F today according to my temp gauge. I need to get more info with torque pro and it'd be easy to test resistance on the temp sensor. The temp gauge is new so it could be as simple as a mis-read. I haven't noticed the warm-up roar on the '96 lately, but I have with the '99. My (original part) fan is difficult to turn when off/cold or warm and that's as far as I've gotten with that. It does run when the truck is running so that's a plus.
The kid got his intermediate license so getting drive time is...dificil. He says he doesn't care but then always grabs his keys.
 Jul 4, 2019 | 04:17 PM
#3871
Thread Starter
Contributing Member
Joined: Sep 2005
Posts: 8,247
Likes: 497
From: mo
96 4Runner 306779 miles
Some part numbers:
Fan clutch: 08921-04950
Coolant temp sensor: 89422-35010
Coolant temp sensor pigtail: discontinued by Toyota
the connector at the sensor is 90980-10737
So far-
I tested resistance of the coolant temp sensor compared to the numbers on torque pro. The ohms match the temps as the computer sees them according to the range on the chart in the FSM. Next I took off the temp sensor and warmed it up in a pot of water while keeping track of resistance. The sensor's ohm range is telling the computer it's around 12ish degrees colder than it actually is.
When it is cold the fan only turns when it's pushed and no further. When the engine is hot it will spin 1/4 turn beyond the push. The truck is running a little warm, apparently warmer than the computer knows which is what the aftermarket gauge shows. I did do the paper test, but it was only an envelope with a sheet of paper. The fan wasn't stopped by it. I'm kinda worried about hurting my old fan. It's okay to call me wimpy.
Last edited by habanero; Jul 6, 2019 at 02:49 PM.
Jul 6, 2019 | 03:31 PM
#3872
Thread Starter
Contributing Member
Joined: Sep 2005
Posts: 8,247
Likes: 497
From: mo
96 4Runner 306,796 miles
Changed the coolant temp sensor. Drained enough coolant to lower the level. Removed the upper radiator hose. Removed the cam sensor plug retainer connected to the front of the upper timing belt cover. Removed the spark plug wire retainers and any vacuum lines in the way. Unplug the knock sensor wiring if it's in the way. Remove the upper timing belt cover- 6 bolts, don't let coolant drip on the timing belt stuff. Loosen the end fuel rail bolt on the driver's side (I used a paper towel to catch the fuel gas drips). Remove the end fuel rail bolt on the passenger side (another paper towel) to swing the tube out of the way. To remove the coolant temp sensor a deepwell 19mm socket will do the trick. Some coolant will come out if the level's not low enough....more paper towel. There should be a sensor and gasket (metal). Torque for ECT install is 20n-m or 14 ft-lbs. Torque for the Fuel Pipe is 34.3n-m or 25 ft-lbs (and a metal gasket on each side of the pipe, don't let 'em get away). Torque for #2 timing belt cover (top one) 9n=m or 80 IN-lbs.
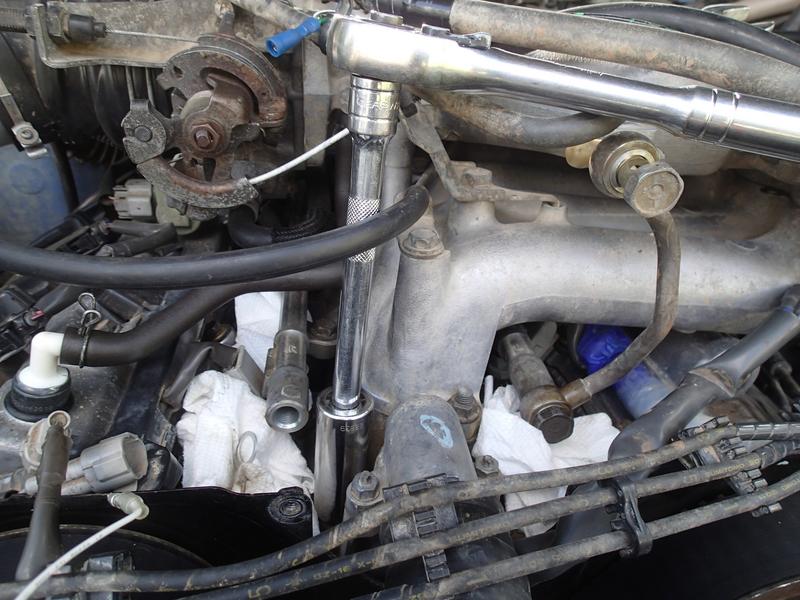
Also changed the fan clutch. Remove the 4 nuts and take the fan clutch out of the truck. If you have to gently pry the thing off be gentle, the fins will break easily. The fan is held on by 4 nuts. I used the mini impact to take them off so I could transfer it to the new one. I put the new fan clutch on, hand started the nuts, then torqued them to 7.4n-m or 65 IN-lbs in a pattern. I couldn't find the torque spec for the fan itself.
Changed the coolant temp sensor. Drained enough coolant to lower the level. Removed the upper radiator hose. Removed the cam sensor plug retainer connected to the front of the upper timing belt cover. Removed the spark plug wire retainers and any vacuum lines in the way. Unplug the knock sensor wiring if it's in the way. Remove the upper timing belt cover- 6 bolts, don't let coolant drip on the timing belt stuff. Loosen the end fuel rail bolt on the driver's side (I used a paper towel to catch the fuel gas drips). Remove the end fuel rail bolt on the passenger side (another paper towel) to swing the tube out of the way. To remove the coolant temp sensor a deepwell 19mm socket will do the trick. Some coolant will come out if the level's not low enough....more paper towel. There should be a sensor and gasket (metal). Torque for ECT install is 20n-m or 14 ft-lbs. Torque for the Fuel Pipe is 34.3n-m or 25 ft-lbs (and a metal gasket on each side of the pipe, don't let 'em get away). Torque for #2 timing belt cover (top one) 9n=m or 80 IN-lbs.
Also changed the fan clutch. Remove the 4 nuts and take the fan clutch out of the truck. If you have to gently pry the thing off be gentle, the fins will break easily. The fan is held on by 4 nuts. I used the mini impact to take them off so I could transfer it to the new one. I put the new fan clutch on, hand started the nuts, then torqued them to 7.4n-m or 65 IN-lbs in a pattern. I couldn't find the torque spec for the fan itself.
Jul 7, 2019 | 01:06 PM
#3873
Registered User

Joined: Jun 2013
Posts: 3,112
Likes: 582
From: Portland, Oregon, USA
Thanks for posting the procedure and the torque specifications, as well as things to watch for!
I am sure that anyone who comes across your thread also appreciates it too!
You are very thorough!

I am sure that anyone who comes across your thread also appreciates it too!
You are very thorough!
Jul 9, 2019 | 11:20 AM
#3874
Thread Starter
Contributing Member
Joined: Sep 2005
Posts: 8,247
Likes: 497
From: mo
Thanks old87yota, I'm trying and dragging you all along for the ride.
96 4Runner 306,864 miles
Tire rotation, greased the manual hubs, replaced the lower ball joint bolts for pieces of mind....er...peace of mind:
Toyota lower ball joint bolts #90080-10066- newer 3rd gens went to a different part number as well as torque spec: 59 ft lbs and loctite for my 96.
Everything was copacetic until I got to the lower ball joint bolts on the left side. When you take the bolts out the upper a-arm should lift up a little, giving you a gap between the ball joint and the spindle. The right side acted accordingly. To re-unite them loosen the upper a-arm bolt and it will drop down, then make sure to tighten the a-arm bolt 87 ft lbs after the truck is back on the ground.
This time the left side didn't move up at all, turns out the left upper a-arm bolt was a little too loose. I loosened up the rest of the way, installed my lower ball joint bolts, torqued the wheel back on and lowered the truck to the ground, then tightened the upper a-arm bolt.
Symptoms of the loose bolt was the steering wheel wiggling back and forth rhythmically when driving straight, same symptom as the a-arm bushings when they were going bad.
Jul 28, 2019 | 08:07 PM
#3875
Thread Starter
Contributing Member
Joined: Sep 2005
Posts: 8,247
Likes: 497
From: mo
96 4Runner 310,210 miles.
Bet some of you know what I've been up to the past couple of weeks!
Usually there is a list of broken-need of repair things. This go-round I really don't have much except:
One thing I am super-glad I did when installing my on-board air- using a separate solenoid with its own switch to supply power.
The last time I needed to air up I hit the solenoid switch to provide power, then the switch for the OBA to fill the tank while I was driving. Well, it kept running and running..
and running
and running
and running.
Thinking that was weird I glance down at the gauge to see it's got about 25ish pounds more pressure in the tank than it's supposed to and the compressor
isn't stopping.
Huh. I quickly hit the OBA on/off switch and nothing- it kept running.
So I hit the solenoid switch which cut power to the back and shut the compressor down.
The pressure switch w/relay is apparently fried. It won't not run if power is supplied, whether switched off or not.
I'll be replacing the VIAIR 90111 Pressure Switch with Relay soon.
I used the airhose and blower to bleed off the excess pressure from the tank. I used the solenoid switch to turn the compressor on and air up, being careful not to let it get too pressurized.
Jul 28, 2019 | 08:16 PM
#3876

Registered User
Joined: Aug 2013
Posts: 4,262
Likes: 683
From: Southern Arizona
96 4Runner 310,210 miles.
Bet some of you know what I've been up to the past couple of weeks!
Usually there is a list of broken-need of repair things. This go-round I really don't have much except:
One thing I am super-glad I did when installing my on-board air- using a separate solenoid with its own switch to supply power.
The last time I needed to air up I hit the solenoid switch to provide power, then the switch for the OBA to fill the tank while I was driving. Well, it kept running and running..
and running
and running
and running.
Thinking that was weird I glance down at the gauge to see it's got about 25ish pounds more pressure in the tank than it's supposed to and the compressor
isn't stopping.
Huh. I quickly hit the OBA on/off switch and nothing- it kept running.
So I hit the solenoid switch which cut power to the back and shut the compressor down.
The pressure switch w/relay is apparently fried. It won't not run if power is supplied, whether switched off or not.
I'll be replacing the VIAIR 90111 Pressure Switch with Relay soon.
I used the airhose and blower to bleed off the excess pressure from the tank. I used the solenoid switch to turn the compressor on and air up, being careful not to let it get too pressurized.
Bet some of you know what I've been up to the past couple of weeks!
Usually there is a list of broken-need of repair things. This go-round I really don't have much except:
One thing I am super-glad I did when installing my on-board air- using a separate solenoid with its own switch to supply power.
The last time I needed to air up I hit the solenoid switch to provide power, then the switch for the OBA to fill the tank while I was driving. Well, it kept running and running..
and running
and running
and running.
Thinking that was weird I glance down at the gauge to see it's got about 25ish pounds more pressure in the tank than it's supposed to and the compressor
isn't stopping.
Huh. I quickly hit the OBA on/off switch and nothing- it kept running.
So I hit the solenoid switch which cut power to the back and shut the compressor down.
The pressure switch w/relay is apparently fried. It won't not run if power is supplied, whether switched off or not.
I'll be replacing the VIAIR 90111 Pressure Switch with Relay soon.
I used the airhose and blower to bleed off the excess pressure from the tank. I used the solenoid switch to turn the compressor on and air up, being careful not to let it get too pressurized.
 Jul 29, 2019 | 10:51 AM
#3878
Thread Starter
Contributing Member
Joined: Sep 2005
Posts: 8,247
Likes: 497
From: mo
Or that I stopped it before it did its thing....mostly I was thinking, 'well, this isn't right' when it didn't shut off with the Viair switch and 'oh good' when I flipped the solenoid switch. I'll have to replace the pressure switch and check the valve. Even though there was a valve, I was glad to have a simple right-in-my-reach way to shut it off.
There are a lot of pics to go through, we did a mix of trails along with a few new ones. Kinda bummer that a lot of the passes around Silverton and Ouray was closed, but because of it we spent more time at other places.
There are a lot of pics to go through, we did a mix of trails along with a few new ones. Kinda bummer that a lot of the passes around Silverton and Ouray was closed, but because of it we spent more time at other places.
Last edited by habanero; Jul 29, 2019 at 11:04 AM.
Aug 1, 2019 | 05:27 PM
#3879
Thread Starter
Contributing Member
Joined: Sep 2005
Posts: 8,247
Likes: 497
From: mo
96 4Runner 310,216 miles
Yep, pop-off valve was stuck shut. B'lasted it back into mobility, letting it sit overnight for more.
Right before our adventure dinner at the local chinese food joint netted an interesting fortune...
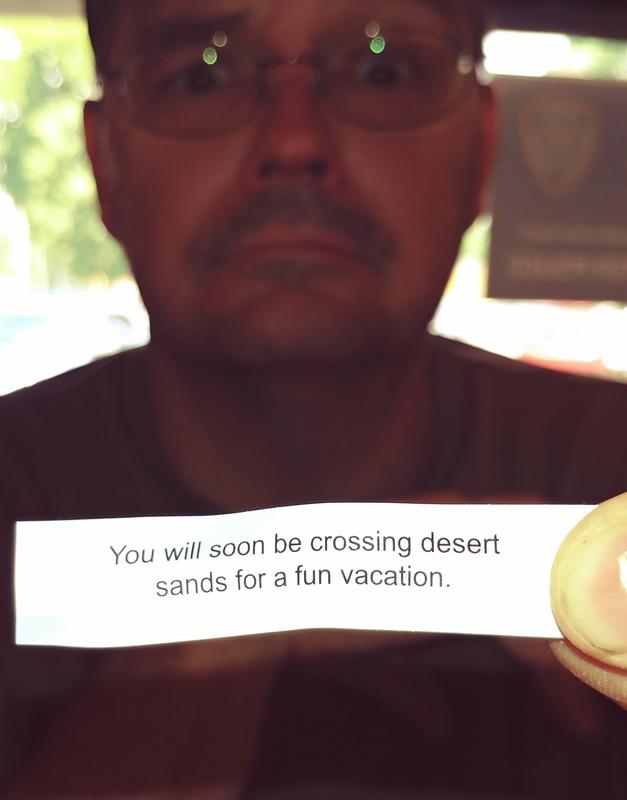
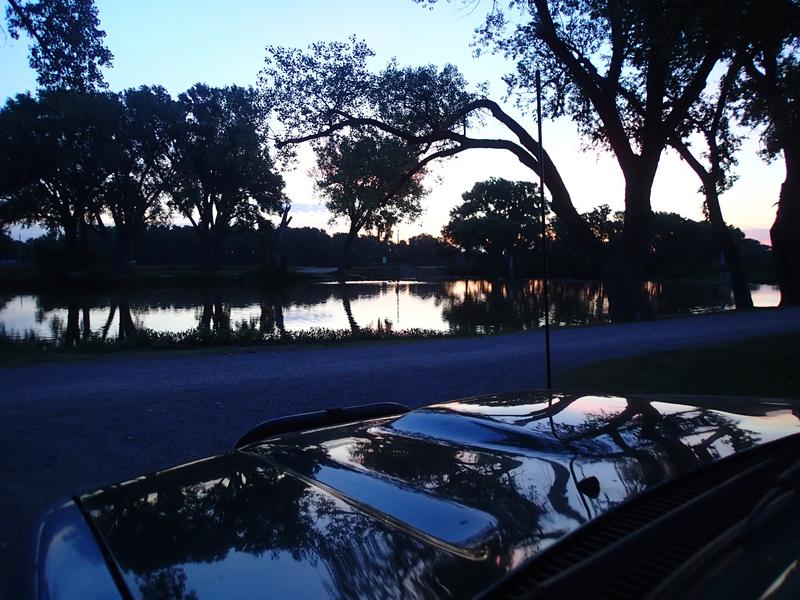
We started out with a night in the town of Ellis, KS. There's a little tiny camp area in town. $15 for a place to sleep, not too bad for what we were doing. The tent area is a patch of grass on the east end. There is a road right there, and a parking lot, and a light, and a kennel at some distance. It was a place to sleep before we got to CO. We counted 40 turkey vultures perched on a tower a block or so away.
Yep, pop-off valve was stuck shut. B'lasted it back into mobility, letting it sit overnight for more.
Right before our adventure dinner at the local chinese food joint netted an interesting fortune...
We started out with a night in the town of Ellis, KS. There's a little tiny camp area in town. $15 for a place to sleep, not too bad for what we were doing. The tent area is a patch of grass on the east end. There is a road right there, and a parking lot, and a light, and a kennel at some distance. It was a place to sleep before we got to CO. We counted 40 turkey vultures perched on a tower a block or so away.
Aug 3, 2019 | 01:05 PM
#3880
Thread Starter
Contributing Member
Joined: Sep 2005
Posts: 8,247
Likes: 497
From: mo
96 4Runner 310,437 miles
Oil change. It was a good not-much-damage year for me for this trip, just a few well-tested armor bits.
Also did part of the oil change on the '99 while the hubby messed around with his speedycar, but couldn't blindly figure out the fumoto valve he has on his. Got the hose and fitting on it, just couldn't get the valve to open, and later, to close.
Winter Park was next, for our Tipperary loop bike ride, only with the kid it was a tipperary shuttle and not loop to cut down the miles. Kinda bummer because while I don't really like the gravel road section I do really like Northwest Passage even with all the missing trees. Fun little trail. I'm still trying to wrangle all the pics together between 3 phones, 2 car camera ssd cards, and 2 regular camera ssd cards. So many things to catch up on, not enough time to fit it all in (and yet I'm finding time to do this..)
Oil change. It was a good not-much-damage year for me for this trip, just a few well-tested armor bits.
Also did part of the oil change on the '99 while the hubby messed around with his speedycar, but couldn't blindly figure out the fumoto valve he has on his. Got the hose and fitting on it, just couldn't get the valve to open, and later, to close.
Winter Park was next, for our Tipperary loop bike ride, only with the kid it was a tipperary shuttle and not loop to cut down the miles. Kinda bummer because while I don't really like the gravel road section I do really like Northwest Passage even with all the missing trees. Fun little trail. I'm still trying to wrangle all the pics together between 3 phones, 2 car camera ssd cards, and 2 regular camera ssd cards. So many things to catch up on, not enough time to fit it all in (and yet I'm finding time to do this..
)


