
4ever4running's 2002 4Runner Build-Up Thread
 Nov 5, 2012 | 06:41 PM
#202
Thread Starter
Registered User
iTrader: (1)
Joined: Aug 2009
Posts: 817
Likes: 2
From: Arlington, Virginia
Really? I don't know if its just me but recently I have been wanting to swap them out for some black wheels...either way I am going to wait until I need new tires before I make a decision so I have some time to think it over.
Nov 6, 2012 | 05:40 AM
#203
Thread Starter
Registered User
iTrader: (1)
Joined: Aug 2009
Posts: 817
Likes: 2
From: Arlington, Virginia
This past weekend I went on a trip to GWNF with a couple of members from T4R.org. The trails aren't very tough so I wasn't able to flex out the LX450 coils but it was still nice to get out and enjoy the weather and scenery. I didn't get many action shots because I was the only one with a camera, but here are the pics that I have.
The mandatory group shot


Action shots


And some poser shots


The mandatory group shot
Action shots
And some poser shots
Jan 3, 2013 | 01:15 PM
#204
Thread Starter
Registered User
iTrader: (1)
Joined: Aug 2009
Posts: 817
Likes: 2
From: Arlington, Virginia
December 10 Update
I placed my order for an Engo EPF10000S with a synthetic rope. I ordered it from Mudflaps.com and got it for $465 out the door. I decided to go with the Engo because it is within my price range, has gotten good reviews, and it has the same warranty as Warn (Lifetime warranty for mechanical parts and a 1 year warranty for electrical parts).
December 21-December 29 Update
I bumped of my contura rocker switches with my knee and broke the actual rocker. So, I went on OTRATTW.com with the intention of just replacing the rocker, but that didn't last long...I ended up ordering another rocker switch and another 3-switch holder. I figure that with my ShrockWorks coming I will eventually have enough accessories to fill the switches. But, for now the "Zombie Lights" switch is the only one that is functional on the top row and it controls my roof lights. I am hoping to order some PIAA 510 Ion Crystal fog lights to fill the bottom light holes of the ShrockWorks and I will eventually get some lights to sit on top of the bumper.
I used my Dremel to cut the hole to fit the switch holder and the switches. It was a pretty easy process but it took a little while because I was being really careful to not cut more than I needed to.

Also, with 6 switches the wiring was getting out of control. So I cleaned it up by looping all the 12V lights (green wires) and the grounds (black wires) together. It was a PITA but definitely worth it because the wiring is a lot cleaner.

Final Product:


Finally, my big Christmas present from my wife was some Weather Tech Digial Fit floor mats. They have already gotten some use because of some recent rain and snow and so far I love them!


I placed my order for an Engo EPF10000S with a synthetic rope. I ordered it from Mudflaps.com and got it for $465 out the door. I decided to go with the Engo because it is within my price range, has gotten good reviews, and it has the same warranty as Warn (Lifetime warranty for mechanical parts and a 1 year warranty for electrical parts).
December 21-December 29 Update
I bumped of my contura rocker switches with my knee and broke the actual rocker. So, I went on OTRATTW.com with the intention of just replacing the rocker, but that didn't last long...I ended up ordering another rocker switch and another 3-switch holder. I figure that with my ShrockWorks coming I will eventually have enough accessories to fill the switches. But, for now the "Zombie Lights" switch is the only one that is functional on the top row and it controls my roof lights. I am hoping to order some PIAA 510 Ion Crystal fog lights to fill the bottom light holes of the ShrockWorks and I will eventually get some lights to sit on top of the bumper.
I used my Dremel to cut the hole to fit the switch holder and the switches. It was a pretty easy process but it took a little while because I was being really careful to not cut more than I needed to.
Also, with 6 switches the wiring was getting out of control. So I cleaned it up by looping all the 12V lights (green wires) and the grounds (black wires) together. It was a PITA but definitely worth it because the wiring is a lot cleaner.
Final Product:
Finally, my big Christmas present from my wife was some Weather Tech Digial Fit floor mats. They have already gotten some use because of some recent rain and snow and so far I love them!
Last edited by 4ever4running; Jan 15, 2013 at 12:33 PM.
Jan 15, 2013 | 12:22 PM
#205
Thread Starter
Registered User
iTrader: (1)
Joined: Aug 2009
Posts: 817
Likes: 2
From: Arlington, Virginia
January 9th Update
I got home from work and had my winch waiting for me.
My initial reaction is that this thing is beefy! and it looks great! I am really impressed at how well the winch was packaged. Everything was in great shape and completely undamaged.


Control Box

I didn't waste any time and got right to work getting it clocked so the clutch lever can be easily accessed through the cutouts in the Shrockworks. To clock the winch I started by removing the allen screws that secure the crossbars.

Once the crossbars are removed, the gearbox comes right off.

Then the 10 allen screws on the inside of the gearbox need to be removed.

At this point, the "feet support piece" can be removed from the gearbox.

Now there are two options for properly clocking the winch:
Option 1: You can remove the "feet support piece" from the gearbox, rotate it to the desired position, then simply place it back onto the gearbox. OR
Option 2: Rather than removing the "feet support piece" you can simply rotate it while keeping the actual gearbox stationary. This is the easiest way IMO.
Either way, once the "feet support piece" aligned with the gearbox (making sure that the gasket is also properly aligned) the 10 allen screws can be put back in place

Lastly, the crossbars are reattached with the two large allen screws. Done! Here is the final product:


Finally, I ordered some 3/4" Smittybilt clevis shackles, Daystar D-ring isolators, and D-ring washers from Quadratec. The clevis shackles showed up, but the isolators and washers are backordered...

I got home from work and had my winch waiting for me.
My initial reaction is that this thing is beefy! and it looks great! I am really impressed at how well the winch was packaged. Everything was in great shape and completely undamaged.
Control Box
I didn't waste any time and got right to work getting it clocked so the clutch lever can be easily accessed through the cutouts in the Shrockworks. To clock the winch I started by removing the allen screws that secure the crossbars.
Once the crossbars are removed, the gearbox comes right off.
Then the 10 allen screws on the inside of the gearbox need to be removed.
At this point, the "feet support piece" can be removed from the gearbox.
Now there are two options for properly clocking the winch:
Option 1: You can remove the "feet support piece" from the gearbox, rotate it to the desired position, then simply place it back onto the gearbox. OR
Option 2: Rather than removing the "feet support piece" you can simply rotate it while keeping the actual gearbox stationary. This is the easiest way IMO.
Either way, once the "feet support piece" aligned with the gearbox (making sure that the gasket is also properly aligned) the 10 allen screws can be put back in place
Lastly, the crossbars are reattached with the two large allen screws. Done! Here is the final product:
Finally, I ordered some 3/4" Smittybilt clevis shackles, Daystar D-ring isolators, and D-ring washers from Quadratec. The clevis shackles showed up, but the isolators and washers are backordered...
Last edited by 4ever4running; Jan 15, 2013 at 12:30 PM.
Jan 15, 2013 | 12:25 PM
#206
Thread Starter
Registered User
iTrader: (1)
Joined: Aug 2009
Posts: 817
Likes: 2
From: Arlington, Virginia
January 9th � January 13th Update
January 9th
With all my accessories piling up and more on the horizon, I am quickly running out of space on the battery. So, I decided to install a Blue Sea fuse block to help organize all my wires and make sure that all of my accessories are properly fused. I ordered a Blue Sea 12 position positive and negative fuse block from OTRATTW. I didn�t order anything else because I wanted to figure exactly what I needed and where to mount it.
January 11th
I got the Blue Sea fuse block in the mail. I am always impressed how quickly OTRATTW ships their stuff!
Background
I found a guy on a different forum who used a sheet of Lexan to mount his fuse block. I really liked the idea so I decided to do something similar. For those of you who don�t know Lexan is a strong, heat resistant, and impact resistant polycarbonate plastic. I was able to find some at my local Home Depot. I bought an 8� X 10� sheet for about $4 and some hardware to mount everything. When I was thinking about how to mount the fuse block to the Lexan and how to mount the Laxan to the factory fuse box cover, one of the main issues that I was concerned about what having access to the factory fuse box. Read more below to see what I ended up doing.
January 12th - January 13th
I got to work mounting the fuse block. First I test fit and cut the Lexan sheet down to size. An added benefit of the Lexan is that even though it�s pretty strong, it is still really easy to cut. I marked off the area that I wanted to cut and used a level and a razor blade to repeatedly score the Lexan. After the Lexan is scored sufficiently the pieces break off with a little force.
Test fitting the trimmed Lexan over the factory fuse box.

I determined where I wanted the fuse block and drilled the mounting holes in the Lexan

I lined up the factory fuse cover and the Lexan and drilled the mounting holes in the factory fuse cover. The two large holes in the middle are where bolts for mounting the Blue Sea to the Lexan will sit.
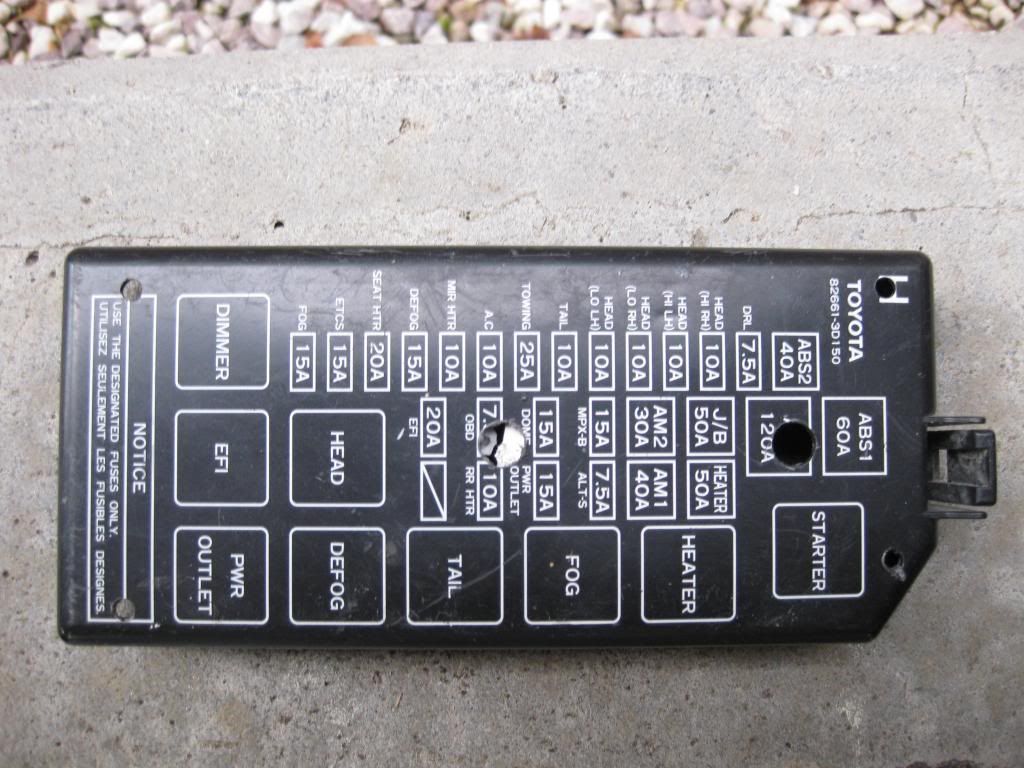
I used #8 hardware to secure everything. I used nylon lock nuts to secure the Blue Sea to the Lexan. To ensure that I have access to the factory fuse box when I need to, I used wing nuts to secure the Lexan sheet to the factory fuse box cover. That way I can simply remove the four wing nuts and pull the entire Lexan sheet off and move it out of the way.


Then I started wiring up my accessories.


Those of you with a keen eye will notice the random wires looped around the battery�I ran those in anticipation of my next accessory�
Lastly, I used my Microsoft Excel skills to create a label so I can tell which wires go to which accessory.

Can you sport the new accessory?
January 9th
With all my accessories piling up and more on the horizon, I am quickly running out of space on the battery. So, I decided to install a Blue Sea fuse block to help organize all my wires and make sure that all of my accessories are properly fused. I ordered a Blue Sea 12 position positive and negative fuse block from OTRATTW. I didn�t order anything else because I wanted to figure exactly what I needed and where to mount it.
January 11th
I got the Blue Sea fuse block in the mail. I am always impressed how quickly OTRATTW ships their stuff!
Background
I found a guy on a different forum who used a sheet of Lexan to mount his fuse block. I really liked the idea so I decided to do something similar. For those of you who don�t know Lexan is a strong, heat resistant, and impact resistant polycarbonate plastic. I was able to find some at my local Home Depot. I bought an 8� X 10� sheet for about $4 and some hardware to mount everything. When I was thinking about how to mount the fuse block to the Lexan and how to mount the Laxan to the factory fuse box cover, one of the main issues that I was concerned about what having access to the factory fuse box. Read more below to see what I ended up doing.
January 12th - January 13th
I got to work mounting the fuse block. First I test fit and cut the Lexan sheet down to size. An added benefit of the Lexan is that even though it�s pretty strong, it is still really easy to cut. I marked off the area that I wanted to cut and used a level and a razor blade to repeatedly score the Lexan. After the Lexan is scored sufficiently the pieces break off with a little force.
Test fitting the trimmed Lexan over the factory fuse box.
I determined where I wanted the fuse block and drilled the mounting holes in the Lexan
I lined up the factory fuse cover and the Lexan and drilled the mounting holes in the factory fuse cover. The two large holes in the middle are where bolts for mounting the Blue Sea to the Lexan will sit.
I used #8 hardware to secure everything. I used nylon lock nuts to secure the Blue Sea to the Lexan. To ensure that I have access to the factory fuse box when I need to, I used wing nuts to secure the Lexan sheet to the factory fuse box cover. That way I can simply remove the four wing nuts and pull the entire Lexan sheet off and move it out of the way.
Then I started wiring up my accessories.
Those of you with a keen eye will notice the random wires looped around the battery�I ran those in anticipation of my next accessory�
Lastly, I used my Microsoft Excel skills to create a label so I can tell which wires go to which accessory.
Can you sport the new accessory?
Last edited by 4ever4running; Jan 15, 2013 at 12:29 PM.
Jan 15, 2013 | 12:27 PM
#207
Thread Starter
Registered User
iTrader: (1)
Joined: Aug 2009
Posts: 817
Likes: 2
From: Arlington, Virginia
December 12th - December 13th Update Continued
While I was under the hood, I started looking for a place to mount the control box for the Engo. There are a couple different possibilities for mounting locations but I wanted to mount it in the engine bay where it will be safe from water, debris, and damage. I think I found the perfect spot.


As an added bonus, I was able to reuse the factory mounting brackets and yes I am still able to close the hood without hitting the control box.

There are a few downsides about mounting the control box in this location but I think I can work around them.
1) Since the control box is designed to be mounted on top of the winch, the connection wires are waaay too short to reach the winch. This is a pretty easy fix since I can either extend the existing wires or just rewire the control box.
2) With the control box mounted in this location, I won't really have access to the winch remote plug and even if I do, I will have to open the hood and/or run the cord across the hood when winching. To fix this I am considering 2 options. The first option is to order a universal wireless winch remote and just control the winch wirelessly. The second option involves extending the winch remote plug to mount on the Shrockworks. I contacted Joel at Engo and asked him if they make a winch remote extension cord and currently they don't but he did say they are in the process of producing them and they should be available soon. I think for now I am going to go with the first option and just control the winch wirelessly. I figure that I can always add the extension cable later if I want to.
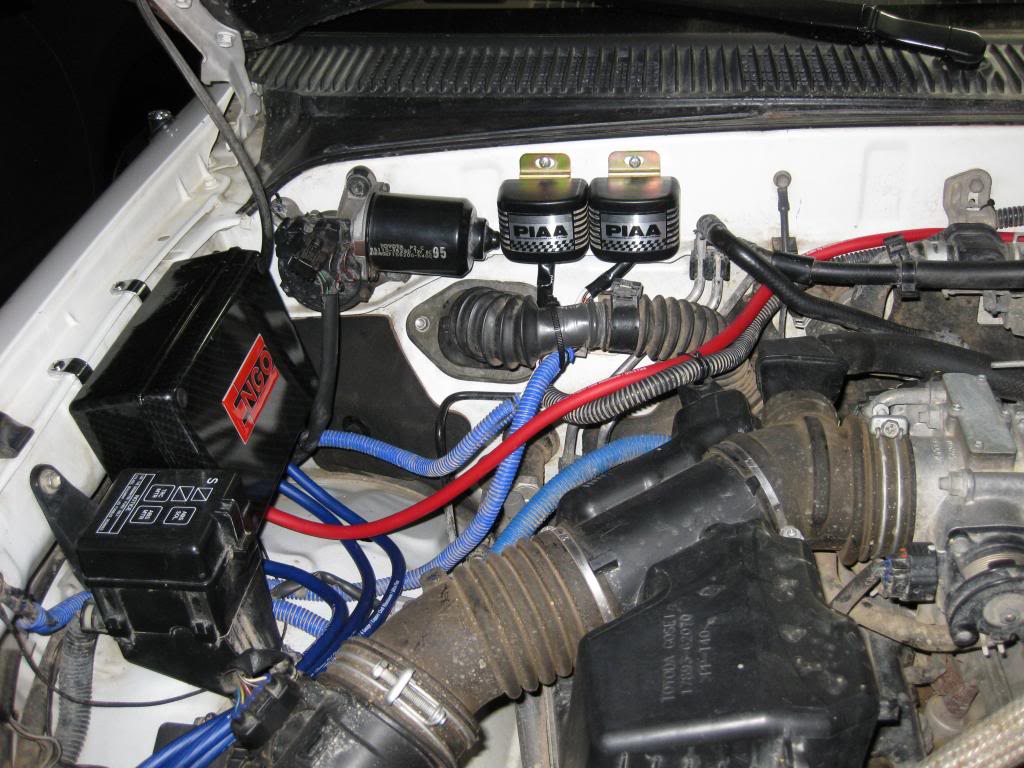
3) I had to move the 2 PIAA relays for the roof lights. No big deal because I was able to find enough room to mount the relays on the firewall in the same general area.

While I was under the hood, I started looking for a place to mount the control box for the Engo. There are a couple different possibilities for mounting locations but I wanted to mount it in the engine bay where it will be safe from water, debris, and damage. I think I found the perfect spot.
As an added bonus, I was able to reuse the factory mounting brackets and yes I am still able to close the hood without hitting the control box.
There are a few downsides about mounting the control box in this location but I think I can work around them.
1) Since the control box is designed to be mounted on top of the winch, the connection wires are waaay too short to reach the winch. This is a pretty easy fix since I can either extend the existing wires or just rewire the control box.
2) With the control box mounted in this location, I won't really have access to the winch remote plug and even if I do, I will have to open the hood and/or run the cord across the hood when winching. To fix this I am considering 2 options. The first option is to order a universal wireless winch remote and just control the winch wirelessly. The second option involves extending the winch remote plug to mount on the Shrockworks. I contacted Joel at Engo and asked him if they make a winch remote extension cord and currently they don't but he did say they are in the process of producing them and they should be available soon. I think for now I am going to go with the first option and just control the winch wirelessly. I figure that I can always add the extension cable later if I want to.
3) I had to move the 2 PIAA relays for the roof lights. No big deal because I was able to find enough room to mount the relays on the firewall in the same general area.
Jan 22, 2013 | 05:53 AM
#208
Thread Starter
Registered User
iTrader: (1)
Joined: Aug 2009
Posts: 817
Likes: 2
From: Arlington, Virginia
January 20th Update
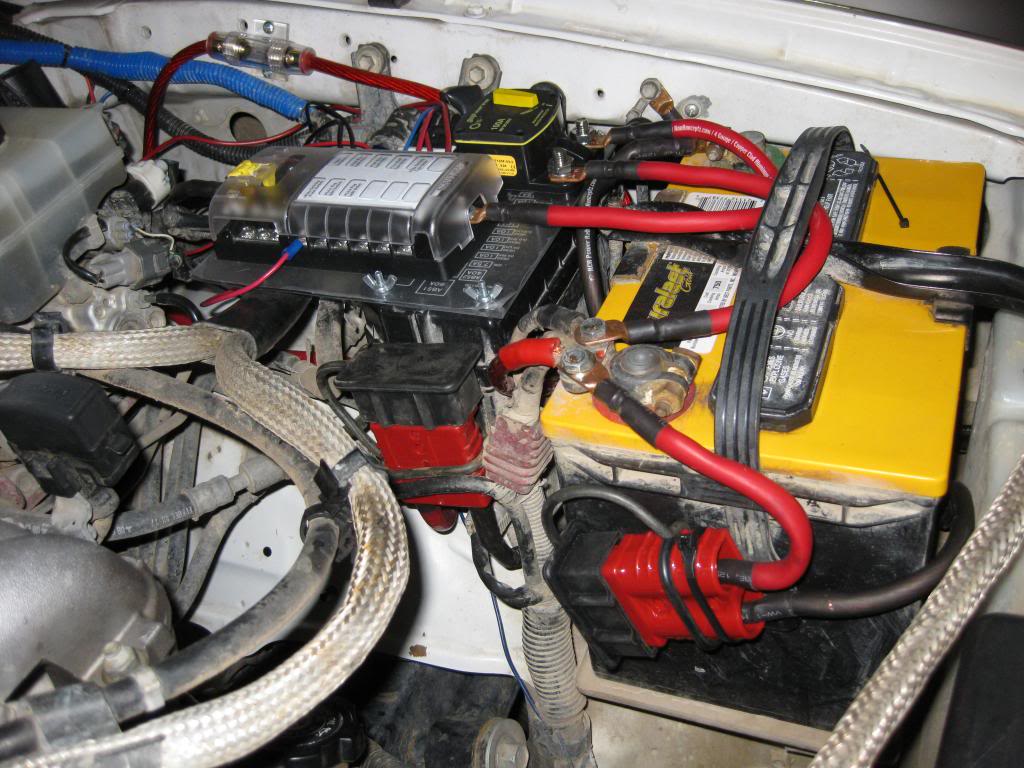
I was able to finish installing my Blue Sea fuse block and I am really happy with how it came out and everything works perfectly! Here is the final product:
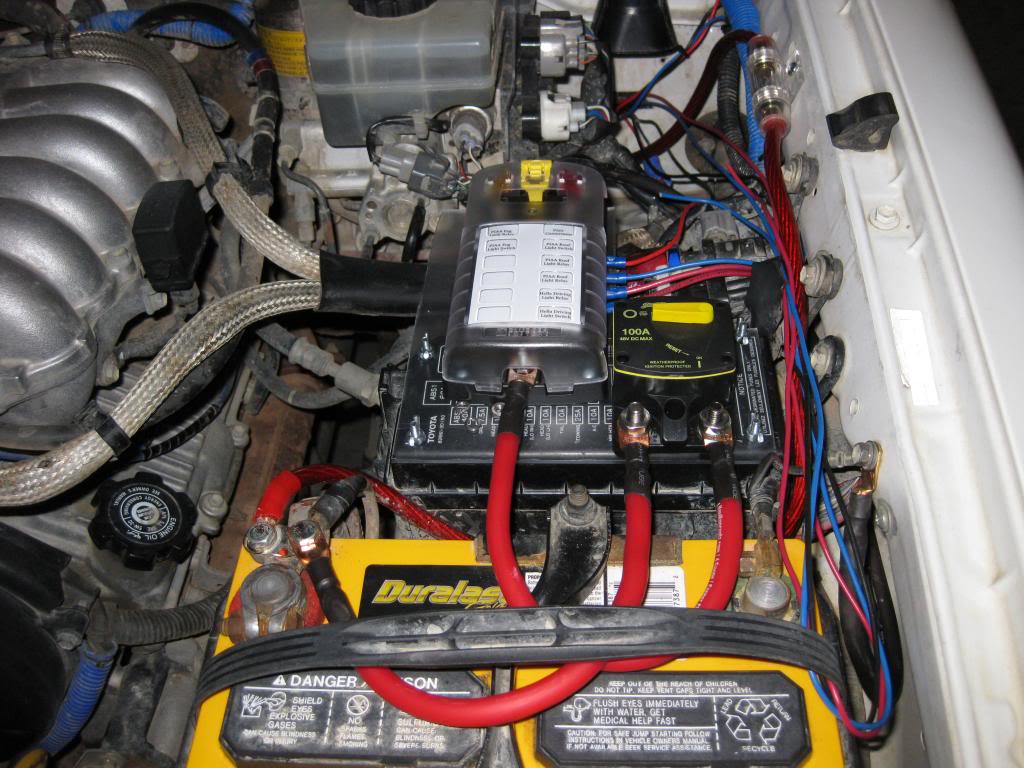
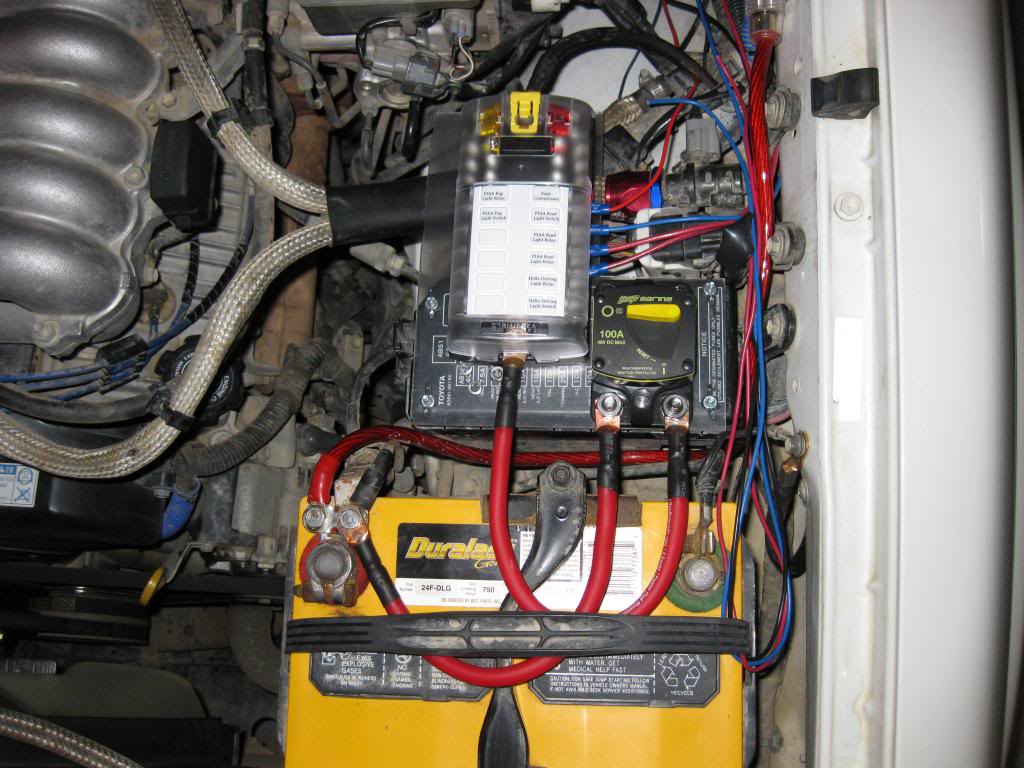
The hardest part of the project was making the 4 gauge power wires and ground wire that connect the battery to the fuse block. For anyone doing this in the future, here is the method that I used.
1) Measure and cut the wire to the proper length.
2) Strip the power wire so there is enough room for the wire to fit into the terminal and still have about 1/8" of wire visible.
3) Use a small blow torch to heat the terminal.
4) Once the terminal gets hot enough feed solder into the terminal.
5) Continue to feed solder until it starts coming out the top of the terminal.
6) Let the wire and terminal cool for a couple minutes.
7) Finish the wire and terminal connection with some heat shrink tubing to cover the exposed wire.
Here is a list of the main parts I used and where you can find them:
1 - 12 Circuit Blue Sea fuse block (OTRATTW)
1 - Stinger 100 AMP circuit breaker ( )
2 ft KnuKonceptz 4 gauge wire - red (power wire) ( )
3 ft KnuKonceptz 4 gauge wire - black (ground wire) ( )
6 - Pico 4 gauge eye terminals ( )
I was able to finish installing my Blue Sea fuse block and I am really happy with how it came out and everything works perfectly! Here is the final product:
The hardest part of the project was making the 4 gauge power wires and ground wire that connect the battery to the fuse block. For anyone doing this in the future, here is the method that I used.
1) Measure and cut the wire to the proper length.
2) Strip the power wire so there is enough room for the wire to fit into the terminal and still have about 1/8" of wire visible.
3) Use a small blow torch to heat the terminal.
4) Once the terminal gets hot enough feed solder into the terminal.
5) Continue to feed solder until it starts coming out the top of the terminal.
6) Let the wire and terminal cool for a couple minutes.
7) Finish the wire and terminal connection with some heat shrink tubing to cover the exposed wire.
Here is a list of the main parts I used and where you can find them:
1 - 12 Circuit Blue Sea fuse block (OTRATTW)
1 - Stinger 100 AMP circuit breaker ( )
2 ft KnuKonceptz 4 gauge wire - red (power wire) ( )
3 ft KnuKonceptz 4 gauge wire - black (ground wire) ( )
6 - Pico 4 gauge eye terminals ( )
Jan 22, 2013 | 06:17 AM
#210


very nice. thanks for the links, too. i have a new source for wiring now
pro-tip: all of your exposed-metal connections (terminal studs, etc) can be coated in dielectric grease to prevent corrosion. to do it thoroughly, take all the connections off, coat the studs with dielectric grease, then reconnect everything. it's worked on my truck for over a year, and all my connections still look new.
pro-tip: all of your exposed-metal connections (terminal studs, etc) can be coated in dielectric grease to prevent corrosion. to do it thoroughly, take all the connections off, coat the studs with dielectric grease, then reconnect everything. it's worked on my truck for over a year, and all my connections still look new.
Jan 22, 2013 | 10:31 AM
#211
Thread Starter
Registered User
iTrader: (1)
Joined: Aug 2009
Posts: 817
Likes: 2
From: Arlington, Virginia
very nice. thanks for the links, too. i have a new source for wiring now
pro-tip: all of your exposed-metal connections (terminal studs, etc) can be coated in dielectric grease to prevent corrosion. to do it thoroughly, take all the connections off, coat the studs with dielectric grease, then reconnect everything. it's worked on my truck for over a year, and all my connections still look new.
pro-tip: all of your exposed-metal connections (terminal studs, etc) can be coated in dielectric grease to prevent corrosion. to do it thoroughly, take all the connections off, coat the studs with dielectric grease, then reconnect everything. it's worked on my truck for over a year, and all my connections still look new.
That's a really good idea. Looks like I'm going to have to pick up some dielectric grease next time I'm at the auto parts store. Thanks!
 Jan 28, 2013 | 06:04 PM
#213
Thread Starter
Registered User
iTrader: (1)
Joined: Aug 2009
Posts: 817
Likes: 2
From: Arlington, Virginia
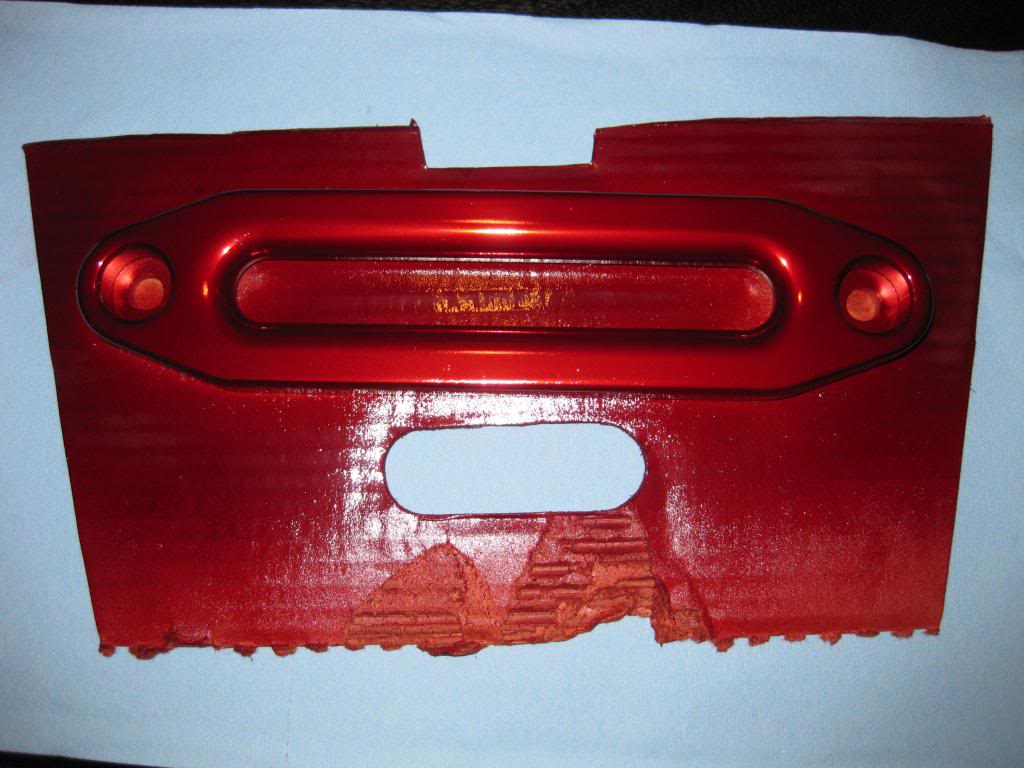
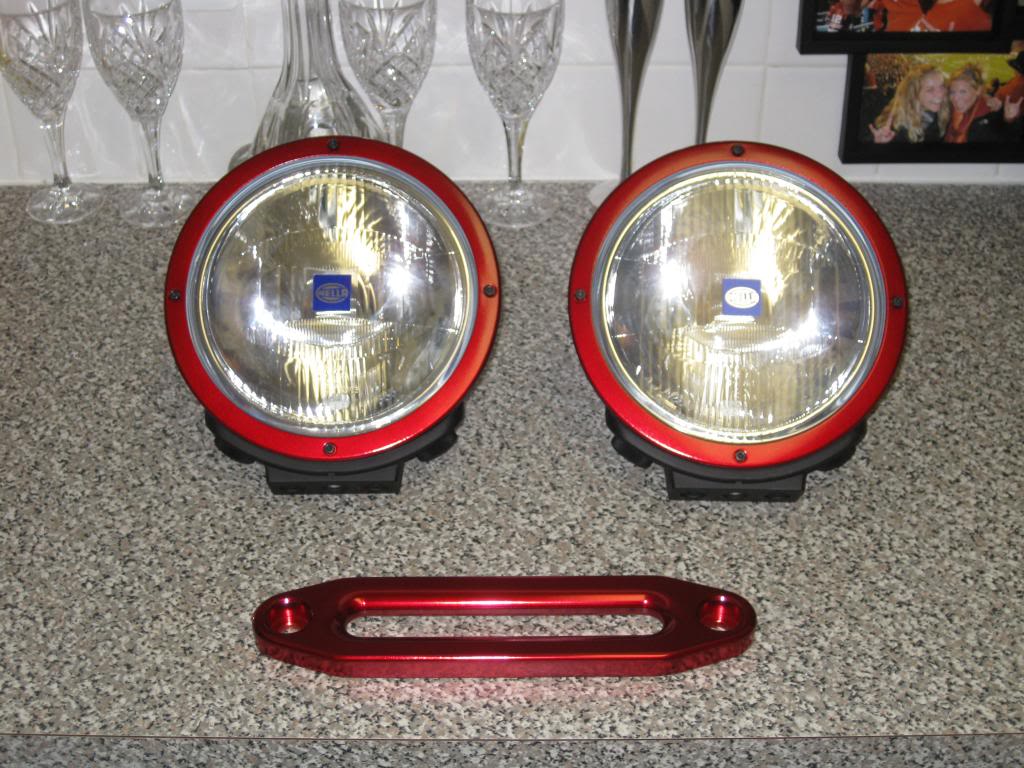
I decided to paint my winch fairlead with Duplicolor Metalcast. I went with red to keep with the white, black, and red scheme I have going.
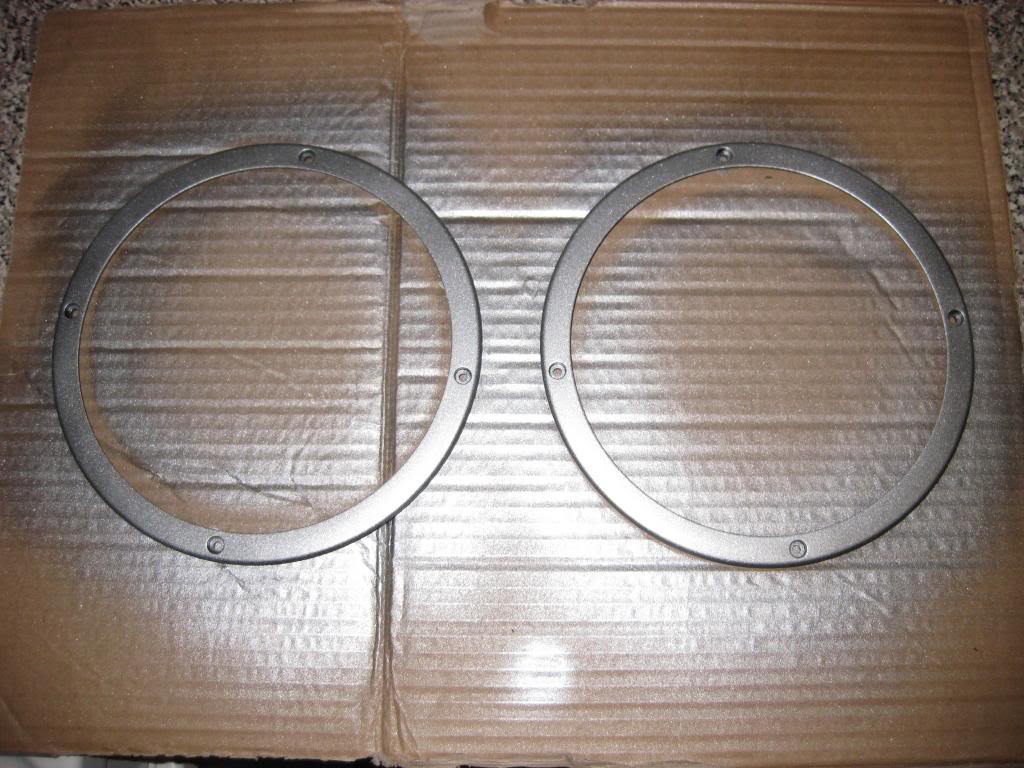
I also painted the rings around the Hella's to match the fairlead. Since the rings weren't chrome or other reflective surface, I had to use Duplicolor's Metalcast Ground Coat first.

Even though I used the same paint, the fairlead and light rings are slightly different shades, I don't think there is anything I can do about it though. (For some reason my camera makes the shades look a lot different that it actually is)
I also painted the rings around the Hella's to match the fairlead. Since the rings weren't chrome or other reflective surface, I had to use Duplicolor's Metalcast Ground Coat first.
Even though I used the same paint, the fairlead and light rings are slightly different shades, I don't think there is anything I can do about it though. (For some reason my camera makes the shades look a lot different that it actually is)
Jan 29, 2013 | 04:27 AM
#214
wow! that red will look great! i have to admit, i'm trying to find things i can paint with that stuff on my truck now, haha.
you've gotten so much done on this page alone. can't wait to see what's coming next.
you've gotten so much done on this page alone. can't wait to see what's coming next.
Jan 30, 2013 | 09:55 AM
#215
Thread Starter
Registered User
iTrader: (1)
Joined: Aug 2009
Posts: 817
Likes: 2
From: Arlington, Virginia

Yeah for now I'm just waiting on my SW bumper. Once it comes, I'll have to get the frame mounts cut off and have the new ones welded on, then I can install the actual bumper, winch, and lights myself (with the help of a friend). Other than that, I need to do my timing belt so that will probably be next on the list.
Feb 5, 2013 | 09:54 AM
#218
Thread Starter
Registered User
iTrader: (1)
Joined: Aug 2009
Posts: 817
Likes: 2
From: Arlington, Virginia
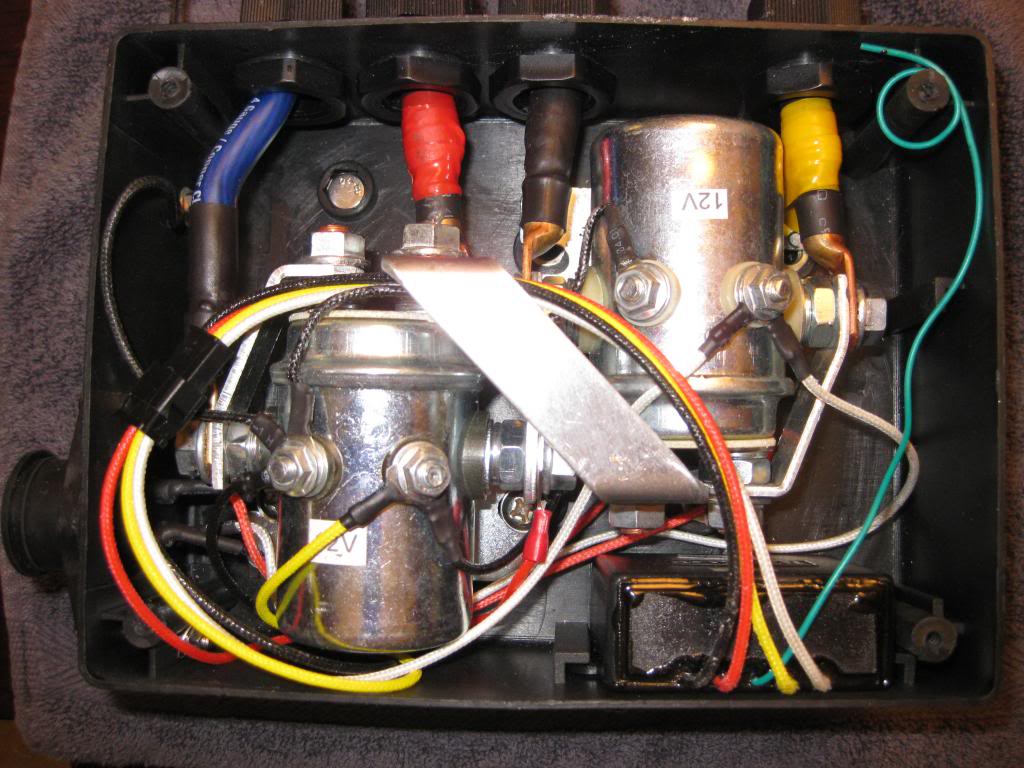
Small update: I got my winch control box re-wired with 6' - 4 gauge wires. Now they should have no problem reaching the winch motor and battery termial.

The 3 blue wires connect to the winch motor and the red wire connects to the positive terminal of the battery.

The 3 blue wires connect to the winch motor and the red wire connects to the positive terminal of the battery.
Feb 20, 2013 | 05:57 PM
#219
Thread Starter
Registered User
iTrader: (1)
Joined: Aug 2009
Posts: 817
Likes: 2
From: Arlington, Virginia
Another small update: In order to solve the lack of access to the winch remote plug problem, I ordered and installed a Tuff Stuff universal wireless winch controller (
). The wireless control box fits perfectly in the winch control box and wiring it up was super easy.
Everything included in the package:

Installed:
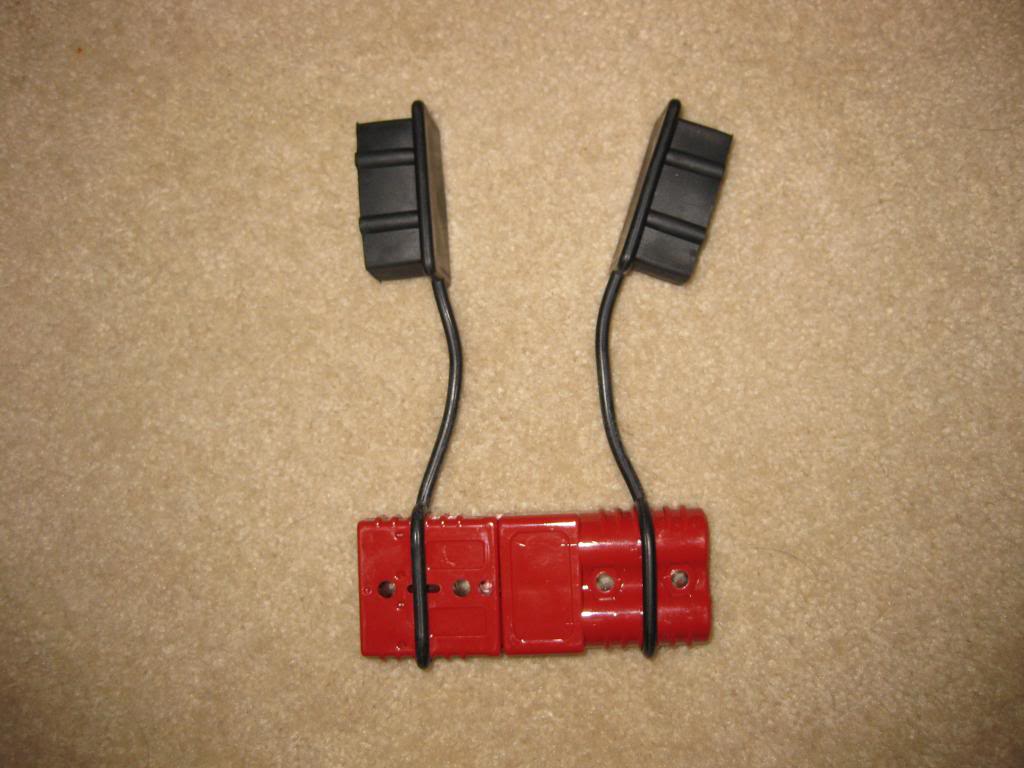
I also ordered a winch quick connector ( ). so I can disconnect the winch from the battery when its not in use

Everything included in the package:
Installed:
I also ordered a winch quick connector ( ). so I can disconnect the winch from the battery when its not in use
Mar 4, 2013 | 11:01 AM
#220
Thread Starter
Registered User
iTrader: (1)
Joined: Aug 2009
Posts: 817
Likes: 2
From: Arlington, Virginia
This weekend I had some time to continue prepping for my SW. Speaking of which, I talked to Mark at SW and my bumper is currently in the production process and should be here in less than 2 weeks! 
I mounted the winch control box, ran the wires, and installed the winch quick disconnect plug.
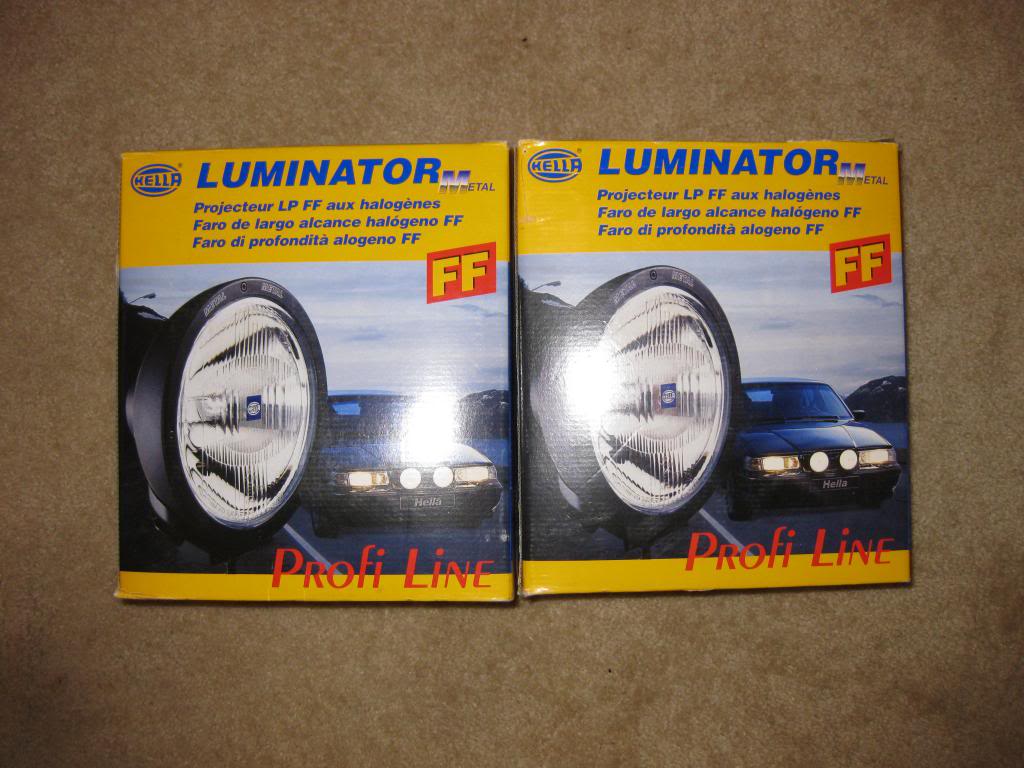
I mounted the relay for my Hella Rallye 4000s.

and I removed the factory bumper. I zip tied on my license plate and turn signal lights just so I am legal until I get the SW installed. (Sorry for the crappy pic, I got a late start so it was dark outside by the time I finished).

I mounted the winch control box, ran the wires, and installed the winch quick disconnect plug.
I mounted the relay for my Hella Rallye 4000s.
and I removed the factory bumper. I zip tied on my license plate and turn signal lights just so I am legal until I get the SW installed. (Sorry for the crappy pic, I got a late start so it was dark outside by the time I finished).
Last edited by 4ever4running; Mar 4, 2013 at 11:03 AM.


