
Swapped Intake and Battery - Done
 Oct 15, 2004 | 06:47 PM
#1
Thread Starter
Registered User
Joined: Jun 2004
Posts: 495
Likes: 0
From: Fayetteville, NC
Swapped Intake and Battery - Done
Here are some pictures of the swapped intake and battery. I had a CAI but changed it to this because I was afraid of water damage.
(Pictures removed from server.)
(Pictures removed from server.)
Last edited by YotaTruck1986; Dec 7, 2004 at 12:58 PM.
Oct 15, 2004 | 07:04 PM
#2
Contributing Member
Joined: Oct 2004
Posts: 1,078
Likes: 0
From: Bellingham, Washington and Ketchikan, Alaska
SICK!!!!!!!!
How did you get the wiring done. I was thinking about doing that to my 22re, but I was to scared to mess with the MAF wiring harness, and battery cables. Howd u do it?
How did you get the wiring done. I was thinking about doing that to my 22re, but I was to scared to mess with the MAF wiring harness, and battery cables. Howd u do it?
Oct 15, 2004 | 07:05 PM
#3
Registered User
Joined: Aug 2004
Posts: 447
Likes: 0
From: HELL,AKA Phoenix,Arizona
Very COOL!! 
How did you get the MAF wiring to reach to that side and how was it running the battery wiring to that side???
Ive thought of doing the same thing.Anything for a bit more HP!!
How did you get the MAF wiring to reach to that side and how was it running the battery wiring to that side???
Ive thought of doing the same thing.Anything for a bit more HP!!
Oct 15, 2004 | 07:29 PM
#4
Thread Starter
Registered User
Joined: Jun 2004
Posts: 495
Likes: 0
From: Fayetteville, NC
To lengthen the MAF cable I... Removed the plastic cable covering from the cable, cut all 7 wires, stuck in about 4 feet of wire, wrapped it all up, and plugged it back in to the MAF. There was no signal degration and no problem with the MAF, the truck started right up, no problems so far. I also covered the cable with a plastic cable cover to try and protect the wires since it runs right across the radiator. I lengthened the battery cable by... purchasing two 4 gauge 60 inch negative battery cables and connecting them to the old ones with some bolts. (Really easy to do, no wire cutting required.) To mount the battery on the other side all I had to do was... remove all stock intake crap first, then place a 1 inch board under where the battery is going to go (the same width and length of the battery, like the stock plastic tray that sits under it.) place the battery in place, and bolt the "battery holster" thing on. Your going to need to drill into the wheel well cover so you can hook the long metal bolt thing on that is part of the "battery holster."
It's really an easy process, you just have to be brave and cut the MAF wires. As long as you dont mix up any of the wires, youll be fine. I made my 4 foot cable first and labled all 7 wires as so to keep track of them all. Then one by one I cut the MAF wires and connected the long cable to it.
If you have anymore qestions, be sure to ask. I'm really tired right now so my directions may be somewhat poor. I'll probably post more detailed instructions later.
Oct 15, 2004 | 07:32 PM
#5
Registered User
Joined: Aug 2004
Posts: 447
Likes: 0
From: HELL,AKA Phoenix,Arizona
Originally Posted by YotaTruck1986
To lengthen the MAF cable I... Removed the plastic cable covering from the cable, cut all 7 wires, stuck in about 4 feet of wire, wrapped it all up, and plugged it back in to the MAF. There was no signal degration and no problem with the MAF, the truck started right up, no problems so far. I also covered the cable with a plastic cable cover to try and protect the wires since it runs right across the radiator. I lengthened the battery cable by... purchasing two 4 gauge 60 inch negative battery cables and connecting them to the old ones with some bolts. (Really easy to do, no wire cutting required.) To mount the battery on the other side all I had to do was... remove all stock intake crap first, then place a 1 inch board under where the battery is going to go (the same width and length of the battery, like the stock plastic tray that sits under it.) place the battery in place, and bolt the "battery holster" thing on. Your going to need to drill into the wheel well cover so you can hook the long metal bolt thing on that is part of the "battery holster."
It's really an easy process, you just have to be brave and cut the MAF wires. As long as you dont mix up any of the wires, youll be fine. I made my 4 foot cable first and labled all 7 wires as so to keep track of them all. Then one by one I cut the MAF wires and connected the long cable to it.
If you have anymore qestions, be sure to ask. I'm really tired right now so my directions may be somewhat poor. I'll probably post more detailed instructions later.
It's really an easy process, you just have to be brave and cut the MAF wires. As long as you dont mix up any of the wires, youll be fine. I made my 4 foot cable first and labled all 7 wires as so to keep track of them all. Then one by one I cut the MAF wires and connected the long cable to it.
If you have anymore qestions, be sure to ask. I'm really tired right now so my directions may be somewhat poor. I'll probably post more detailed instructions later.
 Oct 30, 2004 | 06:19 AM
#7

I did this many years ago. I used a multi-conductor wire (microphone wire perhaps) and a pair of 9-pin Molex connectors when I did mine:
http://www.4crawler.com/4x4/CheapTri...shtml#Phase-II
I made it so I could eliminate the extra wire and revert to stock if needed. Made a handy way to test the system, too before making the jump.
You may probably find that corrugated flex hose does not hold up with time, mine would last about 1 year then crack and leak air, causing the engine not to run. I finally replaced mine with a much better setup:
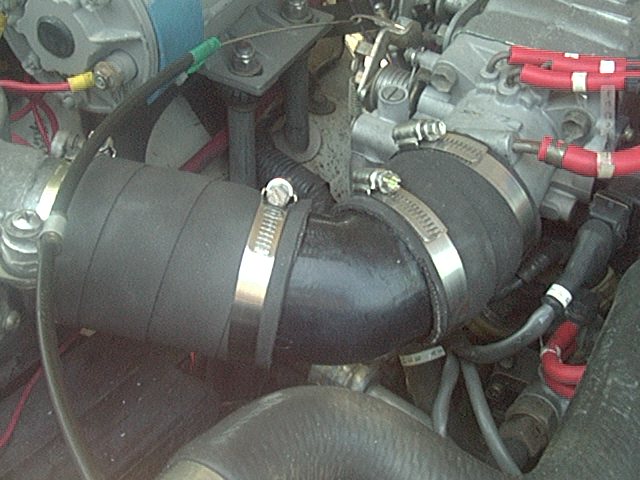
The smoother insides of this setup flows air a whole lot better, it made a real seat-of-the-pants improvment in throttle response and acceleration.
http://www.4crawler.com/4x4/CheapTri...shtml#Phase-II
I made it so I could eliminate the extra wire and revert to stock if needed. Made a handy way to test the system, too before making the jump.
You may probably find that corrugated flex hose does not hold up with time, mine would last about 1 year then crack and leak air, causing the engine not to run. I finally replaced mine with a much better setup:
The smoother insides of this setup flows air a whole lot better, it made a real seat-of-the-pants improvment in throttle response and acceleration.
Last edited by 4Crawler; Oct 30, 2004 at 06:24 AM.
Trending Topics
Oct 30, 2004 | 07:11 AM
#8
Thread Starter
Registered User
Joined: Jun 2004
Posts: 495
Likes: 0
From: Fayetteville, NC
Originally Posted by 4Crawler
I did this many years ago. I used a multi-conductor wire (microphone wire perhaps) and a pair of 9-pin Molex connectors when I did mine:
http://www.4crawler.com/4x4/CheapTri...shtml#Phase-II
I made it so I could eliminate the extra wire and revert to stock if needed. Made a handy way to test the system, too before making the jump.
You may probably find that corrugated flex hose does not hold up with time, mine would last about 1 year then crack and leak air, causing the engine not to run. I finally replaced mine with a much better setup:
The smoother insides of this setup flows air a whole lot better, it made a real seat-of-the-pants improvment in throttle response and acceleration.
Last edited by YotaTruck1986; Oct 30, 2004 at 07:12 AM.
Dec 7, 2004 | 12:57 PM
#10
Thread Starter
Registered User
Joined: Jun 2004
Posts: 495
Likes: 0
From: Fayetteville, NC
Originally Posted by 4Crawler
I did this many years ago. I used a multi-conductor wire (microphone wire perhaps) and a pair of 9-pin Molex connectors when I did mine:
http://www.4crawler.com/4x4/CheapTri...shtml#Phase-II
I made it so I could eliminate the extra wire and revert to stock if needed. Made a handy way to test the system, too before making the jump.
You may probably find that corrugated flex hose does not hold up with time, mine would last about 1 year then crack and leak air, causing the engine not to run. I finally replaced mine with a much better setup:
The smoother insides of this setup flows air a whole lot better, it made a real seat-of-the-pants improvment in throttle response and acceleration.
http://www.4crawler.com/4x4/CheapTri...shtml#Phase-II
I made it so I could eliminate the extra wire and revert to stock if needed. Made a handy way to test the system, too before making the jump.
You may probably find that corrugated flex hose does not hold up with time, mine would last about 1 year then crack and leak air, causing the engine not to run. I finally replaced mine with a much better setup:
The smoother insides of this setup flows air a whole lot better, it made a real seat-of-the-pants improvment in throttle response and acceleration.
Dec 7, 2004 | 03:06 PM
#12
Thread Starter
Registered User
Joined: Jun 2004
Posts: 495
Likes: 0
From: Fayetteville, NC
Originally Posted by 4Crawler
I think its 2-1/2" PVC, 45 elbow with some trimming to fit. Actual OD is about 2-3/4", same as the TB inlet.
Dec 7, 2004 | 04:20 PM
#15
Originally Posted by YotaTruck1986
Thanks. I'm planning on fabbing my own intake pipe like yours instead of using the stock pipe.
Dec 7, 2004 | 04:26 PM
#16
Thread Starter
Registered User
Joined: Jun 2004
Posts: 495
Likes: 0
From: Fayetteville, NC
Originally Posted by 4Crawler
If you have trouble finding the parts, I can supply the elbow, rubber hose, and/or band clamps as needed to make your own.
Dec 7, 2004 | 06:13 PM
#20
Thread Starter
Registered User
Joined: Jun 2004
Posts: 495
Likes: 0
From: Fayetteville, NC
Originally Posted by cacattack
i cut up old bicycle innertubes to use to wrap the ends of mine,
ghetto it may be
but it works fine for me
ghetto it may be
but it works fine for me


