
Searched the tech section: Suspension
 Mar 18, 2005 | 11:26 AM
#1
Thread Starter
Registered User
Joined: Dec 2004
Posts: 168
Likes: 0
From: Santa Clara, CA
Searched the tech section: Suspension (updated w/ pics)
Well, my OME stuff arrived today! YIP YIP YIP
I'm going to install this stuff on Sunday. I know I need to rent a spring comressor.
Anything else I'm gonna need? It's IFS with rear coil spring.
I'm going to install this stuff on Sunday. I know I need to rent a spring comressor.
Anything else I'm gonna need? It's IFS with rear coil spring.
Last edited by Vtec_Killer; Mar 21, 2005 at 08:58 AM. Reason: Updated
Mar 18, 2005 | 11:54 AM
#2

Registered User
Joined: Mar 2004
Posts: 224
Likes: 2
From: North Texas
I just did my Downey 1.5 HD springs last weekend and everything went smooth. Took me about 3.5 hours working solo. I didnt even need a spring compressor but I guess you might if your OME springs are really long. The Downey 1.5 HD springs went in no problem since they were the same length as the stock ones (just a bit firmer than stock, hence the 1.5" lift)
Bike4miles trick of using a bottle jack to lower one side of the axle really helped with removing the stock springs and getting the new Downey's in place with out the aid of a helper. Here is a link to his posts showing what he did: https://www.yotatech.com/forums/f2/if-you-plan-installing-downy-1-5-coils-2nd-gen-read-42784/
Other than that just make sure you have all the proper tools you need and a brake bleeding method. I used PB Blast on all the bolts for several days ahead of time and that helped make things go faster as well. I also used a big pair of channel locks on the old shocks (it will ruin them but I was replacing them anyways) to hold the body still while removing the upper nuts. I found that a ratcheting box end wrench was about as good as it gets when trying to remove the upper nuts from the shocks - its a tight fit up there!
Good luck! Be sure to take before and after pics along with measuring each corner from the top of the rim to the bottom of the fender well (on level ground of course).
Last edited by ROMAD; Mar 18, 2005 at 11:56 AM.
Mar 18, 2005 | 11:58 AM
#3
Thread Starter
Registered User
Joined: Dec 2004
Posts: 168
Likes: 0
From: Santa Clara, CA
Sweet! Thanks for the link. I'll take pics 
One thing about the brakes....I called the company that sold me the OME kit. They told me I wouldn't need new brake lines. True or False?
One thing about the brakes....I called the company that sold me the OME kit. They told me I wouldn't need new brake lines. True or False?
Mar 18, 2005 | 12:01 PM
#4
Registered User
Joined: Mar 2004
Posts: 224
Likes: 2
From: North Texas
I dont know about the OME springs but with the Downey 1.5 kit they give you a extended brake line plus brackets for a few things. I have heard that you can get away without the brake line extension if you keep the stock shocks (which limit overall travel) but otherwise you need to lengthen it.
How much taller are your OME springs over stock?
How much taller are your OME springs over stock?
Last edited by ROMAD; Mar 18, 2005 at 12:02 PM.
Mar 18, 2005 | 03:05 PM
#6
Contributing Member
Joined: Jun 2002
Posts: 7,454
Likes: 10
From: Eastern NC
Originally Posted by Vtec_Killer
Sweet! Thanks for the link. I'll take pics
One thing about the brakes....I called the company that sold me the OME kit. They told me I wouldn't need new brake lines. True or False?
One thing about the brakes....I called the company that sold me the OME kit. They told me I wouldn't need new brake lines. True or False?
 Mar 18, 2005 | 03:23 PM
#7
Contributing Member
Joined: Jun 2003
Posts: 1,067
Likes: 0
From: Bethlehem, GA
http://www.drawhorn.org/rear_ome_install_writeup.htm
http://www.drawhorn.org/front_ome_install_writeup.htm
Everything you need to know...
http://www.drawhorn.org/front_ome_install_writeup.htm
Everything you need to know...
Trending Topics
Mar 18, 2005 | 03:39 PM
#8
Registered User
Joined: Apr 2003
Posts: 495
Likes: 2
From: Woodinville, WA
I installed mine front and back with a spring compressor I rented from schucks. only thing I had wished I had that I didn't was a table vise to hold the front struts while I was compressing them. The bottle jack trick works great..
Mar 18, 2005 | 08:02 PM
#9
Thread Starter
Registered User
Joined: Dec 2004
Posts: 168
Likes: 0
From: Santa Clara, CA
Great instructions! Thanks!
Looks like my bud and I are gonna tackle this tomorrow!
My sister is taking her camera with her...so um...I guess I'll only have before and after pics. No installation pics. I'll post them on Monday!
Thanks again
Looks like my bud and I are gonna tackle this tomorrow!
My sister is taking her camera with her...so um...I guess I'll only have before and after pics. No installation pics. I'll post them on Monday!
Thanks again
Mar 19, 2005 | 10:54 PM
#10
Thread Starter
Registered User
Joined: Dec 2004
Posts: 168
Likes: 0
From: Santa Clara, CA
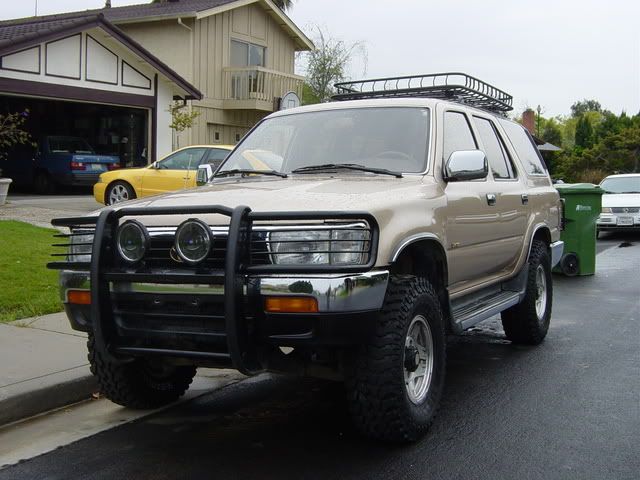
Great! I used the drawhorn.com instructions to complete the installation. Let me say that those instructions are very precise and help A LOT!
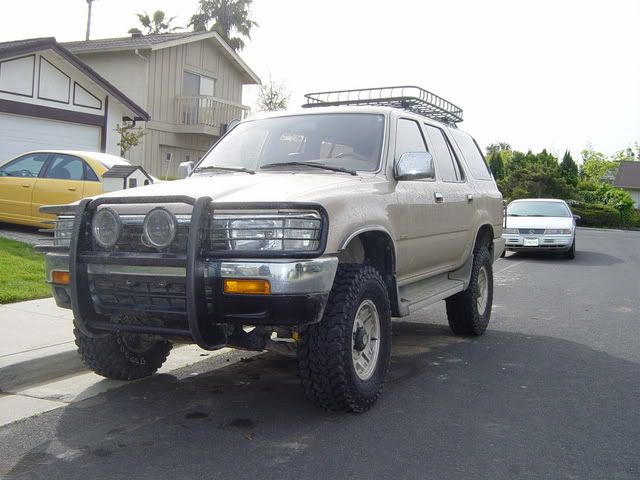
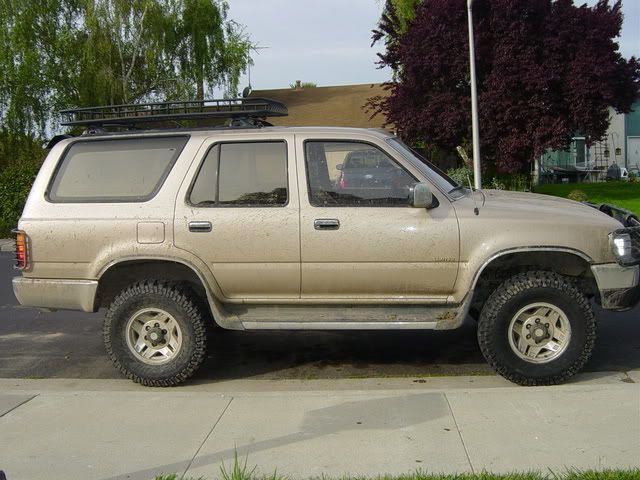
I'll take pics of her on Sunday Afternoon...the lift is awesome. I torque'd the torsion bar by 5 revolutions...she looks really good with the OME components. The ride not too harsh...even for the heavy duty springs. Nose dive during braking is virtually eliminated.
As per the distributor's comments...a new brake line was NOT needed.
...will post the pics Sunday evening...


 Mar 21, 2005 | 09:05 AM
#15
Thread Starter
Registered User
Joined: Dec 2004
Posts: 168
Likes: 0
From: Santa Clara, CA
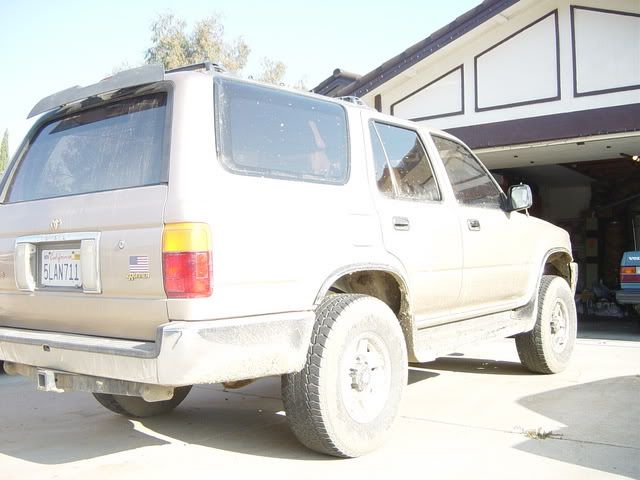
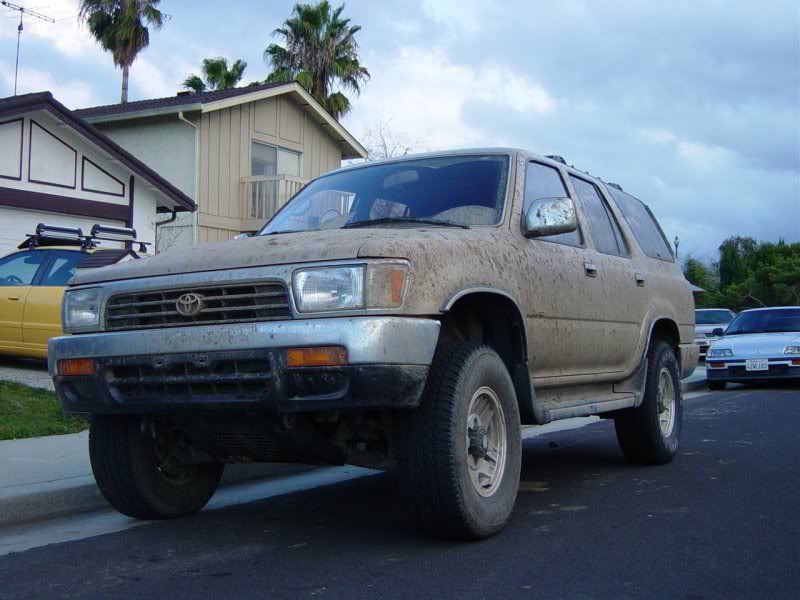
Thanks! Totally going to enjoy it. I took it to a small offroad park near here to get here all muddy, but I guess it hasn't rained in a while and A LOT of the mud dried up. 
I'm still running 31x10.5x15. Those are the Firestone Destination M/T
I ordered through Rocky Road outfitters.
I'm still running 31x10.5x15. Those are the Firestone Destination M/T
I ordered through Rocky Road outfitters.

Thread
Thread Starter
Forum
Replies
Last Post
Yotadawgjr
95.5-2004 Tacomas & 96-2002 4Runners
10
Aug 23, 2015 10:51 AM
landrunner
86-95 Trucks & 4Runners
17
Aug 5, 2015 09:18 PM
kirkrunner
86-95 Trucks & 4Runners
2
Jul 27, 2015 07:59 PM
Vargntucson
95.5-2004 Tacomas & 96-2002 4Runners
0
Jul 4, 2015 12:15 PM


