
Recoloring interior of 3rd gen 4runner...PICS included
 Mar 31, 2006 | 09:22 PM
#43
Thread Starter
Registered User
Joined: Oct 2003
Posts: 461
Likes: 0
From: Austin / Houston TX
Originally Posted by DavidA
Dang...while you have the dash out you ought to replace the dash bulbs with your favorite color bulbs. Nice job on the painting.


A few shots of the LEDs. It looks much better in person. Anyway hopefully i get somewhere with this stuff tonight.
Mar 31, 2006 | 10:27 PM
#44

Registered User
Joined: Jan 2006
Posts: 29
Likes: 0
nice. i only have one LED on my climate control. but i put 2 LEDs on my gauges which the needles are hyper white. but i have a white face gauge over the stock ones which i still like. but i like how you color your interior black. i plan to do it also. maybe a short DIY of how to remove the whole dash? =)

 Apr 1, 2006 | 09:27 PM
#47
Thread Starter
Registered User
Joined: Oct 2003
Posts: 461
Likes: 0
From: Austin / Houston TX
Yeah I have to do it section by section. I'm in grad school right now so its hard to find time to do all of this. I just wanted to get the dash back in right now so I could drive it around safely. I'm doing the console and dash pieces right now in gunmetal gray so I can reinstall those. This will prolly be one of those multi-month projects. It'll end with the seats being reupholstered.
Apr 1, 2006 | 10:10 PM
#48
Contributing Member
Joined: Jun 2005
Posts: 1,725
Likes: 0
From: San Jose, CA
Originally Posted by tv4184
Yeah I have to do it section by section. I'm in grad school right now so its hard to find time to do all of this. I just wanted to get the dash back in right now so I could drive it around safely. I'm doing the console and dash pieces right now in gunmetal gray so I can reinstall those. This will prolly be one of those multi-month projects. It'll end with the seats being reupholstered.
The only disadvantage I see with that is that you would get a flat black instead of having the option to do more than one color.
Keep us updated, this is a great project!
Apr 7, 2006 | 11:21 PM
#50
Thread Starter
Registered User
Joined: Oct 2003
Posts: 461
Likes: 0
From: Austin / Houston TX
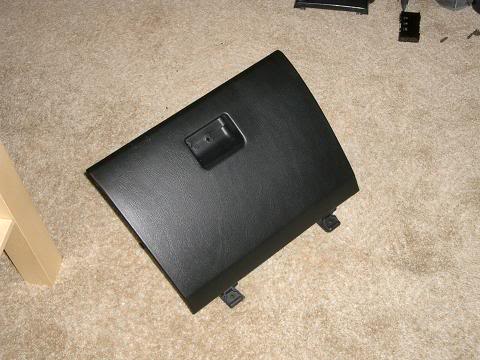
Day Five: Glovebox
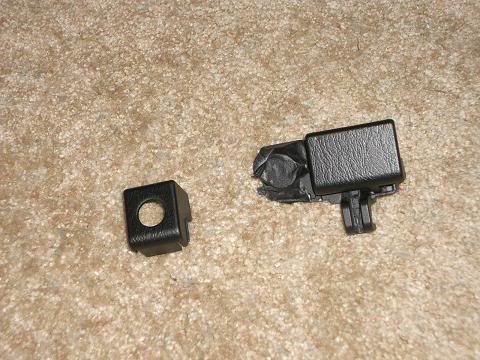
So I found some time to prep and paint my glovebox after my two exams this week. Turned out pretty well and installed it just a few minutes ago. Its too dark outside to get a good picture so I'll wait til the morning to post those. Anyway here are a few shots of the box and the parts that make up the handle.
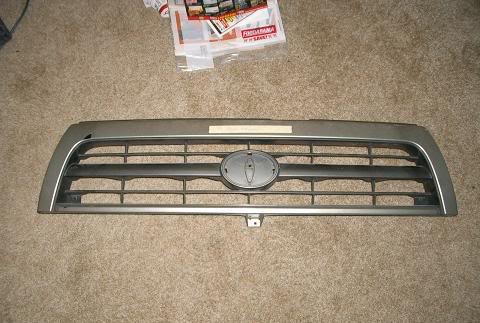
Also on another note I got another part in this week to work with now. Found it on ebay two weeks ago and its a sport / 4cyl grill so it'll be easier to paint!
Next up is the drivers door panel.
Also on another note I got another part in this week to work with now. Found it on ebay two weeks ago and its a sport / 4cyl grill so it'll be easier to paint!
Next up is the drivers door panel.
Last edited by tv4184; Apr 7, 2006 at 11:42 PM.
Apr 10, 2006 | 06:28 PM
#51
Thread Starter
Registered User
Joined: Oct 2003
Posts: 461
Likes: 0
From: Austin / Houston TX
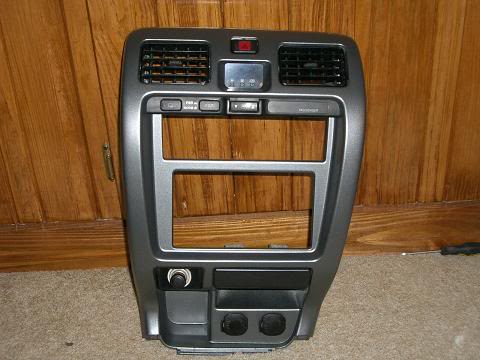
Day Six
Heres a small update. Shot of the glove box installed. Also a shot of the completed center console bezel.

I also started cutting my satoshi grill but I'll just post pictures of that project on another thread when I'm near completion on that.
I also started cutting my satoshi grill but I'll just post pictures of that project on another thread when I'm near completion on that.


 May 20, 2006 | 04:35 PM
#58
Registered User
Joined: Jul 2005
Posts: 972
Likes: 0
From: Tampa, Florida
wow.... you have done what i have wanted to do since the day i got my oak interior.... with 100k miles now and the seats bein torn up, i might just have to bite the bullet and copy you... perhaps a write up is in the future? can anyone estimate how much a new headliner and carpet/ redoing the leather on the seats?
May 20, 2006 | 04:54 PM
#59
Thread Starter
Registered User
Joined: Oct 2003
Posts: 461
Likes: 0
From: Austin / Houston TX
I haven't been able to do much on account of school and then I've been in Austin on vacation. I have a few projects on my hands right now and I'll get back to working on this later this summer.
May 20, 2006 | 04:56 PM
#60
Thread Starter
Registered User
Joined: Oct 2003
Posts: 461
Likes: 0
From: Austin / Houston TX
Originally Posted by X88&94GT
You should have used dye instead of paint. Hope it holds up for ya. You are a brave one!! I will stick with my oak interior, which I prefer. 


