
DVD Multi-Media Install-another Gen3 Mod
 Mar 16, 2009 | 02:04 PM
#1


DVD Multi-Media Install-another Gen3 Mod
Well I started the install, its not quite what I was expecting and then again, most of the projects I start seem basic until you really get into them. I will do a full write up (Just for you Ron!) as this is just another creature comfort.
If anyone else is contemplating this mod, has already done the mod, inputs are always welcome. When Circuit City closed it's doors, I was onhand for the last day in my local store. Did pretty well, snagged a Canon 40D DSLR with an image stablilizing 28-135 macro for $650, and a Jensen DVD Media display for $250 (originally $850).
To start with had to find my FSM and it takes you to the Body section for headliner removal. Seems pretty basic, Remove trim, remove headliner
Yeah right! LOL So just so you know what to expect, you will need to remove ALL the interior trim, scuff plates, grab handles, visors lights and the seat belts. You need to do this to get at the head liner which also has to be removed to do this properly. This is also the same procedure if you need to get at your sunroof. Makes sense to me and I will be checking my drains while I have it all pulled out.
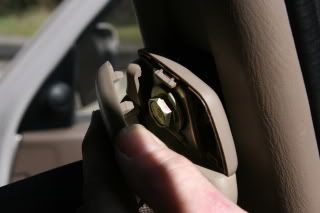
But to start with you need to pull the rear cabin light.
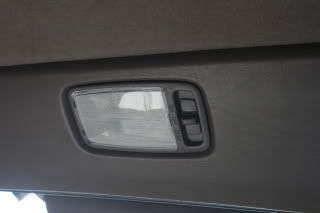
Pop the lense off revealing four hold down screws.

Remove those screws.
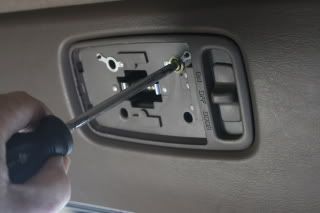
Unplug the power wire connector.
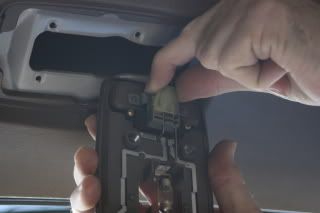
Next you need to remove the rear upper headliner trim.
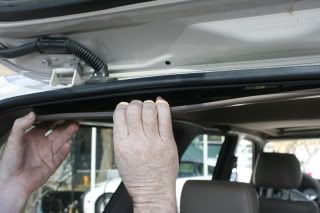
Work your way slowly around the edges and pop each retaining clip and then remove the trim.
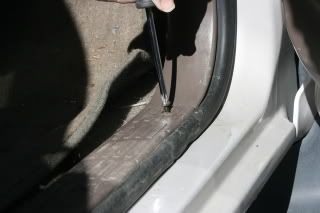
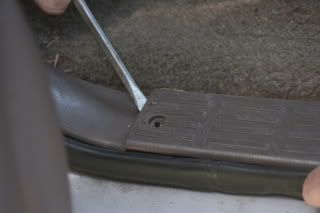
Remove the rear scuff plate screws.
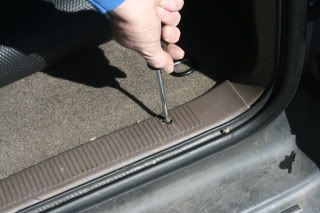
Pry up the edges and then work you way down the front edge lifting as you go.
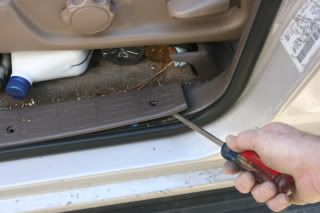
Remove the rear passenger door scuff plate screws.
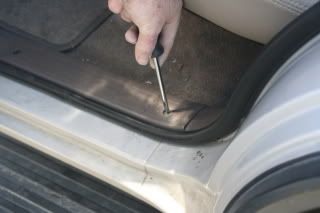
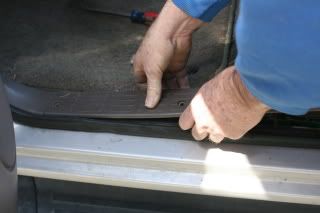
Grasp the ends and begin to pull the scuff plate upward and release the clips.
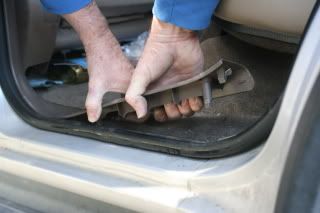
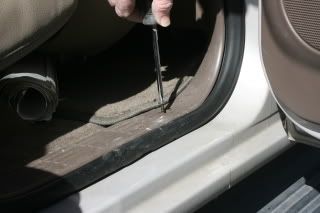
Remove the front seat scuff plate screws and pry loose as you did with the rear door scuff plates.
Remove the front seat lower pillar covers, these are the ones just behind the front seats. I grasped them from the rear and starting at the base popped the clips and worked my way up and over.
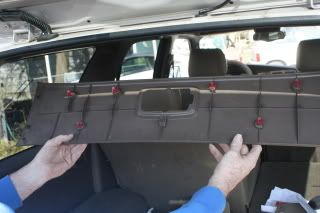
If your 4runner comes with the cargo cover you will need to remove the cargo cover mounts. Two screws and they come right out.
Remove the two screws, one each side, that hold the rear cargo panel upper tab. They were covered by the upper rear headliner trim panel.
For each rear cargo area panel, start at the passenger door about mid level and begin to pull the panel outward to release the clips in the rear pillar and around the edges of the rear window.
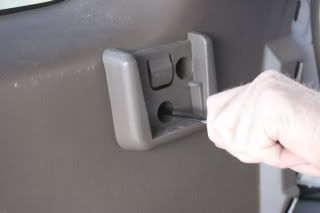
Gently pull the trim from around each window as well as from the rear edge of the panel near the lift gate. PLEASE READ THE NOTE before performing this step! I will include some more pictures to show you what I am talking about.
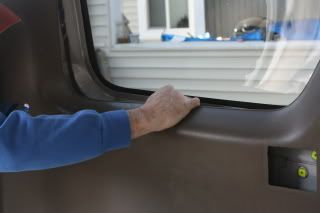
NOTE: In the middle of the bottom edge of each window, there is a piece of plastic with a hook on it that inserts into a square hole in the fender area. DO NOT pull the panel out too far until you press the plastic bar down so it disengages from the fender mounting. Failure to perform this step correctly will result in damage to your cargo side panels.
Continue working your way around the window until all the mounting clips are free. (More pictures to come with the next installment)
If anyone else is contemplating this mod, has already done the mod, inputs are always welcome. When Circuit City closed it's doors, I was onhand for the last day in my local store. Did pretty well, snagged a Canon 40D DSLR with an image stablilizing 28-135 macro for $650, and a Jensen DVD Media display for $250 (originally $850).
To start with had to find my FSM and it takes you to the Body section for headliner removal. Seems pretty basic, Remove trim, remove headliner
Yeah right! LOL So just so you know what to expect, you will need to remove ALL the interior trim, scuff plates, grab handles, visors lights and the seat belts. You need to do this to get at the head liner which also has to be removed to do this properly. This is also the same procedure if you need to get at your sunroof. Makes sense to me and I will be checking my drains while I have it all pulled out.
But to start with you need to pull the rear cabin light.
Pop the lense off revealing four hold down screws.
Remove those screws.
Unplug the power wire connector.
Next you need to remove the rear upper headliner trim.
Work your way slowly around the edges and pop each retaining clip and then remove the trim.
Remove the rear scuff plate screws.
Pry up the edges and then work you way down the front edge lifting as you go.
Remove the rear passenger door scuff plate screws.
Grasp the ends and begin to pull the scuff plate upward and release the clips.
Remove the front seat scuff plate screws and pry loose as you did with the rear door scuff plates.
Remove the front seat lower pillar covers, these are the ones just behind the front seats. I grasped them from the rear and starting at the base popped the clips and worked my way up and over.
If your 4runner comes with the cargo cover you will need to remove the cargo cover mounts. Two screws and they come right out.
Remove the two screws, one each side, that hold the rear cargo panel upper tab. They were covered by the upper rear headliner trim panel.
For each rear cargo area panel, start at the passenger door about mid level and begin to pull the panel outward to release the clips in the rear pillar and around the edges of the rear window.
Gently pull the trim from around each window as well as from the rear edge of the panel near the lift gate. PLEASE READ THE NOTE before performing this step! I will include some more pictures to show you what I am talking about.
NOTE: In the middle of the bottom edge of each window, there is a piece of plastic with a hook on it that inserts into a square hole in the fender area. DO NOT pull the panel out too far until you press the plastic bar down so it disengages from the fender mounting. Failure to perform this step correctly will result in damage to your cargo side panels.
Continue working your way around the window until all the mounting clips are free. (More pictures to come with the next installment)
Last edited by Ritzy4Runner; Mar 17, 2009 at 08:44 PM.
 Mar 17, 2009 | 08:42 PM
#4
 Mar 18, 2009 | 01:42 PM
#7
PART 2
When we last left our intrepid 'modifier', he was deeply involved in gutting the interior of his 1998 4runner to remove the headliner. We rejoin him now ...
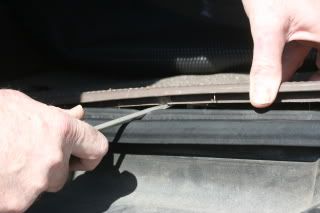
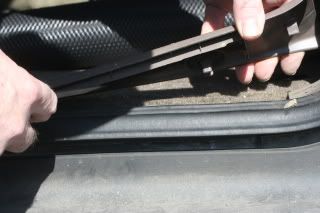
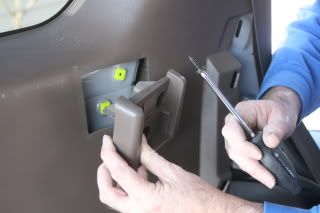
PLEASE READ THE NOTE and look at the picture before performing this step! I recommend you start with the Driver side first. Gently pull the trim from around each window as well as from the rear edge of the panel near the lift gate.
In the center of the lower edge of the panel window trim there is a long plastic finger that snaps into a small square hole in the cargo area sides just below the rear window edge. Gently press downward on this 'finger' releasing the notch in the finger from the fender well. Continue working your way around the window until all the mounting clips are free.
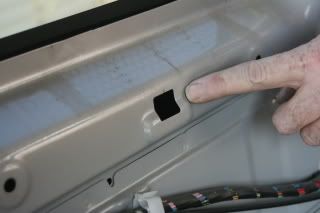
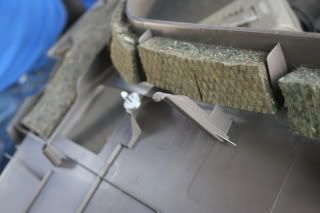
NOTE: In the middle of the bottom edge of each window, there is a piece of plastic with a hook on it that inserts into a square hole in the fender area. DO NOT pull the panel out too far until you press the plastic bar down so it disengages from the fender mounting. Failure to perform this step correctly will result in damage to your cargo side panels.
With all clips now free, lay the panel over on its side. The seat belt will be holding the panel up so after removal of passenger side we will remove the seat belts. If you have not already lowered the passenger seats down you might want to do that to make doing this part easier as well as removal of the rear seat belts from the floor.
If you have a 4runner with a rear OEM 12vdc outlet located in the passenger side cargo panel, pull the connector from the outlet.
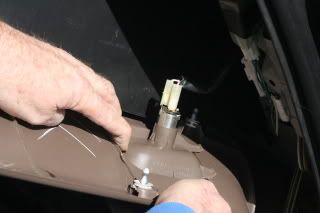
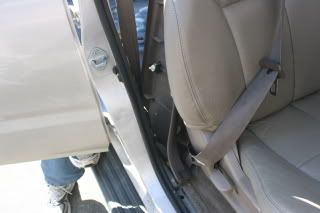
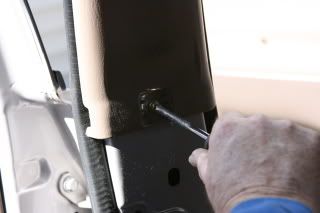
Using a 14mm socket, remove the hold down bolt for each rear seat belt.
With the seat belt now free, pull the belt webbing and the seat belt clip through the slot in the front of the cargo panel. the panel is now completely free and can be removed from the vehicle.
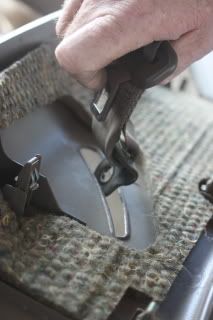
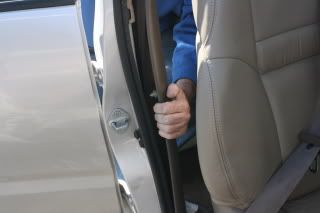
Remove the screws from the front seat scuff plates, pry them up and remove them.
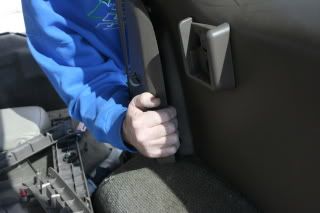
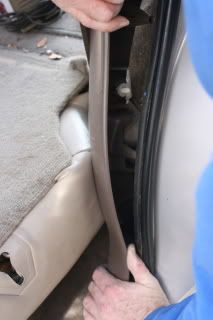
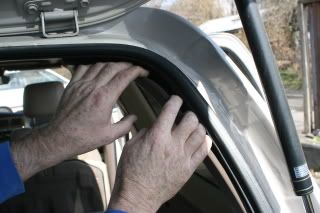
Move the front seats fully forward to provide for more room to remove the 'B' pillar covers. Remove the 'B' pillar lower covers by grasping it near the top and front edge, pull it away from the pillar.
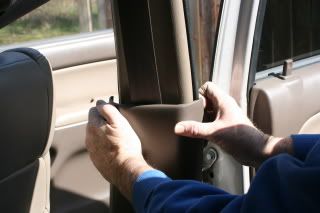
Work your way down and finally lift the pillar cover free.
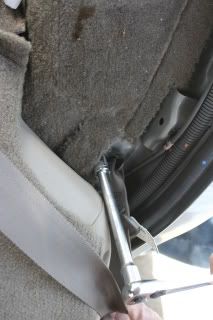
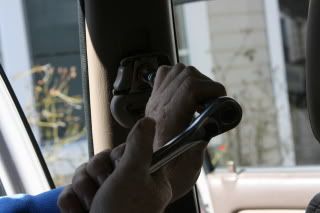
Removal of the front seat belt shoulder anchors can be a bit tricky if you don't want to bugger up your anchor covers. Use a very thin flat tip screwdriver and work the seam apart. Once you get it split it will just pop apart.
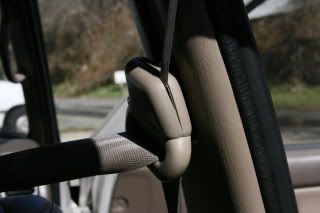
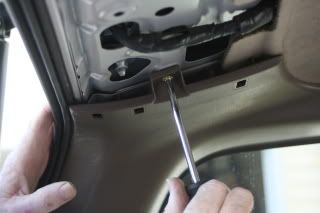
Using a 14mm socket and ratchet loosen and remove the mount bolt.
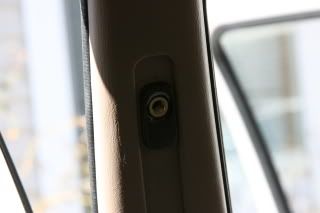
Remove the small phillips head screw at the base of each 'B' pillar upper cover.
That's all I have time for today. More to come, stay tuned
When we last left our intrepid 'modifier', he was deeply involved in gutting the interior of his 1998 4runner to remove the headliner. We rejoin him now ...
PLEASE READ THE NOTE and look at the picture before performing this step! I recommend you start with the Driver side first. Gently pull the trim from around each window as well as from the rear edge of the panel near the lift gate.
In the center of the lower edge of the panel window trim there is a long plastic finger that snaps into a small square hole in the cargo area sides just below the rear window edge. Gently press downward on this 'finger' releasing the notch in the finger from the fender well. Continue working your way around the window until all the mounting clips are free.
NOTE: In the middle of the bottom edge of each window, there is a piece of plastic with a hook on it that inserts into a square hole in the fender area. DO NOT pull the panel out too far until you press the plastic bar down so it disengages from the fender mounting. Failure to perform this step correctly will result in damage to your cargo side panels.
With all clips now free, lay the panel over on its side. The seat belt will be holding the panel up so after removal of passenger side we will remove the seat belts. If you have not already lowered the passenger seats down you might want to do that to make doing this part easier as well as removal of the rear seat belts from the floor.
If you have a 4runner with a rear OEM 12vdc outlet located in the passenger side cargo panel, pull the connector from the outlet.
Using a 14mm socket, remove the hold down bolt for each rear seat belt.
With the seat belt now free, pull the belt webbing and the seat belt clip through the slot in the front of the cargo panel. the panel is now completely free and can be removed from the vehicle.
Remove the screws from the front seat scuff plates, pry them up and remove them.
Move the front seats fully forward to provide for more room to remove the 'B' pillar covers. Remove the 'B' pillar lower covers by grasping it near the top and front edge, pull it away from the pillar.
Work your way down and finally lift the pillar cover free.
Removal of the front seat belt shoulder anchors can be a bit tricky if you don't want to bugger up your anchor covers. Use a very thin flat tip screwdriver and work the seam apart. Once you get it split it will just pop apart.
Using a 14mm socket and ratchet loosen and remove the mount bolt.
Remove the small phillips head screw at the base of each 'B' pillar upper cover.
That's all I have time for today. More to come, stay tuned
Last edited by Ritzy4Runner; Mar 18, 2009 at 01:49 PM.
Trending Topics
Mar 19, 2009 | 08:04 AM
#8
Registered User
Joined: May 2007
Posts: 2,175
Likes: 2
From: Denver metro area-CO
I love these illustrated writeups.
You can not imagine how helpful they are to those of us that have trouble removing even scuff plates. It is nice to see where to pry and where not to.
keep em coming Ritzy.
You can not imagine how helpful they are to those of us that have trouble removing even scuff plates. It is nice to see where to pry and where not to.
keep em coming Ritzy.
Mar 19, 2009 | 12:43 PM
#9
Ritzy, you'll be amazed how much the sound deadening material helps w/ road noise. I've only done the floor from the pedals to the tailgate, but that little bit helped a ton. I need to do the doors and roof, just have not gotten around to it.

 Mar 27, 2009 | 08:05 PM
#12
Actually you do need to remove all that stuff to install it correctly. I have basically finished the install and no just need to download the pics and do the write up. As you will see in my next segment, in order to have the support required for correct and fully supported installation, I will install a second roof support that I removed from another 4runner then installed exactly like the OEM roof support. Anyway I am working on the wirte up. Hope to have it out this weekend
Apr 6, 2009 | 09:44 PM
#14
No you don't, at least I did not have to. I did however have to put 4 very small holes in the head liner to put the securing screws in through the unit to the mounting bracket.
My son misplaced my camera I used to take th epics so as soon as I retreive it I will post up the rest of the pics.
My son misplaced my camera I used to take th epics so as soon as I retreive it I will post up the rest of the pics.
Apr 19, 2009 | 10:10 PM
#17
Sorry for the delay but my son seems to have misplaced my camera which had all of my photos on the final install of the this DVD player. While I can not duplicate the photos, I will endeavor to describe the final install and hopefully will find the camera so that those install pics will be here to finish up this project. Please be patient, if you have children I think you will understand, if you have teenage children I know you will understand! more to follow


Thread
Thread Starter
Forum
Replies
Last Post
TheBFA
Solid Axle Swaps, All Years
8
Feb 15, 2020 06:55 AM
voiddweller
86-95 Trucks & 4Runners (Build-Up Section)
53
Feb 1, 2016 05:46 AM


